ScottyT Lefty

Active Member
Thanks a lot Pakalolo. Great feedback as usual. Always great to have a spare in a jam, but hey if it ain't broke don't fix it strategy is fine by me!
Till next time!
 
ScottyT Lefty,

ScottyT Lefty

Active Member
Hey ScottyT Lefty..... seems we both inhabit the same rock, lol. I live on the the island too :>)
That's great! I love Vancouver Island. Strongly recommend a visit if you've never been here friends. We have a thriving cannabis culture and history here on the Island. Dates back to the 50's and 60's when American draft dodgers started large scale outdoor crops. They learned our unique growing soil and weather are prime factors for high grade outdoor. Annually our local police departmenst pull approximately 20 thousand plants from the island (and surrounding Islands) each season with helicopter patrols. A sad waste of resources as most Islanders are concerned. The Island is also well known for our premium organic strains of Indica's, Sativa's and hybrids.
 
Last edited by a moderator:
ScottyT Lefty,
  • Like
Reactions: KidFated.

BoBurn

Member
NEED HELP - Blown up the 3rd Stage2 Charger :-(

I´m a bit in a mess. Today my 3. Stage2 Charger was blown up, once again.
I happens because the EURO Plug Adapter seems not to fit perfekt. There seems to be a loose connection. And when i wiggle the cord, there is a spark on the adapter. At this point the charger makes an unpleasant dull noise - and has blown up. Unfortunatly for the 3 or 4 Time now. As it happens for the 1. Time I got an replacement charger from the seller (but not the adpater). On the 2. Time the same.
On the 3. Time a was ashamed and bought the new one on my own. And now the 4. time.

Now I destroyed the f*** EU adapter and ordered a new one....


Can somebody help me to fix one of the 4. defect Charger lying here around me?

I´m a little bit frustrated. The defect seem to be the same on all of them, short circuit.
Maybe I could change a capacitor or a resistor or something like that, to get them work again. It´s a shame.

i would greatly appreciate all of your help!

Thanks, Bo


Last edited:
BoBurn,
  • Like
Reactions: Vitolo

FlashVAPE

...fast and efficient ! http://flashvape.com
Manufacturer
Hi Bo,

ok, from the picture, I dont see any capacitors or resistors that looks like they are blown (most times its pretty obvious as you see physical damage). For plug adapters that are a little loose, you may consider bending the plugs outwards or inwards a little so that the contacts are firm within the receptacle.

feel free to PM. thanks!
 

GreenGenes

Doobie Snacks?
My charger appears to be broken....

As I was enjoying the FV yesterday, the green light on the vape faded.
I put the battery into the charger, but unlike before the light on the charger did not turn red.
The bright green light is glowing constantly and the battery has no power, even after 2-3 h

Some info to figure out the issue here: (I don't understand anything about electronics)
The charger model is: FVSC -001.
I am located in Germany, so I am using the European adapter, which was provided by flashvape.

I also should mention that a week ago, I have broken one of my two batteries, as I switched the + to the - pole accidentally.
Though, I was using the one good battery plenty of times the last few days, charging it on a regular basis. Therefore I got no explanation what could've caused the problem.

Is there any easy fix to my problem, or should I just order a new charger?


Thanks
 
Last edited:
GreenGenes,

GreenGenes

Doobie Snacks?
same thing here but very long time ago battery inversion= one charger and batterie down.

That's really a shame! After I realized my error, I took a tiny Sticker which I attached to the charger so I have something pointing to the right direction.
The battery has arrows all over, but the charger is in all black. I don't wanna be a complainee here, but it's really hard to see + and - when it's a bit dark. :uhoh:
So I'm just throwing out a hint for anyone using the Flashvape and who doesn't see good at night.... or while being baked ^^
MARK YOUR CHARGERS >>>> :myday:
 
GreenGenes,

grendizer

Member
Hey guys. I'm looking for advice. I received the flashvape with the stage2 kit 3 days ago and I'm so disappointed. Herbs wil combust all the time. If it doesn't reach combustion it won't produce almost vapor and there are always tiny bits that combust anyway.
I'va vaped through a vaporgenie so I thought being a convection vape it will give similar or better vape quality but the buds always taste more toasted than dried with hot air.
Do you think I should keep trying? I love the high of the vaporgenie and I think I would love the flashvape too. Maybe it's about the different temps the buds go through each time?
And what about the PA? Can you make it harder to combust so you can use convection more directly?
 
grendizer,

FlashVAPE

...fast and efficient ! http://flashvape.com
Manufacturer
Hi there! usually, if you are combusting with the S2 kit installed in your FV (the ceramic spacer in particular), it is most likely related to how you are using the vape.

The FV on S2 is a seriously powerful vaporizer. When that power-on button is pressed, the heat starts to build immediately inside the ceramic bowl, and the temperature is controlled through how long you keep the power-on button pressed and more importantly, the speed of your draw once the vapor starts to flow.

Try pressing power on for 2 seconds, then with the power on button pressed, slowly start to draw through the draw tube. You should see vapor being produced within 1-2 seconds of drawing, then continue to press the power-on button for another 2-3 seconds after you start to draw, and let go of the power on button, and finish your draw for one complete FV hit. (The speed of your draw should be slow and steady, imaging taking a breath (inhaling) from totally flat to "I can't take in anymore air" in 8-10 seconds total... thats about how fast you draw through the draw tube when vaporizing. You can adjust this speed accordingly, once you get the hang of it.)

after that, give the vape a little shake to re-distribute the herbs inside, then repeat.

try that and let me know how it works out for you! I think you will be pleasantly surprised once you get the technique down... it will be very rewarding indeed!

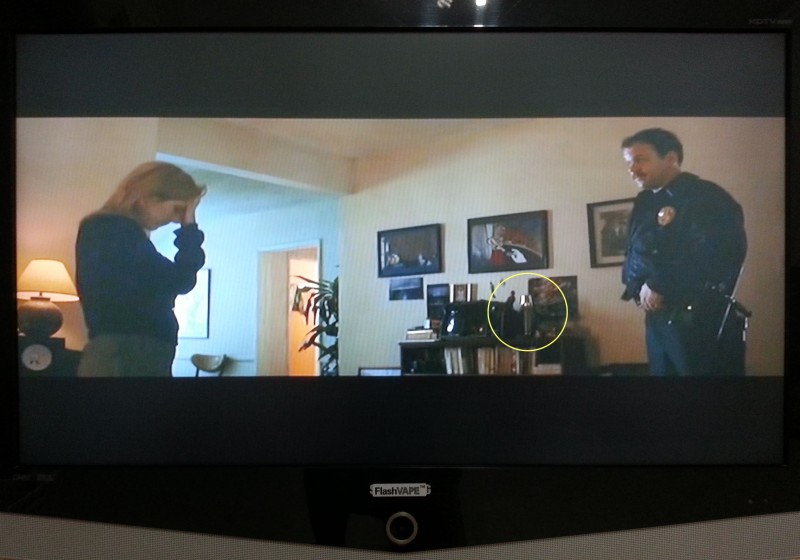
Also: w00t?! check it out!

how did this FV travel back in time to make a ghostly appearance in this classic hollywood blockbuster?

flashvape-movie-contest-800x560.jpg
 
Last edited by a moderator:

pakalolo

Toolbag v1.1 (candidate)
Staff member
Hey guys. I'm looking for advice. I received the flashvape with the stage2 kit 3 days ago and I'm so disappointed. Herbs wil combust all the time. If it doesn't reach combustion it won't produce almost vapor and there are always tiny bits that combust anyway.
I'va vaped through a vaporgenie so I thought being a convection vape it will give similar or better vape quality but the buds always taste more toasted than dried with hot air.
Do you think I should keep trying? I love the high of the vaporgenie and I think I would love the flashvape too. Maybe it's about the different temps the buds go through each time?
And what about the PA? Can you make it harder to combust so you can use convection more directly?

With the PA you can set the power low enough that combustion is unlikely even if you hold the button down for 20-30 seconds. I often set mine so low that it takes about 10 seconds before vapour starts. That's remarkable for a device as powerful as the FV and demonstrates the wide range of the PA. When I turn it all the way up I can easily do dabs directly on the screen.

Try FlashVAPE's suggestion. If that doesn't work, try making a series of soft puffs starting right after you hit the button. Stop when you taste vapour. The next time, give yourself one or two more puffs. If you keep doing this, you'll soon learn how to control the FV.
 

grendizer

Member
Thanks flashvape and pak. I'm checking the spacer again too. Flat side mut be facing up, right?

I'll try the described techniques and post back.
 
grendizer,
  • Like
Reactions: FlashVAPE

pakalolo

Toolbag v1.1 (candidate)
Staff member
Thanks flashvape and pak. I'm checking the spacer again too. Flat side mut be facing up, right?

I'll try the described techniques and post back.

That's correct, but to be honest, I've had it upside down, ummm, more than once and it really makes no difference that I can detect.
 

FlashVAPE

...fast and efficient ! http://flashvape.com
Manufacturer
Good morning everyone!

We suggest the flat side facing up so that the slanted side will have minimal contact with the hottest area of the heating element screen, which is toward the center. this will maximize convection heat transfer.
 

grendizer

Member
I've been observing the resistance and the first part that gets red hot is on the side of the bowl, not center. Is this ok?
 
grendizer,

pakalolo

Toolbag v1.1 (candidate)
Staff member
I've been observing the resistance and the first part that gets red hot is on the side of the bowl, not center. Is this ok?

That's normal. Consider how the FV works: under the ceramic bowl, there are two copper rods on either side that make contact with the heater screen. The heat spreads out from these rods towards the centre. What is not good is to see a really bright point that is obviously getting hotter much faster than the rest of the screen. This could be a sign that the screen is starting to deteriorate. Here's a video I made when I first got the FV and was testing various batteries:


ScottyT Lefty

Active Member
I've been experimenting with different a stage 2 setup this month with interesting results. Instead of a spacer and a screen as per normal operations, I've removed the spacer and placed a screen directly on top of the original heating screen. The 2 screens are touching each other. I find vapor builds very quickly and with some tweaking on technique I've been getting huge clouds with great taste. I also notice my batteries seem to last longer as I'm not taxing them with long draws, its a more short blast.
I notice as my stage 2 batteries start to gradually lose a bit of power this technique I described above has been working great.
 
ScottyT Lefty,
  • Like
Reactions: Egzoset

pakalolo

Toolbag v1.1 (candidate)
Staff member
I've been experimenting with different a stage 2 setup this month with interesting results. Instead of a spacer and a screen as per normal operations, I've removed the spacer and placed a screen directly on top of the original heating screen. The 2 screens are touching each other. I find vapor builds very quickly and with some tweaking on technique I've been getting huge clouds with great taste. I also notice my batteries seem to last longer as I'm not taxing them with long draws, its a more short blast.
I notice as my stage 2 batteries start to gradually lose a bit of power this technique I described above has been working great.

Heh. That's what we call "Stage 1". Usually you'd do that with the 3.2V S1 batteries, which make it a little easier to control, but as you've discovered you can use the S2 batteries with great results. It just takes a quicker button release, because your way builds heat so fast that you will reach combustion if you don't let up fast enough.
 

speedyg

Well-Known Member
My screen does not get as red-hot as what you show, even with the PA at 9 after 8 seconds. Guess I should install a new heating screen. What is the best way to bend the rods to remove and replace the screen?

Edit: Found the instructions on the FV website. Should have checked there first.


That's normal. Consider how the FV works: under the ceramic bowl, there are two copper rods on either side that make contact with the heater screen. The heat spreads out from these rods towards the centre. What is not good is to see a really bright point that is obviously getting hotter much faster than the rest of the screen. This could be a sign that the screen is starting to deteriorate. Here's a video I made when I first got the FV and was testing various batteries:

 
speedyg,

pakalolo

Toolbag v1.1 (candidate)
Staff member
My screen does not get as red-hot as what you show, even with the PA at 9 after 8 seconds. Guess I should install a new heating screen. What is the best way to bend the rods to remove and replace the screen?

Edit: Found the instructions on the FV website. Should have checked there first.

Before you do that, try tightening the heater bezel. Once you've tightened it as much as you can, hit all around the perimeter with something like a screwdriver handle. That should let you tighten it a little bit more. Repeat until you get no more slack. It might save you replacing the screen.

If you do take it apart, be really gentle bending the copper rods. Bend them only as much as you need to remove and replace the screen. Don't get any kinks in them, because if they don't sit evenly when you put it back together you could get shorting and that will make a hole in your new screen in no time. If you bend the rods too often they will break. Trust me on this, I have experience. :(
 
pakalolo,
  • Like
Reactions: speedyg

speedyg

Well-Known Member
Thanks for your advice Pakalolo. I'll try that first. Visually the screen looks good and there is no sparking. I cleaned off the rods with 90+ iso and it now seems to be working a little better.

My FV is the original version. I had to channel my inner gorilla to get the bezel off without damaging it, using 2 rubber strap wrenches.
 
speedyg,
  • Like
Reactions: RUDE BOY

Pipes

Addicted DIY Enthusiast
Accessory Maker
My screen does not get as red-hot as what you show, even with the PA at 9 after 8 seconds. Guess I should install a new heating screen. What is the best way to bend the rods to remove and replace the screen?

Edit: Found the instructions on the FV website. Should have checked there first.
If your screen has EVEN heat, it's likely good. Power loss maybe somewhere else. Switch or connections, look for misplaced heat.
As Pak states, the cap pressure on the rails is a good place to start.
There is risk involve in getting a new screen seated just right. So unless it's absolutely necessary I would not go there.
 
Pipes,
  • Like
Reactions: pakalolo
Top Bottom