
-
SCAM WARNING! See how this scam works in Classifieds.
You are using an out of date browser. It may not display this or other websites correctly.
You should upgrade or use an alternative browser.
You should upgrade or use an alternative browser.
'The Misty Log' - DIY wooden Log Vaporizer
- Thread starter blokenoname
- Start date


blokenoname
DIY Log Dabbler 😁🪵💪💨💨💨


blokenoname
DIY Log Dabbler 😁🪵💪💨💨💨
New forum is 'read only' now, as the admin of original FC here returned in time to renew the domain lease and updated the forum software. So they could close down our 'life boat' and we all can continue the voyage here at our old haunts 


Hi, i can't find a thinwall 11mmOD tube for my builds, i try to reduce in and out diameter of an 12mmOD 10mmID but it's time consuming and not so good at the end, i would like 0,5 wall or 0,3 as @blokenoname one's in this site http://www.menzel-modellbau.de/ there's an 11x0,3 but it's only in german and ask me 21 euro more shipping cost, i continue to search maybe in my area and online but, if someone has suggestion are welcome, Thanks and top diy thread 
Hi,
I would like to build a control box for my logs, i think to put a transformer like this https://www.amazon.it/takestop®-TRASFORMATORE-ELETTRONICO-LAMPADA-220-240V/dp/B072M4ZVHW
Whit a buck converter or similar in a wooden box, the one thet blokenoname suggest posts ago could be right ?
I don't know what buy, i like button and a display, what technical details o have to look ?
Hippie
Well-Known Member
The ZK-J5X is the cheapest one I've found but the resolution isn't the best as it only goes up and down in .05V steps and has button controls
There's some specs here
 www.icstation.com
The DPS3005 goes up and down in smaller increments, has a knob to do that, some memory slots, and some colour display options for 3 or 4 times the money
Specs:
I have both of those and power them with a 12V 5A dc supply and a switchable laptop supply that goes up to 24V for my projeccts
The XYS3580 looked good on paper but it has a fan on the back that kicks in at 1A .... if it's connected")
It runs OK without the fan upto about 2A but really needs a better heatsink or a silent fan
Specs

 www.banggood.com
And here are some 4A devices I've not tested but are on my radar ....
zk-4kx
 www.banggood.com
xy-sep4

 www.banggood.com
sk35
www.banggood.com
There's some specs here
ZK-J5X DC-DC Step Down Power Supply Module | Adjustable Buck Converter
Get precise control with the ZK-J5X DC-DC Step Down Power Supply Module. Featuring an LCD display, it's a versatile constant voltage and constant current adjustable buck converter, ideal for various power supply applications.
The DPS3005 goes up and down in smaller increments, has a knob to do that, some memory slots, and some colour display options for 3 or 4 times the money
Specs:
I have both of those and power them with a 12V 5A dc supply and a switchable laptop supply that goes up to 24V for my projeccts
The XYS3580 looked good on paper but it has a fan on the back that kicks in at 1A .... if it's connected
It runs OK without the fan upto about 2A but really needs a better heatsink or a silent fan
Specs
XYS3580 DC DC Buck Boost Converter CC CV 0.6-36V 5A Power Module Adjustable Regulated Laboratory Power Supply Variable
Only US$27.99, buy best xys3580 dc dc buck boost converter cc cv 0.6-36v 5a power module adjustable regulated laboratory power supply variable sale online store at wholesale price.
And here are some 4A devices I've not tested but are on my radar ....
zk-4kx
ZK-4KX CNC DC DC Buck Boost Converter CC CV 0.5-30V 4A Power Module Adjustable Regulated Power Supply for Solar Battery Charging
Only US$9.59, buy best zk-4kx cnc dc dc buck boost converter cc cv 0.5-30v 4a power module adjustable regulated power supply for solar battery charging sale online store at wholesale price.
xy-sep4
XY-SEP4 DC DC 0.5-30V 4A 35W Automatic Boost/Buck Converter CC CV Regulated Adjustable Laboratory Power Supply Module
Only US$11.99, buy best XY-SEP4 DC DC 0.5-30V 4A 35W Automatic Boost/Buck Converter CC CV Regulated Adjustable Laboratory Power Supply Module sale online store at wholesale price.
sk35
XY-SEP4 DC DC 0.5-30V 4A 35W Automatic Boost/Buck Converter CC CV Regulated Adjustable Laboratory Power Supply Module
Only US$11.99, buy best XY-SEP4 DC DC 0.5-30V 4A 35W Automatic Boost/Buck Converter CC CV Regulated Adjustable Laboratory Power Supply Module sale online store at wholesale price.
XY-SEP4 DC DC 0.5-30V 4A 35W Automatic Boost/Buck Converter CC CV Regulated Adjustable Laboratory Power Supply Module
Only US$11.99, buy best XY-SEP4 DC DC 0.5-30V 4A 35W Automatic Boost/Buck Converter CC CV Regulated Adjustable Laboratory Power Supply Module sale online store at wholesale price.
Thanks, i think i try with this one.
blokenoname
DIY Log Dabbler 😁🪵💪💨💨💨
New cherry wood unit with maple bottom cap in progress 


Edit: Done

And a little stand for a mahogany-sapele unit made from a raw wood slice, they sold in one of those 1,- EUR shops

Edit: Done
And a little stand for a mahogany-sapele unit made from a raw wood slice, they sold in one of those 1,- EUR shops
Last edited:
f2j
Chaque jour est une chance
Beautifull ! The stand is awesome too !
I recently bought a small lathe and can't wait to make my own vaporizer.
For now, I chose to go with halogen heating (maybe it's not the easiest but I was not sure about soldering iron heating elements' harmlessness), so I bought 24V 50W G4 halogen bulbs. I think Musa has 35 W so it should be more than enough.
I also bought glass beads to experiment (either in the heating tube, or in the mouthpiece/next to the load).
Now i'm thinking about the heating tube. I was thinking at something close to what you did. How did you attach the screens at the top of the tube ?
Also the 2 joints we can see n the tube, are they threaded ? if not, how did you join the two pieces ? Also, how do you manage temperatures with your DIY ? a simple dimmer ?
blokenoname
DIY Log Dabbler 😁🪵💪💨💨💨
ThanksBeautifull ! The stand is awesome too !
I recently bought a small lathe and can't wait to make my own vaporizer.
For now, I chose to go with halogen heating (maybe it's not the easiest but I was not sure about soldering iron heating elements' harmlessness), so I bought 24V 50W G4 halogen bulbs. I think Musa has 35 W so it should be more than enough.
I also bought glass beads to experiment (either in the heating tube, or in the mouthpiece/next to the load).
Now i'm thinking about the heating tube. I was thinking at something close to what you did. How did you attach the screens at the top of the tube ?
Also the 2 joints we can see n the tube, are they threaded ? if not, how did you join the two pieces ? Also, how do you manage temperatures with your DIY ? a simple dimmer ?
Nah, the heating tube is all just one piece. The two 'joints' you see there, are actually just indentations/cuts made by the tube cutter, not cutting all the way through. The one at the top serves to hold the clip ring (serving as a stop for the slide over GonG adapters) and the indentation also forms a slight rim on the inside of the tube, serving as a stop for the 8mm stainless steel slide in tips. The screen is a basket screen, flat side up, which gets pushed up against that indentation/rim from the bottom part of the tube.
The indentation at the bottom part of the tube serves as a guide line for the two horizontal cuts/slits I make there with a Dremel tool, which then form the air intake.
The tube gets mechanically fastened to the washer at its base, by choosing a washer with a slightly smaller hole, than the outer diameter of the (3/8") tube. Bottom part of the tube then gets machined down a bit over a length of maybe 5mm (simply using a big steel file there), till it fits through the smaller hole in the washer and the protruding section of the tube is simply hammered flat then against the washer, so that the washer can't slip off or slide up the tube then.
Note that the slits for the air intake have to be cut after fastening the tube to the washer, as otherwise you'll inevitably hammer the slits shut again, when hammering the protruding part of the tube flat. Here's a bigger pic of the heater cover.
(Cudos to @Alan again, for the fine method of fastening washer to tube).

For a regular Log type vape, a soldering iron's heating element is much too big and overpowered and there is certainly no need to play around with 110/220v AC power here, which can be quite dangerous in case of a short. All my Logs work with 12v DC power!
There are nice small ceramic, steel clad heater cartridges (20mm x 6mm) for use in 3D printers, that fit the bill perfectly. I usually use a 24v/30w cartridge or alternatively a 24v/40w, that'll give you 7,5w or 10w respectively, when powered with just 12v (= 1/4 of the nominal wattage output at 24v).
https://reprapworld.de/products/ext...es/ceramic_heater_cartridge_24_v_30_w_100_cm/
For temp control a simple DC dimmer can be used, yes. Or more comfortably a step-down/buck converter, like @Hippie has already listed above.

Last edited:
brainiac
log wrangler
Really nice work on that cherry Misty  . And the maple base cap adds attractive contrast. Great job
  .
.
Also, that's a typically generous and detailed description of the build that you've provided for f2j. That's hallmark of this thread
@f2j Good luck with the project. Keep us up to date on your progress.

. And the maple base cap adds attractive contrast. Great job .Also, that's a typically generous and detailed description of the build that you've provided for f2j. That's hallmark of this thread
@f2j Good luck with the project. Keep us up to date on your progress.
f2j
Chaque jour est une chance
Awesome, thank you a lot @blokenoname for the time taken to share all this information with me and all of us !
Do you think that 24V 50W is too much for a halogen heater ? I ordered the ZK-J5X module to be able to lower the voltage around 12V.
@brainiac, sure, I'll post pictures or videos when I am working on this project (I have to many of them at the same time =D). I still have to figure out what i use for the mouthpiece (i'd like to use glass), and what diameter i'll need for the SS heat tube (if I want my "wand" to enter the heating tube, or on the contrary, if I want the heat tube to enter the tip of the wand).
Thanks again all for sharing thoughs and experiments in here !
blokenoname
DIY Log Dabbler 😁🪵💪💨💨💨
Awesome, thank you a lot @blokenoname for the time taken to share all this information with me and all of us !
Do you think that 24V 50W is too much for a halogen heater ? I ordered the ZK-J5X module to be able to lower the voltage around 12V.
Oh, we discuss Halo powered Logs from page 35 onwards (and probably at several other places earlier) in this thread. Just flip back

 .
.When choosing your bulb, it depends foremost on the inner diameter and material of the heating tube, you want to use. That determines how much air can pass the heater and so the wattage output needed, to heat up the load.
Also, there are fitting 12v versions for the bulbs (I only use the 24v cartridge heaters, because their available 12v versions are much too powerful: a 12v/40w cartridge for instance, would deliver 40w with 12v applied, which would burn down the poor Log. So I use the 24v/40w cartidge, because that delivers only 10w with 12v applied).
Not so with halogen bulbs! There you can get fitting 12v versions.
My Halo Misty Log uses a stainless steel tube with an inner Diameter (ID) of 10mm. Outer diameter (OD) is 11mm. It uses a 12v/10w Osram Halostar Starlite bulb with an OD of 9,5mm and a G4 socket. With the bulb located about 10mm below the debris screen, this provides ample power for even vaping concentrates.
Alan uses a 7/16" ss OD heating tube with an ID of 3/8" for his halo Version of the Square HI and also a 12v/10w bulb:
For a wider diameter heating tube, like the glass heater cover of the MUSA (ID ~13mm), you'll need a more powerful bulb, as it allows a larger air volume to pass through and the glass is less conducive, than steel. I think, MUSA is using a 12v/30w bulb right now in the 2.0 version. The 30w bulb also has a wider OD itself, about 12mm, IIRC.
Last edited:
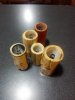
My little production,my share it's for keep this alive, very interesting project to follow thanks to all specially to @blokenoname and @brainiac...not to able to show and videoing how they works and i'm not so experienced...but they do a great job :-)
Attachments
brainiac
log wrangler
That's a very impressive little collection of logs.
I'm particularly impressed with the way that you've allowed the natural shape of the wood
to guide your build decisions - it's what I aim for too.
Are they all halogen units? What methods did you use for drilling and shaping the wood?
And did you go with the buck converter or the dimmer?
I'm particularly impressed with the way that you've allowed the natural shape of the wood
to guide your build decisions - it's what I aim for too.
Are they all halogen units? What methods did you use for drilling and shaping the wood?
And did you go with the buck converter or the dimmer?
blokenoname
DIY Log Dabbler 😁🪵💪💨💨💨
My little production,my share it's for keep this alive, very interesting project to follow thanks to all specially to @blokenoname and @brainiac...not to able to show and videoing how they works and i'm not so experienced...but they do a great job :-)
Great job


We're shaping up to a real nice little DIY Log Builders guild here


That's a very impressive little collection of logs.
I'm particularly impressed with the way that you've allowed the natural shape of the wood
to guide your build decisions - it's what I aim for too.
Are they all halogen units? What methods did you use for drilling and shaping the wood?
And did you go with the buck converter or the dimmer?
Thanks,
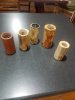
The wood is laurel from a tree in my garden, for the build, where possible use the portion i like, these were old and little damaged by insect and breaks, i would like to find more pattern interest in local tree, i live on the hills, i really like the rustic way.
Are all halogen without a dimmer, i have the one came with vapbong that i purcased recently, but they seems better with more 11 volt than 12, so i need to buy some or maybe a way to adjust the distance from tha bulb in a analogic way...
I use a drillpress abd forsterner bits and very little work possible on the wood.
Many thing to do but it's a very pleasure build to try and modify, don't need so much things and money.
f2j
Chaque jour est une chance
I tried to play with the few glass pieces I had here and the 24V 50W bulb (powered with a lab power supply), but couldn't manage to create something working with what I had.
So in the meantime, I started designing a SS heating tube (that I would have machined by someone, i know it's not really DIY at that point, but it can be pretty cool). I want it to be easily removable (at least the top parts) for maintenance/cleaning purposes hence the threadings.
It's not complete yet (it misses a final part with a second meshscreen that will also be the stop for the tip of the wand you'll insert in the heating tube).
Here is an exploded view of this WIP.
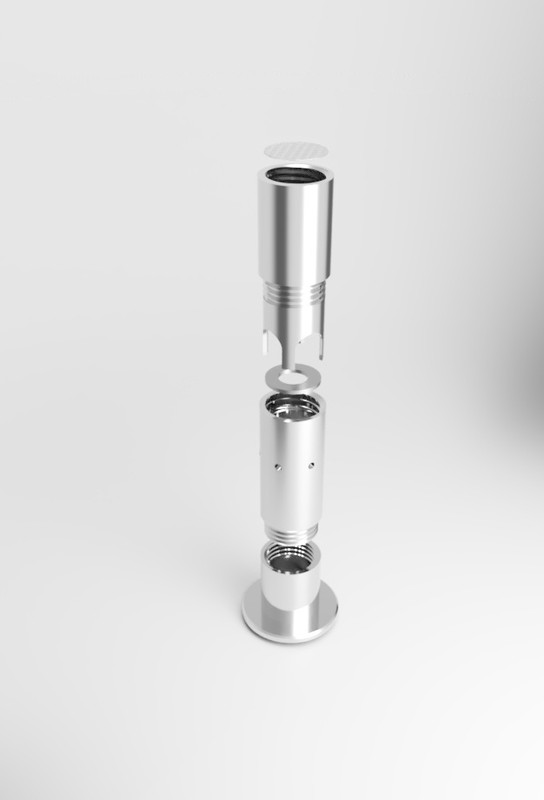
Hello to all,
I would like to ask some questions about this project.
In your opinion, if I increase or decrease the distance between the bulb or cartridge and the roasting tube, do I get the same effect as a dimmer ?
I find that the dimmer is not very useful (12v 10w halogen) and works only in a narrow range 10-12v.
Is it a good idea to have a system that increases and reduces the air flow and/or mixes hot air with cold air to have more control ? or is it irrelevant or ineffective ?
What difference do you find between, the roasting tube that enters the heater or wraps the heater ?
It seems to me that there is more conduction in the roasting tube that wraps, I prefer the other method, and you ?
Last, what do you think is the amount of material and therefore the size of the blow useful ?
I think the deeper it is, less hot air will reach the bottom,according to your experience ?
Thanks.
A greeting.