Fluxer Heaters, induction heaters for Dynavap

mr_cfromcali

Accessory Maker
Accessory Maker
I am interested in picking up another Fluxer heater before this government shutdown of vape shipping. Sorry for asking but when will the last (Flix, Flite) be available?

I'm working on it! I ran out of a few components and have more parts coming today. The payment side was a huge concern, but it looks like Zelle, checks, and money orders will work, at least for US customers. Payments from international customers still present challenges for me, and I'm working on that but may not be able to get past the blockages.

I expect to have post info on how to order heaters from these final run(s) very soon - a day or two, max! - but unfortunately it isn't ready yet.
 

purpletweed

Well-Known Member
There are other, more aggressive chargers out there, but please consult your batteries and see what their specs are, as they will have a max charging rate spec, and you will want to observe that limit.

That does help, thanks. I just wanted to make sure that a higher amperage wouldn’t damage the Deluxe, as it looks like my batteries support more than 1A.

Edit:
Here’s a photo of my Deluxe in action as tax 🥰
5-F1801-C3-E095-4-E94-A7-BE-042604-C1-F6-A1.jpg
 

Zoltani

Well-Known Member
Holy cow these battery sleds clamp down on the cell lol. Is there any technique for putting them back and as to not damage the wrapper?

Also, how much does everyones internals slide around? Mine doesn't normally but it was all over the place when I was applying pressure trying to get my batteries back in. I'm debating whether or not to buy some neoprene foam (think 1/32" thick) and line the top so it's less snappy when I put the lid onto the heater, but should I do under the PCB too? :shrug:

I don't know if the flite uses its casing as a heatsink... I don't want to prevent cooling if it is required.

Did you ever get an answer to the question about the wrappers? I am trying to be as gentle as possible when removing and installing batteries and the wrappers are still getting chewed up on the ends. Won't be long before I have to do a rewrap job and/or get some new batteries.
 

Sn4Pz

Well-Known Member
Did you ever get an answer to the question about the wrappers? I am trying to be as gentle as possible when removing and installing batteries and the wrappers are still getting chewed up on the ends. Won't be long before I have to do a rewrap job and/or get some new batteries.

No, no response but I don't think that I was purposely ignored, the thread moves fast.

What I do is use that little paper thingie under the cells to remove them, and when inserting them I try to put the positive side end in first, then the negative. Once its in halfway I just push in the middle. I do the positive first since the wrapper is covering (what I am assuming... and you know what they say about that) the negatively charged metal cylinder of the battery. I figure less damage to the sensitive side is best :hmm:

I got my replacement charger so I don't need to remove them every time anymore... fortunately. (and my tafee bowle... which is kicking my ass :rofl:)
 

mr_cfromcali

Accessory Maker
Accessory Maker
Sorry about skipping over the battery question, I didn’t mean to.

If you square up the cell above the contacts so the battery poles are perpindicular to the contacts and push straight down, you may have more success.

Please use the battery strap to remove cells. Center the strap under the cells before lifting, keep a thumb or finger on the white relay, and peel the strap up and towards the front; it should lift straight up, freeing the cells without chewing them up.

The contacts are supposed to be tight, but if they are too tight, try using a flat object to compress them a bit more. Obviously, remove the cells first.

Lastly, I’ve noticed that the Keeppower cells have thicker wrappers than some other brands - Vapcells, for example.

Sorry for the annoyance this is causing you. Given current postal circumstances, I don’t have a good way to address this other than suggesting you try to bend the contacts a little more to lessen the preload, or perhaps try a thinner rewrap if that becomes ncessary.

If I were restocking my cells I would look for a different brand next time, but as we know I don’t know when that may be.

:\
 
Last edited:

RustyOldNail

SEARCH for the treasure...
That does help, thanks. I just wanted to make sure that a higher amperage wouldn’t damage the Deluxe, as it looks like my batteries support more than 1A.

Edit:
Here’s a photo of my Deluxe in action as tax 🥰
5-F1801-C3-E095-4-E94-A7-BE-042604-C1-F6-A1.jpg

Jeff can advise on the charging amperage limits of the Fluxer Deluxe BMS and what the AMP input limit is. Most modern and current 18650 batteries can handle a 2 amp charge, and higher, at the expense of longer life. And most Rechargable electronics, only draw the current they need, but I’m not sure if you can use a 10 amp charger, like the 12.5 variable voltage Chinese ones recommended in this thread, as there has to be some limit to the amperage rate, but I don’t have that BMS info.
 
RustyOldNail,
  • Like
Reactions: TommyDee

mr_cfromcali

Accessory Maker
Accessory Maker
I’m not sure if you can use a 10 amp charger, like the 12.5 variable voltage Chinese ones recommended in this thread, as there has to be some limit to the amperage rate, but I don’t have that BMS info.

That 10A VVPSU was recommended as a Flix power source, NOT a charging adapter for Flite or FD! The 10A PSU is not a charger and does not have a charging circuit, it will just keep pushing power to your cells. It also has a different tip size than what you need for the FD, 2.5mm vs 2.1mm.
 

Jah75

Well-Known Member
Did you ever get an answer to the question about the wrappers? I am trying to be as gentle as possible when removing and installing batteries and the wrappers are still getting chewed up on the ends. Won't be long before I have to do a rewrap job and/or get some new batteries.
Jeff would have to confirm if this was a good idea or not, but I can tell you what I have always done in instances like these:

I used to vape (nic) and got into the handcrafted box mod market (mostly stabilized wood). Oftentimes some of the rougher Philipino hand-carved boxes would have super tight compartments. I started carrying around an older piece of a laminated card (credit or ID).
-Cut it to slightly thinner than the width of the cells
-insert it it between the springyist contact and the battery
-pull out battery from the end you have just parted rip free
You can also do it when inserting the batts - just be sure it’s not too thick

hopefully this isnt terrible advise that will lead to certain doom!
 
Last edited:

Zoltani

Well-Known Member
Sorry about skipping over the battery question, I didn’t mean to.

If you square up the cell above the contacts so the battery poles are perpindicular to the contacts and push straight down, you may have more success.

Please use the battery strap to remove cells. Center the strap under the cells before lifting, keep a thumb or finger on the white relay, and peel the strap up and towards the front; it should lift straight up, freeing the cells without chewing them up.

The contacts are supposed to be tight, but if they are too tight, try using a flat object to compress them a bit more. Obviously, remove the cells first.

Lastly, I’ve noticed that the Keeppower cells have thicker wrappers than some other brands - Vapcells, for example.

Sorry for the annoyance this is causing you. Given current postal circumstances, I don’t have a good way to address this other than suggesting you try to bend the contacts a little more to lessen the preload, or perhaps try a thinner rewrap if that becomes ncessary.

If I were restocking my cells I would look for a different brand next time, but as we know I don’t know when that may be.

:\

Oof, I have been away for awhile and just read up on all of the issues you are having. Very sorry to hear this and will do my best to contact representatives to voice my opposition.

The cells I have are the keeppower, and I will try a different brand next time.
Thanks for all you do!
 

mr_cfromcali

Accessory Maker
Accessory Maker
Hi all,

Just a quick update to say I'm reconfiguring my store so US customers will be able to use the shopping cart without having to complete payment at checkout. I'm very happy to be able to use the store rather than moving to a fully manual system, as the store keeps track of inventory. The shopping experience will be the same as before. You can load your cart, and you will see the items and amount of your purchase when you check out.

Checkout will be different. You will not pay at the store when you check out, but you'll still receive an order confirmation, an order number, etc.

The store will send me an email with the details of your purchase, and I will need to manually process your order to initiate a Zelle payment request to your email address or phone number. If I am at my computer I will do this right away, otherwise I will catch up with these as I can.

Once I process your order, I will send a payment request to you via Zelle to your email address or phone. It will include your order number. Please verify the order number before submitting payment! I expect things to get hectic, and I need the data I have to be as accurate as possible.

Zelle is for US bank accounts only, so this will work for my US customers but not international ones, unless they or someone they know has a US-based bank account. I don't have a good int'l solution yet, other than suggesting you find a US-based person to partner with. I'm working on it, we'll need to see if I can find something straightforward.

OK, so when are more heaters dropping?

By the end of the week. I'm currently planning to drop at least 20 Flite and 20 Flix v2 heaters when I put more up for sale in the store. These will be in addition to the orders for which people are already sending in payments. I'll happily add more if there's demand and I am able to get to them before I have to stop.

That's the latest news and my current plans. Thanks for your support! :love:

Updated to add: Some people whose orders I had to cancel last week were waiting for me to revive an online payment method before re-ordering. If this is your situation and you are able to use Zelle, AND you want to place that same order again (or mostly the same), please send me an email or PM
now with the order number and I will get that going. I'll post this separately as well so it is sure to to be seen. I don't want to accidentally omit folks who were in the last batch and had their orders cancelled. Thanks!
 
Last edited:

rvarick

Well-Known Member
Magnet info

As more Flite make their way out into the world, I want to take a moment and share some info on the N52 magnets that hold the lid to the body.

Neodymium magnets are strong little buggers!

They mostly stay in place, but because aluminum expands and contracts with heat they can sometimes come loose.

I have been wrangling these into FD cases for the last several years, and my techniques have gotten a lot better over time. I will be happy to re-glue any of your magnets that come loose, but of course that will require returning the case to me for the fix, and not everyone wants to part with their heater for a few days for this sort of thing.

If you need to reattach a magnet and want to give a try yourself, here are some things I can share to make this task easier:

• Remove the heater form the case first!!!!! Don't bring super glue near your heater, you won't be happy if you make a mistake with it. You can easily clean super glue from aluminum with solvent. The same can't be said for the circuit board.

Loctite Gel Control super glue is pretty good. It's easy to apply, which is a big deal. The KISS Molecular Adhesive I recommended earlier in this thread is a little more reliable and the "flexible" in its name does seem to handle aluminum expansion OK, but the Loctite is cheaper, easy to apply, and will adhere well.

• Use a Sharpie to mark the side of the magnet that needs to go into the hole, then stick the magnet to a piece of Scotch tape, marked side up. Apply a drop of glue into the hole, then place the magnet-on-tape into the hole, marked side down. The tape is there to hold the magnet in place and also help you separate the parts afterwards. Once installed and taped, you can put the lid on and clamp the whole thing together.

• I allow ~45 minutes for the glue to set up (with the adhesive I use), then I separate the lid and clean off the tape. To remove the excess glue, I soak the case in GoofOff solvent for 30 minutes (60 minutes max, or you will be re-gluing another magnet). Acetone will also work. The excess glue will fall away easily with a paper towel or an old toothbrush.

I hope that helps, but if you have any magnets come loose and need help with them, please contact me. :)
My magnet popped out but I was going to give the instructions above a go, seems pretty straightforward and thanks for putting these together here.

QQ: Does it matter what direction the top of the magnet is in the hole? I understand there’s obviously a top (which should go up against the lid’s magnet) and then a bottom (which will go into the hole on the case). Besides this orientation, does it matter how the magnet is rotated in the hole (like in a specific N/S direction)? And how much glue should I use, like just a dot?
 
rvarick,
  • Like
Reactions: TommyDee

mr_cfromcali

Accessory Maker
Accessory Maker
My magnet popped out but I was going to give the instructions above a go, seems pretty straightforward and thanks for putting these together here.

QQ: Does it matter what direction the top of the magnet is in the hole? I understand there’s obviously a top (which should go up against the lid’s magnet) and then a bottom (which will go into the hole on the case). Besides this orientation, does it matter how the magnet is rotated in the hole (like in a specific N/S direction)? And how much glue should I use, like just a dot?

The magnets are polarized, so yes, proper orientation is critical!!!!

Notice my instructions call for you to place one magnet on the other, and that's so the loose one is in the right orientation. Put the loose magnet on it's exposed partner, and mark the top side of the loose magnet with a Sharpie. The marked side is the side that has to go face down into the hole.

Make sure you have removed any old glue residue before adding new glue.

Put one drop of glue in the hole; more glue will just make a bigger mess that you'll hate cleaning up. Press the magnet into the hole as per my above instructions (i.e., , dot-side down, with cellophane tape, etc.).

Excess glue wipes away easily after soaking the area in GoofOff! or acetone, aka nail polish remover.
 
mr_cfromcali,
  • Like
Reactions: NexVision

mr_cfromcali

Accessory Maker
Accessory Maker
Update to my last post: Some people whose orders I had to cancel last week were waiting for me to revive an online payment method before re-ordering. If this is your situation and you are able to use Zelle, AND you want to place that same order again (or mostly the same), please send me an email or PM now with the order number and I will get that going. I want to do this before I add new orders; I don't want to accidentally omit folks who were in the last batch and had their orders cancelled. Thanks!
 

Sn4Pz

Well-Known Member
Anyone here who has gone down from the flite to the flix?

I love how aggressive the flite is but I don't want to deal with charging the batteries, especially when I rarely dynavap on the go. I have a torch for then anyways :hmm:

I don't need both, and my stash bag is already looking a little chunky...
 

rvarick

Well-Known Member
The magnets are polarized, so yes, proper orientation is critical!!!!

Notice my instructions call for you to place one magnet on the other, and that's so the loose one is in the right orientation. Put the loose magnet on it's exposed partner, and mark the top side of the loose magnet with a Sharpie. The marked side is the side that has to go face down into the hole.

Make sure you have removed any old glue residue before adding new glue.

Put one drop of glue in the hole; more glue will just make a bigger mess that you'll hate cleaning up. Press the magnet into the hole as per my above instructions (i.e., , dot-side down, with cellophane tape, etc.).

Excess glue wipes away easily after soaking the area in GoofOff! or acetone, aka nail polish remover.
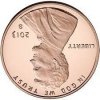
Thanks again. Besides getting the top/down orientation correct, does the rotation of the top of the magnet matter? Like say the magnet was a penny, and the Lincoln memorial/tails is the bottom of the magnet. And while stuck to the other magnet Lincoln's head is up/normal (facing to the right, like this):
penny front.jpg
Does it matter which direction Lincoln is facing when I glue? Like if Lincoln was facing to the left instead (like below), is this an issue?
penny front rotated.jpg
Or does it just matter what's top (heads) and what's bottom (tails), which is easily marked with the sharpie? Sorry, may be a basic magnet question!
 
Last edited:

mr_cfromcali

Accessory Maker
Accessory Maker
Thanks again. Besides getting the top/down orientation correct, does the rotation of the top of the magnet matter? Like say the magnet was a penny, and the Lincoln memorial side is the bottom of the magnet. And while stuck to the other magnet Lincoln's head is up/normal (facing to the right, like this):
View attachment 6123
Does it matter which direction Lincoln is facing when I glue? Like if Lincoln was facing to the left instead (like below), is this an issue?
View attachment 6124
Or does it just matter what's top and what's bottom, which is easily marked with the sharpie? Sorry, may be a basic magnet question!

Ah, sorry if I misunderstood your question. No, that sort of orientation doesn't matter, only which side is up or down.

I'm assuming the magnet that fell out was one of the smaller magnets in the body.

The procedure works the same if a lid magnet comes loose, but in this instance stack the loose magnet (which should be on a piece of tape) to the top of the body magnet. With the two magnets separated by the tape, and the apply the drop of glue directly to the top of the loose magnet. Put the lid on the loose magnet, then clamp the lid to the case for an hour to set. Separate, clean the excess glue with solvent, and you should be good.
 
Last edited:

TommyDee

Vaporitor
Oof, I have been away for awhile and just read up on all of the issues you are having. Very sorry to hear this and will do my best to contact representatives to voice my opposition.

The cells I have are the keeppower, and I will try a different brand next time.
Thanks for all you do!
I have the purple eFest 1200mah cells and the black KeepPower cells. The shrink seems a little less prone to stretching on the eFest cells. No problems inserting but on removal, I give eFest the edge. I like the looks of the KeepPower's though. Both perform nearly identically.
 

RustyOldNail

SEARCH for the treasure...
That 10A VVPSU was recommended as a Flix power source, NOT a charging adapter for Flite or FD! The 10A PSU is not a charger and does not have a charging circuit, it will just keep pushing power to your cells. It also has a different tip size than what you need for the FD, 2.5mm vs 2.1mm.

Sorry, I guess I wasn’t clear. I know I can use my Chinese variable voltage 4-12.5v, 10amp PSU (it’s actually 8a. continuous) to power my FD, as long as I REMOVE the batteries. But as long as I do not activate the IH, can this high amperage PSU be used just to charge the 3 18650 batteries? The BMS I originally mentioned, is the one inside the FD, will that monitor and cutoff the charge at 12.6 volts, and only draw the current needed? I thought this is what the OG poster was asking, and I was curious as well. Thanks.
 
RustyOldNail,
  • Like
Reactions: TommyDee

mr_cfromcali

Accessory Maker
Accessory Maker
Sorry, I guess I wasn’t clear. I know I can use my Chinese variable voltage 4-12.5v, 10amp PSU (it’s actually 8a. continuous) to power my FD, as long as I REMOVE the batteries. But as long as I do not activate the IH, can this high amperage PSU be used just to charge the 3 18650 batteries? The BMS I originally mentioned, is the one inside the FD, will that monitor and cutoff the charge at 12.6 volts, and only draw the current needed? I thought this is what the OG poster was asking, and I was curious as well. Thanks.

Ah, OK. Sorry I misunderstood your question @RustyOldNail. Unfortunately, in this case the answer is the same. The circuit that monitors the cells charge status and knows when to stop pushing power to the cells is built into the charging adapters, not the BMS. The BMS does have some over-voltage protections, but that's during discharge, I believe.

Sorry.
 

mr_cfromcali

Accessory Maker
Accessory Maker

Not on its own, but yes, that ^^^ USB adapter plus the automotive charging adapter I currently carry is the USB charger hack I've been prototyping for the Flite. You need the car charger piece to manage the charge circuit, and the above adapter handles boosting the 5V USB power output to the correct 12V:

IMG-0750-private.jpg


That's the state of the USB charger effort at the moment. I'll keep it going after I stop selling heaters; if it becomes illegal to ship USB adapters, we are truly fucked. :p

Updated to add: You can use that USB charger to charge the batteries, but it won't stop pushing when they reach 12.6V. So you could use it if you were also monitoring the batteries' charge state, but if you just plug it in and walk away, you may run into unexpected issues. 🔥
 
Last edited:
Top Bottom