I will not post a picture this time because they take up so much space, but I got to say switching to NPT piping solved all my issues in both making the vaporizer, and the way the vaporizer smokes. Half the tools I needed to make the aluminum version are no longer needed. I no longer need a pipe cuter, nor a tap and die set. They did the cutting and threading for me. Heat time is quicker, and the body is staying cooler. I packed a pinch-full of wormwood with a few drops of anise essential oil and was getting solid hits for 10 minutes.

-
SCAM WARNING! See how this scam works in Classifieds.
You are using an out of date browser. It may not display this or other websites correctly.
You should upgrade or use an alternative browser.
You should upgrade or use an alternative browser.
'The Misty Log' - DIY wooden Log Vaporizer
- Thread starter blokenoname
- Start date
brainiac
log wrangler
 Time to stock up on those halogen bulbs:
Halogen lightbulb sales to be banned in UK under climate change plans
September's ban will cut carbon emissions and save consumers money, the government says.
oddjobold
Vape swap shop
Halogen lightbulb sales to be banned in UK under climate change plans
September's ban will cut carbon emissions and save consumers money, the government says.www.bbc.co.uk
I am thinking of making something. What bulbs should I get?
HighVapeEnthusiast
Well-Known Member
I would say that depends on waht you prefer to do.I am thinking of making something. What bulbs should I get?
10w for native use with wallplug, with 20W you have to use a dimmer and can also go hotter.
It's really better to read a lot in this thread.
So much helpful information from great guys who build great Vapes!
Stay high!

")
brainiac
log wrangler
Hi @oddjobold
10w provides plenty of heat. And I'd advise using a VVPS or dimmer even with a 10w bulb.
As Tinyvapelover says these's a load of info in the back pages of this thread. Yes, it's a lot to plough through but worth it.
Here's a page that might help.
Best of luck with the project.
Make sure you update us on your progress
Last edited:
HighVapeEnthusiast
Well-Known Member
…but worth

 for real!!!
And thanks for all your work men!!!
I‘ve already produced maybe 10-15 Logs this time.
It's giving me a lot of fun, really!
And it's a lot of fun to give them away to friends for free.
They have just to buy the vvps if they want.
I also put two screens through the Heater cover, with some 3mm glass balls between.
It's nice for the eyes and it get heat soaked.
So I got a little 'buffer' of power.
This time I only work with a drill press.
But a lathe is on my list these days.
I have to learn how to show some pics here.
I've never done that before...
But again @brainiac , thank you very much for giving your baby to us...
brainiac
log wrangler
Souds great @Tinyvapelover The 'buffer idea is particularly interesting.
Looking forward to the pictures. https://fuckcombustion.com/threads/image-attachments.50036/
The 'buffer idea is particularly interesting.Looking forward to the pictures. https://fuckcombustion.com/threads/image-attachments.50036/
darkstar72
Well-Known Member
@sayvay sounds like you have found a new assembly method using NPT piping. Please share some pictures of how you have done this. Less tools the better as I am thinking of building a log.I will not post a picture this time because they take up so much space, but I got to say switching to NPT piping solved all my issues in both making the vaporizer, and the way the vaporizer smokes. Half the tools I needed to make the aluminum version are no longer needed. I no longer need a pipe cuter, nor a tap and die set. They did the cutting and threading for me. Heat time is quicker, and the body is staying cooler. I packed a pinch-full of wormwood with a few drops of anise essential oil and was getting solid hits for 10 minutes.
@darkstar72 On my first attempt I wasn’t paying attention to the aesthetic, I wanted to produce a solid hitter; I figured I’ll clean it up for my second attempt. I tried to put a thermometer in it, and a voltage readout. It turns out that the hardest and least reliable part is the thermometer. My temperature reading is about 20 degrees low at 300f and increases to about 45 degrees low when I get closer to 400f. So in order to simplify it, and make it look more professional I would probably only include a voltage readout. To make it look real nice, one can put a one-way mirror on the bottom, covering the hole and letting the numbers shine through.sounds like you have found a new assembly method using NPT piping. Please share some pictures of how you have done this. Less tools the better as I am thinking of building a log.
Now for the actual device It is simple enough to be built in a few hours if one starts with a pre-rolled slab of wood. I used a 2-1/2 inch rolling pin that claimed to be rose wood, but looks and feels like hard maple. Cut the wood to size and drill the holes, etc.
Here is a picture of the components for the core of the unit.

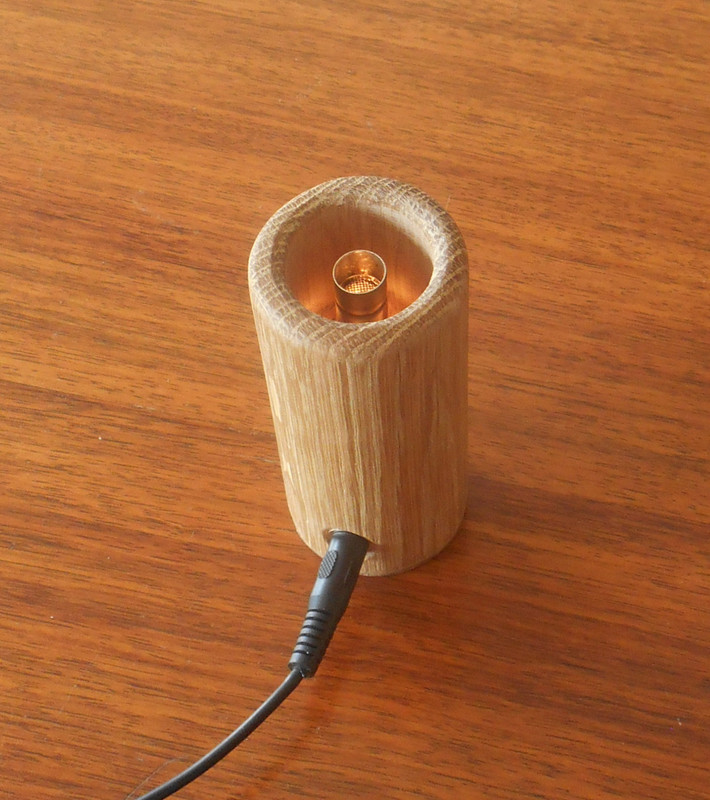
Next is a closeup of the miraculous black iron bowl. Season it before use, as you don't want it to rust. It will make it more pleasurable to touch, as one would no longer get black hands from touching the iron. To season dip in oil and bake at the highest temperature your oven will reach until it turns black and stops smoking. You may have to brush off some spots that got on to thick and possibly do a second seasoning. ps I ordered one 3/8” x 1/4” Black Malleable Iron Reducing coupling, they sent me a box of 30. I tried to return them but amazon will not accept the return. They told me to keep them and even refunded me on the original payment until I clarified. I didn't want the refund.

Here is a picture of the bowl connected to the 1/4“ NPT brass hex nipple couple, and on the bottom there is an end cap. I drilled two holes in this end cap so the heater wires can get through. One will have to drill additional holes in the upper portion of the hex nipple below the bowl in order to let air in. P.S. I bought brass piping with lead in them as they cost a fraction of the price. The only thing touching the brass will be air, and the air will never get close to the brass's smoke point. But one may be cautious and spend a bit more to get lead free brass.

For securing the device to the log one can put a washer above the end-cap making sure the washer is larger than the hole letting the stem through. This method is quick and efficient but I wanted to keep the heat more isolated in the upper chamber. To do that, one will have to screw it in somewhere along the upper chamber. For example, one can get a hex locking nut and screw down the nut, or secure the stainless shot glass to the log. Also, I would leave out the furnace cement as its messy takes too much time, and turns muddy if it gets wet. This hits like a beast, cooks evenly and steadily like only cast iron can, and preheats quick. If one once to speed up the preheating time they can get a variable voltage power supply and boost the power to 15-18v just be careful not to burn the log down, and turn it back down after the preheat. One can pack the bowl and hit it for a long time, or pack a smaller amount in the straw. To hit it through a bong, one could experiment with other attachments as they are all screw on. Hope you found this helpful.
darkstar72
Well-Known Member
Ramahs
Fucking Combustion (mostly) Since February 2017
We've got a house move this month so I've been busy packing stuff in preparation
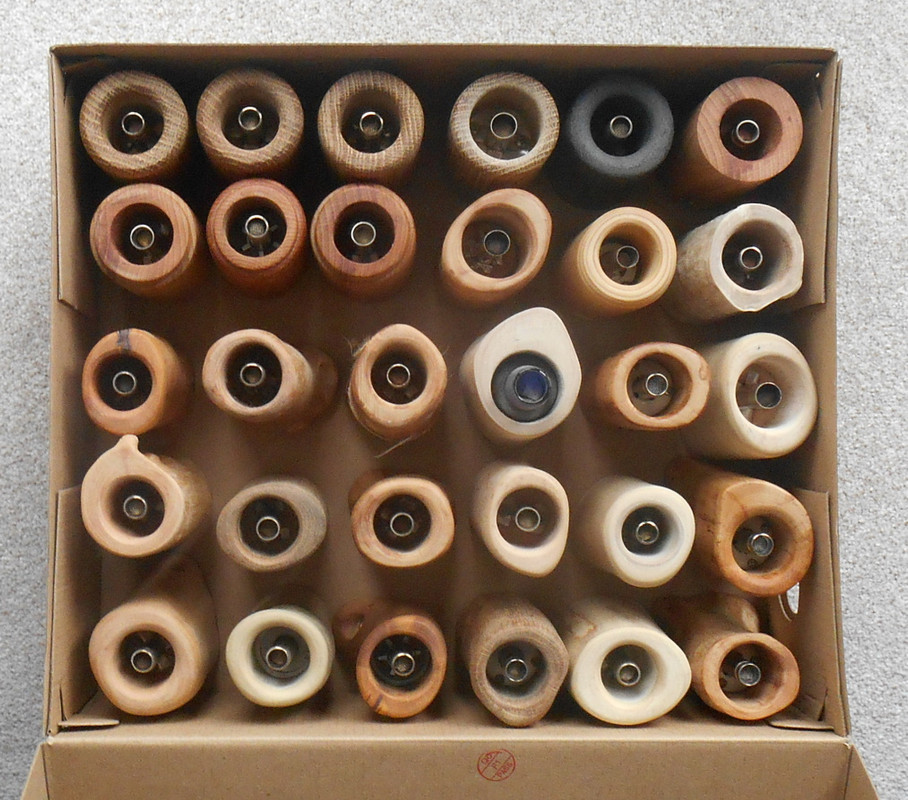

Wow. That's a big ol' box of happiness right there!
darkstar72
Well-Known Member
BakedDiogenes
Well-Known Member
He means “seasoning” like you would a cast iron pan. A thin coat of oil (I prefer crisco) cooked at high temps polymerizes the oil, creating a thin protective layer on top of the iron.@sayvay Thanks for the explanation and engineering new ideas. Looks interesting. I don't get the reason for seasoning the black bowl and what is it seasoned with? Thanks again for the info.
@darkstar72 It's as @BakedDiogenes saidI don't get the reason for seasoning the black bowl and what is it seasoned with?
 , this bowl is cast iron. Cast-iron pans will cook better than any other material which I’ve tried, this is because cast iron retains its heat and distributes the heat evenly. but caring for cast iron differs from stainless steel. Cast iron will rust when exposed to water, also there may be a mild galvanic reaction when connecting brass to iron, causing the brass to rust (although this is not such a concern because they considered brass a dielectric) To avoid any issues one wants to put a coating on the iron (aka: seasoning). To season one, coats the iron with oil and burns the oil on. The easiest way would be to put the oiled iron piece into an open flame for a bit. If not, an oven can work. Brass is easier to work with and conducts the heat better, and the stem doesn't need to hold heat. For these reasons brass is better in the stem. Black iron comes in NPT sizing, brass comes in multiple different sizing's. If you want it to be easy peasy make sure all your connections are using the same standard sizing.
brainiac
log wrangler
Hi @darkstar72
They're all good. The 5w resistor units run at a good temp for herbal directly from the PSU and have great reliability. The cartridge units need a VVPS or a dimmer to prevent combusting the bud, so that's an extra complication but a minor one. On the plus side they've got plenty of those top end temps you want for vaping your concentrates. Halogen units also need taming with a VVPS/dimmer and bulb life/ease of replacement are factors. Bulb filaments are not as robust vs impact as cartridge or resistor. That said, if logs are your desktop of preference, you want a halogen unit in your collection. Just switching it on and seeing it light up is a litte event in its own right. Warm up rates are very good - about 4 minutes.
They're all good. The 5w resistor units run at a good temp for herbal directly from the PSU and have great reliability. The cartridge units need a VVPS or a dimmer to prevent combusting the bud, so that's an extra complication but a minor one. On the plus side they've got plenty of those top end temps you want for vaping your concentrates. Halogen units also need taming with a VVPS/dimmer and bulb life/ease of replacement are factors. Bulb filaments are not as robust vs impact as cartridge or resistor. That said, if logs are your desktop of preference, you want a halogen unit in your collection. Just switching it on and seeing it light up is a litte event in its own right. Warm up rates are very good - about 4 minutes.
darkstar72
Well-Known Member
Thanks @brainiac I will first try with the ohmite 25J20RE resistor. I picked up a used drill press. Need a rotary tool, pipe cutter, soldiering iron, etc. I plan to detail my progress here. So again thanks and to @blokenoname for your willingness to share this knowledge.Hi @darkstar72
They're all good. The 5w resistor units run at a good temp for herbal directly from the PSU and have great reliability. The cartridge units need a VVPS or a dimmer to prevent combusting the bud, so that's an extra complication but a minor one. On the plus side they've got plenty of those top end temps you want for vaping your concentrates. Halogen units also need taming with a VVPS/dimmer and bulb life/ease of replacement are factors. Bulb filaments are not as robust vs impact as cartridge or resistor. That said, if logs are your desktop of preference, you want a halogen unit in your collection. Just switching it on and seeing it light up is a litte event in its own right. Warm up rates are very good - about 4 minutes.
brainiac
log wrangler
Finally back to making logs following our recent house move - a real tonic after the physical/mental hassle of the move.
I picked up a branch of silver birch back in March that looked suitable for a full live edge Rustic. Here's the result...
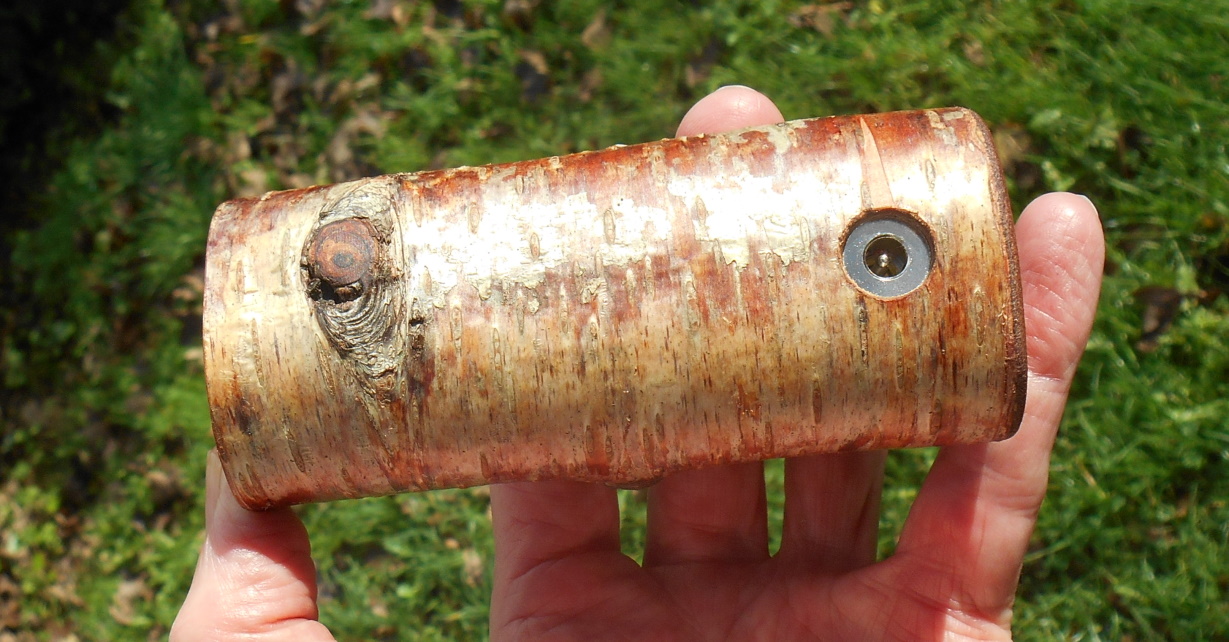

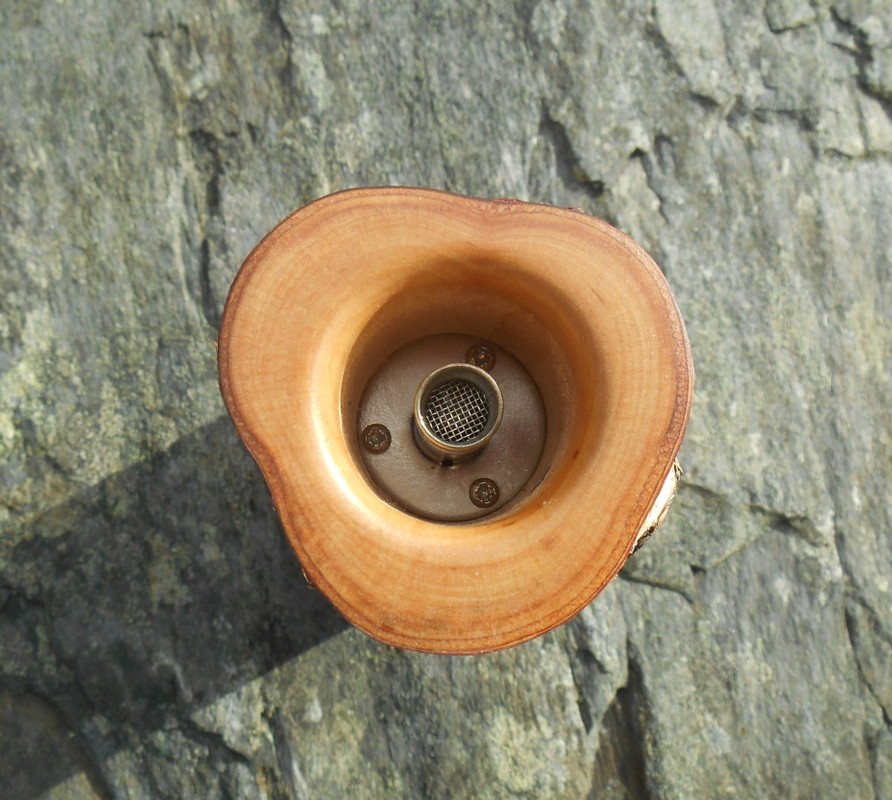
One of Dave @underdog hc's in there to reassure us that this raw chunk of nature will indeed cook the herb - more testing required, ofc 
There's a halogen full live edge in the works. Should be finished next week.
I picked up a branch of silver birch back in March that looked suitable for a full live edge Rustic. Here's the result...
There's a halogen full live edge in the works. Should be finished next week.
darkstar72
Well-Known Member
Your work is great. What a cool hobby. Hopefully one day I will follow but it's on hold for the time being.Finally back to making logs following our recent house move - a real tonic after the physical/mental hassle of the move.
I picked up a branch of silver birch back in March that looked suitable for a full live edge Rustic. Here's the result...
One of Dave @underdog hc's in there to reassure us that this raw chunk of nature will indeed cook the herb - more testing required, ofc
There's a halogen full live edge in the works. Should be finished next week.
Thanks to brainiac I got motivation to make version two of my advanced Misty. I haven't named her yet, but I’ll think of something. She way simplified and made more elegant, Yet I had to remove the thermometer as that was the weak link that made it too bulky and unreliable. I am no master carpenter like brainiac, but I am getting better at drilling holes. Anyway, here is a picture of the final product.


Here is a brief picture tutorial on building my version as no one else built this one yet. I was thinking about starting a new post but as 80% of this design came from Blokenoname ideas, so to give blokenoname credit I will post my guide here.
Here are most of the items one will need to build my version
First one has to drill the major hole. The trickiest part here is getting the log clamped down, so it doesn’t spin. The regular clamp is no good at holding round items, so one will need some kind of pipe/chain/pliers/clamp/vise to help hold it in place. I ended up using my free hand, but that could be dangerous. For the hole, I recommend starting with a pilot hole and slowly enlarge it. Don’t go full width at one shot, as the hole will most likely get messy that way. Once the bit is in the hole, even a 1/8 inch deep, making the hole deeper is easy.

This time around I went with a top mounting method and secured the washer from atop.

Some more holes one will have to drill. I drilled four holes in the stem which was easy because brass is easy to drill. Make sure you drilled the air intake holes in a spot which will end up in the cup as one wants the air path to come from atop. The stainless shot cups hole is off centered but still works fine. The only tricky part about drilling the cup is getting it secured, so it doesn't spin. I accomplished this by putting the cup in a rubber barbell grip and clamping down on the grip. And finally, two holes in the end cap to let the cartridge heater wires through. I made them slightly bigger than the wire itself, as making them smaller can end up being a real pain.

Screw the stem into the cup.

Place the heater in the stem. And place the whole cup with the heater/stem into the main hole.

Fish the two wires through the end cap holes and secure the end cap.

Put on some high temp silicone in order to stop any air from being drawn in from the bottom, but I would wait for the last step before I do that as the wires still have to be manipulated.

Attach all the positive with positive, and negative with negatives. I used a “no lead solder” as the melting temperature is much higher, but it was a bitch to work with.

Now is the best time to put the silicon on. Put a drop of glue on the female DC plug and push the plug into its hole. Screw down the volt reader into the drilled notches.

Finally, let the silicone dry, burn it out by running it on high for an hour. Cover the bottom hole with a covering that lets the volt meter show through it. Oh, and don't forget to screw in the bowl.

Here are most of the items one will need to build my version
First one has to drill the major hole. The trickiest part here is getting the log clamped down, so it doesn’t spin. The regular clamp is no good at holding round items, so one will need some kind of pipe/chain/pliers/clamp/vise to help hold it in place. I ended up using my free hand, but that could be dangerous. For the hole, I recommend starting with a pilot hole and slowly enlarge it. Don’t go full width at one shot, as the hole will most likely get messy that way. Once the bit is in the hole, even a 1/8 inch deep, making the hole deeper is easy.
This time around I went with a top mounting method and secured the washer from atop.
Some more holes one will have to drill. I drilled four holes in the stem which was easy because brass is easy to drill. Make sure you drilled the air intake holes in a spot which will end up in the cup as one wants the air path to come from atop. The stainless shot cups hole is off centered but still works fine. The only tricky part about drilling the cup is getting it secured, so it doesn't spin. I accomplished this by putting the cup in a rubber barbell grip and clamping down on the grip. And finally, two holes in the end cap to let the cartridge heater wires through. I made them slightly bigger than the wire itself, as making them smaller can end up being a real pain.
Screw the stem into the cup.
Place the heater in the stem. And place the whole cup with the heater/stem into the main hole.
Fish the two wires through the end cap holes and secure the end cap.
Put on some high temp silicone in order to stop any air from being drawn in from the bottom, but I would wait for the last step before I do that as the wires still have to be manipulated.
Attach all the positive with positive, and negative with negatives. I used a “no lead solder” as the melting temperature is much higher, but it was a bitch to work with.
Now is the best time to put the silicon on. Put a drop of glue on the female DC plug and push the plug into its hole. Screw down the volt reader into the drilled notches.
Finally, let the silicone dry, burn it out by running it on high for an hour. Cover the bottom hole with a covering that lets the volt meter show through it. Oh, and don't forget to screw in the bowl.
Last edited:
brainiac
log wrangler
Well done @sayvay
You've found some new and interesting ways of getting around the various challenges of building a log. Don't worry about a professional appearance at this stage - that can always come later (much later in my case") ). The use of brass might be problematic for some. @KeroZen has advised against it iirc, and I know @blokenoname has stopped using it.
). The use of brass might be problematic for some. @KeroZen has advised against it iirc, and I know @blokenoname has stopped using it.
The main issue I'd raise is safety. I had a few lucky escapes in the early days and now take health and safety very seriously. Getting the workpiece properly clamped down is vital when drilling, especially when using a frostner bit. Eye protection is equally vital. Eye protectors, or a visor, are a must for any drilling, milling or soldering. And the proper equipment will not only be safer to use - it'll also give you a better log.
So, how well does it work? I see a cartridge heater there, what type is it?
Keep us informed of your progress.
You've found some new and interesting ways of getting around the various challenges of building a log. Don't worry about a professional appearance at this stage - that can always come later (much later in my case
). The use of brass might be problematic for some. @KeroZen has advised against it iirc, and I know @blokenoname has stopped using it.The main issue I'd raise is safety. I had a few lucky escapes in the early days and now take health and safety very seriously. Getting the workpiece properly clamped down is vital when drilling, especially when using a frostner bit. Eye protection is equally vital. Eye protectors, or a visor, are a must for any drilling, milling or soldering. And the proper equipment will not only be safer to use - it'll also give you a better log.
So, how well does it work? I see a cartridge heater there, what type is it?
Keep us informed of your progress.
Thanks @brainiac for the compliment.
What’s wrong with brass? I would think brass is the optimal material. It has a very high smoke point, has a thermal conductive value of “96” vs stainless witch has a value of “25”. Aluminum and copper both are better conductors, but they are too soft, and don't come nicely threaded. I was thinking about buying a brass version of the bowl, as some people don't seem to like iron. A brass bowl would heat quicker than the iron bowl but would fluctuate in temperature more when hit back to back.
As far as the heater goes, I am using a 24V 50W heater cartridge. this heater works great and I wouldn't dare take it to its full 24V. I ran some numbers by taking the surface temperature of the bowl at different times. At 12V it took the heater a little over a half an hour to max out at about 352°f. At 15V it took 13min to reach 350°f, and it got up to 420°f after 22 min. Yet keeping it at 15V caused a little smoke to come out of the bottom and I could smell the smell of burning wood. That happened while I was keeping it upside down and the surface temperature rose to 480°f, so covering the bowl will cause it to get hotter. I am using a hardwood maple. Soft wood would probably combust earlier than hard wood. Wood could start combusting in the mid 400°f range.
I can't fully tell you how it smokes as I am not toking these days. I mainly use it as an aromatherapy diffuser by adding a cup on top. I have also used it to take direct hits of essential oils by adding the oils to an herb and then heating the herb. For that I could take many hits in a row with no impact on performance. But essential oils vaporize at temperatures closer to the 200°f range, and I have to drop it down to the 7V range. I am considering making a version out of marble, as marble will tolerate much higher temperatures, yet it would be a whole new project trying to learn how to work with marble. Yet I am supposed to go back to what I am trained to be, a doctor.
Abysmal Vapor
Supersniffer 2000 - robot fart detection device
Nothing wrong with pure brass for dental aplication for example,but you are using machined brass which is often doped with lead to ease the process.Thanks @brainiac for the compliment.
What’s wrong with brass?
I would also advise against vaping pure essential oils,it is harmful, some are toxic even cancerogenic, looks for terps.
So pick up lead free brass. When fluids come into contact with a leaded brass, lead can leach from brass into fluids, hence all plumbing brass has to be lead free. For the lead to vaporize, the brass would have to be heated close to 1700°f hence brass used in HVAC doesn't have to be lead free. You're more likely to inhale lead from lead solder, which all of you seem to use.Nothing wrong with pure brass for dental aplication for example,but you are using machined brass which is often doped with lead to ease the process.
I would also advise against vaping pure essential oils,it is harmful, some are toxic even cancerogenic, looks for terps.
As far as Essential Oil (EO) being toxic when heated, then extracting the EO would have caused them to go toxic, because they extracted EO through distillation, which involves heating the plant. People have been using warmers for EO long before diffusers came on the market. Sometimes changing the particle into its gasses state actually makes it more therapeutic. Ex- putting some eucalyptus in a hot bowl of water and breathing in the vapor. But like everything else, modern medicine has a fear of anything that can cause people to be less reliant on their products, hence the fear of EOs that is put out there.