June 23, 2021 ... i remember it like it was just yesterday ... sitting on the balcony at 3:30 pm, a wednesday, vaping - no orders pending - pandemic business has been shit, as for everyone. being high, i look at the few clouds in the sky - a fucking beautiful day - and thought to myself (my first mistake of the day) i should work in the shop for just an hour, so as to not waste the day and perhaps roll the stone a little higher up the hill ... if i had only known ...
see, i need a jointer-planer (actually a thicknesser) to really get the cubes cut to put into the cnc router. alas, all i have in the shop for sizing the cherry sticks (2.5" x 2.75" x 14") into 2x2x2 cubes is a table saw - inherited from my dad 30 years ago (and it was 40 years old then), and a quick test, even with a sharp blade, showed it just cant rip the cherry sticks; and i have a very nice chop saw, barely used, just sitting around from when we built this house in 1997, also with sharp blades; and a drill press.
so using the chop saw, i start cutting the cherry stick down into 2.5" lengths, which i then have to face to get a reasonable sandable cube from the rough cherry stick (no sides faced from the lumber supplier).
so i notice a problem right away ... the table of the chop saw has a recessed plastic insert around the blade, so the cube can not sit square to the blade. no problemo i'm thinking (my second mistake in this event) ... i have plenty of shim stock (can you see where this is going?) with all the 0.0125" thick stainless steel sheet i have for the cube and case components ... so cut a 1/2" wide strip, pop a couple of holes for the mounting screws, and the chop saw table will be level ... easy peasy (not!).
the first warning was when i took the 1/4" drill bit out of the tray and i thought to myself "this is a dull bit" ... the second warning was the slight tug as the drill penetrated the strip for the first hole ... silly me, i just whip the strip around and start the second and final hole ... at which point the drill bit seized the strip, and the drill press wrapped it around the bit, slicing through my three middle fingers on my left hand on the way to wrapping the bit.
well, that was a surprise! - lots of blood, i mean lots of blood, but thankfully the strip didn't sever the finger bones - i always have h2o2 in the shop cause i seem to cut myself all the fucking time - drown the fingers with h2o2 (blood spots still on the concrete floor as a reminder of my error(s)) - dash upstairs to the mens room trying not to get (much) blood on the rugs or wood floor (mostly successful with this) - tape the wound together enough to get in the car and drive to urgent care (i was alone - spouse had spent the night in the city with a friend) - they took one look and sent me to ER at hospital 20 miles away, too damaged for them, but at least they got the wound stable.
and by 8:30 that night, the NP had sutured the three fingers - fascinating to watch how he did that, by the way, and i do feel a little more emboldened by seeing how to do it properly: lidocaine, rubber band tourniquet, silk thread, small needle, 10 stitches across the three fingers. his digging around and examining revealed a lacerated (severed) tendon in the middle finger.
so immediate visit to the local hand guy, who sent me on to Curtis hand clinic in Baltimore - best in the business - but by now it is exactly 3 week post accident, so restoring the flexor tendon would be really involved - 12 week recovery and lots of physical therapy. one thing i learned during this 3 weeks, is it took about 10 days for my hand to be waterproof again, and in my mind having a waterproof hand is more important than bending the tip of my middle finger 20 degrees.
so, pass on the restoration, and i have a permanently extended middle finger (extensor tendon still works fine) - given what i see happening in my day to day reality, this could be very useful. one good thing is the damage to the hand does not impede strength training - push ups, pull ups, bowflex - no problem.
so i need to outsource the cube prep to somebody with the right tools. there are plenty of peeps around here who can do this.
the ultimate lesson here, is that i can't switch from digital (designing) to analog (shop work) in an hour (not as smart as he thinks he is, eh?)
as a result, i started taking an in depth look at the feasibility of making the case. dusted off the Cricut Maker (mentioned several posts back) and started learning how to use the design space software. cloud based, which i really like, cause i can work on any of my PCs.
tried some simple cuts to get the hang of the cutter and the software and finally added markings and notches and cutouts where i can cut all the matte board, vinyl, double sided tape, lamination panels, and leather by machine - look ma, no hand cutting (ouch, what a pun).
so here is how to make Case v46.15 ... ...
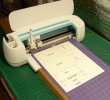
here is the Cricut Maker after marking and cutting the matte board panels for the shell of the case - the white piece is 10" x 14", laminated on the bottom side to adhere to the purple carrier mat. took about 20 minutes to mark and cut:
View attachment 13791
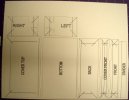
here is a closeup of the marks and cuts:
View attachment 13793
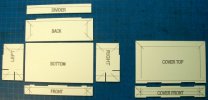
these pieces need just a bit of matte knife on the inside corners of the cuts to separate into the individual panel pieces:
View attachment 13794
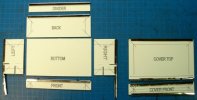
a case made of these panels would have no rigidity, and damn it, i like rigidity (see above tale about my middle finger), so i make edge stiffeners from that 0.012" thick stainless steel sheet. here they are in proper position:
View attachment 13795
(the left and right stiffeners still need to be bent 90 deg.)
but the Cricut also can cut lamination panels - to keep the matte board panels from delaminating when attaching the leather, atp (adhesive transfer paper) panels - to attach the leather coverings, and vinyl panels to cover the outside of the matte board to cover the seams that would otherwise be visible, and felt, when handling the finished case.
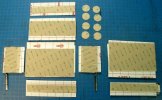
may be hard to see, but this shows the lamination panel, atp, and vinyl associated with their matte board panel. the 8 discs are 26 mm circles of atp to place on the ends of the two batteries to attach the leather that wraps the power pack (2 power packs per vaporizer).
View attachment 13796
as usual, i am iterating my way to the final perfection - which means i am burning through a lot of leather right now, which gets expensive. the green case just wasn't sized quite right, the next one, in blue, also has some problems. i will try cutting the leather for the black case tomorrow and see it the adjustments are correct now.
more details to follow ...


 )
)

