• Do NOT click on any vaporpedia.com links. The domain has been compromised and will attempt to infect your system. See https://fuckcombustion.com/threads/warning-vaporpedia-com-has-been-compromised.54960/.

The Bud Toaster - (currently: Model 14, version 3)

all-Glass-Nerd

New Member
Any updates? It's like an electric version of the Vaponic vape design, seen a good DIY thread on cloning that one, but not using electric heating and temp control. Great craftsmanship and engineering! :clap::clap:

I working on my own vape that is similar to this in how it works fundamentally. The central piece I'm using is a glass one-hitter or Arizer stem, so its more suited to upsidown use, while the BudToaster looks great for upright use.

Have you thought to use something to thermally couple the coil to the glass tube? It could greatly increase the energy efficiency and heat up time, insulation like ceramic fibre wool could also be good, and can be used in combination. For thermal coupling I have been experimenting with fire cement, but my tubes have been cracking, might apply a very thin layer by watering it down as one of my prototypes didn't crack when I used that approach. I am also looking into high temperature silicone, but still trying to find something that fits my low budget and can handle the temperature (which I need to measure). My design only needs about 15w for a full extraction.

This is my first ever post on this forum!
 

Hippie Dickie

The Herbal Cube
Manufacturer
Have you thought to use something to thermally couple the coil to the glass tube?
Welcome to FC! i am honored that your first post was in my thread. best of luck on your vape.

Which glass tube are you referring to? there are three: the oven tube, inside the body of the cube; the vial, which holds the herb and drops into the oven tube; and, the draw tube, which is external to everything.

the heater coil, which is a ribbon not a round wire (used that for the first 11 years), is wrapped tight around the outside of the oven tube. so, the vapor air path is all glass.

i've been meaning to do an update ... still kind of pandemic shell-shocked these days, actually since the end of February.
 

all-Glass-Nerd

New Member
Hi! I was referring to the oven tube. Ribbon sounds like a great way to get good heat transfer. I just applied a very thin watered down coat to a new oven tube prototype for my design, hoping it wont crack this time, but might try out some ribbon next!

I guess an advantage of a dry friction fit (no cement etc.) with the coil is that after repeated use if the oven tube gets dirty, it can easily be taken out and cleaned easily
 

Hippie Dickie

The Herbal Cube
Manufacturer
I guess an advantage of a dry friction fit (no cement etc.) with the coil is that after repeated use if the oven tube gets dirty, it can easily be taken out and cleaned easily
well, it isn't advised to take out the oven tube due to the way the k-type thermocouple and the RT probe for the BBQ thermometer are tucked between the ribbon and the oven tube ... i'm sure there is a better way to mount them, but this currently works, is very reliable. i have labored over the probe positioning since the beginning.

fortunately, the oven tube does not get dirty. even after years of use with herb. i don't do concentrates in this vape (very much), so that may be another issue. a q-tip when the oven is still warm should be adequate. the warm draw tube (after a session) cleans up beautifully with a swab of a paper towel. the vial also wipes clean (i scrape a toothpick against the inside surface) when warm.

i tried some ceramic cement a number of years ago to try to add some thermal mass. the initial tests were not promising so i dropped that approach. this was before i switched to PWM heater control - which, in my mind, is the only way to fly ... it is like inventing fire. such heat control is revelatory. (i live a simple life, it would seem)
 

Hippie Dickie

The Herbal Cube
Manufacturer
well, that's a problem as we roll into 2021, what with the new law prohibiting sale of vaporizers - or rather, regulating them out of existence for the small maker (me). looks like it will have to be purchased from a retailer. if and when.

after a december sales rush in my real world business i am finally getting back into the GCODE. it is always a struggle to switch mindsets between the projects in my life. and then there are the distractions: i.e. covid-19. i have been spending many hours studying the mRNA vaccine and the immune system ... just found a Dutch programmer's blog about reverse engineering the BioNTech vaccine - breaking it all down in computer programming terms ... can be very distracting.

anyway, i am working on a final piece of the maker puzzle. it dawned on me recently that the plastic bezel of the BBQ thermometer (which i hate and have hated from the beginning) can be replaced by a CNC Router version in cherry (which i love!!!) - where the grain of the wood will match the grain of the cube face around it. same idea as the bottom cover matching the grain of the cube bottom.

so, investing some time in a GCODE generator (Excel VB) to allow minor adjustments without the pain of my current tool. tomorrow!!! first prototype. maybe.

about the last thing i did (back in August) before getting diverted by work (spouse had a new book come out and that required updating the website, which required updating the programming tools for Windows 10 to get off Windows 7) and more recently covid, in order to get the cnc router in production mode is installing two 5-piece jigs so i can load 5 covers and 5 cubes at one time. parameterized the GCODE to do 5 cubes/covers to minimize tool changes. a little hard to see without the covers/cubes loaded, but there are vertical metal strips to align the pieces for milling.

cover jig:
picture.php


cube jig:
picture.php


so TL;DR - no pre-orders yet.
 

Hippie Dickie

The Herbal Cube
Manufacturer
well, i finally tamed my monkey mind enough this weekend to finish refining my GCODE generator ... really hard to pull away from studying biochem about covid and the immune system, but i did it at least for a few hours.

so the big effort was to develop and test the GCODE to mill the bezel for the BBQ thermometer from the cherry wood:

picture.php


here it is from the back side:
picture.php


my POCKET-RECTANGLE generator needs to do a smoothing pass along the left and right edges.

here is with the LCD display and elastomeric contact strip (pink-black-pink strip below display) in place:
picture.php


and with the BBQ pcb in place:
picture.php


while i am in GCODE-mode i will update the cube and cover GCODEs and configure all to step across 5 pieces.

then i need to gird my loins to dig out and setup the old table saw and do some wood pre-processing, and cut out 20 cubes.

progress in the new year!!!
 

Hippie Dickie

The Herbal Cube
Manufacturer
Well, well, well – another February.

End of January 2020, i was poised to start my February project with 20 of the brand new pcb design. Then i got distracted for most of the ensuing year by biochemistry and a little botany.

There were a few points of progress during the year – such as acquiring some new tools: cnc router, cnc leather cutter, shear-roll-brake tool. But all in all, thoughts of moving toward production were put on hold.

And, there was (? is, i guess) that pandemic thing - which kicked off an interest in mycology and, more recently and more passionately (i.e. spending a lot of time), in virology. So much to learn – always a click away. i am amazed by the internet every day – answering every question i throw at it, sometimes correctly.

By the end of August 2020, the GCODE for the cube and cover had been created and verified. Four faces of the cube, front and back of the cover. Then i started getting ideas – things that were impossible to mill by hand, but (conceptually) trivial with a cnc router. Like: a bottom cover that is cut from the cube stock, so the grain of the cover matches the grain of the cube. Like: a wood bezel to replace the plastic case of the BBQ thermometer, also cut from the cube stock so the grain matches. Plus, total control of the diameter of the cutout for the pcb (and cover), to accommodate the actual pcb diameter of +/- 0.01” on the nominal 1.7500” diameter requested. And now that is all done.

All this crap about the cover may seem trivial, but it eliminates a vendor (1.75” dowel supplier - with another uncontrollable size tolerance – didn’t want to get a lathe and do that additional woodworking myself) and provides a more aesthetic presentation, imho.

i have only played with the cnc leather cutter a little bit – can’t really say much more about it at this time, except it appears to be perfect for this task. It can cut the seven 1/16” thick matte board panels and the ten 1.5 mm thick (2 oz) leather cover pieces no sweat(shop). The leather case adds so much to the design and function – happy to see this might actually become real.

So, the main effort this February was to develop a GCODE generator specific for my manufacturing task, with 5 cubes and 5 covers mounted at a time. This maximizes milling per tool change, which operation takes several minutes. Using two router bits, plus a 1/16” drill bit (PIC programming port access) and a 60deg engraving tool (text on cover).

The plan is to have the router bounce between cubes and covers, rotating cubes when covers are milled, and flipping cover when cubes are being milled. At least that’s the plan. Each milling operation per face is only taking several minutes – still thinking 10 to 20 cubes per day is possible. And very easy to scale-up with more machines if needed.

And I got the GCODE generator done about a week ago. Using Excel, with a standardized sheet layout for each of the surfaces to be milled with specifications for the type of cuts, choosing from:
  • boss – round,
  • boss – rectangular,
  • hole – round,
  • hole – rectangular,
  • pocket – rectangular,
  • tap,
  • drill,
  • countersink
and the positions and dimensions.

Other sheets have specs for the four tools, offset locations for the 5 pieces in a line, and templates with boilerplate GCODE – feeds and speeds, parking the tool, etc.

And there are VB subroutines to generate the actual GCODE and output as a .ncc file for the cnc router controller.

i avoided doing this for most of the year, but in the end there was just no getting around it. GWizard took me far enough to create and test some GCODE but is far too cumbersome for small changes of position and size.

Now i just need to calibrate the position of 5 cubes and 5 covers … which is delayed due to the cold weather and an unheated workshop. At 73, cold slows me down ... i can find other things to do in the heated spaces.

But! Spring is coming. Wednesday will be in the high 50s … i will drag out the table saw and start some serious woodworking. Most likely.

Onward to 20 cubes!
 

chillmike

Well-Known Member
well, that's a problem as we roll into 2021, what with the new law prohibiting sale of vaporizers - or rather, regulating them out of existence for the small maker (me). looks like it will have to be purchased from a retailer. if and when.

after a december sales rush in my real world business i am finally getting back into the GCODE. it is always a struggle to switch mindsets between the projects in my life. and then there are the distractions: i.e. covid-19. i have been spending many hours studying the mRNA vaccine and the immune system ... just found a Dutch programmer's blog about reverse engineering the BioNTech vaccine - breaking it all down in computer programming terms ... can be very distracting.

anyway, i am working on a final piece of the maker puzzle. it dawned on me recently that the plastic bezel of the BBQ thermometer (which i hate and have hated from the beginning) can be replaced by a CNC Router version in cherry (which i love!!!) - where the grain of the wood will match the grain of the cube face around it. same idea as the bottom cover matching the grain of the cube bottom.

so, investing some time in a GCODE generator (Excel VB) to allow minor adjustments without the pain of my current tool. tomorrow!!! first prototype. maybe.

about the last thing i did (back in August) before getting diverted by work (spouse had a new book come out and that required updating the website, which required updating the programming tools for Windows 10 to get off Windows 7) and more recently covid, in order to get the cnc router in production mode is installing two 5-piece jigs so i can load 5 covers and 5 cubes at one time. parameterized the GCODE to do 5 cubes/covers to minimize tool changes. a little hard to see without the covers/cubes loaded, but there are vertical metal strips to align the pieces for milling.

cover jig:
picture.php


cube jig:
picture.php


so TL;DR - no pre-orders yet.
I hope you do realize, that the vape ban only affects concentrate vapes. Dry herb vaporizers are safe from the law. You can even read the act itself, as it only refers to vapes that can vape liquids or concentrates. So yours would be safe...

Here's a link that talks about companies banding together to create a shipping company that will verify the age of the recipients, since USPS, Fedex, and UPS refuse to:


Quoted from the beginning of the article:

"The definition of products covered by the law is so broad that it captures not just nicotine vaping devices and e-liquid, but anything that can be used to vape any liquid- or oil-based substance (and the substances themselves)."
 
Last edited:

chillmike

Well-Known Member
I like it! I hope that is indeed correct, and that this whole vape mail ban ends up being less of a big deal then it could be (depending on how it is interpreted and implemented)

Here's a little tease that what I said is correct, getting worked out hopefully, and even heard that the government was postponing it as well due to the confusion of what it's supposed to affect.... So it's looking brighter and brighter.....


Jason Mendoza

Well-Known Member
Here's a little tease that what I said is correct, getting worked out hopefully, and even heard that the government was postponing it as well due to the confusion of what it's supposed to affect.... So it's looking brighter and brighter.....

I saw that and thought of callous the whole thing is to those that couldn't make it this far. Everyone else was hit too. I wish the industry would sue the government and win. There should be a penalty for their (govt's) ignorance. Did they procrastinate reading about the industry until the last day? Seriously!
 
Jason Mendoza,

howie105

Well-Known Member
I saw that and thought of callous the whole thing is to those that couldn't make it this far. Everyone else was hit too. I wish the industry would sue the government and win. There should be a penalty for their (govt's) ignorance. Did they procrastinate reading about the industry until the last day? Seriously!
Yhea, who put those clowns in charge?..... Never mind.
 

Hippie Dickie

The Herbal Cube
Manufacturer
June 23, 2021 ... i remember it like it was just yesterday ... sitting on the balcony at 3:30 pm, a wednesday, vaping - no orders pending - pandemic business has been shit, as for everyone. being high, i look at the few clouds in the sky - a fucking beautiful day - and thought to myself (my first mistake of the day) i should work in the shop for just an hour, so as to not waste the day and perhaps roll the stone a little higher up the hill ... if i had only known ...

see, i need a jointer-planer (actually a thicknesser) to really get the cubes cut to put into the cnc router. alas, all i have in the shop for sizing the cherry sticks (2.5" x 2.75" x 14") into 2x2x2 cubes is a table saw - inherited from my dad 30 years ago (and it was 40 years old then), and a quick test, even with a sharp blade, showed it just cant rip the cherry sticks; and i have a very nice chop saw, barely used, just sitting around from when we built this house in 1997, also with sharp blades; and a drill press.

so using the chop saw, i start cutting the cherry stick down into 2.5" lengths, which i then have to face to get a reasonable sandable cube from the rough cherry stick (no sides faced from the lumber supplier).

so i notice a problem right away ... the table of the chop saw has a recessed plastic insert around the blade, so the cube can not sit square to the blade. no problemo i'm thinking (my second mistake in this event) ... i have plenty of shim stock (can you see where this is going?) with all the 0.0125" thick stainless steel sheet i have for the cube and case components ... so cut a 1/2" wide strip, pop a couple of holes for the mounting screws, and the chop saw table will be level ... easy peasy (not!).

the first warning was when i took the 1/4" drill bit out of the tray and i thought to myself "this is a dull bit" ... the second warning was the slight tug as the drill penetrated the strip for the first hole ... silly me, i just whip the strip around and start the second and final hole ... at which point the drill bit seized the strip, and the drill press wrapped it around the bit, slicing through my three middle fingers on my left hand on the way to wrapping the bit.

well, that was a surprise! - lots of blood, i mean lots of blood, but thankfully the strip didn't sever the finger bones - i always have h2o2 in the shop cause i seem to cut myself all the fucking time - drown the fingers with h2o2 (blood spots still on the concrete floor as a reminder of my error(s)) - dash upstairs to the mens room trying not to get (much) blood on the rugs or wood floor (mostly successful with this) - tape the wound together enough to get in the car and drive to urgent care (i was alone - spouse had spent the night in the city with a friend) - they took one look and sent me to ER at hospital 20 miles away, too damaged for them, but at least they got the wound stable.

and by 8:30 that night, the NP had sutured the three fingers - fascinating to watch how he did that, by the way, and i do feel a little more emboldened by seeing how to do it properly: lidocaine, rubber band tourniquet, silk thread, small needle, 10 stitches across the three fingers. his digging around and examining revealed a lacerated (severed) tendon in the middle finger.

so immediate visit to the local hand guy, who sent me on to Curtis hand clinic in Baltimore - best in the business - but by now it is exactly 3 week post accident, so restoring the flexor tendon would be really involved - 12 week recovery and lots of physical therapy. one thing i learned during this 3 weeks, is it took about 10 days for my hand to be waterproof again, and in my mind having a waterproof hand is more important than bending the tip of my middle finger 20 degrees.

so, pass on the restoration, and i have a permanently extended middle finger (extensor tendon still works fine) - given what i see happening in my day to day reality, this could be very useful. one good thing is the damage to the hand does not impede strength training - push ups, pull ups, bowflex - no problem.

so i need to outsource the cube prep to somebody with the right tools. there are plenty of peeps around here who can do this.

the ultimate lesson here, is that i can't switch from digital (designing) to analog (shop work) in an hour (not as smart as he thinks he is, eh?)

as a result, i started taking an in depth look at the feasibility of making the case. dusted off the Cricut Maker (mentioned several posts back) and started learning how to use the design space software. cloud based, which i really like, cause i can work on any of my PCs.

tried some simple cuts to get the hang of the cutter and the software and finally added markings and notches and cutouts where i can cut all the matte board, vinyl, double sided tape, lamination panels, and leather by machine - look ma, no hand cutting (ouch, what a pun).

so here is how to make Case v46.15 ... ...

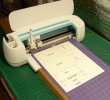
here is the Cricut Maker after marking and cutting the matte board panels for the shell of the case - the white piece is 10" x 14", laminated on the bottom side to adhere to the purple carrier mat. took about 20 minutes to mark and cut:

case46-fork-1.jpg


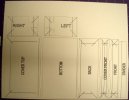
here is a closeup of the marks and cuts:

case46-fork-2.jpg

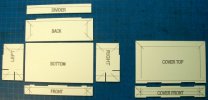
these pieces need just a bit of matte knife on the inside corners of the cuts to separate into the individual panel pieces:

case46-fork-3.jpg

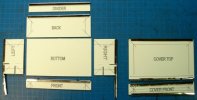
a case made of these panels would have no rigidity, and damn it, i like rigidity (see above tale about my middle finger), so i make edge stiffeners from that 0.012" thick stainless steel sheet. here they are in proper position:

case46-fork-4.jpg

(the left and right stiffeners still need to be bent 90 deg.)

but the Cricut also can cut lamination panels - to keep the matte board panels from delaminating when attaching the leather, atp (adhesive transfer paper) panels - to attach the leather coverings, and vinyl panels to cover the outside of the matte board to cover the seams that would otherwise be visible, and felt, when handling the finished case.

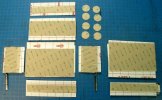
may be hard to see, but this shows the lamination panel, atp, and vinyl associated with their matte board panel. the 8 discs are 26 mm circles of atp to place on the ends of the two batteries to attach the leather that wraps the power pack (2 power packs per vaporizer).

case46-fork-5.jpg


as usual, i am iterating my way to the final perfection - which means i am burning through a lot of leather right now, which gets expensive. the green case just wasn't sized quite right, the next one, in blue, also has some problems. i will try cutting the leather for the black case tomorrow and see it the adjustments are correct now.

more details to follow ...
 

KeroZen

Chronic vapaholic
Oh man! Sorry to hear that, you must have had some good quality crappy time! :x

Thankfully the end is not too bad considering what I expected to read when you started talking about a table saw...
 

el sargantano

Well-Known Member
Oh man hope you the best!
IMHO don't hesitate to work a proper recovery and keep one (the biggest one) carpet drop as future reminder.
Thanks for never giving up, and improve itertion after iteration, as a fcbuster I starred this post from my first times here. Then you were already a legend of an unreleased magic vape, great to see your progress!
 

Hippie Dickie

The Herbal Cube
Manufacturer
here it is, finally, the unobtainium ...

side view:

end view:

i set a goal of creating an easy way to form the case stiffener on jan 17. two nights ago i succeeded.

i created a forming tool using my 8" desktop brake-shear-roller:

and i used my CNC router to cut a slit in a piece of 1/4" thick aluminum bar stock - which i bought about 15 years ago for exactly this purpose (or so it seems now).

and when inserted into the brake, allows creating the U-channel piece from 0.012" stainless steel strip that is 1/2" wide by 6" long, with one crank of the handle. pure nirvana.

each case needs 10 of these. it was taking several minutes to form each one, and there were usually "issues". now it takes just seconds per piece, and the slots in the aluminum bar are positioned to make placing the bar into the brake reliably accurate.

now i just need to find someone to cut the cubes. i have the damaged hand to prove to myself that this is not a task i can just pickup and do. and i don't have the tools to do more than a couple anyway.

now that i have the case figured out it is definitely time to get serious. if the vape didn't work so damn well, i would have dropped this project a decade ago.

tl;dr - still at it ... making some progress ... February, hell yeah!!!

ps: can't seem to paste the image, just the link.
 
Last edited:

ACE OF VAPE

Vape outside the box
Manufacturer
June 23, 2021 ... i remember it like it was just yesterday ... sitting on the balcony at 3:30 pm, a wednesday, vaping - no orders pending - pandemic business has been shit, as for everyone. being high, i look at the few clouds in the sky - a fucking beautiful day - and thought to myself (my first mistake of the day) i should work in the shop for just an hour, so as to not waste the day and perhaps roll the stone a little higher up the hill ... if i had only known ...

see, i need a jointer-planer (actually a thicknesser) to really get the cubes cut to put into the cnc router. alas, all i have in the shop for sizing the cherry sticks (2.5" x 2.75" x 14") into 2x2x2 cubes is a table saw - inherited from my dad 30 years ago (and it was 40 years old then), and a quick test, even with a sharp blade, showed it just cant rip the cherry sticks; and i have a very nice chop saw, barely used, just sitting around from when we built this house in 1997, also with sharp blades; and a drill press.

so using the chop saw, i start cutting the cherry stick down into 2.5" lengths, which i then have to face to get a reasonable sandable cube from the rough cherry stick (no sides faced from the lumber supplier).

so i notice a problem right away ... the table of the chop saw has a recessed plastic insert around the blade, so the cube can not sit square to the blade. no problemo i'm thinking (my second mistake in this event) ... i have plenty of shim stock (can you see where this is going?) with all the 0.0125" thick stainless steel sheet i have for the cube and case components ... so cut a 1/2" wide strip, pop a couple of holes for the mounting screws, and the chop saw table will be level ... easy peasy (not!).

the first warning was when i took the 1/4" drill bit out of the tray and i thought to myself "this is a dull bit" ... the second warning was the slight tug as the drill penetrated the strip for the first hole ... silly me, i just whip the strip around and start the second and final hole ... at which point the drill bit seized the strip, and the drill press wrapped it around the bit, slicing through my three middle fingers on my left hand on the way to wrapping the bit.

well, that was a surprise! - lots of blood, i mean lots of blood, but thankfully the strip didn't sever the finger bones - i always have h2o2 in the shop cause i seem to cut myself all the fucking time - drown the fingers with h2o2 (blood spots still on the concrete floor as a reminder of my error(s)) - dash upstairs to the mens room trying not to get (much) blood on the rugs or wood floor (mostly successful with this) - tape the wound together enough to get in the car and drive to urgent care (i was alone - spouse had spent the night in the city with a friend) - they took one look and sent me to ER at hospital 20 miles away, too damaged for them, but at least they got the wound stable.

and by 8:30 that night, the NP had sutured the three fingers - fascinating to watch how he did that, by the way, and i do feel a little more emboldened by seeing how to do it properly: lidocaine, rubber band tourniquet, silk thread, small needle, 10 stitches across the three fingers. his digging around and examining revealed a lacerated (severed) tendon in the middle finger.

so immediate visit to the local hand guy, who sent me on to Curtis hand clinic in Baltimore - best in the business - but by now it is exactly 3 week post accident, so restoring the flexor tendon would be really involved - 12 week recovery and lots of physical therapy. one thing i learned during this 3 weeks, is it took about 10 days for my hand to be waterproof again, and in my mind having a waterproof hand is more important than bending the tip of my middle finger 20 degrees.

so, pass on the restoration, and i have a permanently extended middle finger (extensor tendon still works fine) - given what i see happening in my day to day reality, this could be very useful. one good thing is the damage to the hand does not impede strength training - push ups, pull ups, bowflex - no problem.

so i need to outsource the cube prep to somebody with the right tools. there are plenty of peeps around here who can do this.

the ultimate lesson here, is that i can't switch from digital (designing) to analog (shop work) in an hour (not as smart as he thinks he is, eh?)

as a result, i started taking an in depth look at the feasibility of making the case. dusted off the Cricut Maker (mentioned several posts back) and started learning how to use the design space software. cloud based, which i really like, cause i can work on any of my PCs.

tried some simple cuts to get the hang of the cutter and the software and finally added markings and notches and cutouts where i can cut all the matte board, vinyl, double sided tape, lamination panels, and leather by machine - look ma, no hand cutting (ouch, what a pun).

so here is how to make Case v46.15 ... ...

here is the Cricut Maker after marking and cutting the matte board panels for the shell of the case - the white piece is 10" x 14", laminated on the bottom side to adhere to the purple carrier mat. took about 20 minutes to mark and cut:

View attachment 13791


here is a closeup of the marks and cuts:

View attachment 13793

these pieces need just a bit of matte knife on the inside corners of the cuts to separate into the individual panel pieces:

View attachment 13794

a case made of these panels would have no rigidity, and damn it, i like rigidity (see above tale about my middle finger), so i make edge stiffeners from that 0.012" thick stainless steel sheet. here they are in proper position:

View attachment 13795

(the left and right stiffeners still need to be bent 90 deg.)

but the Cricut also can cut lamination panels - to keep the matte board panels from delaminating when attaching the leather, atp (adhesive transfer paper) panels - to attach the leather coverings, and vinyl panels to cover the outside of the matte board to cover the seams that would otherwise be visible, and felt, when handling the finished case.

may be hard to see, but this shows the lamination panel, atp, and vinyl associated with their matte board panel. the 8 discs are 26 mm circles of atp to place on the ends of the two batteries to attach the leather that wraps the power pack (2 power packs per vaporizer).

View attachment 13796


as usual, i am iterating my way to the final perfection - which means i am burning through a lot of leather right now, which gets expensive. the green case just wasn't sized quite right, the next one, in blue, also has some problems. i will try cutting the leather for the black case tomorrow and see it the adjustments are correct now.

more details to follow ...
If you want me to put your case on my cnc router Or laser cutter, and make you some samples, send me some drawings and I'll see what I can do.
 

Hippie Dickie

The Herbal Cube
Manufacturer
If you want me to put your case on my cnc router Or laser cutter, and make you some samples, send me some drawings and I'll see what I can do.
i appreciate the offer. the case is leather covering matte board. i use a Cricut Maker to cut all the leather and matte board pieces. i use my cnc router to mill four faces of the cube, both sides of the cover, and the inside of the front bezel. so i think i have it covered - except for cutting the 2" cherry cubes.
 
Top Bottom