The Bud Toaster - (currently: Model 14, version 3)

Stonesy

Member
Hey Hippie Dickie, really lovin your creation here man!
I'm thinking of ordering a few a123 batteries to play around with, but I'm not sure which kind of charger I will need for them. Any tips / recommendations for what I should be looking for? I was thinking of picking up an Imax b6 charger, but I'm not sure if it will work well or will even be compatible with the batteries. Sorry if this has been asked before by the way.

- Stonesy
 
Stonesy,

Hippie Dickie

The Herbal Cube
Manufacturer
@lesvape - a fully charged set of batteries lasts 8 to 9 sessions, each session is 7.5 minutes -- 30 seconds to go from room temp to 390F, and 7 minutes of vapor production. 5 minutes into the session is about the right time to stir the vial to restore the vapor cloud density. After 7 minutes there really isn't anything left of the trichomes.

i find one set of batteries lasts a couple of days. i have a fast charger (major advantage of this battery LiFePO4 chemistry) and the pair is recharged in about 40 minutes. With a couple of packs, i only recharge batteries once a week or so.

@Stonesy -- DANGER WILL ROBINSON! DANGER WILL ROBINSON! i don't know the Imax b6 charger but a very quick Google says that charger is for Lipo only, NOT LiFePO4. There is a very specific recharge protocol that the charger MUST execute: Constant Current, Constant Voltage (CCCV) -- along with voltage and current constraints. Don't try to save pennies. Get a good, high current, charger (6 to 10 amp) to go with the A123Systems batteries. Check radio control hobby websites. My first one was $50 and i had to cobble together a 12vdc power supply (which i happen to have some on hand) to drive it. Well worth the cost and effort to get a 20 minute battery recharge.
 
Hippie Dickie,

Hippie Dickie

The Herbal Cube
Manufacturer
Thanks ... it's always nice to see the thread surface every now and then.

i think i'm going to lose February to a major infrastructure redesign. See, i was awakened at 3:15 am on 2/2 by the blare of the battery backup on the gf's computer (in the bedroom). Neither my favorite sound, nor my favorite time of day to get out of the fucking bed.

Now, the most recent new infrastructure addition was a sufficiently potent UPS for my business -- nice new APC 2000 Watt (can easily supply 3000 watt for extended periods) fed by two extra heavy duty RV batteries. So i have ample time to deal with power out in the house before getting dressed and going down to the basement office. (But not enough time to hit the snooze alarm.)

So i gracefully shut down all the computers on the network and go back to bed. i did think to check and both the land line and the ComCast internet were also out. Somebody must have clipped a pole out on the highway. We're still waiting for the local newspaper to report the event.

Then later that morning, when i finally got up to get to work, my main PC workstation wouldn't start up. Couldn't get past the POST -- CPU was detected as being overclocked so the system wouldn't boot. Totally bogus message. Actually, either the Pentium 4 is fried or the motherboard is fried. Or, just maybe the power supply was fried.

So i've been going through the seven stages of grief of losing my best bud, my 6 year old PC. Part of the denial phase was just being so totally sure that the power supply was pooched and dashing over to Staples to get a nice Antec 450w ATX -- but that had no effect. At least i've got a nice new ATX power supply.

i've been preparing for this day, trying to think through how i would eventually upgrade the business network and PCs. Now it is thrust upon me to actually execute on a plan. What plan?

Oh, well, why not.

So i'm also taking this opportunity (?) to upgrade my server from SBS2000 to SBS2010 Standard. This is going to work out pretty sweet -- i can use enough of the dead PC (and other spare parts) to only need to add a CPU, MB and 16GB of RAM -- about $400 is all it will take to get a rocking i5 quad core server.

So, like i say, i think i'm going to lose much of February to a computer adventure game (so to speak)...

Although i do have a fresh idea for version 2 of the battery sled. i've got an idea that will work, that i can manufacture and that will be aesthetically acceptable.
 
Hippie Dickie,

sublimeluvr

Well-Known Member
I look forward to seeing the bud toaster evolve :smoke:

Also it sounds like quite a mess with the computer. My condolences for the loss of your dear friend
 
sublimeluvr,
@Hippie Dickie
How long did it take you to make the blueprints for this Toaster? I am really amazed by it and will be willing to buy one or the blueprints, but I'm not good at building things
 
GrimR33f3r,

Hippie Dickie

The Herbal Cube
Manufacturer
@sublime - thank you for your condolences. its been a very carthartic experience. of course, the upside is a lot of new, super faster and pretty, new pcs. screens are finally as big as they should be (1920x1080). the development PC i got in June is an HP All-In-One and i really like it. Processing tasks that used to take 30 seconds are done in 5 seconds. Every fucking time i upgrade my system i realize i should have done it years earlier, but the process is just so traumatic -- why fuck around with a system that is working.

Anyway, getting that power supply and being so sure it would work again, and then not -- that forced me to action. i'll have the replacement PC next week or so -- the server is going to take a bit more study -- the motherboard i picked may not support SBS2011 -- i'm like, wtf? it's always something.

@Grim - sorry, the Bud Toaster is not for sale yet. And this thread is the best blueprint you could have. It has all you need to know, and what does and what doesn't work.
 
Hippie Dickie,
  • Like
Reactions: cycleb

VWFringe

Naruto Fan
be curious to hear what you think about the SharePoint piece if you go microsoft - it allows you to build out sites and applications that can be accessed from the web (collaboration or publishing to people inside or outside your business)
 
VWFringe,

Hippie Dickie

The Herbal Cube
Manufacturer
i've been microsoft all the way -- ever since Apple dumped the Apple ][. i've only looked at SharePoint very briefly. my business is very small: me, my gf, and my 8 computers. Outlook handles all the collaboration we need so far. my website is my public facing retail operation.

last two days i've been studying the Virtual PC stuff under Win7. i think i can build a very robust/non-stop infrastructure using that -- along with Acronis to create the restore-to-virtual images.
 
Hippie Dickie,

tintest

Member
Hi Hippie
I was looking over your design and I am amazed! What a great job, I have an idea for you. Along time ago I used to use a home made vaporizer. I made it out of a test tube and a piece of glass tube. Think this might work on your system with little modification. Heres a pic. The air goes in through a hole in the grommet at the top of the vaporizer the air travels down the side of the stem to the bottom where I used to heat it with a three headed torch lighter. You can use your toaster. The whole bowl and stem are removed from the heating source. Nothing but nice clean air in the vapor stream. I used to hold it like a cigar; you have to watch the end like a lit cigar. My stem now is broken havent used it in a while.
You can see it got used. I put a screen at the end loaded it like the solo stem and heated the outside till I saw vapor form in the draw tube. I stopped using this system because I was constantly having to buy and refill my lighter sometimes twice a night. But you solved that probem.

DSC05451.jpg

DSC05450.jpg

DSC05449.jpg

DSC05448.jpg

DSC05447.jpg
 
tintest,

Hippie Dickie

The Herbal Cube
Manufacturer
Thank-you for your suggestion.

i have an all glass system that i standardized on about 7 years ago that works just fine with the toaster. A flat bottom vial has holes drilled in the bottom end. The test tube used as the inhale stem is also drilled in the end. i use a 0.75mm diamond drill bit. So no metal screen is required.

i did try having a long tube inserted into the oven but i kept knocking it over and breaking it. i finally decided all glass should fall away clear. i may drop it and break it but at least i can't knock it over.

i tried a test tube instead of the flat bottom vial. but it just didn't produce any vapor - it needs the 1/8" air gap under the herb vial - as you discovered with your ss disc in your solo.
 
Hippie Dickie,

tintest

Member
Hippie Dickie said:
Thank-you for your suggestion.

i have an all glass system that i standardized on about 7 years ago that works just fine with the toaster. A flat bottom vial has holes drilled in the bottom end. The test tube used as the inhale stem is also drilled in the end. i use a 0.75mm diamond drill bit. So no metal screen is required.

i did try having a long tube inserted into the oven but i kept knocking it over and breaking it. i finally decided all glass should fall away clear. i may drop it and break it but at least i can't knock it over.

i tried a test tube instead of the flat bottom vial. but it just didn't produce any vapor - it needs the 1/8" air gap under the herb vial - as you discovered with your ss disc in your solo.

I understand about the breakage, you can see mine is broken. I used Pyrex just like you. Im not trying to change your mind brother, you have been doing great. My suggestion is just that a suggestion. That being said what if you were to make your unit a holder/heater/base where you would insert the glass unit I used. Not trying to horn in thats why I posted pictures so you would be able to pursue and evolve. Think about it.. If you loaded a stem like a solo. Glass filter and all (4 hole or 2 hole) heck use theres put that into a Pyrex test tube glass on glass fresh air vapor stream. Then you insert this glass unit in the toaster. Heat to a temp that composites for the fact that the unit would be leaving the toaster to be enjoyed and even passed around like a cigar. I know the Pyrex glass holds the heat. I used to heat once and hit 3 to 4 times before I had to re heat. When the vapor stops put it back in the toaster until its gone. Just a thought.
I think of these things when Im medicated. :cool:
 
tintest,

Hippie Dickie

The Herbal Cube
Manufacturer
The insert-heat-remove-toke, is what i plan for using concentrates. i have a special 12mm tube that has a 1/4" hole in the side for inserting the concentrates rather than the drilled holes in the bottom. However i am greatly concerned about contact burns with the 400F glassware -- i'm thinking about a retractable heat shield that automatically retracts when inserted into the oven tube and springs into place as protection when removed from the oven.

That being said, i'm still wary about breaking glassware that sticks up above the cube. Fortunately the borosilicate glassware is very inexpensive -- $0.25 each or so.

It's not so much about changing my mind so much as changing the design so late into the "almost ready for production". If i don't freeze the design at some point it will NEVER be done (kind of like my software).

i do think this is just the first of a long line of designs -- my Apple 1.0, so to speak. Now that i've figured out temperature control the sky is the limit.
 
Hippie Dickie,

tintest

Member
Hippie Dickie said:
The insert-heat-remove-toke, is what i plan for using concentrates. i have a special 12mm tube that has a 1/4" hole in the side for inserting the concentrates rather than the drilled holes in the bottom. However i am greatly concerned about contact burns with the 400F glassware -- i'm thinking about a retractable heat shield that automatically retracts when inserted into the oven tube and springs into place as protection when removed from the oven.

That being said, i'm still wary about breaking glassware that sticks up above the cube. Fortunately the borosilicate glassware is very inexpensive -- $0.25 each or so.

It's not so much about changing my mind so much as changing the design so late into the "almost ready for production". If i don't freeze the design at some point it will NEVER be done (kind of like my software).

i do think this is just the first of a long line of designs -- my Apple 1.0, so to speak. Now that i've figured out temperature control the sky is the limit.
Youre right the sky is the limit. You could make so many different variations. I see your point on committing to a design. Your design also seems to have an interactive type of appeal. I cant tell you how many times I loaded my solo and let it roast with out even one hit. You wont have that problem with the BT!
Keep on Keeping on!
:D
 
tintest,

yayvape

Member
woah, new forum layout. shiny.

Made some progress on my bud toaster copy, it is now in usable form

I managed to jam the arduino code into a attiny84 (I'm not actually using any of hippies code, nor schematic/PCB design), made a little PCB and a wooden structure to support the heater and heatshield I actually still have 4 spare GPIO pins to play with
Features I have put in so far:
-led to indicate when set temperature is reached, and the vape state of operation, also a red led on the FET output
-auto off after 7min
-low voltage power down (so I don't destroy the batteries by overdrawing the cell voltage below 3V, ie 9V for a 3cell. led flashes at a different rate than for usual timeout)
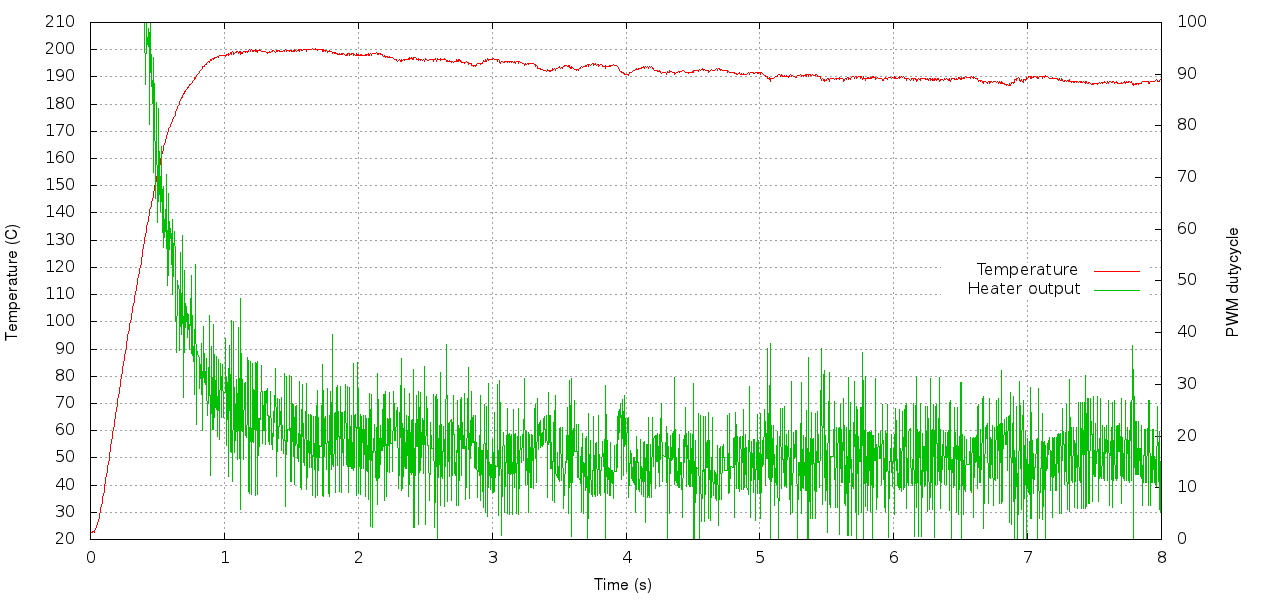
I still want to add temperature adjust buttons (although I wouldn't use it), serial debugging, to graph temperature and power output swings

The PCB was hacked up a bit after the design, I put headers on there so I could easily remove wires to change around the rest of the structure, swapped out a through hole FET with surface mount, just blob soldered on the original pads hehe, works fantastically, about 7A peak from a 3-cell lithium, heats up within about 30sec, seems to do pretty damn well at vaporising. (its the best device I have ever used) and its so easy to use.
anyone reading who cbf building one.. if hippy ever sells them, buy!
lol I'm pretty much reviewing your design

So, I'm happy with it, could look a bit better, and I gotta get that heatshield out of finger-reach. no burns yet. If I was going to make another, I would definitely change some things on the PCB, use SOIC package for the micro instead of that leadless package. I don't want to talk about soldering leadless smd chips haha.

Hippy, I hope you don't mind me sticking this in ur thread, I was tossing up making a new thread but I thought it'd fit in here.

now for some photography (click for big)


Hippie Dickie

The Herbal Cube
Manufacturer
@yayvape - great post, you are certainly welcome to contribute your work to the thread.

we need to do something about getting you some proper glassware ...


On another note ... i'm still digging my way out of the computer hole i fell into on Groundhog day, but some of my stuff is working enough. got bogged down with work and still need to buy a server, but busy is better than not ... at least for a short time.

So i've been messing with the cube. Making it half-round on the back side makes it feel so much better in the hand:

picture.php


picture.php
 
Hippie Dickie,

yayvape

Member
Hippy, I am really liking that shape, what sort of wood is that?

Regarding glassware, I have improved it somewhat since my first post:

For the oven I'm using a 13.8mm ID pyrex vial cut down to about 65mm length
Nichrome winding is 3 parallel windings of 0.5mm which delivers about 75W from a 3cell lipo (about 1.8ohms I think)
I get about 6x7min vape sessions out of a battery before the voltage cutoff kicks in. I can run it off an ATX PC power supply if I need to (7A@12V is easily delivered)
The thermocouple is electrically isolated and held in place using Kapton tape (which is brown to begin with btw) which has held up very well. and does not emit any noticeable smoke (on the outside of the vial anyway)
IMG_20120317_152418.jpg


For the inner vial I'm using an insulin syringe (well cleaned, did not want to try vaping insulin :p) with the rubber end removed, which is perfect size. the bottom hole is small enough that not much falls through (3.5mm) but I have a stainless mesh that goes over the end, this also allows more airflow around the bottom of the vial
IMG_20120317_152643.jpg

For the draw tube, I had some 6.2mm OD tube I cut down to 80mm and melted the ends smooth. Then wrapped with PFTE (Teflon) plumbing tape to have a airtight fit for the inner tube, its shaped to stay seated when not being held, but is short enough to not easily break if dropped.
Teflon pyrolysis is detectable at about 200C and emits significant gases at 250 so I figure its safe at <200, probably not even reaching 150 that high out of the heating chamber
It also has a fine mesh filter in there which does an excellent job.
IMG_20120317_152712.jpg


(For those reading, I am not associated with Hippy Dicky, this is my independant creation and does not represent any product hippy might sell in the future, I say this just to avoid confusion for those who skip to the last page of a thread to see what's happening, which is going to be most people I think)
 
yayvape,

Stu

Maconheiro
Staff member
Cool stuff, yayvape. I love the design. I'm extremely impressed by what you've managed to do on your own, copying a design of an open-source vaporizer that isn't even finished yet! Cool beans.

I'm still waiting for the cube pre-order list, as I will get one.

@Hippie, I kinda prefer the squared off shape of the cube myself. I would hate to see you have to change it's name to "The Rounded-off Cube". I hope you'll do custom orders and let me get an old-school model.

:peace:
 
Stu,

Hippie Dickie

The Herbal Cube
Manufacturer
@yayvape -- be sure to add a digital BBQ thermometer to your vape -- i found one at Target for $11 -- it helps to know what the heater is doing.

The wood for this batch of vapes -- i have 30 cubes in the parts bin -- is Amazonian mahogany. Very nice wood to work with. Not quite as dense as the cherry and maybe more prone to crack if the oven tube touches the wood at the top. i need to make the top hole 1 mm larger and center the oven tube with a stainless steel "washer" so it doesn't touch wood. This will also seal the interior so no herb bits can fall inside -- a two-fer.

@Stu -- i agree with you ... and as an engineer the lines of the cube really appeal to me. i just had this image of a rounded cube and had to try it to see.
 
Hippie Dickie,

yayvape

Member
Hmm I have a few spare pins, might wire up a serial LCD and display the thermocouple temp instead
I also have this tiny bluetooth module which acts as a serial bridge to another device, like a phone. I was thinking of making an android app to control it, now that is a feature no other vape has :D

I had a full arduino board stickytaped to the side of my contraption before I made that PCB, along with an LCD but I found I didnt use it. once the vape is up to temperature you don't really care what its doing (assuming the PID is doing its job, which it seems to be)

I'll do some serial datalogging to see what the temp variances are, more valuable information than watching the temp display in realtime anyway, actually the datalogger I use is written in Processing, which has an android export feature, so I could very easily do control/datalogging/graphing and adjust PID variables from a nice GUI on my phone while I'm using it haha ridiculous
 
yayvape,

Hippie Dickie

The Herbal Cube
Manufacturer
Nice to have that much i/o, my pins are all used ... but i really like having an external independent thermometer anyway. There is a lot going on that is different from what the processor thermocouple can determine. For example, the heat saturation of the glassware and the enclosure is trailing the heater coil temperature. So while the processor thermocouple is the instantaneous temp, the BBQ thermometer is a time averaged temp and (i think) a more accurate measure of what is happening.

Also, i run the batteries until they just can't supply enough current any more, and the dropping temperature display lets me know it is time to swap battery packs. This is not a problem for the batteries because the voltage regulator quits before the batteries can discharge too far.
 
Hippie Dickie,

yayvape

Member
Well I decided to take you up on that, and obtain some actual data.
Used the software serial debug built into the attiny arduino core and GNUplot to do this:
delme.png


It seems that the thermal response is pretty damn slow, either that or the PID is working really well to keep it stable! can't make out any definate tokes there, I decided to do some averaging on the heater output to try and see how much that changes, in response to the differential of temperature:
vape-avgpwm.png

It's pretty easy to see now how the system is responding to tokes, there are a couple of peaks at 4min and 5min that correspond to decreases in temperature. so the thing works well at responding short term, its just a bit of overshoot and long-term temperature that is a worry so maybe need to tweak the integral setting?
current settings are (p,i,d=) 4, 0.1, 5
side-note, I not sure the initial overshoot is actually such a problem, I think it maybe gets things cooking faster since the inner temperature is definitely going to be lagging the outer temp

btw this was with a half-depleted battery
 

Hippie Dickie

The Herbal Cube
Manufacturer
Nice work!

The initial overshoot is something i decided to just live with -- i really like only requiring 30 seconds to reach vape temperature and as you mention it is necessary to heat saturate the structure anyway. i find that i am consistently getting a thick first toke in 90 to 100 seconds after power on.

all-glass, toke-stable vape ... gotta love it!

also, i'm using a 16mm by 6" draw tube these days. it is much cooler than the 12mm by 4" draw tube.
 
Hippie Dickie,

nicus

Member
Hey Hippie!! Its been a few years since I ran across a post of yours. I started watching your stuff back in the Blue LED days. You've come a long way, but it appears you've stayed true to your original concept. A really nice piece of engineering. Great work!

I evolved from the PTC heaters scavenged from glue guns (worked OK but no flexibility in temperature setting) to an all-glass particle-bed heater. The particle bed is about the size of a D cell battery and sits on an electric heating station. The station has two digital thermometers. One upstream and one downstream of the particle bed. I adjust the heat using a simple rheostat so that the upstream temperature is at the desired temperature. When the downstream temperature matches, the bed is at temperature. I can then remove the particle bed from the heater station and it holds its heat for several minutes.

My "whip"was borrowed from your designs and is comprised of a 12mm test tube mouthpiece butted tightly against a 12mm bud vial. Seven 0.75mm holes in the bottoms of each. They are held tightly together using a 1" length of 10mm i.d. silicone tubing slid tightly over their adjacent ends. The tubing is not in the air stream but serves to hold the pieced together for handling as a single assembly. It also allows the pieces to be easily disassembled and reassembled for cleaning and reloading.

To vap, I just hold the whip against the battery size particle bed and inhale. Airflow temperature stays at a constant temperature regardless of draw rate for about a dozen draws which is more than is needed to exhaust the material in the vial and send me toddling off to bed.

The particle bed can also be held against a conventional glass pipe if preferred, but I can't stand the things because they are too hard to clean and they cost a fortune compared with a test tube and vial. Next step is to make it portable.

One comment on your current design. You mention using a 16mm mouthpiece instead of a 12mm tube to get cooler gas? I still use the 12mm tube (more compact and makes interface to the 12mm vial simpler) but have drilled a couple 0.75mm "carburetor" holes in side of the test tube to allow a little fresh air to cool the hot vapor downstream of the bud vial. You can either drill the appropriate area of holes or have multiple holes and hold a finger over some of them to adjust the temperature to a comfortable level.

Stay safe!
 
nicus,
Top Bottom