'The Misty Log' - DIY wooden Log Vaporizer

blokenoname

DIY Log Dabbler 😁🪵💪💨💨💨
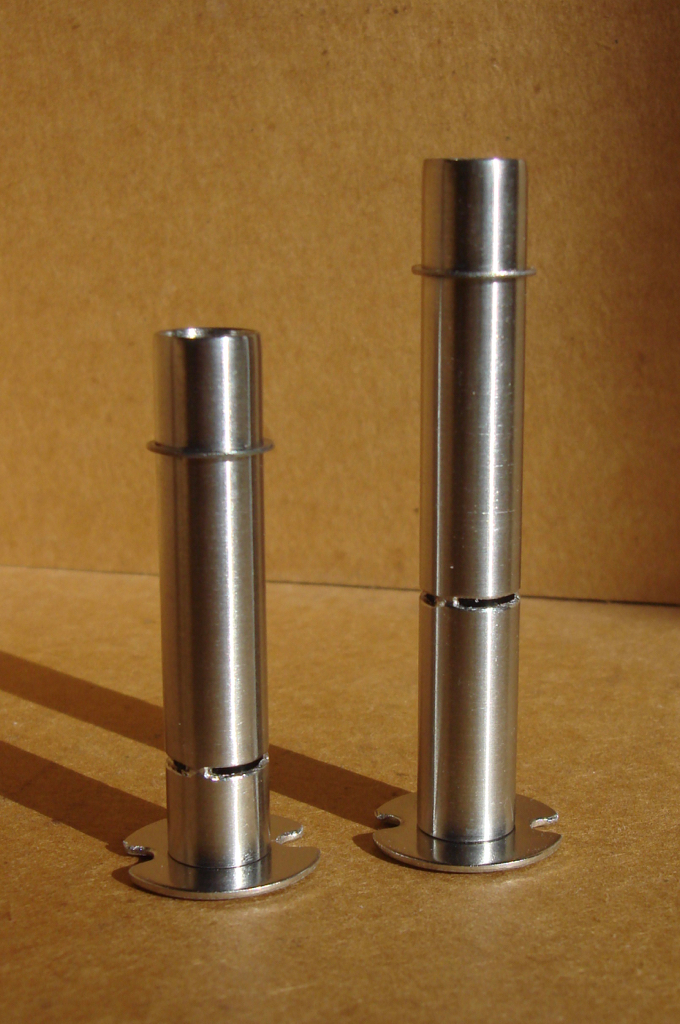
For a long term solution, I'm also looking for a way to fasten ss washers to the ss heating tubes, like you did with your own, so they'll serve as a flange that can be fastened by screws. But still lacking the 'how to', with the tools at hand. Mate of mine offered to weld the washers to the tubes, when he's back from vacation. Are there any other ways, to mechanically fasten the tube to the washer? How do you do it?

Solved.
Slide fitting washer on, grab ss tube directly above the washer with needle nose pliers and give the tube a good squeeze, so that it's slightly bent out of form. 'Sits, fits, wobbles and has space to breathe', as we say here :D

So easy. And now tell me, why I saw this as a problem for months now!? :huh:

Only had a nut at hand, to try this out but works fine. Off to order some washers...

ETA/BTW: Big thanks to @Megaton for inspiration :tup:

2qnaxiu.jpg
 
Last edited:

blokenoname

DIY Log Dabbler 😁🪵💪💨💨💨
@Abysmal Vapor

Thx :) Just had some spontaneous brain storming with @Megaton and this was the result after some detours :D
Also similar to @Alan 's HI sshc. Just wondered, how he fastened the washer to the tube.

Every thread is welcome, to delve a bit deeper into the inner workings of the Woodscents. Missing out on that one, so far. (just started reading its thread here a few days ago). So I'll have a look later on. Thx again :tup:
 

Alan

Master JedHI
Manufacturer
I have been connecting the tube to a washer and fastening it down with screws long before woodscents started doing it. To connect the washer to the tube I machine a small step on the end of the tube that is just wider than the thickness of the washer. The machined portion slides through the washer and stops at the step change in diameter. I flair out the portion that extends through the washer and hammer it down until it locks the washer to the tube. It is a permanent connection. The slots in the tube must be cut after hammering the tube to the washer, otherwise they would get smashed shut. The tube stop ring is a ss retainer clip.

ssheatercovers.jpg
 

blokenoname

DIY Log Dabbler 😁🪵💪💨💨💨
To connect the washer to the tube I machine a small step on the end of the tube that is just wider than the thickness of the washer. The machined portion slides through the washer and stops at the step change in diameter. I flair out the portion that extends through the washer and hammer it down until it locks the washer to the tube. It is a permanent connection
Thanks :) That looks like a solid method to fasten the washers to the tube!

Guess, I also won't be able to exactly replicate that, given the tools and materials at hand. For one thing, I lack the machine, for machining the step :D (apart from a set of files and an old delta sander, that is). And the ss tubing, I use for my heater cover has a thickness of only 0,3 mm, which does not leave much room for a step to begin with.

From your pics and the info you provided in your HI thread, I'd guess your heater cover is made from thicker steel tubing, than mine? 3/8" OD tube that allows for 5/16" tips... that would make its wall thickness about 0,7-0,8 mm maybe?

So I've to improvise a bit, to make it work with my thinner cover. The base of the tube can be easily flared out a bit with some pliers due to the steel being so thin. Then I slid on an M8 DIN 126 washer (ID/OD 9 mm/16 mm) from the top, till it comes to rest on the flare at the bottom. Then I simply squeeze the tube slightly out of shape with the pliers directly above the washer, to block it from moving up again... and finally, the flared out base gets some careful hits with a hammer, making everything sit tight.
With repeated heating and cooling cycles, the heat will also 'bake' washer and tube together, providing additional stability.
Had only a short piece of my 9 mm ss tubing left, but that was enough for proof of concept.

Is there maybe a tool, that would allow me to cut a dimple into the tube from the inside, so that it would form a lib or ledge on the outside? Like my tube cutter does, when I don't cut fully through, just in reverse? That would do away with the squeezing and hammering.


20qe00o.jpg
 
Last edited:

Alan

Master JedHI
Manufacturer
I am not aware of any tool that you use on the inside that allows you to create a ridge on the outside. Maybe something like three tiny ball bearings that will fit inside the tube and then you drive a tapered rod between them which forces them outward to create three dimples.
One thing you could do is create the dimple from the outside and then install a clip to create a stop for the washer. Flare the tube on the bottom to lock it onto the washer. It might allow the heater cover to spin on the washer though.
The first method that I used was to thread the end of the tube and then tap the washer so that it screwed on tightly. I then flared the part that extended through the washer so that it was locked in place. It turned out to be easier for me to just cut the step in the tube. I am using 3/8" OD x 5/16" ID tubing, but it will also work with 7/16" OD x 3/8" ID tubing for a larger heater cover.
If you can just flair out the tube enough where it goes through the washer, you don't need to worry about the washer sliding back up the tube. The washer will be held down with the screws and will be holding the tube down. You can even sandwich the flared part between two washers so that the tube won't dig into the cork. Tube flaring tools are not very expensive and will do a fine job.
Best of luck.
 

Abysmal Vapor

Supersniffer 2000 - robot fart detection device
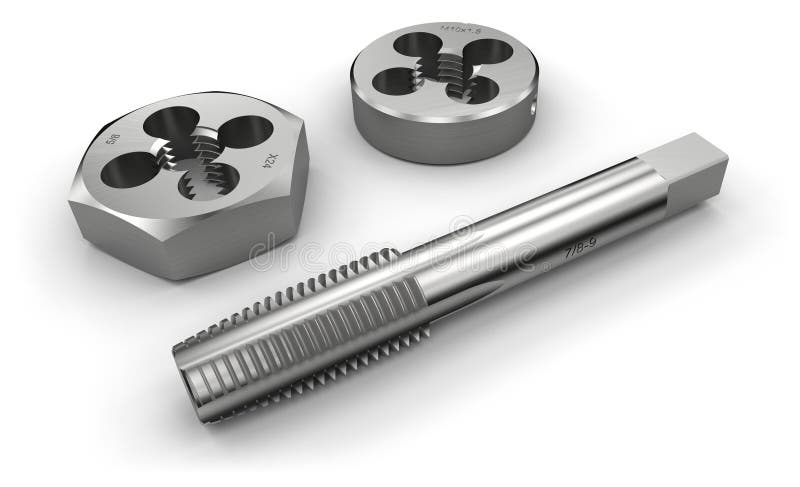
Hmm,i have to ask but i think there was some Tread milling/bohring tool.. It is the hand tool version of a metal lathe instrument ,but i cannot recall its name.. Anyway the idea is to carve a thread at the bottom and screw the washer or the nut.}
Like this one but for metal.
iu

Edited. I think it is this one
thread-cutting-tools-tap-die-isolated-white-32016772.jpg

Maybe even one can add a big disc washer between two nuts,at the bottom :).
I think there was something similar done in my Wychwood ,but instead of making threads to the tube. The maker used threaded tube which had its threads removed on a lathe everywhere but at the bottom .
 
Last edited:

blokenoname

DIY Log Dabbler 😁🪵💪💨💨💨
I am not aware of any tool that you use on the inside that allows you to create a ridge on the outside. Maybe something like three tiny ball bearings that will fit inside the tube and then you drive a tapered rod between them which forces them outward to create three dimples.
One thing you could do is create the dimple from the outside and then install a clip to create a stop for the washer. Flare the tube on the bottom to lock it onto the washer. It might allow the heater cover to spin on the washer though.
The first method that I used was to thread the end of the tube and then tap the washer so that it screwed on tightly. I then flared the part that extended through the washer so that it was locked in place. It turned out to be easier for me to just cut the step in the tube. I am using 3/8" OD x 5/16" ID tubing, but it will also work with 7/16" OD x 3/8" ID tubing for a larger heater cover.
If you can just flair out the tube enough where it goes through the washer, you don't need to worry about the washer sliding back up the tube. The washer will be held down with the screws and will be holding the tube down. You can even sandwich the flared part between two washers so that the tube won't dig into the cork. Tube flaring tools are not very expensive and will do a fine job.
Best of luck.
Thanks again :)

I think both solutions, either flaring the tube at the base and letting the screws and washer hold it in place, or cutting threads and screwing the washer on (or maybe lock it in between two nuts, as @Abysmal Vapor suggested) are worth a try. Thread cutter and a flaring tool come inexpensive enough and will come in handy anyway.
So I can give both solutions a spin and see, what I like best.
 

blokenoname

DIY Log Dabbler 😁🪵💪💨💨💨
Though I will definitively proceed with using stainless steel washers plus screws to fasten the heater cover to the wood or cork base eventually, I've to wait for the thread cutter and flaring tool to arrive first, before I can continue down that road. Also looking for a ss washer, with a bigger outer diameter than the M8 16 mm ones, I've got now. 20 mm would be ideal, I guess.

In the meantime, I also explored further alternatives for fastening the heater cover, which, though I'll probably won't implement them myself, might still be useful for some folks here, when reading this thread and wanting to do their own DIY log:

One alternative I pondered, was using a Teflon washer for a base. I'm aware, that for some folks here the use of PTFE seems quite contentious, but from what I've read so far, it's regarded as quite safe up to 250°C, and even the minimal degradation occurring from >200°C (though also regarded as quite unproblematic for human beings at these low amounts) should be a non issue here, as temps at the base of the heater cover are way below that and also, the washer isn't in the airpath to begin with.
So, as I had a small PTFE rod at hand anyway, I cut a washer from it and gave it a spin.
Had it running for a few hours on full blast now in a resistor Misty unit and there's really no outgassing, odor or freaky taste detectable so far.
Heater cover is a bit flared at the bottom, so it can't slip out of the washer, once it's screwed on.

2a9sd92.jpg
 

blokenoname

DIY Log Dabbler 😁🪵💪💨💨💨
Looks like a boring weekend to come so far. DHL sent notice, that my steel tubing would arrive yesterday, which it of course didn’t. Still lingering in their depot somewhere and hasn’t moved since Wednesday :rolleyes:
New heater cartridges from China are still MIA… might really take until End of August then. Sigh.. :p

Out of frustration re the scarce availability of the 24V/30W Reprap heater cartridges (managed to get only a single one so far and the only way here to get a whole batch for a reasonable price seems via China/Hongkong, which just takes forever), I just ordered a batch of the 24V/40W cartridges (those, and the much too hot running 12V/40W ones -3,6 Ohm(!)- I used before, you can get nearly everywhere and in no time for just two to three EUR a pop).

If I get that Ohm’s Law stuff right, the 24V/40W Repraps should have a resistance around 14,4 Ohm, which makes them a titbit too hot to run at 12V straight from the wall-wart, but at 10-10,5V, they should put out around 7W with that 14,4 Ohm resistance, just like the Ohmite resistor and the 24V/30W cartridge heater do at 12V/19-20 Ohm and given the fact, that both the Ohmite resistor and the three types of Reprap cartridges should all have around the same mass and size, I guess you can use the wattage here for predicting the heat output... and around 7W, is exactly what we want here, to get our ~230°C +/-.

Top to bottom:
Ohmite 20 Ohm resistor
Reprap 24V/30W cartridge
Reprap 24V/40W cartridge (at 10,5V)
11uenv5.jpg


So.. a bit too hot to run without a dimmer/buck maybe, but still not hot enough to accidentally burn down log and home when running at a full 12V. Might make also for a good reserve, when using concentrates. Might really be a pragmatic alternative due to the scarcity of the 24V/30W ones, @RastaVapa recommended. Have to ask him, where he gets his, but wouldn’t like to order via Alibaba.com or something like that, as delivery would probably take as long then anyway.
 
Last edited:

blokenoname

DIY Log Dabbler 😁🪵💪💨💨💨
So... at least the batch of the a bit hotter running 24V/40W/14Ω cartridges already arrived today and as there are still some of the good old maple goblets left, a meter of the now obsolete 11 mm ss tubing and some Arizer Solo glass stems and a GonG (that are now more or less OOS in favor of the smaller DIY glass stems and GonGs for the regular Misty Pine units), let's see, if we can create some easy to make 'Misty Maple' units from that, which will exclusively accept the slide over Solo glass stems/GonGs and maybe DIY ss tips of the same size (11 mm ID), as there are still mates in need of forgoing combustion and getting a nice vape instead :D

244u05k.jpg


BTW: turns out, a flaring tool is really not needed to flare out the heater cover at the bottom. Steel is so thin (0,3 mm), that I can simply cut it with nail clippers and then bend the edges with pliers (will get me one nevertheless, as they're not expensive). Making a dimple where you want to have your bend beforehand, guarantees all the bend pieces are on the same level.

s1umtu.jpg


Cork base will rest snuggly on the three screw at the bottom of the maple wood body, heater cover gets screwed with the teflon washer onto the cork base (will refine that later on with a thinner and wider washer and maybe cover it up with a thin ss sheet layer that keeps an air gap to the hc, just for the looks). Hole for the DC jack, another one at the bottom for setting in and soldering the heater, that then gets plugged up with a cork cap that has a hole for the air inlet and a screen, just like with the regular Pine Mistys...
And maybe I'll also add a thin ss sheet for a 'heat shield', to give it a more Nano like look :D

Nice thing with over-powered heaters is, that they don't care, whatever functionally nonsensical design choices you decide to go with, for your body of choice. Doesn't vape? Just crank up the heat :rofl:

ETA: Yap! I'd say, this is indeed working out as expected with the 24V/40W/14Ω cartridge. Run it with a 12V PS and a VVPS set to 10,5V, or a dimmer set to two to three points below the max, and the 24V/40W/14Ω Repraps make reasonable fine working log heaters too, alongside the 24V/30W/19Ω ones. :)

2lvxyxv.jpg
 
Last edited:

blokenoname

DIY Log Dabbler 😁🪵💪💨💨💨
This little experiment is turning out quite nicely and even better, than expected :)

I'm getting nice vapor at around 11,5V, the heater putting out 8,4W now. A middle brown, even AVB... big hotspot in the middle, but ok... didn't bother with the preliminaries, like putting it on at an angle at first and got directly down to business, or rather onto the heater with the glass stem, so this can easily be avoided :p
Quite some tokes in that big glass bowl, though!

Running it at 11,5V now also means, I can probably run this 24V/40W/14Ohm Reprap cartridge at a full 12V and 9W straight from the wall-wart in the big bore maple wood bodies, as the 2W more the heater provides in comparison to the 20Ohm Ohmite resistor and the 19Ohm Reprap cartridge, make up nicely for the heat loss, due to the wide 4 cm bore and the thinner wooden shell of the maple goblets, I use for bodies here. Nice :clap:

So the leftovers from my batch of maple goblets can still be put to good use with the 14Ohm cartride and besides my regular 'Misty Pine', we've got a 'Misty Maple' now ;pd; :nod:

Update after running some more tests:

Yup, this is working out for the 'Misty Maple' :)
12V straight from the VVPS is already a bit too much though, giving you about 9,2 W and burning the load, so no running directly from the wall wart here, but also posing no danger for burning log and house, should one accidentally do so.

Simply adding a cheapo PWM dimmer to the setup (if there isn't a VVPS at hand) and running from a 12V/2A PS, fixes that though, and gives you a convenient 11,7 V max with 8,75W, and 11,5V with 8,4W is then located at around 8-9 (or roughly a quarter to) on the 1-12 clock face dial of the two different PWM dimmers I ran the tests with. Double checked their output with the VVPS, however accurate that may be, given the pulse modulation of the dimmers.
(10,5V/7W is located between 4-5 on the dial then, BTW).
 
Last edited:

blokenoname

DIY Log Dabbler 😁🪵💪💨💨💨
Finally :clap:

The 24V/30W/19Ω Repraps arrived from Hong Kong :rockon:

So, short nap first, and then we'll do another 'Misty Maple' and see, if they're also up to the task or if I have to keep the hotter 24V/40W/14Ω Reprap as a heater for the wider maple bodies.

ETA: F*ck this shit! Tested three out of ten getting 12 Ohm, not 19! Makes them 24V/50W :cuss::rant:

aeqiop.jpg
 
Last edited:

blokenoname

DIY Log Dabbler 😁🪵💪💨💨💨
Well... always wanted to do a 'closed core' log with a more massive heater core and lots of thermal mass (UD/PD/Zap style), to see how it fares in comparison to the 'open core' logs with the lightweight heater cover and no real thermal mass to speak of, beyond what the tiny heater cover and wooden body itself provide. Used one of the maple goblets as a body again here. Heater is again one of the hotter running 24V/40W/14Ω cartridges, as with the 20Ω standard resistor, we'd probably end up with the classic log's 45 min. heat up time too here... which would be a bit too much retro even for my taste then :p

As I usually come up with ideas like that spontaneously, and then go about it with the materials already at hand to see, if I can make it work in the first place, and only then refine later on with more fitting materials and tools, the result is a bit of an idiosyncratic design for the heat exchanger/core, but the (thirty or so ) tiny 16 mm ss washers I had ready and stacked onto the 9 mm heater tube felt a bit forlorn within the wide 40 mm centre bore and didn't add too much mass to begin with. So the massive brass connector for garden hoses I found in a drawer came in right handy (temporarily at least, 'til I can get some bigger ss washers and throw the brass sleeve out again), as it slipped neatly over the narrow ss washer battery, to add its mass and highly conductive properties (109 W/(mk) compared to 16 W/(mk) for stainless steel).


2hmnhg9.jpg


Heat exchanger follows the accustomed principle: ambient air entering through the slits in the bigger star washer on top of the core, then gets sucked through slits at the top of the heavy brass sleeve, travels down the narrow air gap between the inner wall of the brass sleeve and the battery of ss washers stacked onto the heater tube, enters said heater tube through another set of slits at its base, makes 180° turn then and travels up again past the heater cartridge, finally hitting the load.
Bottom of the unit is sealed hermetically, so that airflow is by way from entering at the top and through the core only, and then going back out through the inner heating tube.

How everything fits together, you can see on the pics. Actually cut a bigger DIY ss washer first from some ss sheeting, to set on top of the teflon washer supporting the inner heater tube at its base, but then forgot all about it, till it was too late and I had already fixated the battery of 16 mm washers with retaining clips, that were a PITA to install. Teflon washer itself is doing fine so far though (and are also doing fine in three other units, where I had them installed two weeks ago, not even showing a hint of degradation) and I'll recheck on this after I've run the new unit for 24h. But really doubt, that even with this massive core the temps at its base will reach 200°C. Log is nice and warm at the top and midsection, but only lukewarm to the touch at its base.

Results:

Fired up the new closed core Misty with 13V at a whopping 11W output, to reduce heat up time and then dialed back to 10,5V after maybe ten minutes or so, which gives me the ~7W output, the 20Ω standard resistor produces at 12V. Had two quite nice dry seshes with stem and ss tips at this setting. Nicely dense clouds, smooth vapor & draw and an evenly extracted (dark) brown AVB im both cases. And you can still crank up the dial another 1,5V, running from a standard 12V PS, if need be :)
 

blokenoname

DIY Log Dabbler 😁🪵💪💨💨💨
@KeroZen

Thanks mate :)
Re the brass... yes. Let me quote myself:

So the massive brass connector for garden hoses I found in a drawer came in right handy (temporarily at least, 'til I can get some bigger ss washers and throw the brass sleeve out again),

:)

Thing is, since the only hardware store in the village closed down, even getting something as simple, as a pack of bigger ss washers requires ordering via the internet now. Just need to find washers with a better fitting size, like maybe 30 mm OD and something between 9-12 mm ID, and the brass can go out immediately.
 
Last edited:
blokenoname,
  • Like
Reactions: KeroZen

blokenoname

DIY Log Dabbler 😁🪵💪💨💨💨
Well, I'm running the Heavy Metal Monster :D for how long as a daily driver now? A week, maybe? Frankly, I do not see much difference, if any, in vape production, heat retention or recovery, to one of my open core, low mass resistor Misties here, running both at the same wattage (~7W) and so probably (or close to) at the same temps. Mainly utilizing the more powerful 10W cartridge heater in the closed core to speed up heat up time, by running it at 12V (or direct from the wall wart) and 9W - 10W for ten minutes, then I've to turn it down to about 10,7V, equalling the 7W of the resistor again, otherwise, I combust.

As I use my logs also for vaping me wild mango pipe tobacco (dedicated stem for that), a given log here sees quite frequent use from waking up till bed time, as you might imagine and as I'm working from home too (with the e-ciggie rarely seeing use when at home now), well. So, none of the logs (open or closed cored) ever gave up on me or got onto its knees, while their maker heavily abused them, chain vaping pipe shag stems :D

Means also, a properly done open, low mass core can, when fully utilizing the narrow air-gap within a not too wide centre bore and conduction brakes for insulation, easily keep up with a closed, high mass core. Where this falls apart, is when the air gap within the bore is too wide, and so loosing its insulating function, and the 7W heater acting more and more like a forlorn heat pipe in the middle of a football field, dissipating all its heat to the thin air :p
Frequently had that when trying to set the 7W resistor into one of the wide rimmed maple goblets, I also use for bodies. There, the high mass heater has the edge, as that massive thermal battery, I created there, easily makes up for the heat loss created by the wider centre bore.
Can also just stuff the good old 7W resistor into the high mass core now (already did, actually, into another body with similar wide bore) and its just working fine... all you've to do is wait at least 1/2 hour for heat-up. Retro Purple Days :lol:
And you actually can do a whole sesh, after you pulled the plug with the high mass one. Tried it :D

With a variety of different wattage heaters at your disposal, the question of high mass vs. low mass heater seems to boil down to a question of aesthetics, mostly, as more heat output solves most heat loss problems anyhow. Though the low mass heater avoiding potential known problems like charring, loosening of the core, wood cracking due to shrinking against unmovable steel, having to use ceramic insulation and so on.
With only one type of heater available, like the classic log vape resistor, I'd guess it's mostly about knowing, which type of core to put in what kind of body. If you go for rather slender bodies with a narrow centre bore, do an open, low mass core. For something heavier, more massive, where you probably also want to make a wider centre bore for proportions sake, go for a high mass heater instead.

My two cents :) :2c:
 

Abysmal Vapor

Supersniffer 2000 - robot fart detection device
@blokenoname You should try adding washers only to the area at the bottom of the heater . That way intake air will be preheated and heat recovery will be probably as quick as with the light core. This was the concept in the OG UD heaters/heatercovers and IMO is the best working log core from all the concepts i've tried. Maybe the only downside is that there is more heat transfer to the wood.
 

blokenoname

DIY Log Dabbler 😁🪵💪💨💨💨
Well... that might prove a bit difficult, with a heater cover only something between 5-6 cm long all across and a heater, that is 2 cm in length ;) As the tips go into the hc a good deal and there still needs to be an internal air gap to the heater, the heater sits pretty deep inside the cover as is and space below the heater is reduced to maybe 1,0 cm max only and then there is another 0,5 mm, already taken up by the teflon washer, which holds the hc in place. Could place maybe two washers there.
Top washer and maybe the one below will get exchanged for lightweight star washers anyway, for better air intake, soon as those arrive.
 
blokenoname,
  • Like
Reactions: Megaton

blokenoname

DIY Log Dabbler 😁🪵💪💨💨💨
Branching off from @Abysmal Vapor s 510 Halo-mesh thread in the DIY forum here, where we discussed similarities shared by both our ‘portable’ projects, I made a small portable log vape, as a side project to my desktop logs, that can be used with your typical 510 box mod on the go (box mod must be able to cope with a max load resistance of at least 4 ohm, better 5 ohm and is preferably to be used in VV/VW/power mode, for the time being -myself using an older iStick100 for this-) and which can also be set/screwed onto a small fitting base with a 510 female connector, which then connects to a 5,5/2,1 mm DC jack and thereby to a 5V/2A DC power supply for use at home as a desktop unit.

The overall idea and also the initial body design for this little portable ‘twiggy’ is obviously inspired by @Alan s iHeat (wooden 510 portable/desktop hybrid) project and @RastaBuddhaTao s Splinter (wooden 510 portable) plus some other 510 solutions, but still lacks that awesome degree of elaboration and perfection these two log/vape makers invested into both their professional 510 portable projects, and so my own 510 portable solution follows a more simple concept, of just setting a smaller sized traditional log onto a 510 box mod and giving it a cartridge heater that is on the one hand powerful enough, to keep initial heat up time well within a minute (so, no real ‘instant portable' here, like the two vapes mentioned above, which are using mesh heaters there), when driven by the 9-10V max and an corresponding output of about ~25W-30W, your typical box mod can provide for a load with a relatively high resistance (for a mod) of about 3,66 ohm, but on the other hand can also be run in kind of a ‘low wattage’ mode, just putting out the accustomed ~7W, the typical classic log vape design needs for producing satisfying clouds, when rum from a DC power supply and used as a desktop unit. The, for most other purposes much too powerful, 12V/40W/3,66 ohm Reprap cartridge heater happily complied to both needs :D

I just give a rundown of materials and specs used here, as you can find all the details and background info over at AbVap's 510 Halo-mesh thread already (and also my first ‘proof of concept’ prototype), whose own portable 510 project follows along similar lines of thought, but using a halogen mesh heater instead.

So this is a relatively simple device, much like your traditional log vape: The cartridge heater gets set into a Velocity type 510 base (easier to handle for my big fingers, than the smaller Kanger RDA base from the first prototype, you still see on some pics here), onto which a ss 9 mm heater cover gets fixed then. Base with heater and the stainless tube goes into a 3 cm diameter bamboo sleeve for a body then (mine is about 7 cm long now, with the base protruding another 5 mm at the bottom) and is fastened by a narrow high temp silicone ring into the bottom of the bamboo sleeve, into the top end of which, an 18,8 mm female tapered glass joint has been set with two high temp o-rings (a cut up 14/18 mm f/m glass adapter. Wanted to go for an all glass airpath before and then use with a 18 mm male joint stem, just like with the Splinter, but the 6 mm diameter cartridge is simply not made for heating the larger air volume, that can pass through an 18 mm GonG adapter and female tapered joint. So I set in the good old 9 mm stainless heater cover/tube again but left the glass, as it gives the whole affair a bit more stabilty, mass and weight and also protects the thin bamboo sleeve from getting to hot, when fired with 25W, running on the box mod.
The base for use as a desktop vape needs still to be build, but as this will be just another shorter piece of bamboo, some cork to set the 510 female connector with soldering ready leads/wings into, bit of wire and a DC jack, that will go fast, once the 510 connector arrives ;)
The 9 mm (~3/8”) stainless heater cover/tube of the ‘MistyToGo’ (Thx to @Megaton for the name ) will accept my standard 8.0 mm or 5/16" ss tips, set into a stem or water adapter, and an 11 mm outer diameter bushing I added around the 9 mm heater tube's top end, allows it accepting the standard Arizer Solo/Air glass stems/GonGs with the glass screen too, the short Arizer Air glass stem making for a conveniently short mouthpiece here. Stainless tips slide in. Glass tips slide over. Just as with me logs :)

Usage: Think of it as kind of a 'quasi instant, session hybrid’. Set unto a mod, for initial het-up, you’ll need to fire the mod at full voltage/wattage for about a minute or 5-6 ten sec cycles (ten sec safety cut off there), to reach the 210-230°C needed. Then insert your stem/mouthpiece with the load.. and vape away :)
Once this little loggie is up to temps, you just need pressing the firing button for some secs at a time to get it up to temps again when need be and you feel/see a noticeable drop in temps while using. You’ll get the hang of it pretty fast, as it comes naturally. Much like lighting up a conventional pipe, actually, where you apply the lighter repeatedly to the bowl while drawing, till its finally going all by itself. For a second session back to back (I kill a stem within a minute, just like with a log), heat-up will require even less cycles (depending on how long you wait before starting the second sesh, naturally) and then you're already up to temps again and can vape along. Once it cools down completely, you’ll need the whole 5-6 cycles (about a minute, all in all) for heat up again.

Will give some updates in this thread on the development of this portable 510 side project as it evolves now and then, but for now at least, it doesn't require its own thread. Also planning for a version with a DIY 510 mesh heater (naturally, given the inspiration :D ), once I figured the ins and outs of such a heater, to build one myself.

Some impressions of the ‘MistyToGo’ :)
(Pics of the heater arrangement itself will be edited in later tonight, as I have to disassemble one of the prototypes for that first. Forgot to take pics before assembling :p )

339j22o.jpg


Edit 1: Heater cartridge in Kanger base and RDA (as used in the first prototype), done the same way in the second prototype here, but using a velocity type base instead. Heater enclosed by the ss 9 mm heater cover. MistyToGo with a 14 mm NonG and a wooden stem (both with ss tips), and the cut off GonG adapter I used for its 18 mm female joint.
19sen8.jpg


Edit 2: On another note, I recycled my very first DIY pine wood body again (the one with the chanel in it, that I tried to do an all glass airpath log from later on, one or two pages back, but that never worked out very well, due to needing a heater with a wider surface area, or maybe a series of cartridge or resistor heater pairs, set up both in series and parallel, as @RastaVapa suggested) and continued my experiments with closed, high mass cores:
2ypgro5.jpg
 
Last edited:

Abysmal Vapor

Supersniffer 2000 - robot fart detection device
Looks good :) ! Looks like another worthy addition the vaporizer arsenal :)).
I just managed to get 3 minutes running time with 75w .. more than enough for a full session.Halo-log yet may live , next on i will try the 90w to see if it is any better . all those bulbs between 35 and 90w have the same body but different coil.
Just remembered of the Ettera moxie. Look how tiny it was. Those guys started the whole logvape thing and were the first to offer a portable,this one was available when i was starting to get into vaping more than a decade ago.I didnt got due to the lack of user feedback .
wood-mox-alone.jpg
new-moxie-wbatt.jpg

new-moxie-wstem.jpg

Compared to its battery pack,looks even tinier,lol i guess those are 1,2v x 10 recharables like the one magic flight uses..
 

blokenoname

DIY Log Dabbler 😁🪵💪💨💨💨
Thanks :)

Yeah. Came out quite lovely, especially for something that simple in body design, which, even with the cutting of bamboo, steel and glass involved, takes just a couple of minutes to assemble all in all :D
Was also lucky, to find a fitting piece of bamboo still lying around from earlier bamboo log experiments. I'll see, that I get a smaller diameter pine handrail blank for the body next, which I can bore with a fitting Forstner bit then, just like my MistyPine log bodies

Ja. Came across the Moxie pics a while ago already, while plowing me way through the old Purple Days and AZ/MZ/CRZ threads here. Battery was not quite as big, as a car battery, but close :evil:

That (or these) guy/s (Bob?) came up with some other models in their time, besides the Eterra and Eterra Moxie. There was the original Flash Evaporator, a log, which sat on a base receiving the power and that could be used 'wireless', by simply removing the log from its base and use it, while still hot. Then the Pneuma, introducing a adjustable air intake and then The New Flash Evaporator, which combined Flash Evap. and Pneuma features. He also did some real portables back then, like the Viip and Tobacco Master

http://flash.esva.net/diagrams.htm
http://flash.esva.net/details.htm
http://flash.esva.net/pneuma.htm
http://flash.esva.net/viip.htm
http://flash.esva.net/tm.htm

His old website is a clusterfuck to navigate, though ;)
 
Last edited:
blokenoname,
  • Like
Reactions: RUDE BOY
Top Bottom