Fluxer Heaters, induction heaters for Dynavap

NexVision

Well-Known Member
I am thinking about doing that aswell, havent received it yet tho. Was it easy enough? I want it to heat low on the cap, I am guessing this is why you did it too?
If by "low" you mean closer to the "heat fins" body then the tip that was my purpose, you could easily go the other way if you wanted to. Took me longer to go get my needle nose pliers then to make the adjustments and put it back together.
 
NexVision,
  • Like
Reactions: proz9c

NexVision

Well-Known Member
Hi all,

One area I do need to get better at is "order fulfilment" (final processing, packaging, and shipping), as it currently takes a lot of time. I'm working on that.

Thanks again for your great support!

Cheers, and have a great weekend!
:leaf:

Removed the rest of the post to highlight this. You should be able to check with some schools that teach machining or electrical and they will send u a intern that could help with packaging and just teach them some things in-between. I know people who have done that with welding, ceramics and even AC repair. You get free labor they get out of school and get to see and learn first hand.
 

proz9c

Member
If by "low" you mean closer to the "heat fins" body then the tip that was my purpose, you could easily go the other way if you wanted to. Took me longer to go get my needle nose pliers then to make the adjustments and put it back together.

How do you feel it improved?
 

RustyOldNail

SEARCH for the treasure...
FLUXER DELUXE - COIL HEIGHT and VOLTAGE

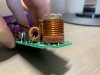
I’ve been experimenting today with coil height on my 15mm. In its shipped/stock position on top of the 3 red orings I didn’t like the toasty taste, too hot. I removed the single 1/2 width oring and moved the coil down that distance, coil gets closer to tip, quicker to click, less heat. That first adjustment was now too quick, too cool. So next and last I moved the coil in between the previous two positions, it’s tiny millimeter moves, you can end up adding or subtracting a few seconds of click timings. I’ll stay at this setting for awhile and judge by taste and efficiency.

One NOTE: If you do your tests by counting by clicks, before adjusting coil height, it’s best to start at a known rate of charge, then your comparisons are more accurate, the easiest way is too fully charge your batteries. Get your average to click time, make your coil adjustment, then test timings again till happy. Reason for this, the device is not regulated and as the voltage of the batteries drops, the clicks will take a bit longer and longer if you go as low as possible, my unit was tested to a sitting low voltage of 10.6v, red battery test light on fully (if your model has this feature), TIME to CHARGE. May seem like a small thing, but since we are discussing just a few seconds either way, I learned the BIG difference it can make, a few bowls of CHAR.

My only other IH before this was the cheap SKJ Chinese Dental IH, not designed for a VapCap, it functioned ok, and I got my introduction to induction heating, then wanted the Lamborghini of IH’s. But going from 15 seconds click times to 4-7, depending on battery voltage and coil height, I broke the speed limit a few times, so I’ve seen the difference the proper tool can make. And if you want to drive it fast, obey the CLICK.
 

Skeemo

Member
It gave me dead on timing with the click. Prior to adjustment I went just about 2 seconds past the click to get a good heat, after adjustment dead on timing. The adjustment was so mynute I actually wondered if it would make a difference but it did.
Hell yeah! I raised my coil height to just over a mm and man this thing absolutely rips. It's made it even more better than it already was. Feels like heating super low with a single flame torch. Can clear a bowl in 2 thick dense hits just the way I like it. Avb comes out dark chocolate
 
Got my 12v power supply this morning, so I fired the Flix up for a test run. Loaded a tiny bowl (smallest screen setting on Ti tip) and was surprised by how aggressive the heating was with the 16mm coil / 2mm insert. First click in 5-6 seconds and the hit was definitely toasty. Second cycle clicked in 4 seconds and the bud was pretty much black at that point (no combustion). I removed as soon as it clicked both times. Guess I need to look at adjusting the coil. If that doesn't get me where I want to be, I guess I need to order a VVPS.

Is this normal behavior for this coil @mr_cfromcali ? I can't imagine the more aggressive configurations...
 
letter never sent,

mr_cfromcali

Accessory Maker
Accessory Maker
Glad you got it and it’s working.

Each heater and each Dynavap are different - not to mention ti vs SS tips - so you do need to adjust your heater to suit your own tastes.

Try adjusting the bottom of the coil downwards 1mm-2mm to shorten the heating time. The shortest (and therefore coolest) heating time will be with the coil touching the top o-ring.

The copper coil wire is relatively soft and doesn’t need a lot of force to move.

Let me know how it works after adjusting it.
 
mr_cfromcali,
Glad you got it and it’s working.

Each heater and each Dynavap are different - not to mention ti vs SS tips - so you do need to adjust your heater to suit your own tastes.

Try adjusting the bottom of the coil downwards 1mm-2mm to shorten the heating time. The shortest (and therefore coolest) heating time will be with the coil touching the top o-ring.

The copper coil wire is relatively soft and doesn’t need a lot of force to move.

Let me know how it works after adjusting it.

Thanks - will give it a shot. What is the best way to remove the circuit board from the casing? I don't want to hurt it...
 
letter never sent,

mr_cfromcali

Accessory Maker
Accessory Maker
Sorry, I have not had time to record a Flix coil adjustment video yet.

Use the included 5/64" (2mm) hex wrench to remove the 4 screws from the bottom of the Flix. Remove the 8mm nut from the on/off switch (depending on when I sent yours, your Flix may have included a simple wrench for this nut, too, as the wrenches finally showed up a day or two after I began fulfilling orders.)

IMG-9749-private.jpg


Remove the bottom and acrylic insert, and then push the PCB out by pressing down on the coil.

(Optional): Unplug switch and set the top case off to the side if it is in the way.

With the coil exposed, follow the steps in the FD coil adjustment video. You want to make yours cooler, so you will be lowering the coil insteasd of raising it.

Reinstallation is a reversal of the above steps. After reassembly, use a Sharpie or similar non-metallic object to re-center the heating coil if needed. I give a few tips in the quick start guide, too.

The whole thing I just descried should take about 2 minutes. The only thing that requires some care is the pyrex button that protects the top of the tactile switch. It is held in place with glue and care should be taken not to move it side-to-side or pry up on it.

I'll make a video explaining this as soon as I have some time - hopefully this week.

It's not a big deal and it should only take 1-2mm of downwards movement to see a difference. Let me know how it goes.
 
Last edited:
@mr_cfromcali thanks! I didn’t think to remove the nut around the switch... super easy once that was off.

So, my coil was already sitting pretty low. I moved it down as much as possible, but it may not have even been 1mm. Below is what it looks like right now.

Not sure if it made much of a difference. Still hitting pretty big right off the bat. First click in a little under 5 seconds (timed it as best as I could with my phone’s stopwatch). Below is the AVB after just two hits. Cashed.

This will work fine for me with water, but I was thinking it would heat less aggressively overall. Maybe I should have gone for the thickest insert? I’ll probably grab a VVPS so I can dial it back. I would think it behaves much differently at 8v...
 

Attachments

  • 51795FAB-C3E6-4F26-B01B-B4966EA01DE3.jpeg
    51795FAB-C3E6-4F26-B01B-B4966EA01DE3.jpeg
    687.9 KB · Views: 192
  • 22A3557A-D94B-4B9D-A4F9-0AD82DE1FE6C.jpeg
    22A3557A-D94B-4B9D-A4F9-0AD82DE1FE6C.jpeg
    1 MB · Views: 47
letter never sent,
  • Like
Reactions: Jill NYC

TommyDee

Vaporitor
The VVPS will certainly tame the heater. It looks like you might have only tweaked the bottom coil a little. @mr_cfromcali will confirm but maybe one of the o-rings should be snipped away for a little more room. I say this because the riser lead on the long leg is still pretty straight.

I know on my IH efforts that a millimeter is a good 2-3 seconds. I might suggest an "S" bend of the long leg to compress the coil downward... Basically a twist of the needle nose pliers. Or maybe @mr_cfromcali has a similar plan for you. I'll let him confirm the best plan of course.
 
TommyDee,

RustyOldNail

SEARCH for the treasure...
The VVPS will certainly tame the heater. It looks like you might have only tweaked the bottom coil a little. @mr_cfromcali will confirm but maybe one of the o-rings should be snipped away for a little more room. I say this because the riser lead on the long leg is still pretty straight.

I know on my IH efforts that a millimeter is a good 2-3 seconds. I might suggest an "S" bend of the long leg to compress the coil downward... Basically a twist of the needle nose pliers. Or maybe @mr_cfromcali has a similar plan for you. I'll let him confirm the best plan of course.

He could also try swapping one of those two full height red gaskets (seen in his picture) for a half height one, assuming this model has all 3 gaskets I see on my FD, thus room for lowering the coil a bit more.

Be careful with metal needle nose pliers for manipulating the copper wire coils, I have already cut through a bit of the clear insulation/coating in one small area, but it’s small enough and away from other components, so I believe I’ll be OK. Will be more careful in the future, and wrap my pliers in some tape.
 
RustyOldNail,

NexVision

Well-Known Member
By making adjustments on the coils I essentially have the Flux Deluxe 15mm and the 16mm timed at 2 seconds apart now both giving thick full clouds from hit #1 and AVB is almost black. I love these things I no longer have to hear the click and count I can just pull on the click now its beautiful. Definitely have some thinking to do now about devices.
 
NexVision,

mr_cfromcali

Accessory Maker
Accessory Maker
@mr_cfromcali thanks! I didn’t think to remove the nut around the switch... super easy once that was off.

So, my coil was already sitting pretty low. I moved it down as much as possible, but it may not have even been 1mm. Below is what it looks like right now.

Not sure if it made much of a difference. Still hitting pretty big right off the bat. First click in a little under 5 seconds (timed it as best as I could with my phone’s stopwatch). Below is the AVB after just two hits. Cashed.

This will work fine for me with water, but I was thinking it would heat less aggressively overall. Maybe I should have gone for the thickest insert? I’ll probably grab a VVPS so I can dial it back. I would think it behaves much differently at 8v...

Part of the "joy" of making analog devices is discovering just how much variation is possible when combining parts with tolerances that vary from as "low" as 5% to as high as 20%. :rolleyes: Most fall in the middle, but there are obviously going to be outliers on both ends of the spectrum. I think your heater is an over-achiever. :evil:

I will second the suggestions made by @TommyDee and @RustyOldNail : a VVPS will definitely tame this, but in the interim, lowering the height of the coil further may also help.

One thing I see in your picture (quoted below)

index.php


is that the legs of the tactile switch are standing ~1mm proud of the circuit board, which is preventing the bottom o-ring from seating fully against the PCB. That's not a good look on my end, and I'm sorry I didn't get that down lower. That doesn't usually cause an issue, but it isn't helping things here. It does mean, however, that there's some additional coil height that you can reduce.

To lower the coil a bit more, try bending the coil back, out of the way. The inductors (the two wire-wound toroids behind the coil) can easily be pushed out to either side to create room behind the coil. The copper wire of all three components is very flexible. With the coil bent to expose the o-rings, remove the top o-ring. Return the coil to its upright position to reassemble. Finally, lower the insert + coil as far as possible in the new configuration. It's OK if the insert rests on top edge of the switch. Try it in this position and see if it works better for you.

If necessary you can put a slight bend or crimp in the vertical coil support to drop it down a bit more. I bent this one as an example to illustrate the idea:

IMG-9751-private.jpg


One more suggestion - another strategy you can try with your current configuration is to pull after the first click. I often find that with aggressive heaters, if I pull after the first click it will achieve the second click as I am bringing it to my mouth to take a draw.

I hope the above helps, but if none of this helps, please send me a PM and we will discuss some other remedies. Thanks!
 

TommyDee

Vaporitor
By making adjustments on the coils I essentially have the Flux Deluxe 15mm and the 16mm timed at 2 seconds apart now both giving thick full clouds from hit #1 and AVB is almost black. I love these things I no longer have to hear the click and count I can just pull on the click now its beautiful. Definitely have some thinking to do now about devices.

Well, that's where the Flix should land -before- applying a VVPS. Adjusting the coil with a manufacturer's blessing is really is a wonderful option to dial in a fixed state. Setting the "Standard" at 12V, so to speak. The Standard should serve as an ideal session, or ideal average between devices. From there you dial for particular devices or particular sessions with variable voltage. For the full experience, I say the 'tuned' IH provides a reliable Standard and the dialing it back is the device or session.

Remember one thing, the Fluxer varies voltage as batteries discharge. You don't notice anything seriously deficient until maybe you need to charge the batteries. I find this voltage-dialing handy to suite a particular flower or to facilitate the rate of heating [throttling] for on-demand heat through a bubbler or native.

Technically it is not just the voltage in this case. It is a pretty straight forward power calculation [V*I=W] and by lowering voltage, you simultaneously lower the current. Therefore a wattage reading is far more accurate to know what a particular device is doing.
 

RustyOldNail

SEARCH for the treasure...
Remember one thing, the Fluxer varies voltage as batteries discharge. You don't notice anything seriously deficient until maybe you need to charge the batteries. I find this voltage-dialing handy to suite a particular flower or to facilitate the rate of heating [throttling] for on-demand heat through a bubbler or native.

As the (3) 18650’s voltage slowly drops, the 1st DV click timings will slowly grow as well. If you get 1st click at 4-5 seconds while batteries are freshly charged at about 12 volts, after much use, and total voltage drops to 10.6 volts, the 1st click will take longer, 7-?, (I’m still testing), but longer 1st click times are another clue, besides battery voltage, that it’s time to charge batteries. BTW: Fluxer’s with battery life switch/LED, the green-green/red- red LED’s, are surprisingly accurate indicators of remaining battery life.
 

TommyDee

Vaporitor
As the (3) 18650’s voltage slowly drops, the 1st DV click timings will slowly grow as well. If you get 1st click at 4-5 seconds while batteries are freshly charged at about 12 volts, after much use, and total voltage drops to 10.6 volts, the 1st click will take longer, 7-?, (I’m still testing), but longer 1st click times are another clue, besides battery voltage, that it’s time to charge batteries. BTW: Fluxer’s with battery life switch/LED, the green-green/red- red LED’s, are surprisingly accurate indicators of remaining battery life.

The tuning of the circuit, the part that Mr C does in design, determines the power level that affects heating. Speaking on generic modules, which act similarly, yes. And I'll provide the caveats to this observation. It may also help to understand the Fluxer/Flix coil choices.

Please note that I started and have used the stock ZVS circuit coils for a long time. The are open and airy. This is the intent of an induction heater to generate its most efficient magnetic field. Very 'forgiving' coil. Insertion depth didn't matter much because the entire cap was bathed in a fairly homogeneous magnetic field. Settling on 60 watts as a good heating rate, I enjoyed that setup immensely. One little niggle - it also vapes the resins in the cooling fins making for crumbly deposits that don't wash away easily.

I started working coils to see what happens. Mostly I was interested in the circuit variation but I quickly learned to mind the size of the magnetic field. I quickly figured out that small also means less 'generic'. I went down to a 16mm ID on a short coil and learned that 2mm can take the load from green taste to burnt. A slightly longer coil improved that but still very sensitive.

I still fire with 3 coils at the moment. I can manage any of them. However, they are not 'right' to my tastes. But that doesn't matter as yet. However, I am not one to make an aggressive coil the standard. I'd rather have more margin on time. 8-10 seconds heatup is a good balance or me. If I crank that output up to 12V, it'll double click in 5 seconds with any of the coils.

By the same token, I got the click to change several seconds by moving the cup in the smaller coils. This is where I started to notice these were not quite as forgiving. They draw the same power but the intensity of the field is no longer as homogeneous as before with the longer coil. So the clicker is 'left out' It isn't being heated by the magnetic field as much and the temperature must migrate from the hot spot on the cap to the clicker. This can loosely be associated with hysteresis in a 'circuit' but it is compounded by the fact that the magnetic field's influence on heating the clicker also changes when you move the cap within the coil. Double whammy. Therefore, effect-by-the-millimeter is device dependent. In the discussion so far, I am fairly confident that a millimeter of movement of the coil in relation to the VC can have a 2-3 second change in timing and cook time based on the Fluxer/Flix design. This time difference will decrease as you enter the margins of the usable range.

I happened upon those battery meters. I put one in my flat-pack IH. That little HalfPint is running high on the list of favorites. That is the unit that is teaching me about recognizing a low battery charge based on performance. At 9V under load, it never reaches the second click before dipping below the minimum voltage. 9V is the typical safety cutoff for 3S li-ion. I think it is running at a 35 watt range at that time. Therefore, since the cells ae sized for my daily use, if toward the end of the day if starts to lack performance, I should know intuitively where my cells charge state is just by using it. It also means I've overdone my day and I should just lay down the VC.
 
Last edited:

RustyOldNail

SEARCH for the treasure...
The tuning of the circuit, the part that Mr C does in design, determines the power level that affects heating. Speaking on generic modules, which act similarly, yes. And I'll provide the caveats to this observation. It may also help to understand the Fluxer/Flix coil choices.

Please note that I started and have used the stock ZVS circuit coils for a long time. The are open and airy. This is the intent of an induction heater to generate its most efficient magnetic field. Very 'forgiving' coil. Insertion depth didn't matter much because the entire cap was bathed in a fairly homogeneous magnetic field. Settling on 60 watts as a good heating rate, I enjoyed that setup immensely. One little niggle - it also vapes the resins in the cooling fins making for crumbly deposits that don't wash away easily.

I started working coils to see what happens. Mostly I was interested in the circuit variation but I quickly learned to mind the size of the magnetic field. I quickly figured out that small also means less 'generic'. I went down to a 16mm ID on a short coil and learned that 2mm can take the load from green taste to burnt. A slightly longer coil improved that but still very sensitive.

I still fire with 3 coils at the moment. I can manage any of them. However, they are not 'right' to my tastes. But that doesn't matter as yet. However, I am not one to make an aggressive coil the standard. I'd rather have more margin on time. 8-10 seconds heatup is a good balance or me. If I crank that output up to 12V, it'll double click in 5 seconds with any of the coils.

By the same token, I got the click to change several seconds by moving the cup in the smaller coils. This is where I started to notice these were not quite as forgiving. They draw the same power but the intensity of the field is no longer as homogeneous as before with the longer coil. So the clicker is 'left out' It isn't being heated by the magnetic field as much and the temperature must migrate from the hot spot on the cap to the clicker. This can loosely be associated with hysteresis in a 'circuit' but it is compounded by the fact that the magnetic field's influence on heating the clicker also changes when you move the cap within the coil. Double whammy. Therefore, effect-by-the-millimeter is device dependent. In the discussion so far, I am fairly confident that a millimeter of movement of the coil in relation to the VC can have a 2-3 second change in timing and cook time based on the Fluxer/Flix design. This time difference will decrease as you enter the margins of the usable range.

I happened upon those battery meters. I put one in my flat-pack IH. That little HalfPint is running high on the list of favorites. That is the unit that is teaching me about recognizing a low battery charge based on performance. At 9V under load, it never reaches the second click before dipping below the minimum voltage. 9V is the typical safety cutoff for 3S li-ion. I think it is running at a 35 watt range at that time. Therefore, since the cells ae sized for my daily use, if toward the end of the day if starts to lack performance, I should know intuitively where my cells charge state is just by using it. It also means I've overdone my day and I should just lay down the VC.

Nice write up TommyDee.
Having only my SKJ IH previous to my FD, I’m curious what if anything is used on IH units like the Apollo, to keep the hot DV tip, from the push down switch? As you know the FD has a tiny glass button glued to the top of the switch, so it can’t melt. Do the commercial IH devices use the same or similar switches, and are they left stick/bare?
Thanks.
 
RustyOldNail,
Top Bottom