TinyMight / TM 2

666Honeybadger

Unknown member
Do you have the OG glass bowl in your piece? If you do, can you possibly take dimensions and then i can decide if this is what i will use for my project?

There's no OG glass bowl so i'm confused about what you are actually looking for?
The stem is the bowl in the TM2.

If you want the dimensions of the zirconia part that surrounds the heater (or the glass version of that part in TM2) i'll have to disappoint you: i'm not opening up the device just to take measurements. :lol:

As said before: that part requires some teardown to reach, not impossible by any means but i'll only venture there when needed. Not for fun and games. ;)

The only part that can be taken out easily is the SS insert that sits
-on top the heater
and
-inside a glass tube (SS in the PH) (which is also too much hasstle to take out just for measuring it)

So i'm afraid i can't really help you. Maybe somebody with a disassembled device will chime in, if they know what part you are looking for at least 'cause i'm still unsure tbh.
 
666Honeybadger,

gangababa

Well-Known Member
While I too am confused about the request of @Flotsam, I do have this information from my TM teardowns.

The original glass in the TM measures as follows.
The lower glass containing the heater coil: OD 24mm, ID 20mm, Length 35.5mm
The upper glass above the heater: OD 24mm, ID 20mm, Length 25mm

In the newer TM, the upper metal replacing the glass is the same length and ID and (at the wider flange end) the same OD.
In the newer TM, the new zirconia replacing the glass has the same length and ID, but the thinner material results in a smaller OD.

All oem glass stems from Tinymight are 16mm OD with 12mm ID, thus the TM "bowl" is a variable depth, 12 mm ID glass cylinder, within a heating chamber about one inch deep, above a heater, all sitting inside a 26mm diameter hole in the wood body.
 

Flotsam

Well-Known Member
While I too am confused about the request of @Flotsam, I do have this information from my TM teardowns.

The original glass in the TM measures as follows.
The lower glass containing the heater coil: OD 24mm, ID 20mm, Length 35.5mm
The upper glass above the heater: OD 24mm, ID 20mm, Length 25mm

In the newer TM, the upper metal replacing the glass is the same length and ID and (at the wider flange end) the same OD.
In the newer TM, the new zirconia replacing the glass has the same length and ID, but the thinner material results in a smaller OD.

All oem glass stems from Tinymight are 16mm OD with 12mm ID, thus the TM "bowl" is a variable depth, 12 mm ID glass cylinder, within a heating chamber about one inch deep, above a heater, all sitting inside a 26mm diameter hole in the wood body.
Thanks so here is a photo from the teardown that Vapeguy did. https://vapeguy.com/wp-content/uploads/2024/08/TM2-teardown-glass-airpath.webp and it appears those measurements make sense to me now.

I do really like the design of the TinyMight. for my immediate project it tells me these glass pieces are too large for my purposes. thanks again & everyone have a great Holiday season.
 
Tell me, who knows, please, is it possible to calibrate the temperature on the TM1 of the first version (namely the first version)? Can someone give instructions?

Also, the question is, could it be that the original TM1 has very large gaps between the metal covers and the wood?Through these slits, you can even see the light from the device... It confuses me, is this an original device (a friend offers to buy it)? Can you tell me what are the signs of the original to distinguish from a fake?

The thing is, I've dealt with TM2 and I'm not really familiar with the first version.
 
WhyWhyWhy?,

MMJane

Well-Known Member
I also get this problem I think. With mine when I hold the button down sometimes the unit vibrates multiple times (chirps) the lights flash and then the unit switches itself off.
I also thought this was a battery problem but have found simply unscrewing the battery cover and then tighten it up again resets the TM2 and it'll fire up as normal.

Hmmm. I wonder if there's something wrong with the internals or something. Or with the spring in the bottom of the battery compartment? It had been working fine for 2 years~ and then got wonky a few months ago.

Mine is still doing it. And yeah - it's not a specific battery issue. It's happened since with more than one battery and I bought my batteries at the same time, I rotate them all pretty evenly, though I do have 2 different chargers (upstairs and downstairs) that I bought. I don't believe it's a battery issue.
 

Pib

Active Member
Tell me, who knows, please, is it possible to calibrate the temperature on the TM1 of the first version (namely the first version)? Can someone give instructions?
It's the same as the TM2, but i think from TM1.5 (with serial number) on.
Also, the question is, could it be that the original TM1 has very large gaps between the metal covers and the wood?
Yes, the gaps are huge.
 

badbee

Well-Known Member
Tell me, who knows, please, is it possible to calibrate the temperature on the TM1 of the first version (namely the first version)? Can someone give instructions?

Also, the question is, could it be that the original TM1 has very large gaps between the metal covers and the wood?Through these slits, you can even see the light from the device... It confuses me, is this an original device (a friend offers to buy it)? Can you tell me what are the signs of the original to distinguish from a fake?

The thing is, I've dealt with TM2 and I'm not really familiar with the first version.
Yes, it is possible. I don't have the instructions handy but they were posted in this thread in the past. If you are having power fading problems with a TM1 the first thing to try is new cells. If that doesn't work try cleaning the battery door and the underside of the top plate, by rubbing with a pencil eraser or mild abrasive (Barkeepers Friend would probably work), to remove any corrosion (aluminum oxide) that is interfering with current flow. Details have also been posted earlier in this thread, it's a known issue with the v1.

Recalibrating should really only be done after all other sources of power problems have been eliminated. Shoving more power through bad connections will cause excess heat (in bad places) and drain the battery.

Yes, TMs are known for "leaking" light.

Edit: Did some searching: here is a post on fixing electrical contact issues: https://fuckcombustion.com/threads/tinymight-tm-2.44563/page-455#post-1583237
 
Last edited:

Mukmuk

TM2 Rookie
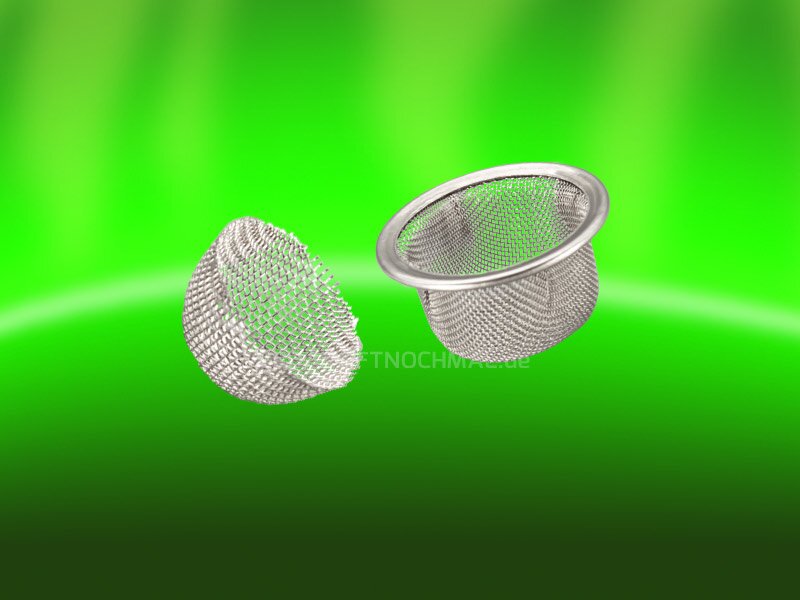
Question about basket screens for the TM2:

Are basket mesh screens available for the standard stems? I can only find options for 3D glass stems, but there are no measurements provided. Do I need to have a 3D glass stem to use them, or can they also fit the normal stems?
 
Mukmuk,

Pib

Active Member
The rimmed basket screen is meant for the 3D cooling stem, but there also unrimmed basket sceens. But i don't know the dimensions. Perhaps the rimmed could also work. I hope other users can help you more.

Unrimmed

Rimmed

And here from verdampftnochmal

Thank you all for your advice. This TM1 turned out to be a fake - its microcircuit is blue and there is no way to turn on silent mode
Silent mode should work from the first ones, the microcircuit was always green in TM1 . I hope you can get your money back.
 
Last edited:

dude_de

Well-Known Member
they also fit the normal stems?
They also fit the normal stems. But beware: rimmed baskets for other devices may look like they would fit but don't. For example, screens for the Arizer Extreme look good, but the rim is too wide and will get stuck on the o-ring when removing the stem.

How do I know? Well... let me just say it was a bit of a pain to get the basket out.
 
Last edited:

MMJane

Well-Known Member
They also fit the normal stems. But beware: rimmed baskets for other devices may look like they would fit but don't. For example, screens for the Arizer Extreme look good, but the rim is too wide and will get stuck on the o-ring when removing the stem.

How do I know? Well... let me just say it was a bit of a pain to get the basket out.

Ugh. What a pain in the butt!

I've always been partial to regular non-rimmed screens and I err on the side of too small rather than too big, I use my pinky and push the screen all the way into the stem so it's snug, If it's loose? I take it out and place it on a table and use my thumb to "open it up" a bit so it's more of a shallow bowl and put it back in the stem so it's snug.

I'm about 80% of the time vaping outside so I gently tap my stem on the railing of my deck and the vaped flower falls into the mulch in front of my porch. The rest of the time, I forget to do it while I'm outside and I'm using a jyarz debowler (3d delta studio sells em.). If I remember to do it immediately? The flower comes out real easy and the screen stays snug and relatively clean-ish. I can go several days of heavy use before I set the stem aside because it's grody and then I just soak the whole thing in ISO, stem and screen. I might pop out the stem when rinsing them out with water after, but they get really clean.

I've never changed screens after 3 years of using my TM1 or 2. I've just had to keep adding them as I've acquired more stems! They're SS and holding up fine to maintenance.

So yeah. Never got the rimmed basket thing! /shrug :)
 

badbee

Well-Known Member
Ugh. What a pain in the butt!

I've always been partial to regular non-rimmed screens and I err on the side of too small rather than too big, I use my pinky and push the screen all the way into the stem so it's snug, If it's loose? I take it out and place it on a table and use my thumb to "open it up" a bit so it's more of a shallow bowl and put it back in the stem so it's snug.

I'm about 80% of the time vaping outside so I gently tap my stem on the railing of my deck and the vaped flower falls into the mulch in front of my porch. The rest of the time, I forget to do it while I'm outside and I'm using a jyarz debowler (3d delta studio sells em.). If I remember to do it immediately? The flower comes out real easy and the screen stays snug and relatively clean-ish. I can go several days of heavy use before I set the stem aside because it's grody and then I just soak the whole thing in ISO, stem and screen. I might pop out the stem when rinsing them out with water after, but they get really clean.

I've never changed screens after 3 years of using my TM1 or 2. I've just had to keep adding them as I've acquired more stems! They're SS and holding up fine to maintenance.

So yeah. Never got the rimmed basket thing! /shrug :)
I find rimmed baskets hit just a little bit better and there are fewer green bits around the edge after a no-stir session (TM1). My theory is that it allows some air space between the screen and glass so there is a little bit of air flow through the sides and less heat lost into the glass via direct conduction. To each their own...
 

Mukmuk

TM2 Rookie
I am having the TM2 2024 Edition with the Zirkonium cylinder. Yesterday I wanted to tighten the top screw as described by some others. Therefore I removed the long bottom screw and removed the bottom plate. But I wasn't able to reach the top screw because my Torx 20 tool and even the Torx 20 itself was to wide to fit through the wooden hole in the body of the TM2.

I’m now confused about this top screw. Is there actually an additional top screw, or has something changed in the TM2 2024 Edition and there is only the long bottom screw?


  • In this vape guy tear down it seems that there is no additional top screw?
  • In another Reddit teardown, it is mentioned to tighten or loosen the top screw.
 
Last edited:
Mukmuk,

Mukmuk

TM2 Rookie
The rimmed basket screen is meant for the 3D cooling stem, but there also unrimmed basket sceens. But i don't know the dimensions. Perhaps the rimmed could also work. I hope other users can help you more.

Unrimmed

Rimmed

And here from verdampftnochmal


Silent mode should work from the first ones, the microcircuit was always green in TM1 . I hope you can get your money back.

I found these basket screens for €5 (5 pieces). The shop seems legit and also offers other accessories for the TM, such as the 3D glass stem and WPA adapters:

Basket Screens – OSGree (DHGate)

Is one of these stems a good one?

 
Last edited:
Mukmuk,

Pib

Active Member
I used the Rocket stem, the one on the far right with the beads. The cooling effect is enormous, the stem is very large and broke when I was cleaning it (my fault). I then used the grav upline taster, next adjusted the temperature of the device to suit me and wavered between the upline taster and the short stem supplied.

Only the TM PH has the zirconium, the others still have glass around the heating coil. Only the topper is now stainless steel on all of them (learned a few days ago).

I've never opened my TM because it's running, so I'm no help.
 
Last edited:
Pib,
  • Like
Reactions: Mukmuk

Tinymight

Manufacturer
Manufacturer
I am having the TM2 2024 Edition with the Zirkonium cylinder. Yesterday I wanted to tighten the top screw as described by some others. Therefore I removed the long bottom screw and removed the bottom plate. But I wasn't able to reach the top screw because my Torx 20 tool and even the Torx 20 itself was to wide to fit through the wooden hole in the body of the TM2.

I’m now confused about this top screw. Is there actually an additional top screw, or has something changed in the TM2 2024 Edition and there is only the long bottom screw?


  • In this vape guy tear down it seems that there is no additional top screw?
  • In another Reddit teardown, it is mentioned to tighten or loosen the top screw.
Hello,
We haven’t made any changes to the top screw; the wooden body has the same dimension hole as before, and we’re still using the same screw. Typically, a 4 mm tool should fit through without any issues.

That said, we generally don’t recommend disassembling the device unless it’s absolutely necessary or you’ve been instructed to do so by Tinymight Support. While the device looks straightforward, a lot can go wrong during the first disassembly if you’re not experienced.

We receive quite a few units for repair that have been damaged in the process of being opened and put back together, which is always unfortunate for both the owner and us. If you think your unit might need to be taken apart, it’s best to contact our support team first for authorization and step-by-step instructions. That way, if something does go wrong, it won’t affect your warranty.
 

Mukmuk

TM2 Rookie
Only the TM PH has the zirconium, the others still have glass around the heating coil. Only the topper is now stainless steel on all of them (learned a few days ago).
This is my Walnut TM2 2024 Edition with a metal cylinder.

You might be right—the Zirconium cylinder could be exclusive to the PH Edition. Mine appears to be stainless steel. The description only mentions it as “metal,” so it’s not entirely clear.

"Newly designed metal insert on the steam path with integrated sieve":

 
Mukmuk,
  • Like
Reactions: cosimo

666Honeybadger

Unknown member
am having the TM2 2024 Edition with the Zirkonium cylinder.

You mean you have the Purple Heart edition? The walnut does not have zirconia in it fyi.

That's the stainless steel insert in the picture.
Under it there is a glass tube surrounding the heater. In the PH that one is zirconia. Zirconia is a white ceramic material, it's not metal.

I’m now confused about this top screw. Is there actually an additional top screw, or has something changed in the TM2 2024 Edition and there is only the long bottom screw?

I'm pretty sure it's there.
You'll need a long, fine tool to reach it.
I think a suited tool is shown in this post by @gangababa
(the one on the left)

https://fuckcombustion.com/threads/tinymight-tm-2.44563/post-1794412

In this vape guy tear down it seems that there is no additional top screw?

Well, yeah... That's because he breaks it instead of disassembling it.
The moment he tears off the cover without undoing that screw there's no way back i think.
fwiw: you have to undo that screw about 10-15turns, it will come loose but won't come out if i understood correctly.
 

Mukmuk

TM2 Rookie
I used the Rocket stem, the one on the far right with the beads.

Thanks. I’ll give it a try!
That's the stainless steel insert in the picture.
Under it there is a glass tube surrounding the heater. In the PH that one is zirconia. Zirconia is a white ceramic material, it's not metal.
Now I understand that. Thanks.

You'll need a long, fine tool to reach it.
I think a suited tool is shown in this post by @gangababa
I bought exactly that one, but it doesn’t fit—it’s too wide in diameter.

EDIT: Mine has 5 mm in diameter, the shown has 4 mm in diameter. I need obviously a thiner one.

Well, yeah... That's because he breaks it instead of disassembling it.
The moment he tears off the cover without undoing that screw there's no way back i think.
fwiw: you have to undo that screw about 10-15turns, it will come loose but won't come out if i understood correctly.
So that screw stays where it is, as shown in the Reddit teardown. There’s a single screw left in the body on top of it.

broke when I was cleaning it (my fault).
You’re not alone:

On the second day after I got the TM2, I broke the glass mouthpiece. It slipped out of my hand from just 5 cm above the desk.
Today, I accidentally dropped my TV remote, and it fell directly onto the glass stem with the CU. That broke too.

:doh:

I then used the grav upline taster
What is that?
 

666Honeybadger

Unknown member
EDIT: Mine has 5 mm in diameter, the shown has 4 mm in diameter. I need obviously a thiner one.

Yes, the thinner one will work i think.

So that screw stays where it is, as shown in the Reddit teardown.

Yes, i think so.
Whatever you do: don't follow the example of the Vape Guy breakdown because he never planned on reassembling the device. If done correctly everything should come loose without having to force anything.

On the second day after I got the TM2, I broke the glass mouthpiece. It slipped out of my hand from just 5 cm above the desk.
Today, I accidentally dropped my TV remote, and it fell directly onto the glass stem with the CU. That broke too.

Dang... That's unlucky. :|
Never a bad idea to have a couple of back up glass stems.
I mostly use the OG long stem (with added cooling balls and mp) and since i bought spares i didn't break one anymore... :rolleyes:


What is that?

https://lacentralevapeur.com/nl/verdamper-accessoires/23193587-3-upline-proever-grav.html

It fits the TM perfectly and is a pretty good stem for native use.
tbh: i switched back to the OG glass stem (after getting the cooling balls and a (ditanium) mouthpiece for it) because the OG stem is easier to clean imo and i also prefer the taper of the Ditanium mp (but that's personal i guess).
 

Pib

Active Member
What is that?
The link has already posted, i'm a little bit slow...

It cools down like or a little better as the short stem with cooling unit, but tastes (in a small amount) better. I use a small sieve from the cooling unit and above that a half dome sieve, so no small parts coming through.

Mostly i use the small stem with drip tip and cooling unit, but sometimes the airflow seems a little restricted.
 
Last edited:
Pib,
  • Like
Reactions: Mukmuk

Mukmuk

TM2 Rookie
Never a bad idea to have a couple of back up glass stems.
I mostly use the OG long stem (with added cooling balls and mp) and since i bought spares i didn't break one anymore... :rolleyes:
I think that’s how it works every time—you break something right after buying it, then you get spare parts (including backups), and after that, you never end up needing the backups again.

It cools down like or a little better as the short stem with cooling unit, but tastes (in a small amount) better. I use a small sieve from the cooling unit and above that a half dome sieve, so no small parts coming through.
https://lacentralevapeur.com/nl/verdamper-accessoires/23193587-3-upline-proever-grav.html

It fits the TM perfectly and is a pretty good stem for native use.
tbh: i switched back to the OG glass stem (after getting the cooling balls and a (ditanium) mouthpiece for it) because the OG stem is easier to clean imo and i also prefer the taper of the Ditanium mp (but that's personal i guess).
Thanks for the link and the explanation. That one looks really nice.
 

dzoinp

Well-Known Member
Accessory Maker
I’m now confused about this
What the hell... why did you open the TM unnecessarily???
Well... It's just their 4th post here... and I bet it was for you...
here's the manufacturer's explanation for not doing it
Hello,
We haven’t made any changes to the top screw; the wooden body has the same dimension hole as before, and we’re still using the same screw. Typically, a 4 mm tool should fit through without any issues.

That said, we generally don’t recommend disassembling the device unless it’s absolutely necessary or you’ve been instructed to do so by Tinymight Support. While the device looks straightforward, a lot can go wrong during the first disassembly if you’re not experienced.

We receive quite a few units for repair that have been damaged in the process of being opened and put back together, which is always unfortunate for both the owner and us. If you think your unit might need to be taken apart, it’s best to contact our support team first for authorization and step-by-step instructions. That way, if something does go wrong, it won’t affect your warranty.
Now you have clear skies... at least in your Avatar
 
Last edited:
dzoinp,
Top Bottom