SonicBacon
Well-Known Member
Thanks Dan, beautiful work as always.


This is a Great question. I think some bamboo stems would really complete the overall natural look to my Nomad.Are these bamboo stems available for purchase now, @Dan Morrison?

 ve:
ve:This is a Great question. I think some bamboo stems would really complete the overall natural look to my Nomad.
Are these bamboo stems available for purchase now, @Dan Morrison?


.jpg")

Should I ask that your tutorial include loading techniques? And cleaning/maintenance?I've been developing an updated version of my usage tutorial guide... as I think my original one could be simplified quite a bit. And I'm just wondering if anyone out there has any ideas about what they would like to see included.
Specifically, I'm trying to come up with a way to give people a place to start that will give guaranteed success. This is especially true for people who don't have any experience with unregulated convection.
I think that following a timed sequence, while counting in your head, is a pretty good way to standardize things. For example. With a fresh battery and the standard (low) heater my inhale sequence goes like this:
Button ON...1...2...3...4...5..Start Inhale..6...7...8...9...10...11...12...13...14...Button OFF...15...16...17...18...Stop Inhaling............exhale.
So long as I follow this sequence, I get very consistent results. And if, for example, a user were to follow these steps and they get little or no vapor, I know that likely the issue is draw speed is too fast. And if they report scorching the material, I know they're draw speed is too slow.
This can also be used for the high heater, but with modified timing.
I find that for subsequent draws, the above formula can be modified to add a couple seconds to either the pre-heat time or the draw length time to achieve consistent results on the second, third, fourth...etc.. draw.
The idea here is to eliminate any chaotic variables that I can, so that first time users can quickly dial their inhale speed. Once they get a sense of what it's suppose to feel like, it's easy to branch out from there and augment your technique to achieve different results.
Thoughts?
__________________________
In other news, I'm ordering a ton of textile samples for the final Nomad II case prototype. The design is pretty much finished, but now I am finding that perfect fabric to use. I've got on order a bunch of nice organic textiles.. and raw natural dye ingredients. Nothing is finalized yet, but I'm hoping to offer a handful of colours all hand dyed in house from plant sources. The current front runners for the colours are; Mustards/yellows, Greens, indigo, greys, natural/cream, rust. The indigo and rust colours will come from the two Japanese dye techniques of using real indigo dye vats, and kakishibu (persimmon tannin).
These cases will be slightly padded, but not too much. Still able to fit into a pocket, but just enough protection to make you feel good about tossing it into a backpack.
The design takes a lot of inspiration from the Japanese shifuku, which is a fabric case used to store various tea ware. Here is a poetic article explaining the philosophy behind the shifuku, White Dew
View attachment 835
The fabric case on the left is what we're lookin' at.
I also like the idea of using a braided cord in some way for the closure... it's reliable, long lasting, replaceable, and won't scratch anything. The other cool thing is that this cord can be adorned by beads or accessories. Glass beads from artists in the cannabis community could be neat, tiny wood storage containers...
In the tea world, there are little objects called tea pets. Here is a tea pet...
View attachment 843
Tea pets are little fun creatures to put on your tea table while drinking tea.
I was imagining something like little carved wooden creatures that could be strung onto the case cord. Vape pets. They'd be like little guardians bringing good vibes to your sesh, hah.
I've been developing an updated version of my usage tutorial guide... as I think my original one could be simplified quite a bit. And I'm just wondering if anyone out there has any ideas about what they would like to see included.
Specifically, I'm trying to come up with a way to give people a place to start that will give guaranteed success. This is especially true for people who don't have any experience with unregulated convection.
I think that following a timed sequence, while counting in your head, is a pretty good way to standardize things. For example. With a fresh battery and the standard (low) heater my inhale sequence goes like this:
Button ON...1...2...3...4...5..Start Inhale..6...7...8...9...10...11...12...13...14...Button OFF...15...16...17...18...Stop Inhaling............exhale.
So long as I follow this sequence, I get very consistent results. And if, for example, a user were to follow these steps and they get little or no vapor, I know that likely the issue is draw speed is too fast. And if they report scorching the material, I know they're draw speed is too slow.
This can also be used for the high heater, but with modified timing.
I find that for subsequent draws, the above formula can be modified to add a couple seconds to either the pre-heat time or the draw length time to achieve consistent results on the second, third, fourth...etc.. draw.
The idea here is to eliminate any chaotic variables that I can, so that first time users can quickly dial their inhale speed. Once they get a sense of what it's suppose to feel like, it's easy to branch out from there and augment your technique to achieve different results.
Thoughts?
__________________________
In other news, I'm ordering a ton of textile samples for the final Nomad II case prototype. The design is pretty much finished, but now I am finding that perfect fabric to use. I've got on order a bunch of nice organic textiles.. and raw natural dye ingredients. Nothing is finalized yet, but I'm hoping to offer a handful of colours all hand dyed in house from plant sources. The current front runners for the colours are; Mustards/yellows, Greens, indigo, greys, natural/cream, rust. The indigo and rust colours will come from the two Japanese dye techniques of using real indigo dye vats, and kakishibu (persimmon tannin).
These cases will be slightly padded, but not too much. Still able to fit into a pocket, but just enough protection to make you feel good about tossing it into a backpack.
The design takes a lot of inspiration from the Japanese shifuku, which is a fabric case used to store various tea ware. Here is a poetic article explaining the philosophy behind the shifuku, White Dew
View attachment 835
The fabric case on the left is what we're lookin' at.
I also like the idea of using a braided cord in some way for the closure... it's reliable, long lasting, replaceable, and won't scratch anything. The other cool thing is that this cord can be adorned by beads or accessories. Glass beads from artists in the cannabis community could be neat, tiny wood storage containers...
In the tea world, there are little objects called tea pets. Here is a tea pet...
View attachment 843
Tea pets are little fun creatures to put on your tea table while drinking tea.
I was imagining something like little carved wooden creatures that could be strung onto the case cord. Vape pets. They'd be like little guardians bringing good vibes to your sesh, hah.
@
Yes that one is mine! @Dan Morrison took what i wanted and turned it into a beauty. He took everything i wanted and turned it into a masterpiece on that sleeve design!! My Morrison collectionis growing, it will look nice next to my Okin and i cannot wait till its my turn on the NOMADIIHoly shit, that last one is beautiful!

The issue with bamboo is that I need to use pieces that are almost exactly the correct outside diameter. Bamboo supply is very limited in Canada at the best of times, forget about covid times. I'd like to work on sourcing some hand selected and sized bamboo from China... but it'll take some time, currently it's sort of a back burner project.
But, I think hardwood will work equally well. I am working through some different versions right now...
I sent out an early wood stem to @Jill NYC , and she mentioned that the basket screens I use for my glass stems were not staying in place in the wood stem. So I'd definitely like to remedy that in future iterations. I think the cherry burl I used was too hard for the screen edges to dig in and grab the wood like it does in the slightly softer bamboo..
I like the chamber size adjustments that basket screens allow... but my screens are relatively shallow, so there isn't much sidewall area to grab the inner walls of the wood stems. So I am thinking that I need to adjust my basket size for deeper baskets... they won't cock sideways in the stem, and should slide with a little more friction. I think these will work nicely in the glass stems as well. Dave sent me a few of his deeper baskets... and I like em!
________________________
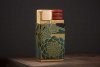
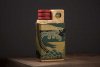
Here's a new sleeve, fresh off the desk. I thought I'd share some process photos as well...
View attachment 498
View attachment 497
View attachment 499
View attachment 492
View attachment 494
View attachment 493
View attachment 495