'The Misty Log' - DIY wooden Log Vaporizer

blokenoname

DIY Log Dabbler 😁πŸͺ΅πŸ’ͺπŸ’¨πŸ’¨πŸ’¨
Morning, @FlyHi :)

First of all, all the heaters used here, can be bought off the shelf. It's no custom made stuff. What we are using here, are 6mm x 20mm stainless steel/ceramic heater cartridges, made for use in 3D printer hot ends and which come at a variety of different wattage and voltage ratings.

For convenience sake, I designate the heaters used here simply by their max wattage/power output at 12v applied as a maximum voltage, which is not necessarily their nominal wattage rating, as used by the manufacturer or seller, which might be a bit confusing, if you haven't read the whole thread yet.

So the '7w heater', I'm alluding to here, is actually nominally rated at 24v/30w, which means, it'll give you a max power output of 30w, when you apply 24v. As we work with only 12v here, we have to recalculate the heater's power output with only 12v applied, instead of 24v, which is quite easy in this case: 1/2 of the nominal voltage applied, means also only 1/2 of the current (A) drawn, and as wattage/power is the product of voltage multiplied by current, you'll get 1/4 of the nominal wattage output as a result then. So with only 12v applied, the 30w heater here will give you: 30w : 4 = 7,5w (~7w).

The 7w cartridge is quite ideal for our purposes, as it can still be used without a dimmer or vvps, but is sadly often hard to get and a bit pricier, than all the other ones. Here is a link:

https://www.amazon.com.au/Bloomerang-Single-Cartridge-Heating-Printer/dp/B07JCJQMSD

Next in line, is the '10w heater', which is nominally rated at 24v/40w (40w : 4 = 10w). This one is easy to get and quite inexpensive, but will make use of a dimmer or vvps mandatory for temp control:

https://www.amazon.com.au/MagiDeal-...009&sr=8-15&keywords=24v+cartridge+heater+40w

The Ohmite resistor, you can get via Mouser au:

https://au.mouser.com/ProductDetail/Ohmite/25J20RE?qs=T1/Cvhh228I%2bs3gSXZfWNg==
 

brainiac

log wrangler
Welcome @FlyHi and good luck with your project.

@blokenoname
Could you also tell us where you get the ss tubing for the heater cover? I've spent ages looking:zzz:
I know you're busy atm so absolutely no rush. Nothing much is going to happen in Brainiac Towers this side of 2019 anyway.
 

blokenoname

DIY Log Dabbler 😁πŸͺ΅πŸ’ͺπŸ’¨πŸ’¨πŸ’¨
Could you also tell us where you get the ss tubing for the heater cover? I've spent ages looking:zzz:
Well.. I've difficulties myself right now, finding another supplier, who's offering the exact same type of thin walled ss tubing, I get from a model making supply shop here in Germany. Maybe we're using the wrong search terms?

The ss tubing I use, is some kind of thin walled telescopic tubing, specifically manufactured with tolerances, that allow for a smooth and easy fit of one size into the next. I get it from Menzel-Modellbau. Their website is in German only, it seems, so you've to use a translation tool.

This is the tubing for the heater cover: OD: 9 mm; Wall: 0,3 mm; ID: 8,4 mm
http://www.menzel-modellbau.de/zube...nwandiges-edelstahlrohr-durchmesser-9-x-03-mm

This is the tubing for the tips: OD: 8 mm; Wall: 0,3 mm; ID: 7,4 mm
http://www.menzel-modellbau.de/zube...nwandiges-edelstahlrohr-durchmesser-8-x-03-mm

As their prices for shipping internationally seem quite exorbitant (€ 21,-) and the UK isn't even listed among the countries they're shipping to, I could add an additional meter of each for you, when I place my next order in January and send it over, when it arrives. Postage will be maybe € 6,- or so then.
 

ubardog

Well-Known Member
Needle Receiving Tube for tatto is a good option for heater tube
https://www.ebay.co.uk/itm/316L-Sta...-Piercing-Needle-Receiving-Tube-/371434490356
Or you can get some Grade 2 Ti fairly cheap. I also looked into SS or Ti hose fittings,( 50mmflat disk leading to a 8mm ID barbed hose fitting). Would have been a nice way to fix it inside log to.
Also gonna get some 1-2mm Needle Receiving Tube to cut up for crimp's
But all this is gonna have to wait a while for me .
 

blokenoname

DIY Log Dabbler 😁πŸͺ΅πŸ’ͺπŸ’¨πŸ’¨πŸ’¨
Morning, folks! :D

Today's menu: further streamlining of the heater cover!

Coming back to using a more narrow 25mm center bore now for thicker walled units, I needed a new washer, to fasten the heater tube to. There is an off the shelf M8 body washer, with a 25mm outer diameter and 8mm inner diameter, that can be relatively easy customized to fit our needs, by fixing it in a vice and giving its 8mm center hole some quick rotations with a 9mm steel drill bit and the drill press.

The body washer will now slip quite snugly over the 9mm heater tube and comes to rest on the flared out bottom end of the tube.
Now it can be mechanically fastened, by placing the heater cover with the washer installed onto a steel block (or other firm surface), taking a wider diameter piece of tubing to slip over the heater tube, till it rest on the freshly installed washer and give the tube 1-2 firm hits with a hammer, to drive the washer down into the flare and press fit it to the heater cover. Voila :clap:

9vayl5.jpg


If you want to add a stop for slide over tips, you can either install a clip-ring, or add a shorter piece of 10mm OD/9mm ID thin walled tubing, that'll slip over the cover, leaving only its tip exposed (bottom right).
If you don't wanna rely on clip rings alone for fastening later, you can also cut two nudges into the washer, for fastening down with screws. Dremel tool + diamond cutter disks is an easy way to go there.
 
Last edited:

FlyHi

Member
Thanks @blokenoname so much for clarifying all the information for me and pointing me to starting points. Thanks your sharing has filled the space of not quite knowing. :tup:

Just to clear one thing up you don’t mind. If I was to purchase this cartridge heater 24v 30w would I be fine to use it in Australia without a dimmer or vvps?

Thanks @brainiac I’ll take all the luck I can get to help start this project:D
Have a good day all
 
FlyHi,
  • Like
Reactions: brainiac

blokenoname

DIY Log Dabbler 😁πŸͺ΅πŸ’ͺπŸ’¨πŸ’¨πŸ’¨
@FlyHi

The 24v/30w cartridge works everywhere the same, as long, as it gets its 12V ;)
It also should work well without a dimmer/vvps. If it proves a tidbit too hot and burns the load, you can adjust it to sit a bit lower within the heater cover later on, so that there's a bigger air gap to the load.

The power supply there is much too big and expensive. This here should do:
https://www.amazon.com.au/SHEMSINZ-...d=1545584342&sr=8-3&keywords=12v+power+supply
 
Last edited:

Abysmal Vapor

Supersniffer 2000 - robot fart detection device
https://core-electronics.com.au/12v-5a-switching-power-supply.html

Somethings like this would be perfect
Correct me If im worng bloke.
not sure about price or site. but 12v with over 2.5 A's But buy over this to be sure
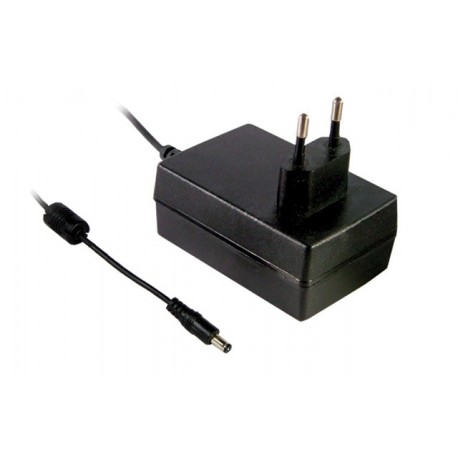
This one is probably overkill for the cartridge heaters.Also those are bulky. Imo best is to get 12v/3a/36w supply than can be plugged directly into the wall.Saves a bit on cables. I have great experience with the brand meanwell there is a local retailer that offers them with 3-5 years warranty depending on the product..Great value for a decent price.
The exact name is :
GS-36E12-P1J
ac-dc-interchangeable-wall-mounted-type-meanwell-gs36e12-p1j.jpg
 

ubardog

Well-Known Member
2mosgwn.jpg


What a bloke !what a man !What a Legend! ty @blokenoname He sent me a random Christmas gift :D
He Sent this last Wednesday but thanks to British royal mail . Its been at my local post office longer than it took to get from Germany. I should get it tomorrow Will post more picks after some testing !
Happy Holidays all!
 

FlyHi

Member
Hope you folks all had a merry Christmas. Thanks again @blokenoname your a top bloke for helping me out again and everyone else here are champs for helping me too and I’ll as well to start this project.
@blokenoname that is so awesome of you with your gift of giving to urardog. Your kind generosity goes a long way through this entire journey you’ve gone through.:clap: You rock:wave: keep up the great journey and thanks heaps for the heads up, I’m going to try order some parts to get started? Hopefully I will make something as half as nice as what your producing;pd; :nod:
Hopefully I can get started soon with some of my health problems in the way. Well hopefully I’ll get there :)
 

The Beagle

Bubbles & Bags
I've been able to try my beta Misty just yesterday night for a couple of sessions through a bubbler and I'm really impressed by it. Excellent taste and serious vapor production with literally just a pinch of weed, the efficiency of this little thing is on a Vapman-esque level.
Now I get why people loves log vapes so much.
Many thanks @blokenoname I'll try to add a video as soon as I can.
 

blokenoname

DIY Log Dabbler 😁πŸͺ΅πŸ’ͺπŸ’¨πŸ’¨πŸ’¨
Final touch on fastening the heater cover: Nudges & Screws :)

Fasten with screws to the wood = solid! You can bounce it off the table now :D
Wider washer and clipring goes on top of that, to hide the screws = solid & neat! :clap:

33tk00o.jpg
 

brainiac

log wrangler
Highly professional example of log making you've got there :tup::clap::rockon:

M8 x 25mm x 1.5mm washers arrived yesterday so today I got out the drill.
Drilled three of them out to 10mm (I'll get a 9mm bit next week).
The top three L -> R 1st attempt:uhoh:, 2nd:rolleyes:, 3rd:\. Getting a tiny bit better as I went along.
The lower one is undrilled but I cut those notches/nudges with the edge of that rusty file.
It takes seconds with the file and might be more convenient than using a Dremel.
washers.jpg

Width of the notches is about 4.4mm. Perhaps they need to be a bit narrower and a bit deeper?

Very useful to read more info on heater cover construction - thx Bloke. It's a critical component
so well worth us paying close attention to the details.
Couple of questions if I may..
I like the 10mm OD sleeve for slide over tips but how is it fixed in place? I guess it's got to do
with the extra washer you've used. What are the dimensions of that washer?
Also a great idea to cover the screws with a M10 x 25 washer (?) fixed in place with a clipring.
Does the clipring hold itself in place purely by friction or do you cut a small recess in the inside
wall of the log to give it some grip?
 

blokenoname

DIY Log Dabbler 😁πŸͺ΅πŸ’ͺπŸ’¨πŸ’¨πŸ’¨
Great :)
The nudges look better than mine! The file is a good idea. I need to get me a proper metal file first, as I've just a set of small ones, that are not up to the task (use them to clean up the heater cover after drilling and cutting).
The 9mm bit will be easier going. I also use a small and inexpensive vice, which has a horizontal and vertical nudges along the inside of its jaws, where the washer can securely rest in, while drilling

Nope. The extra washers don't play into fixing the 10mm sleeve into place. The cover had the outdated 3 washer combo with the bigger M10 10mm/30mm at its base at first, with one of the smaller washers resting below it on the flare (those are designated M8 too, though their ID is actually 9mm and OD is 15mm -the multitude of washer types, sizes and specs confuses the shit out of me-), while the one on too was just for the looks.

Anyway... as I replaced the older 3 washer combo with a single washer now, the 10mm sleeve would slide down the heater tube too far, so that it's intake holes weren't fitting the ones in the heater tube itself any longer. So I just added the two small washers, to prevent that.

So how gets the sleeve fastened? Easy! You just slip it all the way down over the heater tube, fix it in a vice and go through it with a 4mm steel drill bit, to drill the air intake holes. The downwards movement of the drill bit will press the steel of the sleeve into the steel of the tube at the edges of the hole, you're just drilling. That sits snug enough then. Had to actually carefully hammer the tube out of its sleeve, when I took it apart to install the new washer ;)
Would've had better cut me a new cover to begin with, instead of reworking an old one, considering the effort it took, to take it apart :p

The washer covering the screws is a M13 13mm/25mm washer.

Clipring is held solely by friction. As it now has only to hold itself in place and the single washer below it, a recess shouldn't be necessary. As for holding the whole heater cover... that's why I wanted the screws there. The clipring fixed the cover in place neatly so far, but when you drop it once to often, it might come loose.
 
Last edited:

blokenoname

DIY Log Dabbler 😁πŸͺ΅πŸ’ͺπŸ’¨πŸ’¨πŸ’¨
Morning folks :)

Small update on the user serviceable heater version! :nod:
As @Alan already mentioned somewhere, some woods do not hold the threads very good or long, when you cut them along the grain (across the grain works fine, usually). Turns out, this is the case for the cherry and mahogany-sapele, regretfully.

So I thought about other ways to provide a threading for the replaceable heater and found, that the retaining nut coming with the DC jacks fits nicely inside a 24mm x 16mm teflon washer, I had lying around, which again fits nicely inside the 25mm bore at the base (though a ss washer of similar size should do too).

Place nut within 24mm/16mm teflon washer.
25mm/13mm ss washer goes on-top of that, to keep the nut in place.
Fasten down with clipring.
Screw in heater of your choice.*
Voila! :clap:

* Don't forget to mill down the base of the DC jack a bit on opposite sides, so that it can be easily grabbed with pliers or tweezers, for srewing out or in.
jl2tmo.jpg


ETA: might also do to just make a flat recess with a 15mm Forstner bit, to set the nut in, instead of the washer. But have to test this with a new body first, as I can not use the Forstner bits, when there is an existing hole already, as its tip won't have anything to center on then.

:sherlock::sherlock::sherlock:
 
Last edited:
Top Bottom