SloJimFizz

Unknown Member
You mean she's NOT!! :o:tup::rofl:

:shrug: I'm gonna continue imagining she is as she travels the country sampling the finest herbs in her RV which has a Murphy piano of some sort that folds out of one of the push out walls so she can keep her chops up. Don't burst my bubble. :nope:

Relaxing with some stems of a variety of end of stash's while I clean and prep some portables for the week.
Jack Frost, you were good to me.
Gorilla glue, wish I had a semi full.:whoa:
 

flotntoke

thoroughly vaped
My 14mm nano gong was getting a little gunky with reclaim, so yesterday I took a small piece of organic cotton and swabbed out half the reclaim with a wooden skewer. Tonight is the second night I have gotten completely fucked up off of that first swabbing. I still have the rest of the gong to wipe clean and still don't know how much is left on this first cleaning. I'm gonna try and kill it right now:

Edit: :razz: There's still some left.

It would have been a sin to wash this reclaim down the drain with iso. It doesn't taste like huckleberries or fresh lemons, but it don't taste half bad and it sure catches you by the boo boo.

I'm so crescent fresh.

Wand hash like this doesn't always taste the best, but I find it a very nice buzz. And, seems like you're getting a free bonus - doesn't it?

Might be a little late now, but when she gets all gunked up again, try making some magic milk. One very gooed up GonG adapter should be enough to make a tasty and potent drink or 2. Just throw the whole thing (screen and all) into some close to boiling milk and stir lightly for a couple minutes. Rinse well with hot water to remove milk and all the reclaim should be gone. If it isn't, give it another dunk in the milk for a couple minutes. Make sure you don't have anything to do for at least 4 hours when you drink it. :D
 

BabyFacedFinster

Anything worth doing, is worth overdoing.
Wand hash like this doesn't always taste the best, but I find it a very nice buzz. And, seems like you're getting a free bonus - doesn't it?

Might be a little late now, but when she gets all gunked up again, try making some magic milk. One very gooed up GonG adapter should be enough to make a tasty and potent drink or 2. Just throw the whole thing (screen and all) into some close to boiling milk and stir lightly for a couple minutes. Rinse well with hot water to remove milk and all the reclaim should be gone. If it isn't, give it another dunk in the milk for a couple minutes. Make sure you don't have anything to do for at least 4 hours when you drink it. :D

I would if I wasn't such a lightweight. In fact, after many years of enjoying cannabis, I have never tried an edible or any cannabis meant to be absorbed through digestion. I worry about ingesting too much and having a 4 hour panic attack. It's bad enough when vaping too much and having to wait out an uncomfortable hour or so. It is much more manageable to vape the reclaim in small amounts for me. BTW, I swabbed the rest of the reclaim yesterday and I'm still getting high off of that tonight.

:shrug: I'm gonna continue imagining she is as she travels the country sampling the finest herbs in her RV which has a Murphy piano of some sort that folds out of one of the push out walls so she can keep her chops up. Don't burst my bubble. :nope:

just like I really am a cigar-smoking baby :spliff:
 

BabyFacedFinster

Anything worth doing, is worth overdoing.
Ok, I just vaped the most flavorful cannabis I have ever had, hands-down.

At the risk of violating the rule about discussing growing cannabis, I'll just say that I recently had access :brow: to some scissor hash from some very fresh Bubba Kush. Wow.

The high is mellow so far and the flavor was heavenly. The best I can describe the flavor is like pure honey-sweet cannabis extract. I put a scoop of it between two pieces of cotton and dropped it in my nano gong.

I can't wait to vape some of those stinky Bubba buds. :clap:
 
Last edited:

dutz3013

Well-Known Member
Is there a guide for eNano use? I got a list of questions on how to use it properly with the dry stem and an adjustable screen. I also dont have the tool it comes with. How far should my screen be from the heating element? Sometimes I feel like the bud doesn't turn as brown as it should does that mean its too far away? too packed in the screen? And do I need to let the vapor build or can I extract pretty much all the thc by continuously puffing (long slow draws) once the enano is heated up to its temperature. Typically I use settings 5-7. And how much do I know to load? People say .025 to .1 and some say a pinch. Sometimes I put a pinch and feel like not enough vapor is coming out, I'm not sure if its because i'm not loading enough or because of the screen being too far away or packing it improperly. Thanks guys!
 
dutz3013,

ataxian

PALE BLUE DOT
Def use the 91% iso. Sometimes the supermarkets don't have it, but pharmacy stores will always carry.

Soaking will eventually clean them. It is a matter of how much gunk is on the screen. The gunk/reclaim is the solute and the iso is the solvent. Sometimes the solvent needs more time to penetrate due to the thickness of the solute it is dissolving. I'm not a scientist but I play one on FC.

I never noticed an off-taste from using the torch, but my sense of taste is not as strong as others, especially through glass.

BTW, still working on my supply of Cheese through the nano. I had some with me when I recently went on vacation and it just makes everything groovy.

I have to recommend the use of a Smoke Buddy when on vacation (and many other situations). The Smoke Buddy removes all sense of odor, vapor, smoke from your exhale. I was always concerned about setting off a smoke alarm in a hotel room when vaping. I don't know if vaping would set off a smoke alarm, but it always freaked me out. The Smoke Buddy removes all concern.
Cleaning is like RELIGION.

We all have our different method's of cleaning GLASS?

I have a small amount of GLASS I like to keep clean. (to a point of being NEUROTIC)

SCREEN I just replace with a new one.
500 for $10 on flea.bay (ebay)

Dish soap and SIMPLE GREEN and warm tap water and shake. (Plug the end's with a WINE STOPPER) or whatever works?

I use a little salt for abrasive when I have some grime on the perk.

Now I clean between every session. (FREAK)

PBW and ACOLOX I have used and they work but I use what my wife buy's to clean the windows and stone floor.

I'm a CHEAP LOW or NO INCOME SACK.
Do what you feel comfortable with or can afford?

My NANO needs some attention so I'm done displaying my POV.

EMPIRICAL PROOF is my thing.

@BabyFacedFinster I love your post. (this site is SJW or PC) we can't talk about growing a plant that is harmless.
 
Last edited:

SloJimFizz

Unknown Member
:rip: My 14mm gong. I barely knew thee.
Mr. Ives is officially Gongless. :cry:

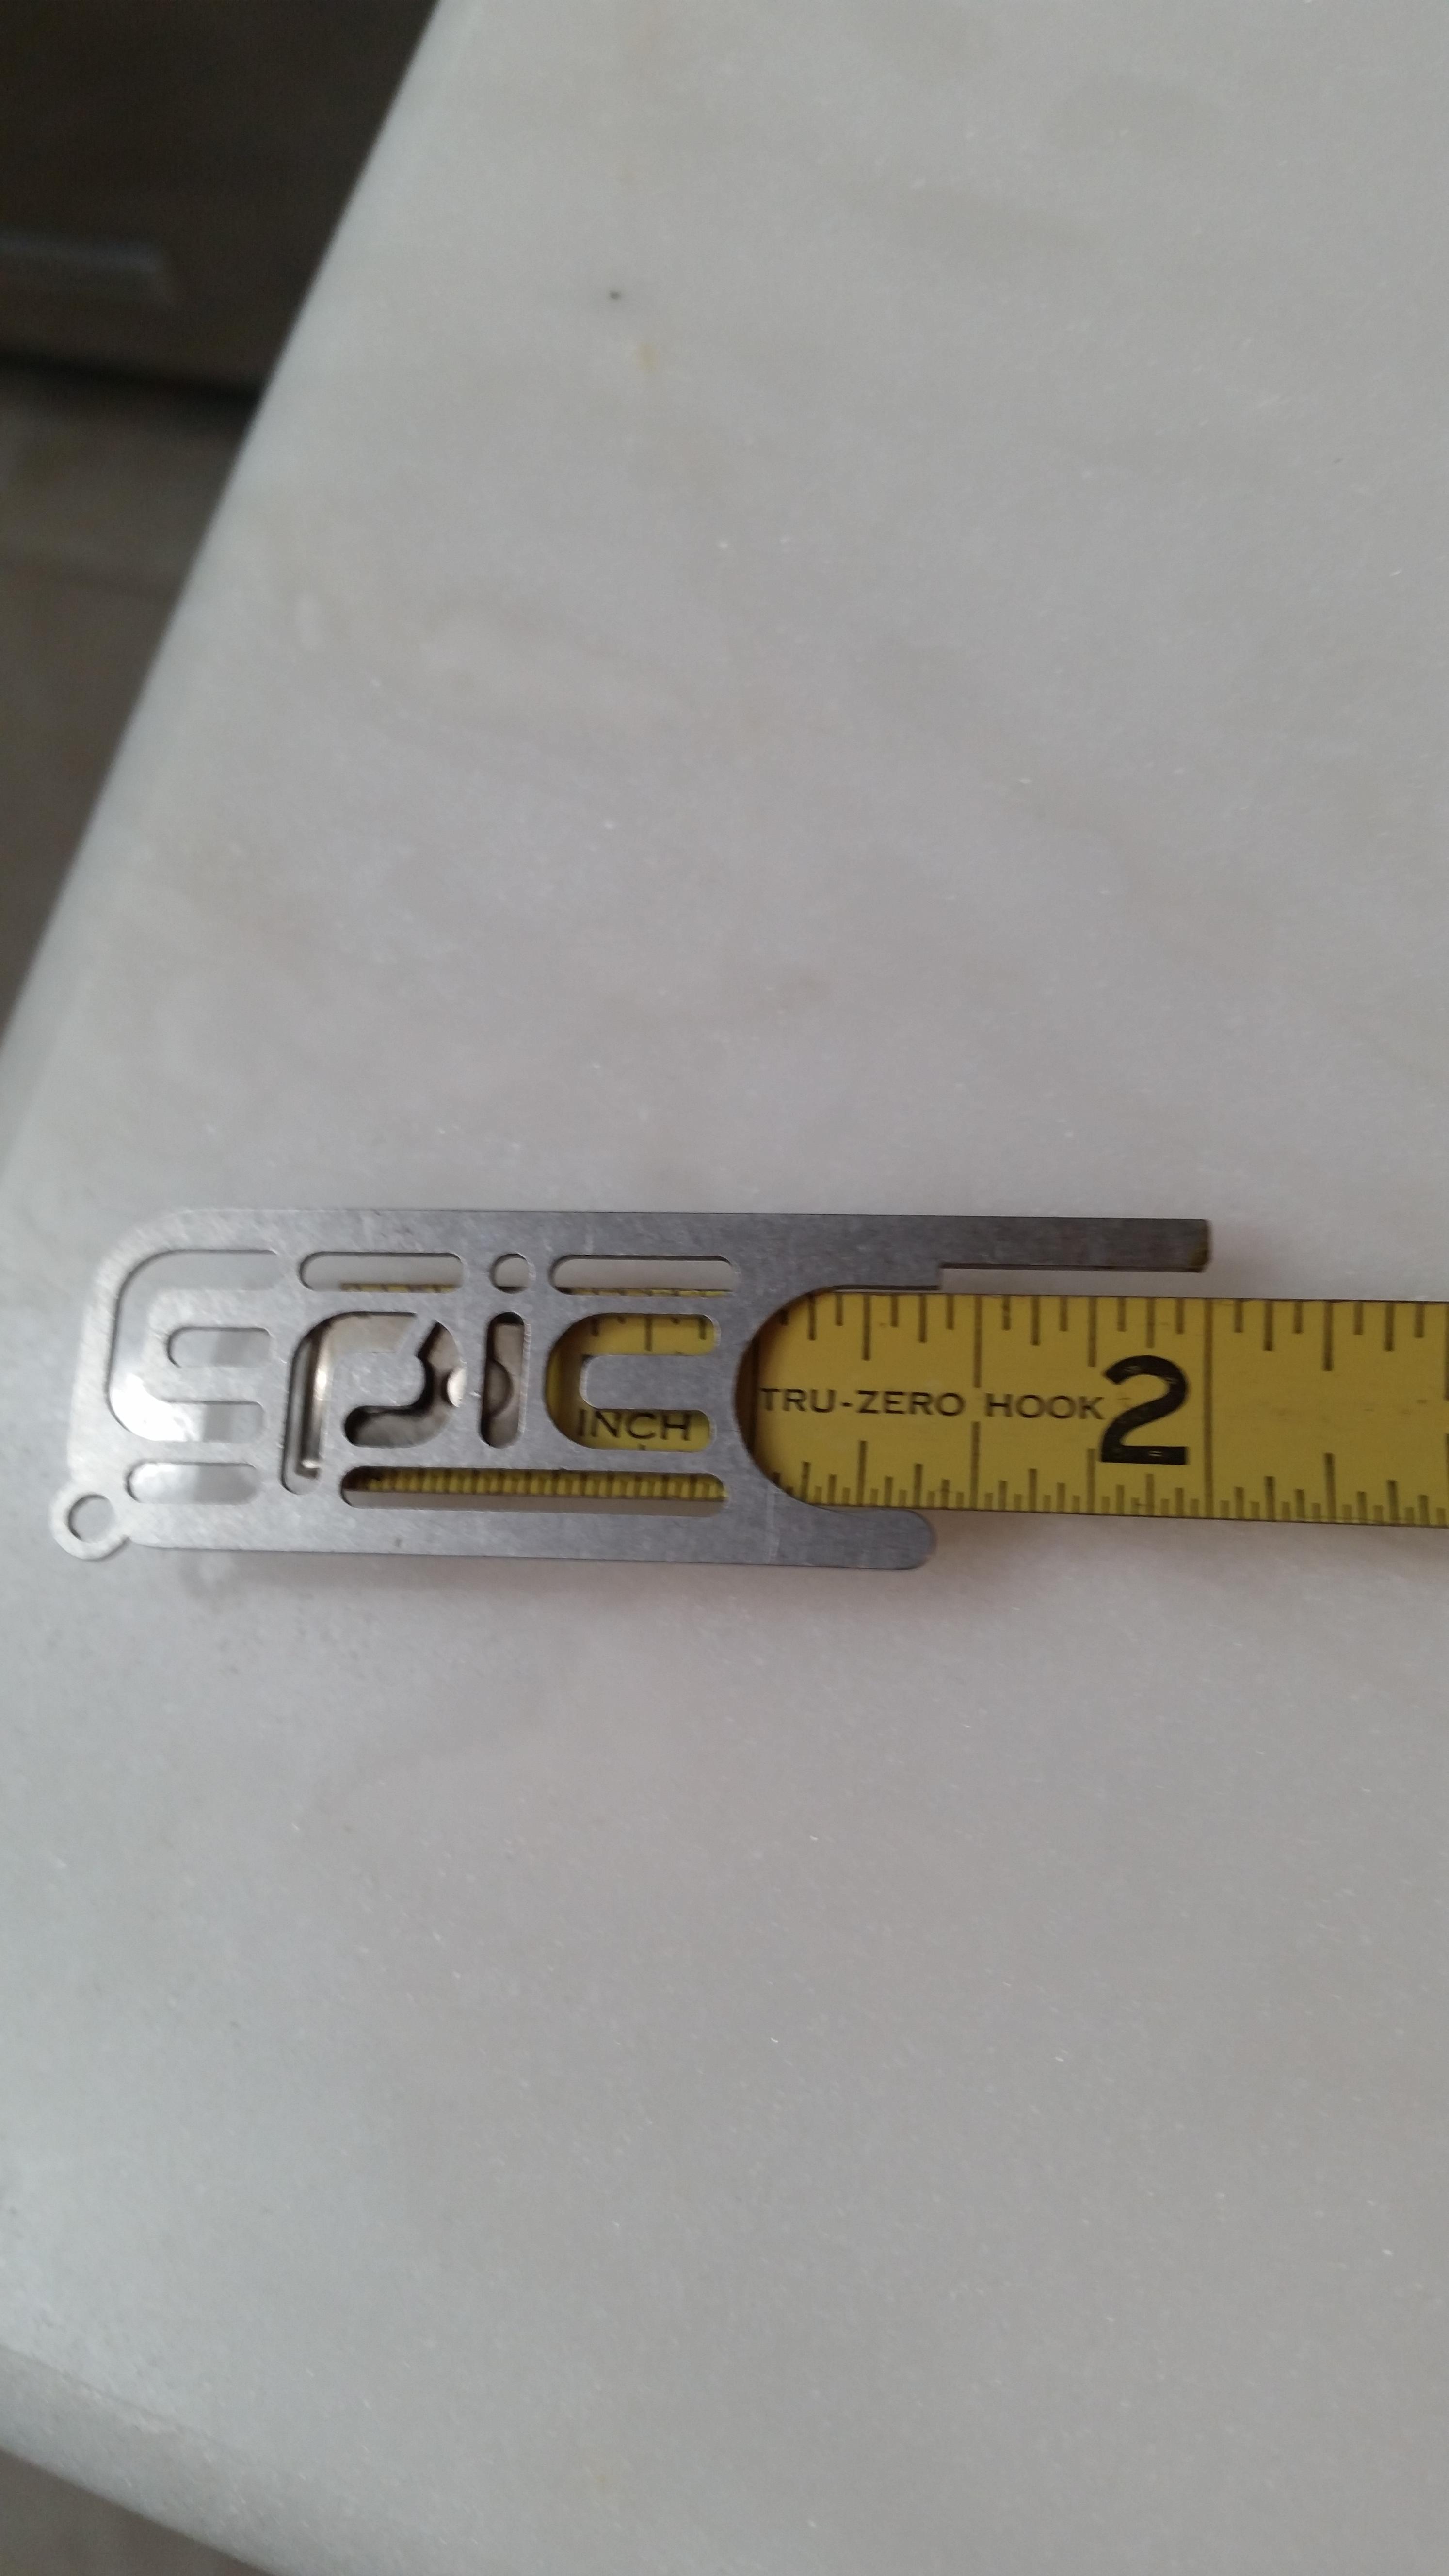
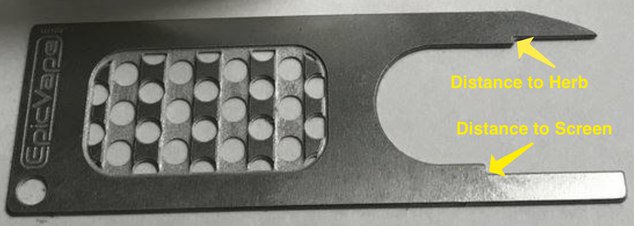
@dutz3013 Here is a pic of the E-pic on a tape measure if you want to make some guide sticks or set the glow in the dark gripper right at where you want the screen. The longer arm, from the bottom to the notch sets the screen, Right about 5/8" inch deep, and the shorter arm shows where the load should come no higher, about 7/16" from the top which equals about a 1/4" off material height.
Get your mitts on one, pretty useful tool. I use mine for more than just the nano time.

OusoBcv.jpg

I have the adjustable stems too, but use the same measurement the E-pic sets when placing my screen.
For me, no matter what size the bowl, I like it somewhat tamped down. A little resistance builds bigger hits, which is also the case in most of my vapes.

Edited to correct wrong measurements. :doh:
 
Last edited:

flotntoke

thoroughly vaped
Is there a guide for eNano use? I got a list of questions on how to use it properly with the dry stem and an adjustable screen. I also dont have the tool it comes with. How far should my screen be from the heating element? Sometimes I feel like the bud doesn't turn as brown as it should does that mean its too far away? too packed in the screen? And do I need to let the vapor build or can I extract pretty much all the thc by continuously puffing (long slow draws) once the enano is heated up to its temperature. Typically I use settings 5-7. And how much do I know to load? People say .025 to .1 and some say a pinch. Sometimes I put a pinch and feel like not enough vapor is coming out, I'm not sure if its because i'm not loading enough or because of the screen being too far away or packing it improperly. Thanks guys!

You're in the best guide available! Welcome to FC and the nano-nation! Best of thread has some good info all in one place. You'll probably also want to skim the last 150 pages or so for good info that comes up all the time.

Seems you have seen posts about using the tool to set screen depth. Put it on your short list for when you order accessories from EpicVape. Think they're still only $5. The depth of the screen from lip should be about 14mm +/- 2mm. 12 - 15 mm is the length of the long leg you'll see in pictures of the E-Pik tool. Think they used to be a little shorter. Sorry @SloJimFizz - not even close to an inch depth - more like 1/2 - 5/8".

Is this your first vape? OR, maybe first real vape I should ask. IOW, not a simple conduction (oven) based portable? Asking because there are some vaporizing basics that apply to most vapes - especially convection vapes like nano. Many factors are going to lead to better or not so good vapor, and different results. Also, there are many personal preferences (like how brown your ABV will be). Too far from heating element can be a problem that will leave less material vaporized to brown. Too much moisture in load, too low of heat, drawing too fast, heater set too low and screen too low in stem are some of the variables that can cause this, as well as others. You also need decent nugs for worthwhile vapor production. Schwag or Mexi-dirt can work, but not too well.

Try to get load as close to heater you can without touching, and tweak on your own using info here to find your favorite settings or to deal with things out of your control. Many of these parameters will also change a little bit depending on your material, how dry it is, ambient temp and even a bit of difference where you have it plugged in and how (such as using extension cord, surge suppressor, different circuit at home that may have other stuff running on it). Usually these changes are very minor, but you'll be able to tell once you get used to your nano.

5-7 on the dial is probably about where you want to be for power setting. Bare in mind these dials are not exact from one to the other (my 6 may be your 5.75 or 6.5 or whatever), and that the dial position can be moved. Seems like you picked this up used, and previous owner may have moved it a little one way or the other. Best placement IMO is to be sure your 0 mark lined up properly and go from there. Lower temps produce wispier vapor that creates more of a "heady" high. Higher temps will produce denser vapor that usually has more of a "body" or "couch-lock" buzz, both in varying degrees depending on variables. 5.5 - 6 on dial seems a good place for most to start and adjust from there as you like. Always better to start lower and work higher while trying to find your sweet spots. No use starting higher and moving lower, as you'll be vaping actives at the higher temp that the lower temps won't release.

How much to load is pretty much up to you. Some load less (I usually do) and some load more. What's really more important than size of load - or depth of screen for that matter - is distance from heater screen (the one on top of cylinder inside nano cup). Optimal is to be as close as you can without load touching it. Err on the side of not touching, rather than barely touching, for best results. You're not going to want to tamp the load down too tight, so you use screen depth to make a deeper area for a larger load. Keep in mind that larger loads will require more stirring, but give more hits. Just another thing the E-Pik tool is good to have for. But, anything with a flat small blade (like a small screwdriver, or cut off and flat blade shaped chopstick) will work well.

I prefer to use material with a medium-fine grind. Others use whole nugs. Both work well, though you'll notice differences of each. Whichever you use, don't pack too tightly. nano being convection requires airflow around and through the load for good vapor production. If you pack tightly, it won't work as well and you'll be straining to get good hits. Kind of like trying to suck a very thick milkshake through a too thin straw.

Size of load gets very subjective, and I think it is easier to site view it than weigh. What you want is a very lightly tamped load that will barely not touch heater screen. A good way to figure this out is to use a cold nano to push the load down and force the screen deeper (or a hot nano, but be sure to gently clean any material off the heater screen soon as you can). Use a tamper (I like a golf pencil or flat end piece of chopstick - the top part) and push it just a little lower. You can mark this screen depth and where the heater core goes into your stem so you know how much you can put in with a Sharpie right on the glass (cleans off easily with alcohol later), or use the silicone sleeve as a depth guide for screen depth if you have one on your stem. After doing this I'd dump that load and fluff it a little, because pushing it down like this will probably compress it too much. No worries, your spots are now marked. Just put not quite all of that load back in to vape and you should be good to go.

I usually like a very small load that only gives 3-4 hits. 2nd and 3rd being the best. 1st can be a bit wispy as you're heating everything up (but not always) and 4th is straining to get vapor because it is pretty much spent. Usually takes a good stir to even get that from it. Sometimes I'll go with a larger load (up to 7-10 hits) and just stir every 3 to keep it going. Flavor will usually drop off after first 3 hits either way. This is the biggest reason I like smaller loads, but larger ones will still be effective even after most flavor drops off.

nano will work OK by just loading it and getting things lined up. But, with a little practice it gets SO much better. This is one of the great things about this vape. It works OK if you throw it together, but is so versatile it allows any user to tweak to their own preferences and use in different ways (big loads vs small, higher heat vs lower, on a water piece instead of dry stem, for concentrates, etc).

So, my advice is to get reading, and start practicing. The best of thread is a great place to start. Learn how to use the search function at the top right corner of every FC page. It can be a pain in the ass, but will usually point you in the right direction. Also, hate to be snooty/conceited, but I've made a good many posts about nano use and tips for more than 4 years in this thread. You can use the search function to look for posts by a specific user in a specific thread. Look for my posts and you can usually tell from the first couple lines whether there is worthwhile usage info and tips - or is just me stoned and rambling on about whatever.

Once you get a better grip on things, you might want to check out nano with a bubbler or other water tool. Most of us do, though some still prefer dry. Might want to keep this in mind while searching thread. You'll need a GonG adapter of proper size from EpicVape, and a glass piece to put it on. Many cheap ones available from China that work great. More on all of that later if you like.

You should post other questions as needed here in the thread. FC is a great place, and this thread is one of the best IMO. Plenty of people will be anxious to help you get a handle on things. But, do a little checking on thread. Some things are asked repeatedly - and some members (me probably worse than most) get a little gripey when you ask a question that was just answered recently on the previous page or three. Also, feel free to PM me for any specifics you'd like (click on someone's name and then start a conversation in the pop-up).
 

flotntoke

thoroughly vaped
@flotntoke Lots of good info.
Thanks for catching my jacked up measurements, huge brain fart there. Edited my post with the right info. May have been partially vaped at the time. :haw:

All good, and didn't really want to call you out on it - but could screw up someone breezing through.

And, I totally get it. Know that old axiom... measure twice, cut once? When vaped for me it's more like measure 5 times and still cut a few times!
 

ataxian

PALE BLUE DOT
You're in the best guide available! Welcome to FC and the nano-nation! Best of thread has some good info all in one place. You'll probably also want to skim the last 150 pages or so for good info that comes up all the time.

Seems you have seen posts about using the tool to set screen depth. Put it on your short list for when you order accessories from EpicVape. Think they're still only $5. The depth of the screen from lip should be about 14mm +/- 2mm. 12 - 15 mm is the length of the long leg you'll see in pictures of the E-Pik tool. Think they used to be a little shorter. Sorry @SloJimFizz - not even close to an inch depth - more like 1/2 - 5/8".

Is this your first vape? OR, maybe first real vape I should ask. IOW, not a simple conduction (oven) based portable? Asking because there are some vaporizing basics that apply to most vapes - especially convection vapes like nano. Many factors are going to lead to better or not so good vapor, and different results. Also, there are many personal preferences (like how brown your ABV will be). Too far from heating element can be a problem that will leave less material vaporized to brown. Too much moisture in load, too low of heat, drawing too fast, heater set too low and screen too low in stem are some of the variables that can cause this, as well as others. You also need decent nugs for worthwhile vapor production. Schwag or Mexi-dirt can work, but not too well.

Try to get load as close to heater you can without touching, and tweak on your own using info here to find your favorite settings or to deal with things out of your control. Many of these parameters will also change a little bit depending on your material, how dry it is, ambient temp and even a bit of difference where you have it plugged in and how (such as using extension cord, surge suppressor, different circuit at home that may have other stuff running on it). Usually these changes are very minor, but you'll be able to tell once you get used to your nano.

5-7 on the dial is probably about where you want to be for power setting. Bare in mind these dials are not exact from one to the other (my 6 may be your 5.75 or 6.5 or whatever), and that the dial position can be moved. Seems like you picked this up used, and previous owner may have moved it a little one way or the other. Best placement IMO is to be sure your 0 mark lined up properly and go from there. Lower temps produce wispier vapor that creates more of a "heady" high. Higher temps will produce denser vapor that usually has more of a "body" or "couch-lock" buzz, both in varying degrees depending on variables. 5.5 - 6 on dial seems a good place for most to start and adjust from there as you like. Always better to start lower and work higher while trying to find your sweet spots. No use starting higher and moving lower, as you'll be vaping actives at the higher temp that the lower temps won't release.

How much to load is pretty much up to you. Some load less (I usually do) and some load more. What's really more important than size of load - or depth of screen for that matter - is distance from heater screen (the one on top of cylinder inside nano cup). Optimal is to be as close as you can without load touching it. Err on the side of not touching, rather than barely touching, for best results. You're not going to want to tamp the load down too tight, so you use screen depth to make a deeper area for a larger load. Keep in mind that larger loads will require more stirring, but give more hits. Just another thing the E-Pik tool is good to have for. But, anything with a flat small blade (like a small screwdriver, or cut off and flat blade shaped chopstick) will work well.

I prefer to use material with a medium-fine grind. Others use whole nugs. Both work well, though you'll notice differences of each. Whichever you use, don't pack too tightly. nano being convection requires airflow around and through the load for good vapor production. If you pack tightly, it won't work as well and you'll be straining to get good hits. Kind of like trying to suck a very thick milkshake through a too thin straw.

Size of load gets very subjective, and I think it is easier to site view it than weigh. What you want is a very lightly tamped load that will barely not touch heater screen. A good way to figure this out is to use a cold nano to push the load down and force the screen deeper (or a hot nano, but be sure to gently clean any material off the heater screen soon as you can). Use a tamper (I like a golf pencil or flat end piece of chopstick - the top part) and push it just a little lower. You can mark this screen depth and where the heater core goes into your stem so you know how much you can put in with a Sharpie right on the glass (cleans off easily with alcohol later), or use the silicone sleeve as a depth guide for screen depth if you have one on your stem. After doing this I'd dump that load and fluff it a little, because pushing it down like this will probably compress it too much. No worries, your spots are now marked. Just put not quite all of that load back in to vape and you should be good to go.

I usually like a very small load that only gives 3-4 hits. 2nd and 3rd being the best. 1st can be a bit wispy as you're heating everything up (but not always) and 4th is straining to get vapor because it is pretty much spent. Usually takes a good stir to even get that from it. Sometimes I'll go with a larger load (up to 7-10 hits) and just stir every 3 to keep it going. Flavor will usually drop off after first 3 hits either way. This is the biggest reason I like smaller loads, but larger ones will still be effective even after most flavor drops off.

nano will work OK by just loading it and getting things lined up. But, with a little practice it gets SO much better. This is one of the great things about this vape. It works OK if you throw it together, but is so versatile it allows any user to tweak to their own preferences and use in different ways (big loads vs small, higher heat vs lower, on a water piece instead of dry stem, for concentrates, etc).

So, my advice is to get reading, and start practicing. The best of thread is a great place to start. Learn how to use the search function at the top right corner of every FC page. It can be a pain in the ass, but will usually point you in the right direction. Also, hate to be snooty/conceited, but I've made a good many posts about nano use and tips for more than 4 years in this thread. You can use the search function to look for posts by a specific user in a specific thread. Look for my posts and you can usually tell from the first couple lines whether there is worthwhile usage info and tips - or is just me stoned and rambling on about whatever.

Once you get a better grip on things, you might want to check out nano with a bubbler or other water tool. Most of us do, though some still prefer dry. Might want to keep this in mind while searching thread. You'll need a GonG adapter of proper size from EpicVape, and a glass piece to put it on. Many cheap ones available from China that work great. More on all of that later if you like.

You should post other questions as needed here in the thread. FC is a great place, and this thread is one of the best IMO. Plenty of people will be anxious to help you get a handle on things. But, do a little checking on thread. Some things are asked repeatedly - and some members (me probably worse than most) get a little gripey when you ask a question that was just answered recently on the previous page or three. Also, feel free to PM me for any specifics you'd like (click on someone's name and then start a conversation in the pop-up).
That guide look's cool?
I don't use one since I don't have one?

Now I use my hand's like a CAVEMAN

Can I order one?
 

pxl_jockey

Just a dude
Is there a guide for eNano use? I got a list of questions on how to use it properly with the dry stem and an adjustable screen. I also dont have the tool it comes with. How far should my screen be from the heating element? Sometimes I feel like the bud doesn't turn as brown as it should does that mean its too far away? too packed in the screen? And do I need to let the vapor build or can I extract pretty much all the thc by continuously puffing (long slow draws) once the enano is heated up to its temperature. Typically I use settings 5-7. And how much do I know to load? People say .025 to .1 and some say a pinch. Sometimes I put a pinch and feel like not enough vapor is coming out, I'm not sure if its because i'm not loading enough or because of the screen being too far away or packing it improperly. Thanks guys!
Hey @dutz3013 welcome! I'm a newbie as well, to vaping in general & Nano specifically, and you have indeed found the best user's guide. And you picked a kick-ass vape. @flotntoke laid it out for you and you really should skim last 150 pages or so for the most common questions. I can tell you there's a depth of knowledge and experience in this thread like very few others, I have found good info from several years ago here. I only say that because when you search, some results may be old but will still be worthwhile. Also, if you're having difficulty finding your answer with the search here, using your search engine works well as many of your results will be for a page right here on FC!

When first starting to research I quickly discovered that other vape-related forums often cited answers attributed to FC members, so FC is where you want to be IME. Anyway, @flotntoke really got you sorted and his advice on practicing is on point: these are analog devices and from what I've read no two are identical, there are sooo many variables. Vaping seems to me a highly individual experience in terms of what one wants from the experience, so depending on the question there may be several correct responses. By reading I saw there are many different opinions and techniques that I had not even considered. That's why you must play around. But it will be some fun practising, I guarantee that! And you will quickly get where you want to be.

FWIW, I've been vaping for almost a whole month so what do I know?! :D WELCOME! :peace:
 

dutz3013

Well-Known Member
@flotntoke Thanks for all the great info!
I have had a pax 3 for a few months now so this is my second vape but first convection and first desktop. Screen too low in the stem can cause the herb to not brown as much as it should?
Could you elaborate on that. And I use high quality stuff. Should I have the herb be only filled to the brim of the screen? or past the screen but still not touching/almost touching the heating element.
And I haven't bought the pick yet because shipping is a little high just for getting the multi tool but I really want it! I have a gong adapter to add it to a water pipe but I'm waiting to order the d020 like everyone else. My current piece is ok with it but has too much diffusion and is too big and leaves me out of breathe lol. Thanks again :)
 

CarolKing

Singer of songs and a vapor connoisseur
@dutz3013 your material shouldn't be touching the oven, you will get charring and an uneven vaporizing of your flowers. I would see what works far as amount of cannabis and distance from the oven.

Do you want a session or a couple of fast heavy hits? I would practice using various amounts and temps. If you get draw resistance it means you have used too much cannabis or maybe a dirty screen. If you use too much product that butts against the oven and you get a restricted draw. You may need to adjust your screen but usually I set my screen and very seldom adjust it after I find my sweet spot.

I personally like a 10 min session when I vaporize. I don't use too high of heat, then I can enjoy the flavor and take my time. I use a temp around 6 and use a medium grind. It's finding your sweet spot. It might be different than someone else. The temp dial and electrical outlets are a little different. My temp 6 might be different than your unit at your house.

I need to adjust the temp depending on the cannabis. If it's too harsh I turn things down. If not enough flavor I turn the temp up. An easy vaporizer to use, after you get your screen where you want it, you will be good to go.

I love this vaporizer for ease of use and flavor. The price isn't bad either.

Eidt
I stir my load usually half way through my session. That freshens the load to get a better even extraction.
 
Last edited:

Baron23

Well-Known Member
I'm just not sure iof how far to pack my herb when using the dry stem, should the herb be packed to the length of the screen wall? or are you able to pack it further? Sorry if my wording is poor, just did a pack of some bruce banner..
First, put your screens in with the basket facing toward you and your lips and the bottom of the basket facing the chamber/heater.

Your nano came with e-pik tool, right?
https://epicvape.com/product/e-pick/

If so, the longer side is to measure to the default screen position and the shorter side allows you to measure to the default top of the load level.

lLqqVkc.jpg


You can adjust from there, but I find the defaults to be pretty good. My screen is generally about a 1/16" deeper but that's about it for me.

Hope this is helpful
 

howie105

Well-Known Member
.55" Rim of stem to top of the moveable screen in the dry stem.
.41" Rim of stem to top of load.

The above is the depths of set I use which is nor necessarily the manufacture suggested settings because I lost my pick. One more thing for your plate, experiment with how much or little you pack the load. I like just enough compression to hold the load off the heater screen.
 

flotntoke

thoroughly vaped
I'm just not sure iof how far to pack my herb when using the dry stem, should the herb be packed to the length of the screen wall? or are you able to pack it further? Sorry if my wording is poor, just did a pack of some bruce banner..

Sorry to you and all others for the previous super lengthy post. Was trying to give a full overview for you and any others passing through.

Give that another read if you didn't get all of it, but let me try to be a bit more concise on this part here. (HA! Like that was going to happen!)

First thing to get into should probably be screen orientation. Sounds like you have your screen in what is normally called "basket" configuration. This means the open end of the cup of the screen is towards the nano. Biggest reason I see to do it like this is that it is easier to put screen in this way. Just put flat side to stem/GonG opening and push. Pros: easier to put screen in, will keep load warmer with screen material around it. Cons: Will keep load warmer with screen around it (pro & con depending on what you like), makes for a much messier screen, a little less material can be put in.

If you flip the screen (open end towards you or water piece, flat side towards nano) it is what is usually called "hat" configuration. I like this a bit better, though it can be tricky to get the screen in while dealing with wobbly sides and pokey screen ends. Pros: screen stays much cleaner and is easier to clean, a bit easier to set and hold proper distance, can fit a bit more material, load only has glass retaining heat instead of metal screen retaining more heat around it. Cons: can be a real pain in the ass to get into the glass!

To answer your question, in basket config you can still load up past sides of screen.

As said in last big post, you can drop the screen down into stem/GonG (away from nano) to create more space for a larger load whther in "basket" or "hat" configuration. I wouldn't get too crazy here, but you can easily double the E-Pik distance to add more. Whether you go with this larger load, or regular, shorter depth screen, the key is how far you are away from heater. With either you want to be as close as you can without touching. Bigger loads on a deeper screen will require more stirring for full vaping of material.

You can use the silicone sleeve as an indicator for your screen depth (put level with top or bottom of screen). Or, you can use a Sharpie to mark screen depth or where your nano goes into your glass so you know the max amount of material you can put before you hit the heater screen. This top line (at closest to heater you want to be) will work no matter how deep you set your screen, but will vary a bit on every piece of glass (and a bit from nano to nano).

You can also roll the silicone sleeve down a little on GonG adapters to give you a lip that makes it easier to pull the GonG for clearing your piece. Pics below show it rolled down like this, but probably better to roll a little further down so it doesn't flip back up every couple times you use it.

We're way over due for a couple pictures showing this better than could ever be explained. Had a new 14mm GonG I'm planning to start using, so grabbed it and my good old Cherry Girl (V1 nano that has been sitting on shelf for a while). Sorry she is so messy! Should have been cleaned long ago.

3brpUwl.jpg


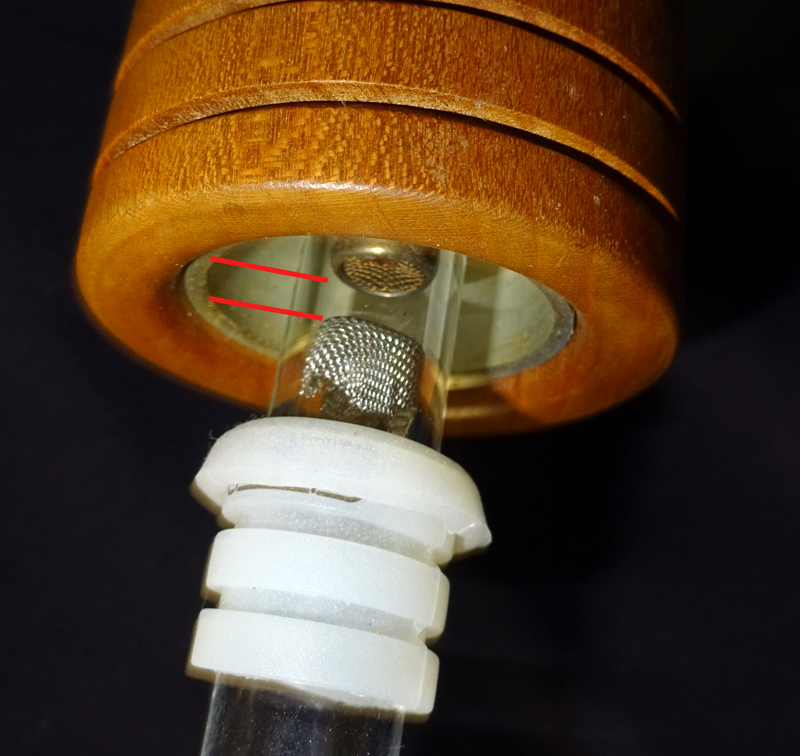
This pic shows regular (E-Pik tool) depth. It's a little hard to set up exact straight lines because of the angle, but you want your load to be between the red lines. I grind medium to medium-fine, suck a little up into the end of stem/GonG, and give a very light tamp with end of a pencil. If too little in stem, add a bit more. If too much, tap a little out. Before hitting, you want your load to be almost at heater screen (top one in this pic), but not touching. About 1 - 1.5 mm away seems to be optimal. A US dime is about 1.35 mm for comparison, so try to go dime width and you should be good if a little off either way.

Forget about weight (unless trying to figure out just how effective nano is, or how much money it is saving you!). Depending on your strain, grind and whatever else, it may weigh a little more or a little less. The important part is a light tamp that leaves you close to heater without touching!

This load should give you at least a couple good hits. Usually gives me around 4 with a stir after 3rd. YMMV.

G18rK7o.jpg


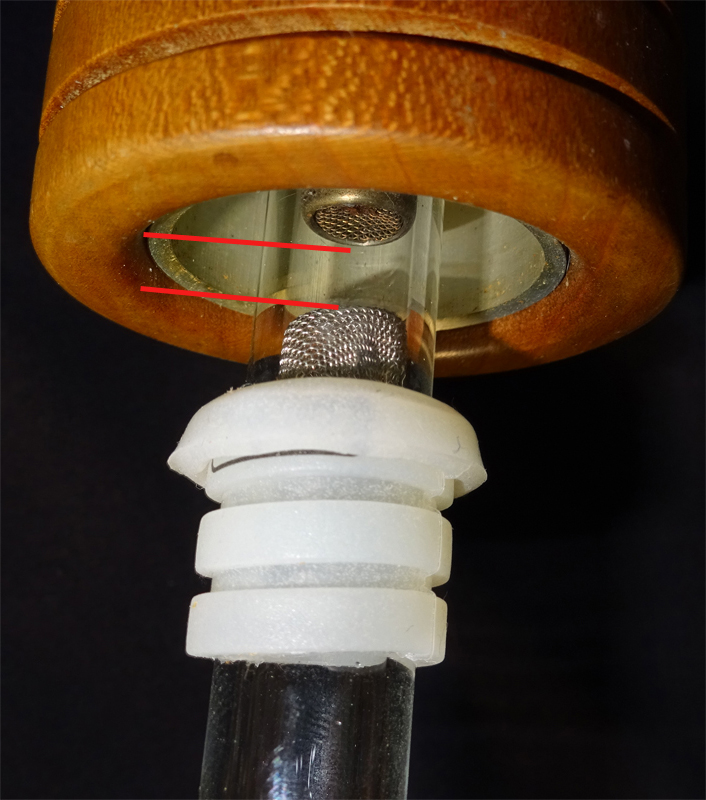
This pic shows the screen pushed further into the glass. All of the above applies except you can now fit a larger load. Follow the guidelines above and add more ground material to get 8-10 hits instead of 3-4. Not positive on this exact setup because haven't used it, but this is about where I am for larger loads. I find it best to give a stir after every few hits to keep vapor production up. Flavor will drop off after first 3 hits or so, but you can still produce plenty of great vapor. When vapor production stops - even after a stir, or flavor starts going to popcorn, time to dump and reload.

Notice my screen in both pics isn't perfectly flat on flat side. I'll adjust before using because I like them totally flat in relation to glass and nano. But, they work just fine if a little out of whack like this one.

You could probably double this screen distance again, and still have a decently vaped load. But, it will require even more stirring and "flipping" the load (getting top to bottom and bottom to top). IMO this is too much of pain the ass to do while the load is in the glass. Usually better to dump whole thing, stir, and suck back up into glass. This is why I hardly ever do this. By the time you dump and reload, might as well dump out ABV of a regular double load (as in pic just above), and load a fresh one.

Worth mentioning here is that you will have to reload a good bit more than you may have to with other vapes. Pain in the ass, right? Not really IMO, and becomes second nature after a while. My process in post below. Simple? Might not look like it while reading, but really is in practice.

Anyway, the plus sides greatly outweigh the downsides here. The less you load at a time (within reason - stick with screen at top pic distance for minimum), the more flavor you'll get out of every gram. I would argue the more effect too, but that gets pretty subjective. When doing smaller loads like this, you stay more in touch with flavor and effects. Not that "over-vaping" a bit is usually a bad thing, but helps you to learn how your vapor is hitting you - something I really enjoy. Also, helps keep you from wasting your stash. Biggest reason? If you use regular depth in top pic (E-Pik depth) you will get awesome flavor from at least 3/4 of your hits. No other vape I know of can do this!

SO MUCH FOR A SHORTER POST!!!:lmao:Figured it was going to go here once I started taking pics. NO worries.... will just have to cut the grass tomorrow. ;)
 

flotntoke

thoroughly vaped
My regular everyday process:
  • Make sure your material is pretty dry. Sticky is fine, but you want humidity/moisture down around 40 - 55% MAX. Don't need to measure it. Snap a small stem. Does it snap or bend and break? Snap is good, bend and break is usually not quite dry enough for me. If not dry, find a warm dry place to put it for an hour or so. Simple and most used for me is to loosely wrap in piece of paper (copy paper or thin brown paper bag best IMO) and set it on top of cable box or other electronics that are slightly warm but not hot to touch. An hour or so is usually plenty.
  • Grind just a little bit. 1/2 gram will usually last me a day or 2. For best results, put leftovers in airtight container for overnight storage - especially if humid out. I do this if it is going to be left out (or in grinder ) for more than an hour or 2 if humid like it is now in much of US. If not, it gets too moist again and you have to re-dry (in paper on electronics), and re-grind a little for best results.
  • Make sure your nano is at full temp while doing the above. If you leave it on all the time (like I do), set it to your normal setting (5.75 - 6.25 for me on current nano). If it is cold, warm for at least 25 - 30 minutes. nano will work OK after 5 minute warm up, or setting to 10 for a few minutes, then desired heat level for a few more. But, for nano to perform optimally and work its magic, EVERYTHING needs to be warmed up. Your wood on outside should be warm to the touch, indicating that the metal cup inside has come to temp.
  • Suck a bit of your ground material into the end of stem/GonG adapter and give it a light tamp. @howie105 is dead on above - tamp it just enough that it doesn't fall back out. Use the stickiness of the material to your advantage and keep in mind it will compress and stick together a bit better after first hit.
  • Put on nano and draw slowly and smoothly. If going through a bubbler or other water piece, be cautious not to stir up too many bubbles or too much diffusion while vapor is going through the perc. Doing so will knock your flavor down a bit. Once it is through the perc you can clear as hard as you like. Most of the flavor robbing is going on while vapor is twisting and turning through perc, or riding in bubbles.
  • First hit if on a fully warmed nano at good temp should be very flavorful, though may be a bit wispy. A short pre-heat can eliminate this. Just put your nano on your stem/GonG adapter, but let it sit there without drawing for 30 seconds or so.
  • Second hit should be divine, and could be a BINGO hit. Same for third hit.
  • Give a quick stir before 4th hit. If screen at regular E-Pik depth (top pic above) probably time to dump to ABV jar after this (save that shit for edibles, QWISO or making salves!).
  • If you've gone with a bigger load, give it another hit or two and stir again. Repeat until no vapor after stir - or it starts to get that burnt popcorn taste.
 
Last edited:

BabyFacedFinster

Anything worth doing, is worth overdoing.
My regular everyday process:
  • Make sure your material is pretty dry. Sticky is fine, but you want humidity/moisture down around 40 - 55% MAX. Don't need to measure it. Snap a small stem. Does it snap or bend and break? Snap is good, bend and break is usually not quite dry enough for me. If not dry, find a warm dry place to put it for an hour or so. Simple and most used for me is to loosely wrap in piece of paper (copy paper or thin brown paper bag best IMO) and set it on top of cable box or other electronics that are slightly warm but not hot to touch. An hour or so is usually plenty.
  • Grind just a little bit. 1/2 gram will usually last me a day or 2. For best results, put leftovers in airtight container for overnight storage - especially if humid out. I do this if it is going to be left out (or in grinder ) for more than an hour or 2 if humid like it is now in much of US. If not, it gets too moist again and you have to re-dry (in paper on electronics), and re-grind a little for best results.
  • Make sure your nano is at full temp while doing the above. If you leave it on all the time (like I do), set it to your normal setting (5.75 - 6.25 for me on current nano). If it is cold, warm for at least 25 - 30 minutes. nano will work OK after 5 minute warm up, or setting to 10 for a few minutes, then desired heat level for a few more. But, for nano to perform optimally and work its magic, EVERYTHING needs to be warmed up. Your wood on outside should be warm to the touch, indicating that the metal cup inside has come to temp.
  • Suck a bit of your ground material into the end of stem/GonG adapter and give it a light tamp. @howie105 is dead on above - tamp it just enough that it doesn't fall back out. Use the stickiness of the material to your advantage and keep in mind it will compress and stick together a bit better after first hit.
  • Put on nano and draw slowly and smoothly. If going through a bubbler or other water piece, be cautious not to stir up too many bubbles or too much diffusion while vapor is going through the perc. Doing so will knock your flavor down a bit. Once it is through the perc you can clear as hard as you like. Most of the flavor robbing is going on while vapor is twisting and turning through perc, or riding in bubbles.
  • First hit if on a fully warmed nano at good temp should be very flavorful, though may be a bit wispy. A short pre-heat can eliminate this. Just put your nano on your stem/GonG adapter, but let it sit there without drawing for 30 seconds or so.
  • Second hit should be divine, and could be a BINGO hit. Same for third hit.
  • Give a quick stir before 4th hit. If screen at regular E-Pik depth (top pic above) probably time to dump to ABV jar after this (save that shit for edibles, QWISO or making salves!).
  • If you've gone with a bigger load, give it another hit or two and stir again. Repeat until no vapor after stir - or it starts to get that burnt popcorn taste.

This is gold Jerry, Gold!

Practically exactly as I do also. It is so true how less is better. I have been known on many occasions to put too much herb in the gong and then have some compression of weed by the plunging heater screen. I rarely have scorched my herb this way, but it's still not good practice because it wastes weed. I can get just as many quality hits from a small pack as a large pack. I can't explain why but I don't recognize the extra vapor when I pack heavily.

I also use the "hat" method. Loading screens is much more of a bastard when you're using the long stem. When using a gong, it is somewhat easier to place a chopstick in the concave end of the basket screen and then shove it up the poop chute of the short gong. This method doesn't work on the stems because the mouth opening is too narrow to fit the screen.

After a while the screens begin to lose their round and start sliding too easily within the gong. This is when I usually toss it for another one. I found trying to re-round an old basket screen is like trying to re-flavor old chewing gum.

So anyway, back to that Bubba Kush that I've mentioned earlier. I just tried a small little popcorn nug that was recently dried. It has nicely knocked me on my ass, so I can't wait to get into some nicely cured colas. Civilized!
 
Last edited:

dutz3013

Well-Known Member
Thanks for everything everyone! Especially @flotntoke. I tried using the hat trick, I couldn't get much vapor production as using the basket. Is there any real reason to change other than the screen gets less dirty? Maybe my screen is already too dirty for the hat trick, i'll pick up some new screens and re-attempt it. I'll also try picking up the e-pik once I can afford another gong so the shipping price is worth the order :)
 
Top Bottom