Baron23

Well-Known Member
Has anyone developed or thought of a way to protect the OGs glass? I can't afford a Ti and the OG would be enough for me but I can't tell if I'd drop it within the first week or not and shatter it. I'm thinking of some sort of protective sleeve or something that 1. Covers the glass for protection and 2. makes the reclaim inside invisible (less suspicious)
Actually, heat shrink tubing would work very well.

This is just from Lowes, but all kinds of it out there from all kind of sources

http://www.lowes.com/pl/Heat-shrink-tubing-Electrical-testers-tools-Electrical/4294722456
 

VapCap

Well-Known Member
Manufacturer
Condenser.

What exactly is a condenser? Well from a physics perspective (and I like physics) a condenser is a component which facilitates heat exchange (cooling) of vapor promoting phase change.

So what is the role of the condenser in a VapCap? First and foremost, cool the vapor. How does this work?
This is the fun part. When Vapor is drawn from the VapCap, there is airflow from two locations. Some from the air port (this is the inverse induction air) and some from around the cap which then displaces the vapor produced in the vaporization chamber. The ratio of these two is variable, which gives the operator control over the strength and the temperature of the extracted vapor. More air through the air port results in a cooler lighter vapor, less air, results in a stronger and warmer vapor.
Here is where this gets more interesting. The air port is not by definition a carb which is just a hole. It is where the inverse induction comes into play. When we look at what is happening to the air after it enters the air port, the physics get more interesting. First, the air flows around the condenser tube. This is good for a few reasons. During use, vaporizers get warm. This is a primarily a result of the heat used to vaporize conducting to the other parts of the unit. So during the design phase I put some thought into a way to reduce this. As I was contemplating this, it seemed like I could combine several objectives in the process of cooling the vapor stream, like cooling the device as well.

As the incoming inverse induction air transits the interstitial space between the inside of the body or stem and the outside of the condenser, it also cools both of these pieces. This reduces the rate of the conducted heat transfer from the hot end to the not so hot end. At the same time, as the induction air comes to the end of the condenser, it makes a 180º turn, which imparts significant turbulence, inducts the vapor, mixes with it and cools it. Next, upon entering the condenser, the harshness of the vapor is further reduced as some of the heavier oils and other higher evaporation temperature compounds condense on the inside surface of the condenser.

Now, I have a condenser upgrade for the Original VapCaps. As of last week, all condensers have been upgraded to a new more durable and more free flowing design.

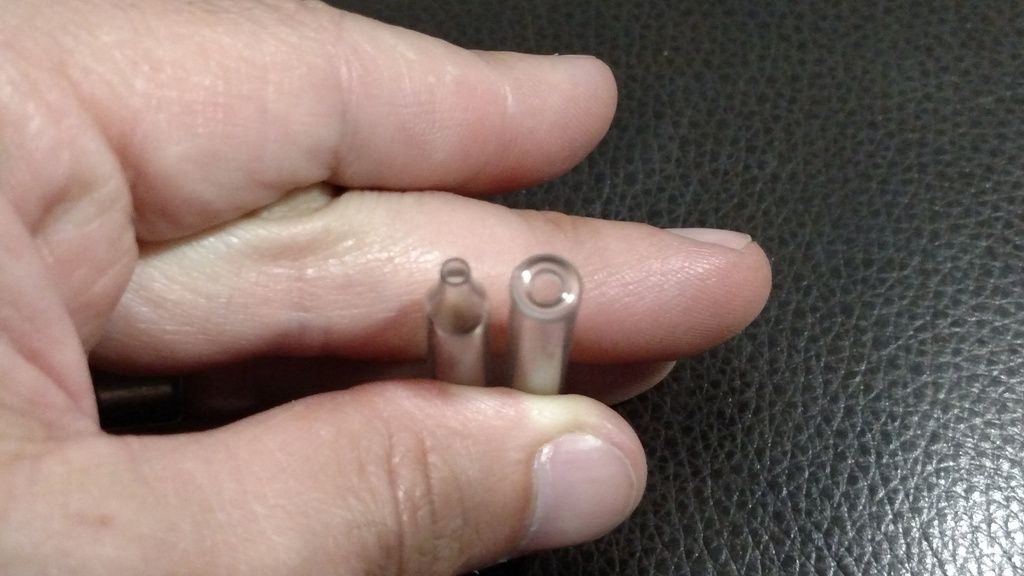
Here are a few pictures to show the difference.

New on the left, old on the right.

IMG_20160811_230310999_zpsuoippqfn.jpg


Here is an end on view.

IMG_20160811_230538211_zpsdghx9wod.jpg


All in all, I hope this is interesting information regarding the components and their purpose.

Cheers,

George
 

Vapor_Eyes

taste buds
Condenser.

What exactly is a condenser? Well from a physics perspective (and I like physics) a condenser is a component which facilitates heat exchange (cooling) of vapor promoting phase change.

So what is the role of the condenser in a VapCap? First and foremost, cool the vapor. How does this work?
This is the fun part. When Vapor is drawn from the VapCap, there is airflow from two locations. Some from the air port (this is the inverse induction air) and some from around the cap which then displaces the vapor produced in the vaporization chamber. The ratio of these two is variable, which gives the operator control over the strength and the temperature of the extracted vapor. More air through the air port results in a cooler lighter vapor, less air, results in a stronger and warmer vapor.
Here is where this gets more interesting. The air port is not by definition a carb which is just a hole. It is where the inverse induction comes into play. When we look at what is happening to the air after it enters the air port, the physics get more interesting. First, the air flows around the condenser tube. This is good for a few reasons. During use, vaporizers get warm. This is a primarily a result of the heat used to vaporize conducting to the other parts of the unit. So during the design phase I put some thought into a way to reduce this. As I was contemplating this, it seemed like I could combine several objectives in the process of cooling the vapor stream, like cooling the device as well.

As the incoming inverse induction air transits the interstitial space between the inside of the body or stem and the outside of the condenser, it also cools both of these pieces. This reduces the rate of the conducted heat transfer from the hot end to the not so hot end. At the same time, as the induction air comes to the end of the condenser, it makes a 180º turn, which imparts significant turbulence, inducts the vapor, mixes with it and cools it. Next, upon entering the condenser, the harshness of the vapor is further reduced as some of the heavier oils and other higher evaporation temperature compounds condense on the inside surface of the condenser.

Now, I have a condenser upgrade for the Original VapCaps. As of last week, all condensers have been upgraded to a new more durable and more free flowing design.

Here are a few pictures to show the difference.

New on the left, old on the right.

IMG_20160811_230310999_zpsuoippqfn.jpg


Here is an end on view.

IMG_20160811_230538211_zpsdghx9wod.jpg


All in all, I hope this is interesting information regarding the components and their purpose.

Cheers,

George

Arthur C. Clarke said:
Any sufficiently advanced technology is indistinguishable from magic.

You sir, are a wizard! The Merlin of the Vape world.

Next I would like you to please explain the OmniVap's adjustable airflow. That is sorcery of the highest degree!

I've seen your videos and diagrams and can't figure out how it screws in without screwing in, if you know what I mean. No threads and such. Like I said, pure sorcery!

I'm just glad to be a part of this scene and look forward to expanding my collection.
 

lemmeadem

Well-Known Member
Posted this over in the Sticky Bricks thread, hoping both threads don't mind a little cross-contamination. XD

Was messing around with my Brick and Omni (my bebehs!) and often use the two in-conjunction and recently discovered that the intake hole for the mouthpiece brick that comes with the Brick perfectly nests my Omni body/mouthpiece. Using the two in conjunction is like having a walnut-flavored J-hook and I love it! :D

The two put out pretty comparable vapor, as well, if anyone wanted to know (with the VapCap much more conservative with smaller doses but the Sticky Brick having superior flavour-retention (IMO) and being much quicker/less of a butane hog).
 

Vapor_Eyes

taste buds
Posted this over in the Sticky Bricks thread, hoping both threads don't mind a little cross-contamination. XD

Was messing around with my Brick and Omni (my bebehs!) and often use the two in-conjunction and recently discovered that the intake hole for the mouthpiece brick that comes with the Brick perfectly nests my Omni body/mouthpiece. Using the two in conjunction is like having a walnut-flavored J-hook and I love it! :D

The two put out pretty comparable vapor, as well, if anyone wanted to know (with the VapCap much more conservative with smaller doses but the Sticky Brick having superior flavour-retention (IMO) and being much quicker/less of a butane hog).
I too have a Brick and an Omni. They make a great butane pair. I will have to try this out!
 

lemmeadem

Well-Known Member
I too have a Brick and an Omni. They make a great butane pair. I will have to try this out!

Hey @Vapor_Eyes get amongst it! :D It's great fun. You're right, too, they're basically complimentary - one radiation/conduction, small-bowled, one convection, large-bowled, both get you ripped. :p

Report back when you give it a shot! :) Also, would just like to say, every time I'm on the SBL threads, I feel like you and me are ghosting each other. <.< SHARE THE KNOWLEDGE! :p
 

Vapor_Eyes

taste buds
Hey @Vapor_Eyes get amongst it! :D It's great fun. You're right, too, they're basically complimentary - one radiation/conduction, small-bowled, one convection, large-bowled, both get you ripped. :p

Report back when you give it a shot! :) Also, would just like to say, every time I'm on the SBL threads, I feel like you and me are ghosting each other. <.< SHARE THE KNOWLEDGE! :p
I tried that last night before bed. It worked wonderfully, I was surprised how thick the vapor looked. It's really nice to have that visual feedback, I'll have to break out my D020-D soon and rig something up for my omni.

My omni didn't quite fit in the air intake hole of the mouthpiece block but it still provided a good seal. One chamber from the omni and it was lights out for me. :zzz:
 
Vapor_Eyes,
  • Like
Reactions: Vape Dr.

Shit Snacks

Milaana. Lana. LANA. LANAAAA! (TM2/TP80/BAK/FW9)
Condenser.

What exactly is a condenser? Well from a physics perspective (and I like physics) a condenser is a component which facilitates heat exchange (cooling) of vapor promoting phase change.

So what is the role of the condenser in a VapCap? First and foremost, cool the vapor. How does this work?
This is the fun part. When Vapor is drawn from the VapCap, there is airflow from two locations. Some from the air port (this is the inverse induction air) and some from around the cap which then displaces the vapor produced in the vaporization chamber. The ratio of these two is variable, which gives the operator control over the strength and the temperature of the extracted vapor. More air through the air port results in a cooler lighter vapor, less air, results in a stronger and warmer vapor.
Here is where this gets more interesting. The air port is not by definition a carb which is just a hole. It is where the inverse induction comes into play. When we look at what is happening to the air after it enters the air port, the physics get more interesting. First, the air flows around the condenser tube. This is good for a few reasons. During use, vaporizers get warm. This is a primarily a result of the heat used to vaporize conducting to the other parts of the unit. So during the design phase I put some thought into a way to reduce this. As I was contemplating this, it seemed like I could combine several objectives in the process of cooling the vapor stream, like cooling the device as well.

As the incoming inverse induction air transits the interstitial space between the inside of the body or stem and the outside of the condenser, it also cools both of these pieces. This reduces the rate of the conducted heat transfer from the hot end to the not so hot end. At the same time, as the induction air comes to the end of the condenser, it makes a 180º turn, which imparts significant turbulence, inducts the vapor, mixes with it and cools it. Next, upon entering the condenser, the harshness of the vapor is further reduced as some of the heavier oils and other higher evaporation temperature compounds condense on the inside surface of the condenser.

Now, I have a condenser upgrade for the Original VapCaps. As of last week, all condensers have been upgraded to a new more durable and more free flowing design.

Here are a few pictures to show the difference.

New on the left, old on the right.

IMG_20160811_230310999_zpsuoippqfn.jpg


Here is an end on view.

IMG_20160811_230538211_zpsdghx9wod.jpg


All in all, I hope this is interesting information regarding the components and their purpose.

Cheers,

George

Always innovating aren't you?! :tup:

Love it, my OG condenser actually seems to be in between these too, not such a narrow pointed tip, more rounded but the ID does narrow unlike the new condenser. I've also been curious about how the spiraly turbulated condenser performs by comparison, also those old multi air hole flute like bodies...

Anyway I've since got the Ti body on my Omni clean and in use, getting the hang, still not sure how the twisting mouthpiece changes things, I've tried closed open and everything in between and they can be different but better or worse I am not so sure... I really like the feel of it though, a shorty wood body would be best to really class it up though, while the mouthpiece is indeed incredible (but it screws to the condenser, don't think it'd work with the standard condensers as someone above asked). However I actually still might prefer performance of the all glass tip of the OG as I mentioned earlier, probably need to turn it into an S me thinks... Wish it could go GonG
 
Last edited:

Vapor_Eyes

taste buds
For those that have question about the omni functionality


This video maybe help
Thanks for posting that. I've seen the video before, and I understand the principle. However, there are no threads or inclined plane on the mouthpiece/condenser section of the OmniVap. Because of this I can't figure out how it "screws in" and gets deeper when you rotate it. It appears to remain the same distance from the tip.

The thought occurred to me that maybe the conical area of the Ti tip might be asymmetrical, which would allow for varying resistance without threading. I don't think this is true, if that was the case it would have the full range of adjustment with 360° of rotation. And from what I can tell there is a much larger range of rotation required to get the full adjustment. I'm not sure about this though, it's hard to tell.

In the end I'm just glad it does work, it's a really cool feature.

My curiosity got the best of me and I ordered a glass body and wenge Dynastash. It will be cool to be able to see inside the omni as I adjust it.

I love the modularity of this design. I agree with @Shit Snacks suggestion of a glass gong VapCap. I'm thinking ground glass or maybe even etched if that would work on a gong. That would be sexy as hell in my opinion.
 

Baron23

Well-Known Member
Condenser.

What exactly is a condenser? Well from a physics perspective (and I like physics) a condenser is a component which facilitates heat exchange (cooling) of vapor promoting phase change.

So what is the role of the condenser in a VapCap? First and foremost, cool the vapor. How does this work?
This is the fun part. When Vapor is drawn from the VapCap, there is airflow from two locations. Some from the air port (this is the inverse induction air) and some from around the cap which then displaces the vapor produced in the vaporization chamber. The ratio of these two is variable, which gives the operator control over the strength and the temperature of the extracted vapor. More air through the air port results in a cooler lighter vapor, less air, results in a stronger and warmer vapor.
Here is where this gets more interesting. The air port is not by definition a carb which is just a hole. It is where the inverse induction comes into play. When we look at what is happening to the air after it enters the air port, the physics get more interesting. First, the air flows around the condenser tube. This is good for a few reasons. During use, vaporizers get warm. This is a primarily a result of the heat used to vaporize conducting to the other parts of the unit. So during the design phase I put some thought into a way to reduce this. As I was contemplating this, it seemed like I could combine several objectives in the process of cooling the vapor stream, like cooling the device as well.

As the incoming inverse induction air transits the interstitial space between the inside of the body or stem and the outside of the condenser, it also cools both of these pieces. This reduces the rate of the conducted heat transfer from the hot end to the not so hot end. At the same time, as the induction air comes to the end of the condenser, it makes a 180º turn, which imparts significant turbulence, inducts the vapor, mixes with it and cools it. Next, upon entering the condenser, the harshness of the vapor is further reduced as some of the heavier oils and other higher evaporation temperature compounds condense on the inside surface of the condenser.

Now, I have a condenser upgrade for the Original VapCaps. As of last week, all condensers have been upgraded to a new more durable and more free flowing design.

Here are a few pictures to show the difference.

New on the left, old on the right.

IMG_20160811_230310999_zpsuoippqfn.jpg


Here is an end on view.

IMG_20160811_230538211_zpsdghx9wod.jpg


All in all, I hope this is interesting information regarding the components and their purpose.

Cheers,

George

Hi George - definitely interesting, particularly the part about the air flow from the carb hole looking non-carb hole! LOL

The new style OG condenser....will you be selling these on the parts page? Will the old style still be available also or or just the new.

Also, any word on availability of Ti diffuser for Ti Woody?

Thanks and still loving my vapcaps.

Thanks
 
Baron23,
  • Like
Reactions: Squiby

PeteSeattle

Well-Known Member
Hi friends ... especially those who like heady glass,

As I'm messing around in my glass studio I came up with some rough pieces that I will perfect soon. I thought I'd share and get feedback.

I'm mocking these up with a slightly smaller carb based on conversation here. I used 2mm borosilicate glass which in my opinion helps retain heat for an extra draw or two. Please chime in if you have another theory about glass and heat (radiant?) retention.

This is a mock up of a short body without condenser (to be added later). Color band was to be melted in but ran out of fuel.

image.jpg


Okay so this one I'm playing with color and made the cap side "heady." The mouth piece is not finished because I need it flared open. I ran out of propane so this one will have to be continued. This one in particular has an even smaller carb. Need to test it out when completed. The mouth piece is built in making one piece (sorry, again, fuel ran out).

image.jpg


I'll post more practice bodies here for more feedback. My goal is to make these less than the diameter of the Stash and the right length to fit in it.

I have others sketch out that are longer and more sculpture one offs. They may include a Sonic Scredriver and/or a Light Saber but that's down the line ;)

Thanks for looking, friends.

Now where's my DaynaStash?
 

Vapor_Eyes

taste buds
Hi friends ... especially those who like heady glass,

As I'm messing around in my glass studio I came up with some rough pieces that I will perfect soon. I thought I'd share and get feedback.

I'm mocking these up with a slightly smaller carb based on conversation here. I used 2mm borosilicate glass which in my opinion helps retain heat for an extra draw or two. Please chime in if you have another theory about glass and heat (radiant?) retention.

This is a mock up of a short body without condenser (to be added later). Color band was to be melted in but ran out of fuel.

image.jpg


Okay so this one I'm playing with color and made the cap side "heady." The mouth piece is not finished because I need it flared open. I ran out of propane so this one will have to be continued. This one in particular has an even smaller carb. Need to test it out when completed. The mouth piece is built in making one piece (sorry, again, fuel ran out).

image.jpg


I'll post more practice bodies here for more feedback. My goal is to make these less than the diameter of the Stash and the right length to fit in it.

I have others sketch out that are longer and more sculpture one offs. They may include a Sonic Scredriver and/or a Light Saber but that's down the line ;)

Thanks for looking, friends.

Now where's my DaynaStash?
I think you're headed in the right direction, especially with the smaller carb. I hope you start selling these at some point, I would buy one for sure, probably several.
 

PeteSeattle

Well-Known Member
I think you're headed in the right direction, especially with the smaller carb. I hope you start selling these at some point, I would buy one for sure, probably several.
Thanks @Vapor_Eyes

I tested the pin-point carb. First heat cycle produced four cloudy hits. I wouldn't go past 3 heat cycles on these.

Now an interesting thing happened. I had my home made body with the VapCap and it rolled off my bench right on garage concrete ... only for me to watch it bounce a bit. I checked it and not a crack. The 2mm walls plus kiln annealing really makes this almost indestructible (but I would never suggest testing out a glass piece that way).

We'll see about works available for purchase ;)
 

HikaruEyre

Active Member
Condenser.

What exactly is a condenser? Well from a physics perspective (and I like physics) a condenser is a component which facilitates heat exchange (cooling) of vapor promoting phase change.

So what is the role of the condenser in a VapCap? First and foremost, cool the vapor. How does this work?
This is the fun part. When Vapor is drawn from the VapCap, there is airflow from two locations. Some from the air port (this is the inverse induction air) and some from around the cap which then displaces the vapor produced in the vaporization chamber. The ratio of these two is variable, which gives the operator control over the strength and the temperature of the extracted vapor. More air through the air port results in a cooler lighter vapor, less air, results in a stronger and warmer vapor.
Here is where this gets more interesting. The air port is not by definition a carb which is just a hole. It is where the inverse induction comes into play. When we look at what is happening to the air after it enters the air port, the physics get more interesting. First, the air flows around the condenser tube. This is good for a few reasons. During use, vaporizers get warm. This is a primarily a result of the heat used to vaporize conducting to the other parts of the unit. So during the design phase I put some thought into a way to reduce this. As I was contemplating this, it seemed like I could combine several objectives in the process of cooling the vapor stream, like cooling the device as well.

As the incoming inverse induction air transits the interstitial space between the inside of the body or stem and the outside of the condenser, it also cools both of these pieces. This reduces the rate of the conducted heat transfer from the hot end to the not so hot end. At the same time, as the induction air comes to the end of the condenser, it makes a 180º turn, which imparts significant turbulence, inducts the vapor, mixes with it and cools it. Next, upon entering the condenser, the harshness of the vapor is further reduced as some of the heavier oils and other higher evaporation temperature compounds condense on the inside surface of the condenser.

Now, I have a condenser upgrade for the Original VapCaps. As of last week, all condensers have been upgraded to a new more durable and more free flowing design.

Here are a few pictures to show the difference.

New on the left, old on the right.

IMG_20160811_230310999_zpsuoippqfn.jpg


Here is an end on view.

IMG_20160811_230538211_zpsdghx9wod.jpg


All in all, I hope this is interesting information regarding the components and their purpose.

Cheers,

George
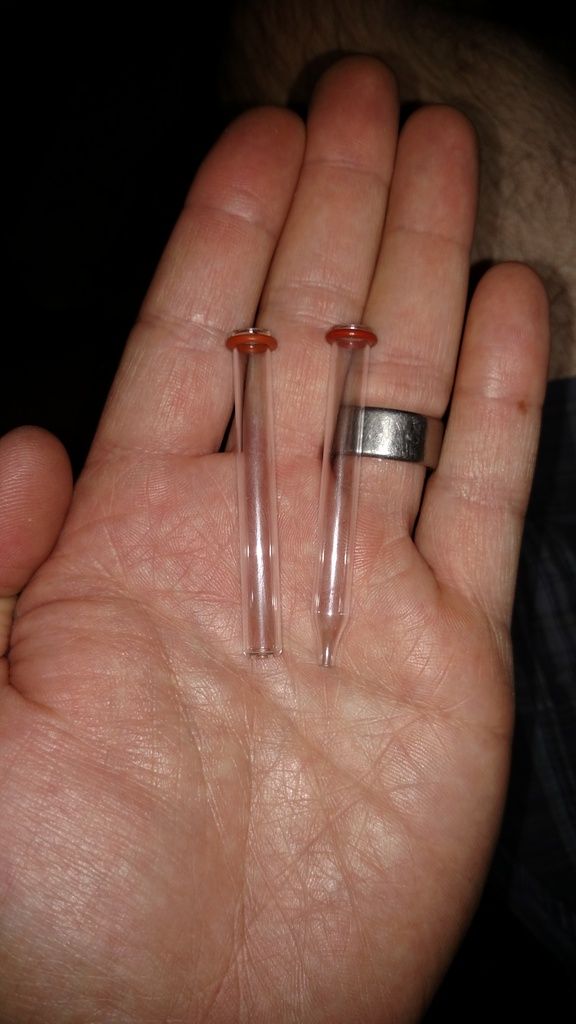
Are you going to also have this one in the turbulated model?
 

StormyPinkness

Rhymenocerous ʕ•ᴥ•ʔ
Hi friends ... especially those who like heady glass,

As I'm messing around in my glass studio I came up with some rough pieces that I will perfect soon. I thought I'd share and get feedback.

I'm mocking these up with a slightly smaller carb based on conversation here. I used 2mm borosilicate glass which in my opinion helps retain heat for an extra draw or two. Please chime in if you have another theory about glass and heat (radiant?) retention.

This is a mock up of a short body without condenser (to be added later). Color band was to be melted in but ran out of fuel.

image.jpg


Okay so this one I'm playing with color and made the cap side "heady." The mouth piece is not finished because I need it flared open. I ran out of propane so this one will have to be continued. This one in particular has an even smaller carb. Need to test it out when completed. The mouth piece is built in making one piece (sorry, again, fuel ran out).

image.jpg


I'll post more practice bodies here for more feedback. My goal is to make these less than the diameter of the Stash and the right length to fit in it.

I have others sketch out that are longer and more sculpture one offs. They may include a Sonic Scredriver and/or a Light Saber but that's down the line ;)

Thanks for looking, friends.

Now where's my DaynaStash?
Nice, very nice. I wouldn't be surprised to see you in the artists corner on the site sometime soon.
 

*plainlazy*

Well-Known Member
Im in love with this thing. Best results with whole nug. Major clouds. Using it with my water pipe is insane. Proper white wall and dark brown avb. Might do my first vape vid soon. Anyone umming and arrring just do it. My 14mm ti vong is my go to right now would highly recommend them.
 

PeteSeattle

Well-Known Member
Please make this happen. I am liking all your ideas but it would be fitting to have a SaberCap as the force would explain quite a bit about the VapCap :o.

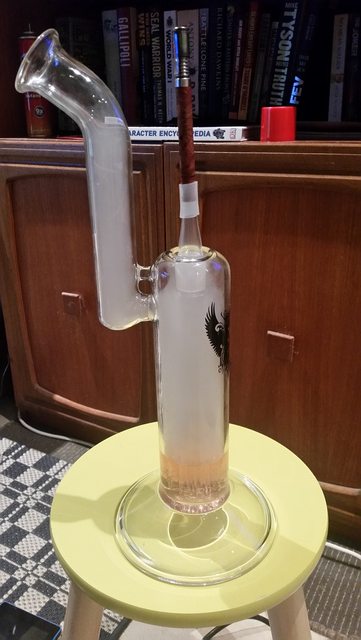
For anyone doubting the ability to whitewall large pieces

NBG3enfl.jpg

Hmmm, a Light Saber or sonic screwdriver with a gong ... VapSaber? VapDriver?

Btw, here's a VERY prototype and unfinished interpretation of a Ti shorty (mentioned earlier that my fuel ran out)

image.jpg


I just received a standard condenser and put this together. My goodness such a tiny vape and powerful. If you accidentally drop this thick ass glass body it just bounces (2mm thick walls).

Thanks for chiming in.
 
Last edited:
Top Bottom