Arizer Solo

olivianewtonjohn

Well-Known Member
I just ordered my first vape, the solo from pv with screens because of the crumpling dry brick weed I get and a travel tube. It's not stealthy enough for frequent use but reading through the threads it seems worth it and thanks to the fc members for helping me make my decision. I cant wait to get my hands on it and start vaping. I would need to I guess put a black tape on the glass stem for stealth. Sadly I couldn't find a way to order a wooden stem but that can wait for now. :)
Make sure the stem is clean and this will work for stealth:

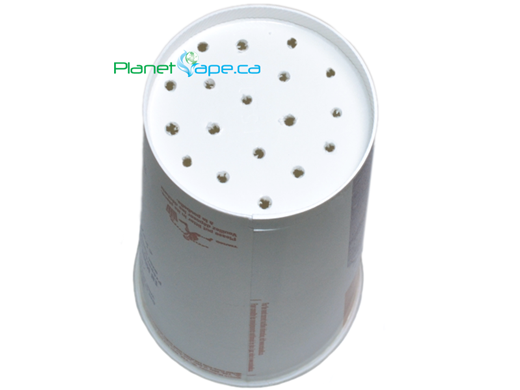
Paper cup (medium size), poke holes in the bottom to keep the solo cool, put lid on

Looks like a cup with straw lol

83154115.jpg
 

CarolKing

Singer of songs and a vapor connoisseur
At Planetvaoe they sell the stealth adapter. You mean like this?

Made with borosilicate glass by hand, using an original Arizer stem to ensure a perfect factory fit. PVHES mods are included with the Stealth Adapter.


Where's the Solo?
mc_cup520.png


Safety 1st, poke lots of ventilation holes in the bottom

mc_cup_bottom520.png


There's the Solo

(cut out is there just to give a cut away view, for actual use, do not cut out the side)

mc_cup_open520.png
 

crisallin

Well-Known Member
Thanks I did see these but the stealth in my situating is more about being able to use it around the house without my folks finding out or figuring out what it is if they find it. But the cup idea is prefect for public use although I doubt anyone here would know what it is. Only thing that can be suspicious is the glass stem so I'll be fine with a solid looking stem.
 
crisallin,
  • Like
Reactions: ataxian

olivianewtonjohn

Well-Known Member
At Planetvaoe they sell the stealth adapter. You mean like this?

Made with borosilicate glass by hand, using an original Arizer stem to ensure a perfect factory fit. PVHES mods are included with the Stealth Adapter.


Where's the Solo?
mc_cup520.png


Safety 1st, poke lots of ventilation holes in the bottom

mc_cup_bottom520.png


There's the Solo

(cut out is there just to give a cut away view, for actual use, do not cut out the side)

mc_cup_open520.png

Exactly like that although stealth adapter is not 100% necessary you can use a straight arizer stem

Thanks I did see these but the stealth in my situating is more about being able to use it around the house without my folks finding out or figuring out what it is if they find it. But the cup idea is prefect for public use although I doubt anyone here would know what it is. Only thing that can be suspicious is the glass stem so I'll be fine with a solid looking stem.
I thought many countries in that region were chill about these things? Maybe times have changed, my dad has stories of opium shops in karachi and buckets full of hashish. Anyways FYI I dont think you can talk about hiding stuff from your parents here, its to keep this place for adults only
 
olivianewtonjohn,
  • Like
Reactions: ataxian

crisallin

Well-Known Member
Haha i'll avoid taking about that then but I'm an adult who lives at home, lame but that's how it is around here. I'm studying animation and vfx so I have another couple years before I move out. There are people here who are cool about cannabis but not most people. I assume the same things about Canada, like everyone there must be chill about weed but that's just an assumption.
 

OF

Well-Known Member
I would need to I guess put a black tape on the glass stem for stealth. Sadly I couldn't find a way to order a wooden stem but that can wait for now.

First off, welcome to the Forum! Great choice as a first vape IMO.

Too bad you've already ordered, I'd have added a couple straight stems I think. Being glass you're SOL if you have an accident. The bent one is not only more conspicuous but won't fit in the travel tube. The (metal and) wood ones are, of course, a solution as you say.

I'm paranoid, I tend to worry about such things, but it's not like the replacement stem is going to be really handy? We Yanks believe in "Murphy's Law" ('if something can go wrong, it will...'). A mission critical piece of glass half way around the world from support is dangerous open invitation.

Anyway, sure, cover it with tape. Just remember you can't do this to the top of the cover. The glass gets quite hot down there, and hot tape is not going to stick well but will stink up the joint in an effort to compensate...... Maybe half an inch of bare glass? High temperature paint, if available, like in stove and auto use, might be an option? Or perhaps cotton cloth?

Brick weed should work just fine, you'll just need to reload more often. It will extract what's available very effectively. In a fun way sort of an advantage potentially since so much of the flavor of the weed is exhausted before the cannabinoids we crave are? I'd charge it up, load it up, fire it up, set it to mid range (say 4?) and see what adventure awaits. While it can no doubt be improved by experience, I'm confident it won't be disappointing in the long run.

Just remember, combustion and vaping don't mix. You really need to quit combustion all together to get the full benefit of vaping.

Regards and best wishes,

OF
 

crisallin

Well-Known Member
Thanks OF I will quit combusting for sure I've been smoking on and off for the last 8 years and pretty regularly for the last 2 years and I've always hated smoking esp cigarettes and it's worse if you have brick weed out tastes harsh and bitter and I hate the taste it leaves in your mouth. I also need to quit smoking for health reasons since I workout and I'm not a huge fan of the couch lock high from smoking. I did want to order another stem but a friend of mine is visiting NY he's there right now and I could have him get me a couple wooden stems. Any suggestions where he might be able to get them or is it best to order online?
 

OF

Well-Known Member
I did want to order another stem but a friend of mine is visiting NY he's there right now and I could have him get me a couple wooden stems. Any suggestions where he might be able to get them or is it best to order online?

Great to hear, sounds like you're solidly on track. I think you'll be pleased with the Solo's ability to block the formation (or delivery depending) on a lot of what you don't want and with it most of the taste you're avoiding. The remaining taste I hope will please you, the THC part is pretty tasteless.

Good show you have a friend visiting, unfortunately I know of no LHS that carries them, perhaps someone on the other coast does? OTOH, Ed is very fast at shipping out, hopefully you'll be able to make something happen. You'll still have the 'flash' issue, even with a black wood stem, since the bottom is polished SS. I'm sure you can deal with that.

Best wishes,

OF
 

ou812?

Well-Known Member
trying to find how to properly use the new Solo or should say how to start it up as far as charging the new one and conditioning it. Confused as to the right way to make it right.. I dont know if charging and being able to use at the same time is good or bad,just confusing. I have the PA on the older version and this vape just works so well and I think I read that there were a bunch of runs with certain letters in the model #. I have a model that has " T " in its serial#. Any pointers on making the newer unit as dependable as my 1st or the break in procedure,if it has changed that is, Thank You all.
 
ou812?,

Ano

FC Lover
What's the 'flash' issue?
I think he is referring to the reflective properties/brightness of SS and glass, which might be why you want to cover your glass stem with black tape.
If only the material (glass) is the issue, you should be fine with one of Ed's stem.

Edit: if you are ordering from @Ed's TnT's online shop, I think it can't hurt to mention you're from FC.
 

FUnhouse

Well-Known Member
I got my Solo from PIU on wednesday . I really like it a lot .
But I had something strange happen with it and I am not sure what I did.
I plugged it in to charge for the second time and when I took it off and turned it on it stopped beeping when I power it on or off and the lights seem to be behaving differently .
Everything else works fine it heats up correctly and all is good .
Did I screw something up ?
 

OF

Well-Known Member
I got my Solo from PIU on wednesday . I really like it a lot .
But I had something strange happen with it and I am not sure what I did.
I plugged it in to charge for the second time and when I took it off and turned it on it stopped beeping when I power it on or off and the lights seem to be behaving differently .
Everything else works fine it heats up correctly and all is good .
Did I screw something up ?

Not sure what to say about the "behaving differently" lights, can you give us a few clues?

The beep part is turned on and off by holding the left key down for a few seconds while it's running normally. If it's off, you get a beep confirmation, if it's on you get a silent confirmation......test afterwards.

The right key also does a 'hidden function'. If you hold it down it goes back to the stored value from the last power off. Usually.

OF
 

FUnhouse

Well-Known Member
Thanks OF
Good to know
About the lights . I really was not use to the regular pattern of lights when powering on . After the beeping stopped it seemed different but may not be ( I was vaping when I noticed it ) .
And i figured that turning of the beep was a hidden feature . I prefer it off .
Thanks !
 

OF

Well-Known Member
Thanks OF
Good to know
About the lights . I really was not use to the regular pattern of lights when powering on . After the beeping stopped it seemed different but may not be ( I was vaping when I noticed it ) .
And i figured that turning of the beep was a hidden feature . I prefer it off .
Thanks !

You're welcome. The normal pattern is: Hold the keys down for two flashes of the idle light, on the second flash comes the beep (if enabled) and light 7 only lit. Then you get battery level LEDs for a second or so, followed by temperature indication (most likely only idle light if it's cold). Then you set the heat level.

It's a complex little dance, but you soon learn it.

Enjoy it as you do?

OF
 

photobooth

Well-Known Member
You're welcome. The normal pattern is: Hold the keys down for two flashes of the idle light, on the second flash comes the beep (if enabled) and light 7 only lit. Then you get battery level LEDs for a second or so, followed by temperature indication (most likely only idle light if it's cold). Then you set the heat level.

It's a complex little dance, but you soon learn it.

Enjoy it as you do?

OF
My idle light has burnt out so now it's all muscle memory and timing getting that thing turned on
 

oldspice

Well-Known Member
I have an M1B and use the power adapter with it 90% of the time since my battery has been diminished, and was wondering if leaving it on the power adapter would somehow be harmful to the solo. I always unplug it after using it, which either turns off immediately or continues to run off the battery. I can't seem to understand the reason why it behaves this way, it just has a mind of it's own. Anyone of you guys experience this? :hmm:
 

Gray Area

Well-Known Member
I have an M1B and use the power adapter with it 90% of the time since my battery has been diminished, and was wondering if leaving it on the power adapter would somehow be harmful to the solo. I always unplug it after using it, which either turns off immediately or continues to run off the battery. I can't seem to understand the reason why it behaves this way, it just has a mind of it's own. Anyone of you guys experience this? :hmm:

Mine will turn off if I remove the jack from the bottom of the solo while the PA is still plugged in and on.
If I switch the power off on the PA before unplugging the jack from the bottom of the solo it will switch to battery...
 
Gray Area,

exit

Well-Known Member
Guys I am devastated

At least I have a backup solo

My m107 died today. It refuses to heat up. The red light does not blink and it stays cold. Sometimes if you try and set the temp all 7 lights will light up.

No amount of different chargers or reset is fixing it. It thinks the battery is all the way full. I am hoping the battery is not dead, but I also hope it is so if it's broken it's fixable.

Right now it it sitting around and it thinks it is set to heat level 7. All lights are on but that charge and heat ones.

Is it possible my solo car charger (official one) killed it? The car charger will never stop charging, the green light blinks forever...

Is there any kind of test I can do on the battery to see if it's shot. I have a Dmm :p I am mostly confuse because this seems atypical behavior for most dead battery solo I have seen.
 
Last edited:

Pipes

Addicted DIY Enthusiast
Accessory Maker
Could you not take the battery from the good unit and try in the 107?
You car charging sounds odd as should act the same as home charger. Only difference is can be slightly higher voltage. Never hitting a full charge sounds like battery problems.
Good luck with it.
 

exit

Well-Known Member
Could you not take the battery from the good unit and try in the 107?
You car charging sounds odd as should act the same as home charger. Only difference is can be slightly higher voltage. Never hitting a full charge sounds like battery problems.
Good luck with it.

When I get home I will swap batteries and see.

The car charger thing is funny though. I have had a third party and an Arizer brand car charger, but they both act the same in both my cars: they either won't charge past 4 or they will charge endlessly and not stop when full. This is consistent across every solo I've ever gone through that has spent enough time on the charger.

I'm partially worried even the official charger is overcharging my batteries and destroying them?

Still, I'll wait till I can get home and do some experiments.

What tools do I need to get access to the solos battery. I am away from home tonight and only have access to a small Philips head.
 

Pipes

Addicted DIY Enthusiast
Accessory Maker
When I get home I will swap batteries and see.

The car charger thing is funny though. I have had a third party and an Arizer brand car charger, but they both act the same in both my cars: they either won't charge past 4 or they will charge endlessly and not stop when full. This is consistent across every solo I've ever gone through that has spent enough time on the charger.

I'm partially worried even the official charger is overcharging my batteries and destroying them?

Still, I'll wait till I can get home and do some experiments.

What tools do I need to get access to the solos battery. I am away from home tonight and only have access to a small Philips head.
The car charger is just a direct connect to the car battery. Besides a fuse of course. Honestly I have never run the car charger full course so can't say what's normal there. I'd assumed the Solo has it's own regulating going on inside.

A small phillips is all you need really.
-Remove the screw on top.
-Remove and take out the bottom 4 phillips screws and put in a small dish. Keep them safe as can loose so easy.
-Place unit right side up on table and pull the outer sleeve up and off.

Now it is open and the battery is under a plastic lid with side snaps.

-Carefully undo the snaps. This is where one will snap on you and after you curse a bit realize it's not that bad.
-Remove battery noting the wire routing and orientation.
-Unplug battery and I'd use a marker to identify which one it is.

Re-assemble in reverse order and do not over tighten the bottom screws as this is where the cracks on the bottom start.

Have fun and let us know how you did.
 

olivianewtonjohn

Well-Known Member
The car charger is just a direct connect to the car battery. Besides a fuse of course. Honestly I have never run the car charger full course so can't say what's normal there. I'd assumed the Solo has it's own regulating going on inside.

A small phillips is all you need really.
-Remove the screw on top.
-Remove and take out the bottom 4 phillips screws and put in a small dish. Keep them safe as can loose so easy.
-Place unit right side up on table and pull the outer sleeve up and off.

Now it is open and the battery is under a plastic lid with side snaps.

-Carefully undo the snaps. This is where one will snap on you and after you curse a bit realize it's not that bad.
-Remove battery noting the wire routing and orientation.
-Unplug battery and I'd use a marker to identify which one it is.

Re-assemble in reverse order and do not over tighten the bottom screws as this is where the cracks on the bottom start.

Have fun and let us know how you did.
Great advice @Pipes as always. Only thing I want to make sure @exit does is remove the cap (how you would put an o-ring into the solo) not the two screws at the top (thought this part could be alittle bit clearer just in case-im sure he knows what you mean)

Actually here is a supplemental video:
 

exit

Well-Known Member
about to do the battery swap, but i'm curious if anyone has disasembled the stock battery pack? i was wondering particularly if it had clips removable from the batteries so i could potentially swap in some new 18650s and re-seal them, obviously only if i make sure to put the batteries in the right direction :)

if not just curious if anyone has recommendations for brackets/clips to use to make a battery pack that'll fit. i'd prefer not to buy a centizen battery simply because of them being backordred and from a different country... i just haven't built a battery pack before and am curious about taking a pair of 3200mah Panasonics and making a pack out of those, was hoping ideally the clips weren't welded to the stock batteries so i could reuse the clips and wiring.

i saw the protoype pics in an old centizen thread and it really doesn't look difficult? i just am not 100% on attaching the wires to the batteries and what protection PCB to use

too long didnt read version: If I build a battery pack what PCB should I use for protection/regulation? Not sure how i feel about reusing the old battery packs' PCB but i suppose i could, but i'd be worried abut that being damaged too.
 
Last edited:
Top Bottom