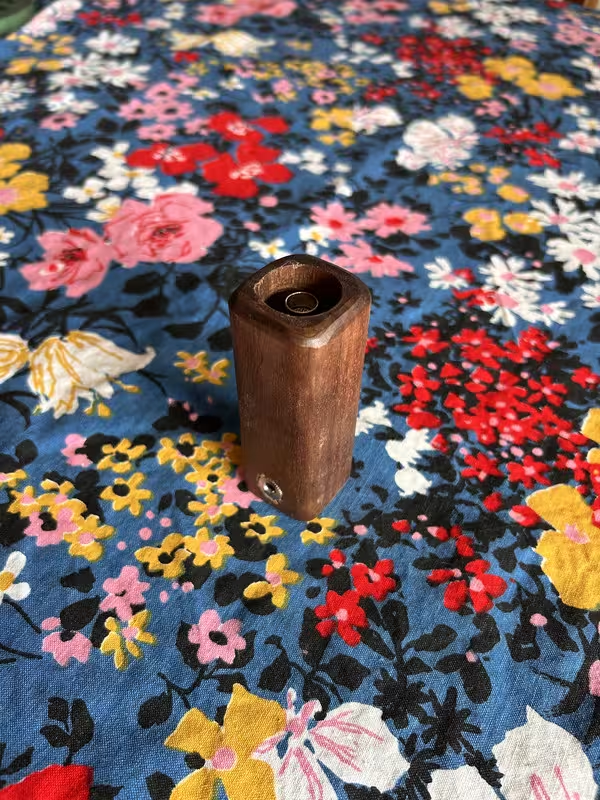
• We are experiencing temporary outages. Keep trying, it does recover. We hope to rectify this as soon as possible.

'The Misty Log' - DIY wooden Log Vaporizer

blokenoname

DIY Log Dabbler ๐Ÿ˜๐Ÿชต๐Ÿ’ช๐Ÿ’จ๐Ÿ’จ๐Ÿ’จ
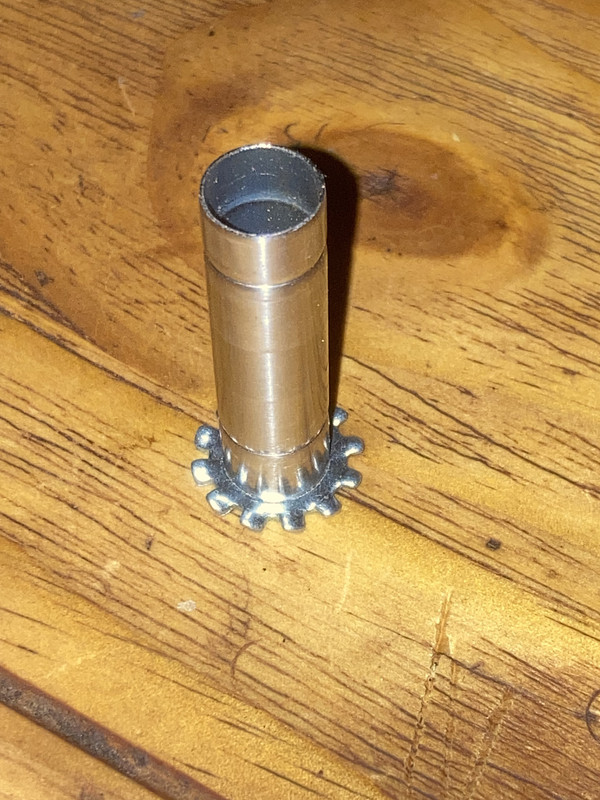
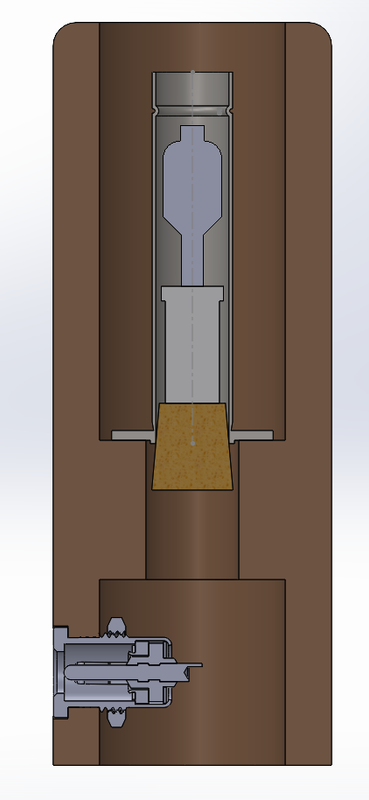
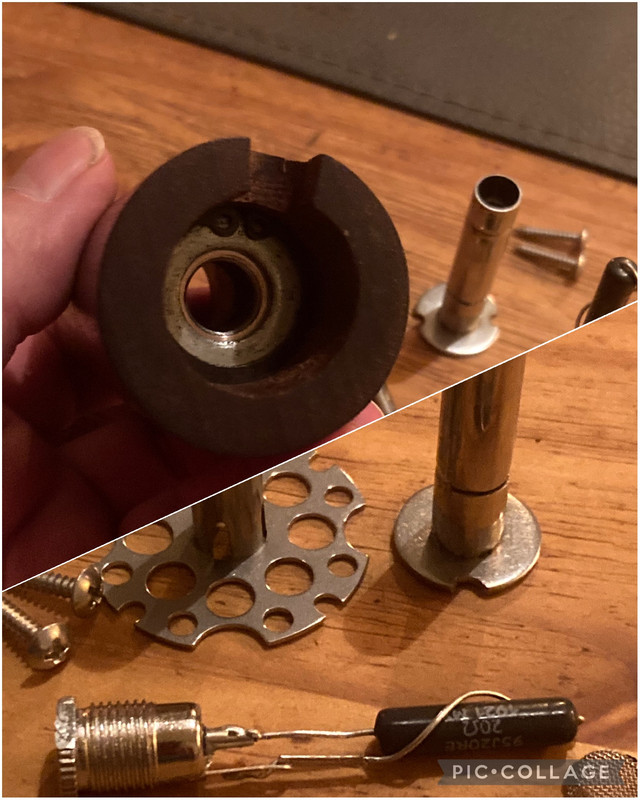
So! Tested out the star washer base with the 11mm UD tubing. Worked out reasonably well for a prototype. Tried to pull it apart with considerable force applied; even threw it against the wall... mechanical connection holds up! ๐Ÿ˜Š๐Ÿ‘

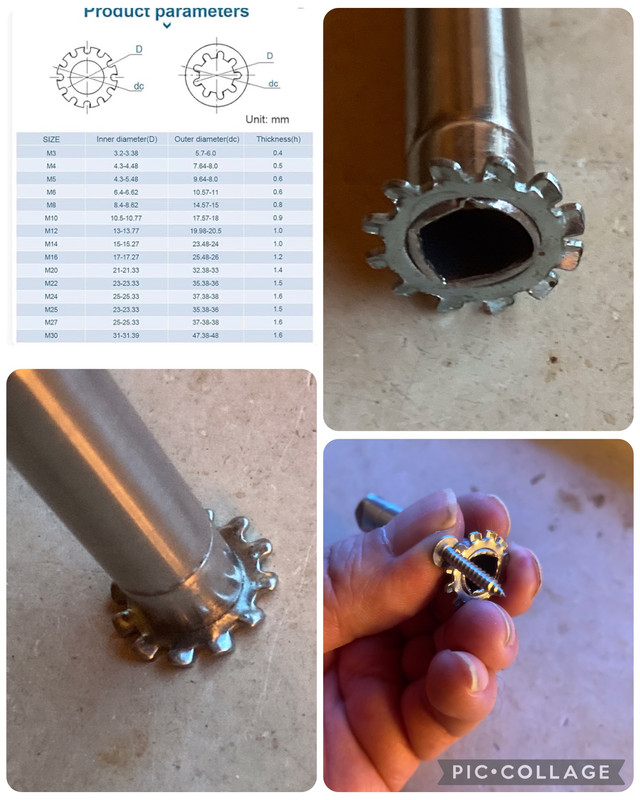
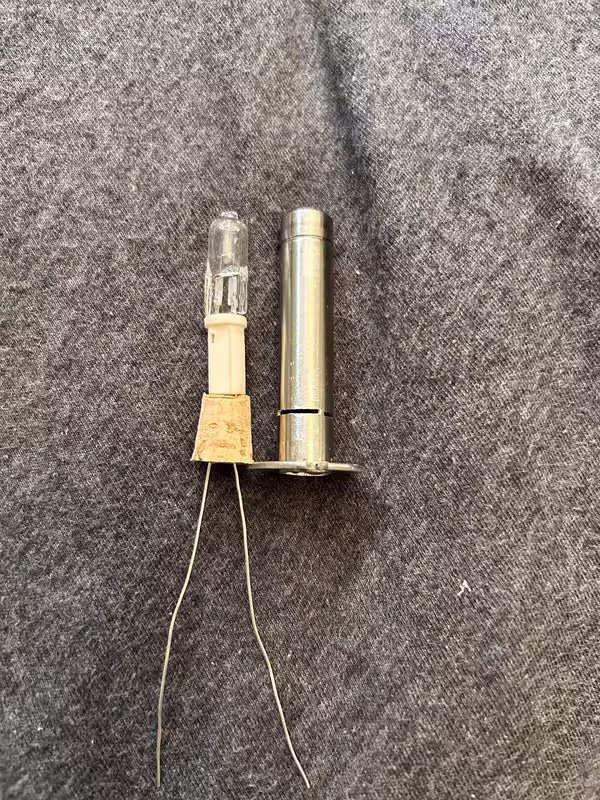
Used an M10 external star washer here with an ID of 10.5mm to 10.77mm. It's about 0.9mm thick and has an OD of ~18mm.

Procedure is basically the same as working with the flat M10 washer I'm usually using for fastening the 11mm OD heater cover. Bit less trimming of the tube necessary here , as ID tolerances of the star washer seem to be less strict than for the flat washers. Meaning... didn't even need to fire up the bench grinder here, but simply used a big hand-file for a minute or two, until I could feed the tube into the washer's hole and give it a go with the hammer.

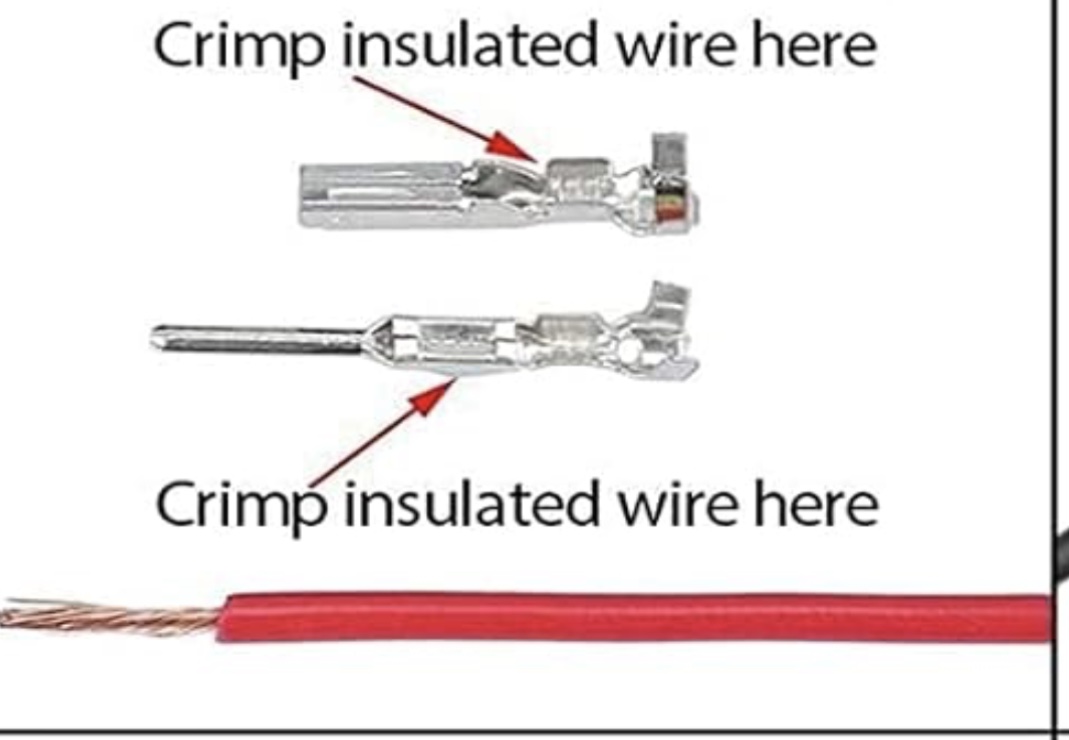
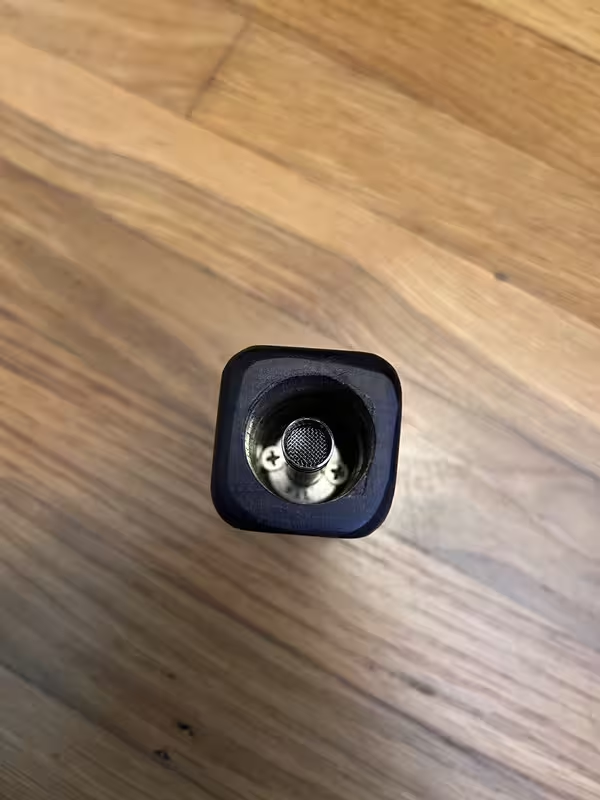
Also... the nudges of the star washer are a perfect fit for my M3/16mm round head wood screws ๐Ÿ‘

IMG-6949.jpg


IMG-6408.jpg
 
Last edited:

jackrod

Member
Thanks to some great tips here, I completed my second log, this one with a halogen heater.

IMG-2934.avif
IMG-2930.avif

IMG-2929.avif

IMG-2932.avif


Square-ish walnut body, 11mm OD/10mm ID heat island style heater cover, 12V 10W bulb.

The heater cover has 3 hacksawed slits at the bottom, and is fixed to a 3/8 washer by filing the end of the tube, hammering it in and peening (?) the rest over flat, as shown in this thread.

I used @Alan 's method of removing the insulation from the crimps on the G4 bulb socket, and using that insulation tab to re-crimp some solid core wire (22AWG tinned copper). Then stabbed these wires though a #1 cork, which is shoved into the bottom of the heater core. The socket sits on top of the cork, and the cork insulates the wires.

The cross section looks about like this:
image.png


Parts used:
heater cover: https://www.amazon.com/dp/B099QMDZRY
bulb: https://www.amazon.com/dp/B09BC9NQGR
socket: https://www.amazon.com/dp/B07CXL6MLD
barrel jack: https://www.amazon.com/dp/B07MPS3QD8
screens: https://www.amazon.com/dp/B07QF5TLZV
2x2 (1.5inx1.5in) walnut from Home Depot
3/8 316 SS washer, filed hole a bit larger
2x #6x3/4 SS wood screws
#1 cork
 

blokenoname

DIY Log Dabbler ๐Ÿ˜๐Ÿชต๐Ÿ’ช๐Ÿ’จ๐Ÿ’จ๐Ÿ’จ
@jackrod... Ah! That was kind of a quick evolution, I'd say! That walnut unit looks already like a pretty solid build. Well done ๐Ÿ˜๐Ÿ‘๐Ÿ‘
And good job on the heater cover!

We've to see how the cork takes the heat buildup over time though, being that close to the heater. If the connection you formed between the socket's leads and the copper wire is solid and straight enough, the cork isn't probably needed anyway, as the heater assembly should then easily support itself and w/out causing a short out, once it's soldered to the DC connector.

You might consider dimming the glare of the bulb๐Ÿ’ก
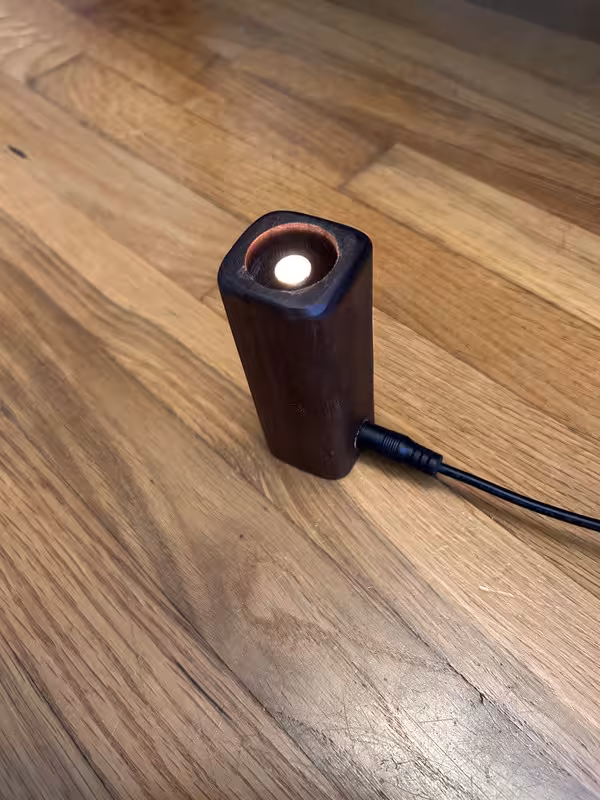
though, as it's not really fun to stare into the harsh light when using a direct draw stem. When using the log upside down with a WPA that's of course not so much of an issue, but still can be improved by simply adding several layers of ss fine mesh to the debris screen in the crimp. You can cut several fitting disks of the right size from ss fine mesh cloth, stack them on top of each other and then trap them between two basket screens, which you then use as a bit 'fatter' debris screen.

Dimming the glare even more, you could also get some 0.1mm thick ss foil and either cut (nail clippers) or punch out (leather puncher) a single ~5mm wide disk out of it and set that on top and into the center of the ss fine mesh disk stack right under the top debris screen basket.
It'll also help to diffuse the air flow away from the center of the tube and force it around its sides, which prevents hot spotting.
Haven't any active Halo Log at the moment to show you pics, but you'll find some in Alan's thread, somewhere in the page number vicinity, where you probably found his method working the halo socket.

Short notice on the bulb๐Ÿ’ก: @brainiac has probably a link for you for getting 'infrared' halo bulbs. They are used in heating appliances and emit a good deal less visible light.

Here are links to the ss fine mesh cloth and the 0.1mm ss foil:

I use the 200Mesh x 0.05mm

 
Last edited:

jackrod

Member
You were right on target with all these suggestions - I rebuilt the core after noticing the same issues. After thinking I had broken the bulb, when I had really just knocked the power supply loose :doh:

When taking it apart, I noticed the cork had scorched a bit. After some more investigation, I saw that the crimps inside the socket had built up some dark oxidation, so they were getting pretty hot. I think my crimping job or the connection to the bulb must have had some pretty high contact resistance. The glare was pretty bright, too.

For the replacement, I skipped the socket entirely. I just tightly wrapped the wires around the bulb leads about 5 times, and smashed/crimped these wraps down hard. Seems to give a lot better contact area, and is actually pretty secure. Then the wires went into a larger cork, which inserted into the hole in the wood, rather than the heater cover.

For the glare, I tried stacking 5 1/2" finer pipe screens at different angles, and it seems to help. I do like the night-light aspect, so I didn't want to eliminate it entirely. It could be a little dimmer, but it's not bad now, especially at 10V/7.7W. The foil or rubies sound interesting too.

image.png
 

brainiac

log wrangler
I use #400 ss mesh for glare reduction but @blokenoname 's #200 works fine, too. Cut a strip 1.5cm wide, about 6cm long, fold it over 5 times, trim the four corners slightly, sandwich it between two debris screens and insert it into the heater cover. So that's your standard debris screen and glare protector. Those 5 layers will also provide some heat diffusion.

@Hippie your ruby option sounds interesting. What diameter rubies would you suggest?

I skipped the socket entirely.
If you're confident about the connection that may be fine. If there's any play or rattle from the bulb you may get a loose connection over time. I use the Sinolec sockets placed within the heater cover slightly above the base of the heater well - ie not in contact with the wood.

Short notice on the bulb๐Ÿ’ก: @brainiac has probably a link for you for getting 'infrared' halo bulbs. They are used in heating appliances and emit a good deal less visible light.
IR halo gives off less glare, though glare reduction is still required. I got them from AliExpress but they might not ship to the US. Functionally, I havn't found any difference between the IR bulbs and the standard ones. If you want to read a bit about this issue check out p47 of this thread.
 

jackrod

Member
If you're confident about the connection that may be fine. If there's any play or rattle from the bulb you may get a loose connection over time. I use the Sinolec sockets placed within the heater cover slightly above the base of the heater well
I feel pretty good about it, at least for Mk. 2. The wires are stiff and held close to the center of the tube by the pins and the cork. The bulb can't rattle, since its tip is contained by the screens. But there is always room for improvement, this isn't at the point I would feel comfortable giving away yet. The empty socket might work pretty well as an insulator, since it's like a bead with 2 holes.

Next version I would also like the bulb or heating element to be more easily replaceable. I thought that the sockets would do that, but the ones I got were poorer quality, with vinyl insulation, which I don't feel I can trust not to melt. Didn't try for a better US source for sockets. Thinking maybe using a screw connection in the base could work.

@Hippie How transparent are the rubies? Seems like you could do some cool things with colored glass beads as well.
 

Hippie

Well-Known Member
Transparent enough to give the bowl a rosy glow
I can see through them enough to see when the soldering iron element is glowing in my life saber heater cover build
Zirconia and Silicon Carbide are other options that will block more light, if that's the plan.

I like the glow of a halo with a glass bowl so I usually use clear borosilicate and either a few layers of mesh or sandwich a punched disc between 2 screens. If that's the plan, quartz is another option.

You can pinch crimp connectors into shape to make your own socket
I bought some of these connectors when I was looking for a more secure power connector
and discovered that the female terminals are just the right size for the bulb terminals
There's probably loads of other crimp terminals you can repurpose
 

blokenoname

DIY Log Dabbler ๐Ÿ˜๐Ÿชต๐Ÿ’ช๐Ÿ’จ๐Ÿ’จ๐Ÿ’จ
I feel pretty good about it, at least for Mk. 2. The wires are stiff and held close to the center of the tube by the pins and the cork. The bulb can't rattle, since its tip is contained by the screens. But there is always room for improvement, this isn't at the point I would feel comfortable giving away yet. The empty socket might work pretty well as an insulator, since it's like a bead with 2 holes.

Next version I would also like the bulb or heating element to be more easily replaceable. I thought that the sockets would do that, but the ones I got were poorer quality, with vinyl insulation, which I don't feel I can trust not to melt. Didn't try for a better US source for sockets. Thinking maybe using a screw connection in the base could work.

I'd guess, the wire wound connection will rather hold up fast and 'bake' to the bulb's leads over time, so that it becomes hard, if not impossible to change the bulb alone in case of failure without replacing & re-soldering the whole heater assembly.
Which btw, might be even the easier and more pragmatical way to do it, than relying on the G4 socket for a replaceable heating element. Over time, the ceramics just slowly disintegrates & the terminals oxidize, so that it becomes harder to replace the bulb and get a good connection.

That's the thing with halo heaters. Though I really like them (especially for the ambient lighting effect) & they were one of my primary choices when I set out with log building, they're just not very durable. Having a G4 socket in your ceiling lamp, you'll replace a bulb maybe every couple of years.
Logs, on the other hand, tend to topple over, roll from the table and hit the ground. Do that once or twice and you'll already need to replace the bulb ๐Ÿคทโ€โ™‚๏ธ
So if you're not careful, you'd need to replace the bulbs in the log more often, degrading the ceramic socket a lot faster, than in your ceiling lamp.

Won't happen with a heater cartridge or resistor for a heater. I've logs here with cartridge/resistor heaters, that I've literally abused for a couple of years now (be it running them 24/7 for a whole year or so, or dropping them from the table dozens of times, that still work solid as a rock ๐Ÿ˜

You could of course make the through hole smaller (10mm) and then tap it out for the DC connector to thread in. Soldering your wire wound bulb assembly straight upright to the poles of the connector and thread the whole assembly in from the base well, like with this replaceable resistor heater here.

IMG-6983.jpg


This is one of my earliest Sapele logs. I was lazy here and didn't tap out the wood itself, but rather found a fitting flat washer and circlip, to hold the nut in place, that came with the DC connector ๐Ÿ˜
Much better to tap out the wood instead and thread in the heater assembly directly, without the washer & nut.
Only caveat with this method is, that you'll need a right angle plug ๐Ÿ”Œ 
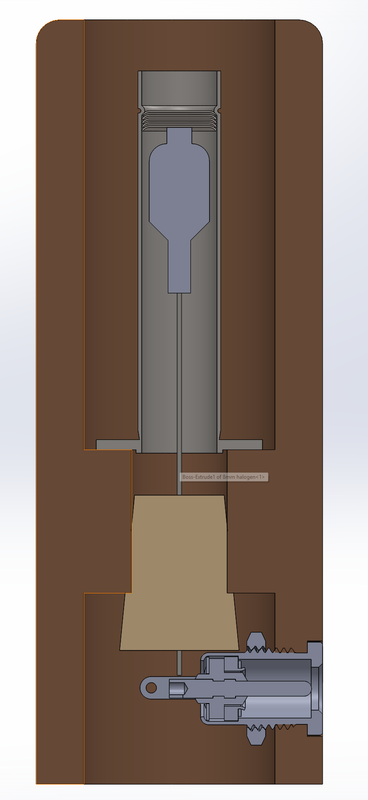
then and drill/file a kind of 'mouse hole' into the base of your log then, for fitting the cable through.
 

jackrod

Member
@Hippie Using bare contacts might be the ticket. You can get them gold plated, sized for many different pins. 100% proper crimping is a bit tricky, requires special tools. But probably a decent contact that is easier to crimp or solder could be found. Then you could use any stranded high-temp insulated wire you want.

@blokenoname I was thinking that the cork/bulb/wires would have to be exchanged as well. Sort of treating the wires as extensions of the bulb pins. Cork could probably be reused a few times. This could work if the connection in the base could be separated without soldering. A small terminal block, small wire nut, or even 2 screws with nuts, could probably enable that. Or, depending on how hot the bulb wires get, the socket could be set into the wood and wires inserted directly. I also like the screw-in cartridge using the DC jack.

I like the idea of halogen, but my main concern is just using safe high-temp materials. I'll have to try the classic resistor heater build sometime too. It's such a clean solution, and hard to break. Much better for giving to someone, etc, and having it work without any fiddling. It would be nice to get the halogen more robust like that, with an easily replaceable bulb, just because it looks cool. But it might be too many parts.
 

Flotsam

Well-Known Member
as far as crimping goes this may be overkill for this application, but i bought this to crimp automobile battery terminal connections as well as stainless steel cable i am using for cable railing. 10 tons of force, you usually just buy the set of dies that is required for a particular application

71vNmUVQIUL._AC_SX679_.jpg


if you have a bench vise that might suffice for such a smaller application.
 

blokenoname

DIY Log Dabbler ๐Ÿ˜๐Ÿชต๐Ÿ’ช๐Ÿ’จ๐Ÿ’จ๐Ÿ’จ
if you have a bench vise that might suffice for such a smaller application.
Wow! ๐Ÿ˜ฎ
That is probably indeed a bit too much for working on such a small scale here. I usually simply use my needle nose pliers for a rough fit and then use the bench vise with a moderate amount of force applied to crimp my 0.75mm ferrules.
You'll break the copper wiring first, before you could separate it from the crimp by pulling. Doesn't look so nice, but does it's job ๐Ÿ˜ƒ

Another option is this very simple crimp tool for 0.25 to 2.5mm diameter:
 
Top Bottom