• We are experiencing temporary outages. Keep trying, it does recover. We hope to rectify this as soon as possible.

'The Misty Log' - DIY wooden Log Vaporizer

blokenoname

DIY Log Dabbler 😁πŸͺ΅πŸ’ͺπŸ’¨πŸ’¨πŸ’¨
Very cool and very exciting to see what you two gents are doing with the cores! :cheers:

Thanks for bearing with me while I've been totally task saturated and time depleted, the patience has been much appreciated! :clap:
We've to thank you, being able to spare some time and work to provide us with some cores to play around with, despite all your hardships in the last couple of years. Hope things are looking up finally and hope, you and Amanda are doing well 😊

Hi folks... πŸ˜ŠπŸ‘‹

Didn't find the time to finish the cardboard alpha yet, but as I also got a nice osage orange body from @brainiac πŸ˜ŠπŸ™ that fits another UD 3/8" SC3 core (~4" hight) from Dave, with a (1.25" OD) star shaped base plate, I decided to do that one first.

Bit less work there, as I only had to solder in the heater (stripped down 7.5w/12v cartridge, the leads of which got extended with a bit of silver plated copper wire, using blank 0.75mm cable shoes for crimps, as seen in my last post above).

IMG-6736.jpg


It got a nice little padauk stem, Brainy did a while ago for me, featuring a 5/16"/8mm OD boro glass tip for micro dosing (ID is ~5mm) and the backend of which fits a 14mm female ground glass joint.

IMG-6342.jpg


In other news: found some very useful little helper tool at Aldi's WTF isle... for doing soldering work and other finicky stuff. Headgear with integrated LED lighting and a set of interchangeable magnifying lenses πŸ€“πŸ”¬
Needs a bit dusting off, though πŸ˜Άβ€πŸŒ«οΈ
 

blokenoname

DIY Log Dabbler 😁πŸͺ΅πŸ’ͺπŸ’¨πŸ’¨πŸ’¨
A year ago or so, I got a beautiful slim Padauk body from @brainiac, which I fitted with a 13mm OD/10mm ID glass heater cover. While it worked admirably well, I rarely used it, because I still prefer the smaller 5/16" stainless steel bowls, for a quick hit. I decided, to give it a new ss core instead. As the body has only a diameter of 1.5", Dave's new ss cores won't fit, as they come with a base plate, that's as wide, as the whole padauk body.

So I set out to recreate one of Alan's ~6cm long 3/8" HI cores as close as possible. Used a 9.5mm OD/8.0mm ID ss tube and an M8 ss washer (20mm diameter, hole is 8.5mm), which is about 1.0mm thick, for a base plate.

Put the washer to the bench grinder first, to cut two notches for the screws. Reworking them a bit with a steel file.
Then I cut 6.3cm length of the ss tube and gave it the crimp for the screen and a second crimp, where the air intake goes, to guide the hacksaw later on. Then I took the base of the ss tube to the bench grinder, slowly milling it down, till about 3mm fitted through the 8.5mm hole of the ss washer. Then I reworked the rough edges sticking out a bit with my needle-nose pliers, bending them mostly outwards... and took a small hammer to pound them (very carefully) flat against the washer. Reworked the compressed steel a bit with a file, so that everything was flat enough to stand upright.
Nice thing about this technique, is that it can all be done w/out welding.

IMG-6766.jpg


Next, I spanned the heater cover into the vice, to cut two air intake slits with a small hacksaw along the second crimp. Originally wanted to cut three slits all around, but the first cut got too wide, so that I had to settle for two slits instead, lest I risk the stability of the whole tube.

Result in comparison with Dave's SC3 core:

IMG-6346.jpg


In the Padauk: 😊

IMG-6350.jpg


IMG-6349.jpg


IMG-6347.jpg


Hope, I'll get to the planned cardboard Alpha next 😁
 

blokenoname

DIY Log Dabbler 😁πŸͺ΅πŸ’ͺπŸ’¨πŸ’¨πŸ’¨
Looks great. You inspire and have taught some of us well. Such a great tool that flies under the radar. I like the slightly larger diameter heater cover at 7/16" outside diameter. Also through water or a dimpled j-hook for cooling. My favorite device.
Thanks ☺️. The idea for connecting the tubing to the base plate/washer in that way comes from Alan again, of course. As you already said, he's admirable open in how he constructs his HI in his thread and the MasterJedHI is a virtual firework of ideas πŸ’‘, that are often so simple (in the best possible way), but most effective.

I also really enjoy working with the sample of UD cores right now,(which are great, btw), Dave so kindly provided to Brainy and me πŸ˜ŠπŸ™. It's just, that producing them at home would require some serious welding & laser cutting equipment and so isn't done so easily.

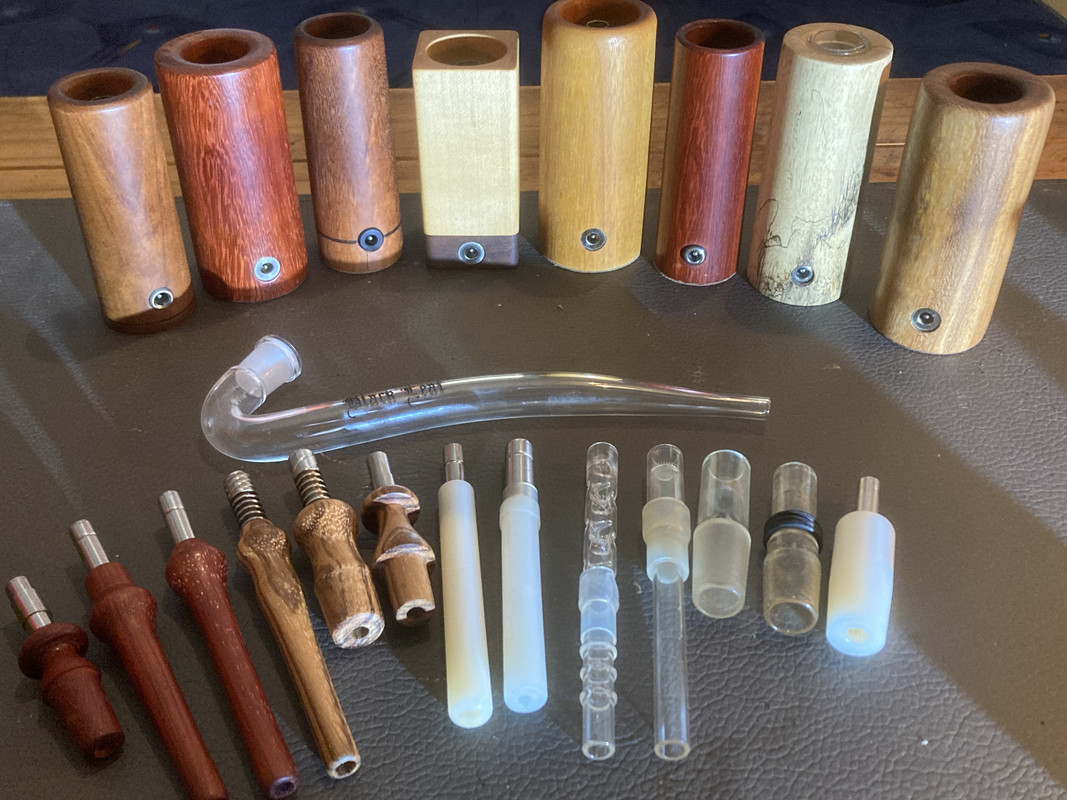
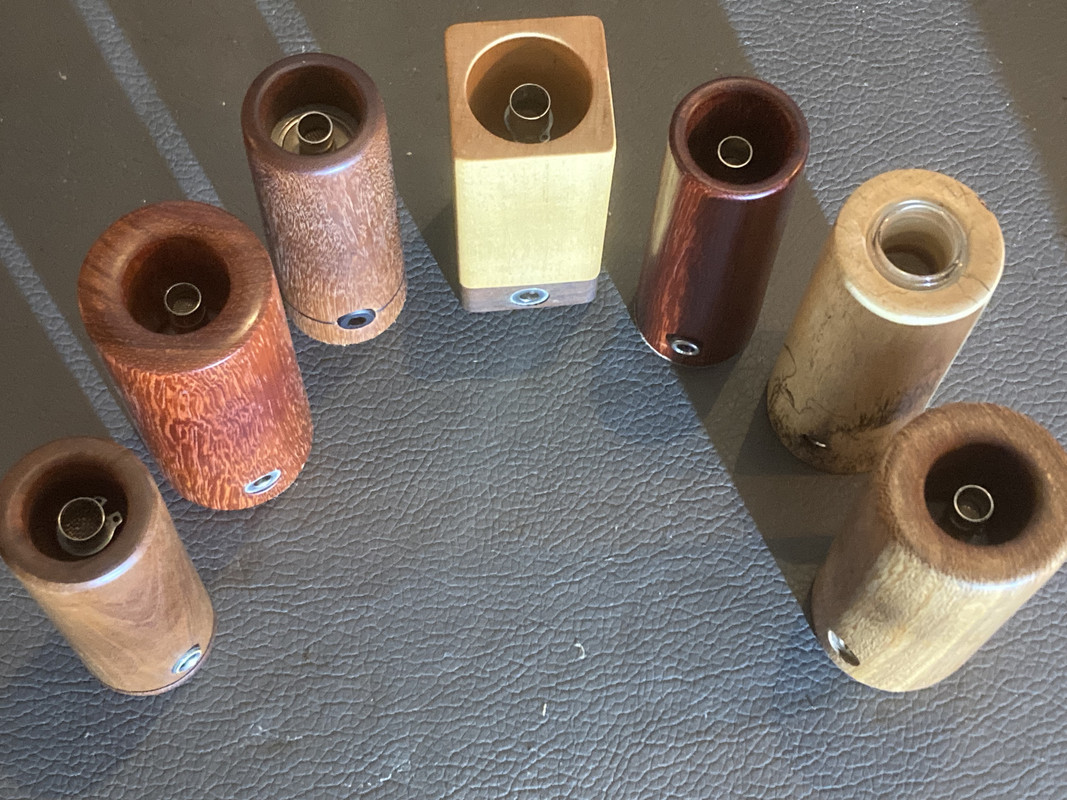
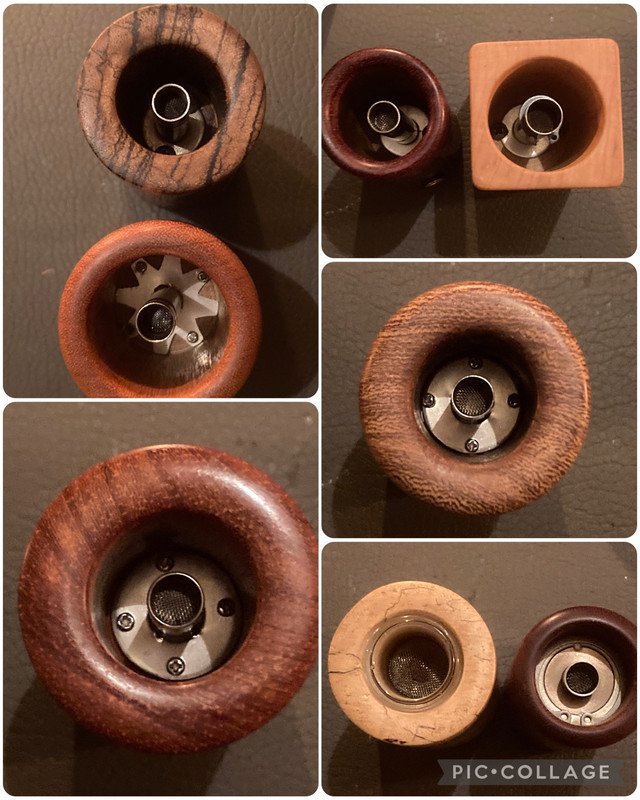
I really like the three Logs, you've done there. Especially the third one, with the base done like the two part/square HI πŸ˜ƒπŸ‘.

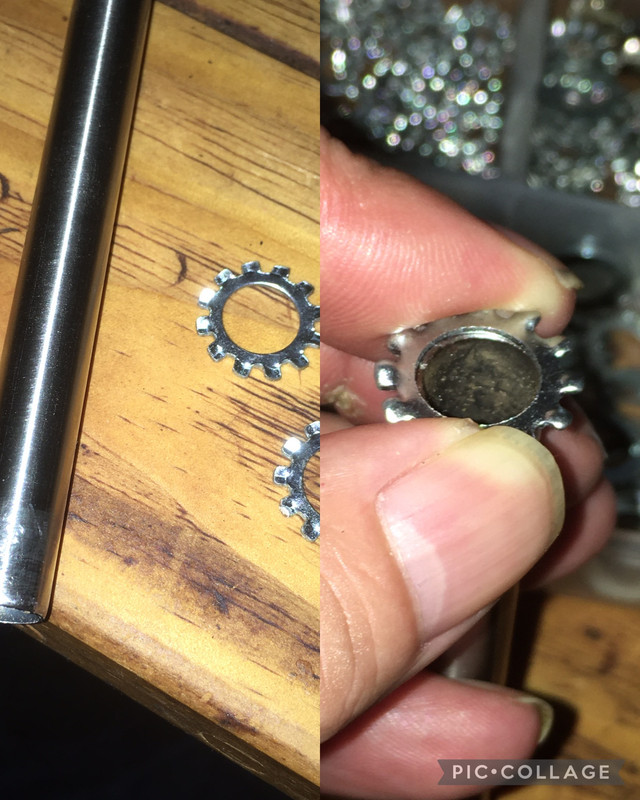
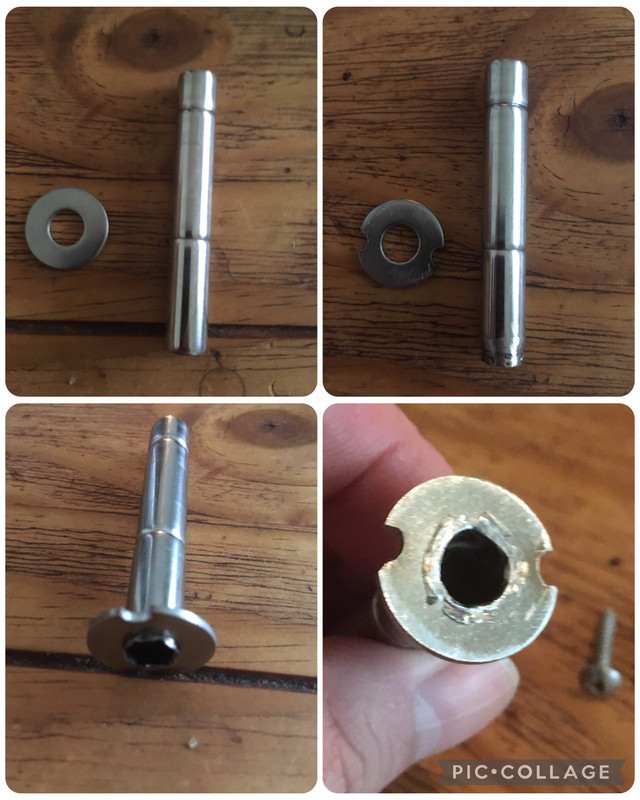
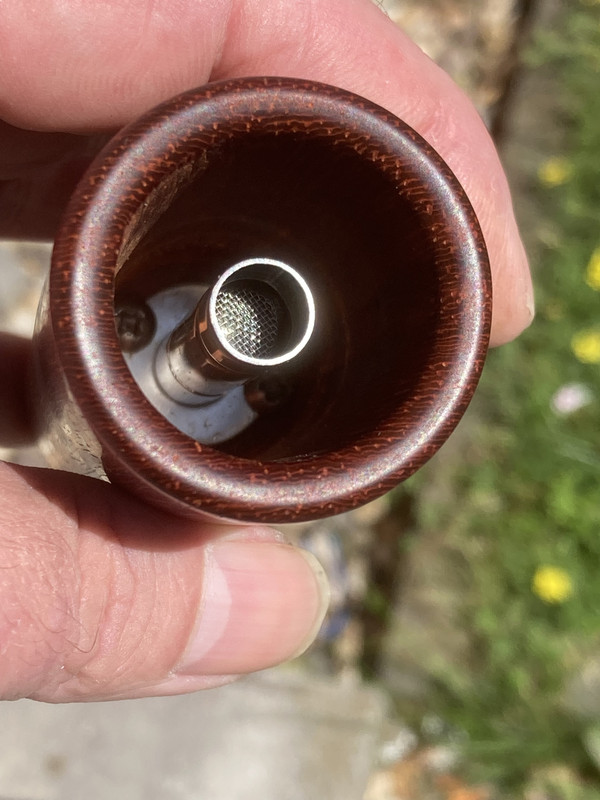
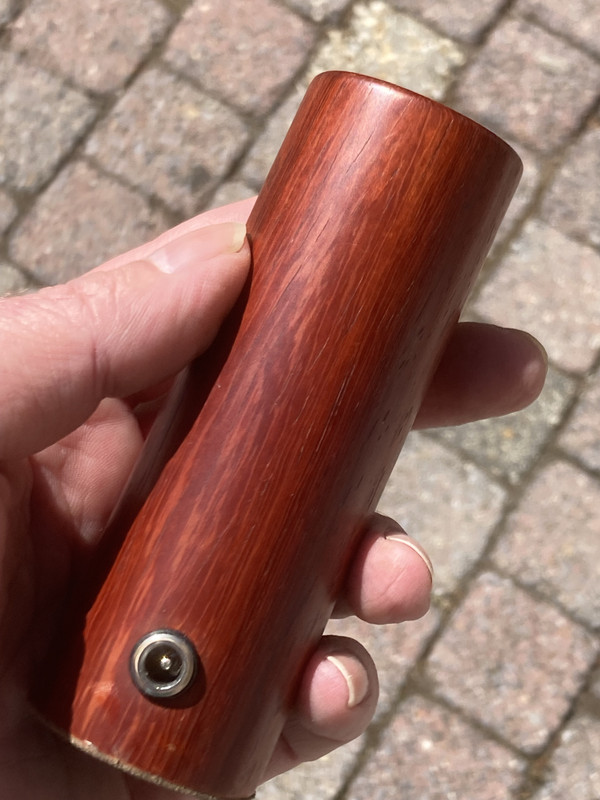
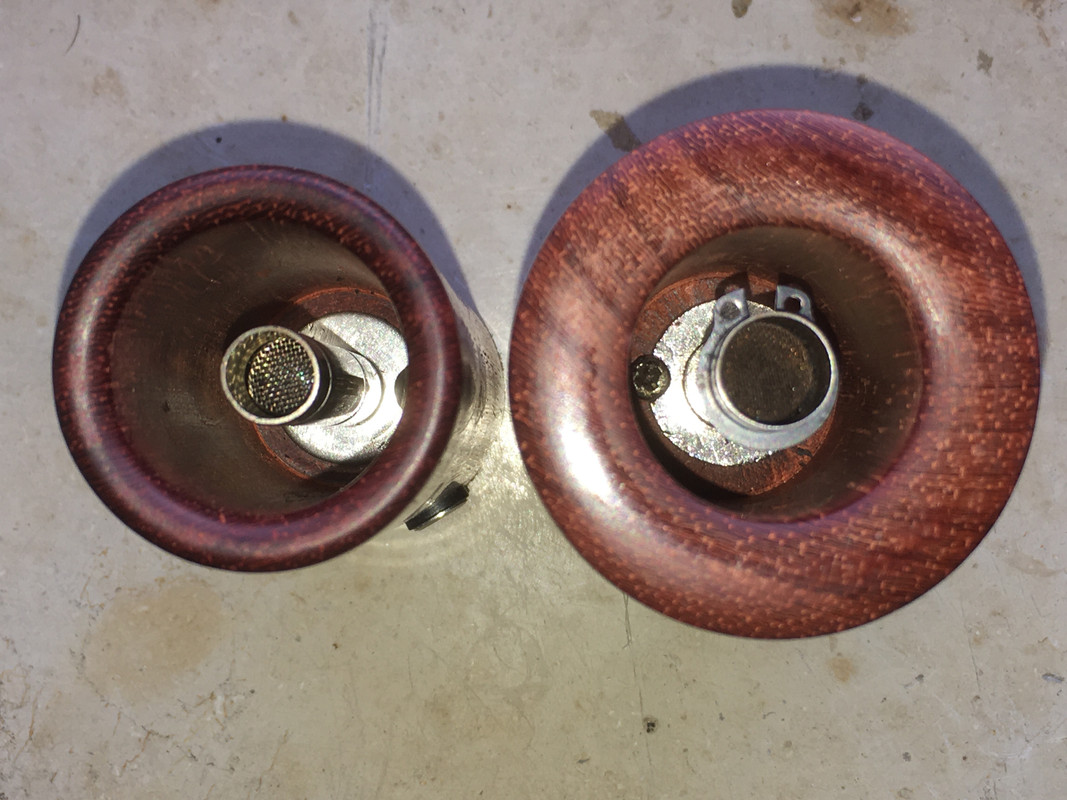
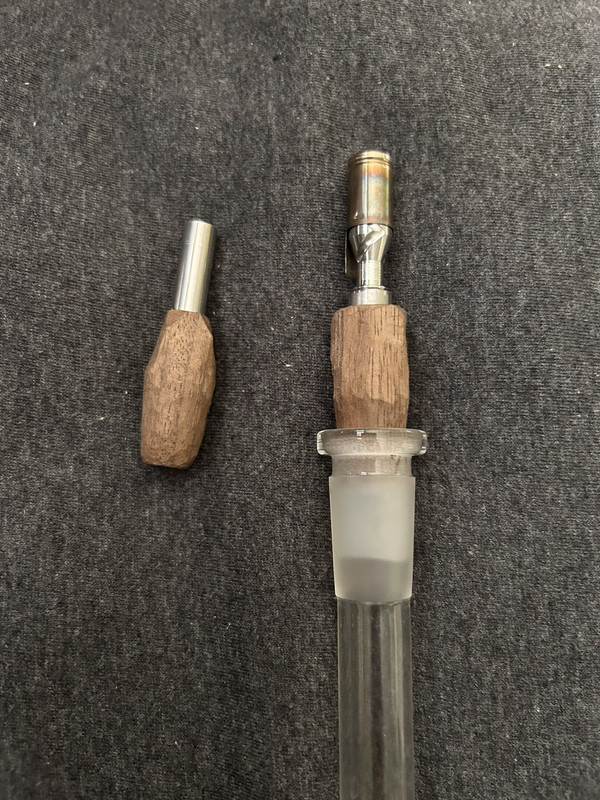
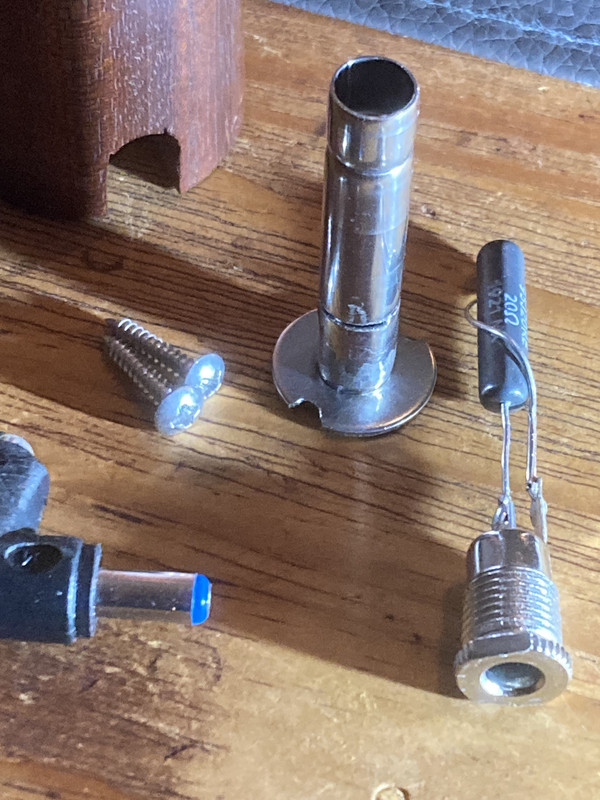
I use 11mm OD/10mm ID tubing here, to reproduce the wider 7/16" heater cover, as the'inchy stuff' is a bit hard to come by, in EU country. And an M10 ss washer (width: 20mm, hole: 10.5mm, thickness: ~1mm) for the base. Here is one in the other padauk body, Brainy did for me. It's a bit shorter, though. Only 4cm in hight.

IMG-7125.jpg


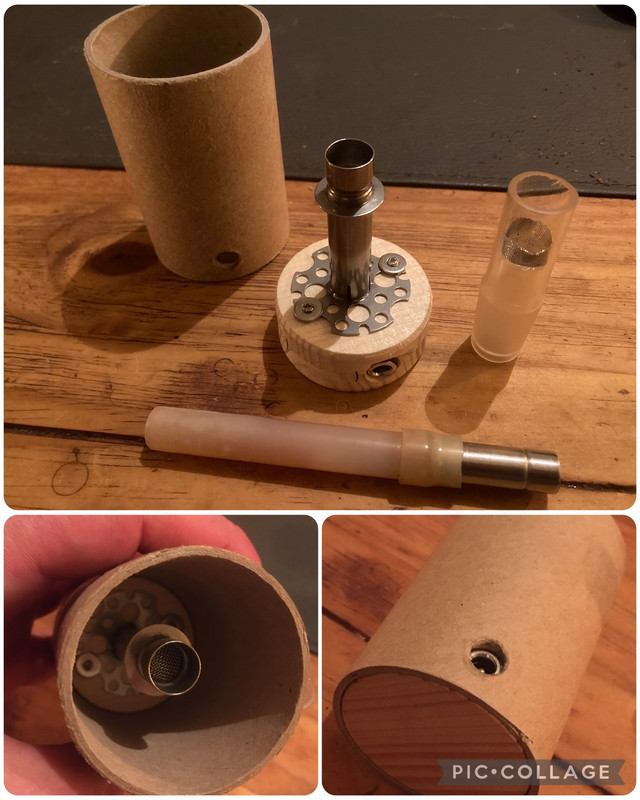
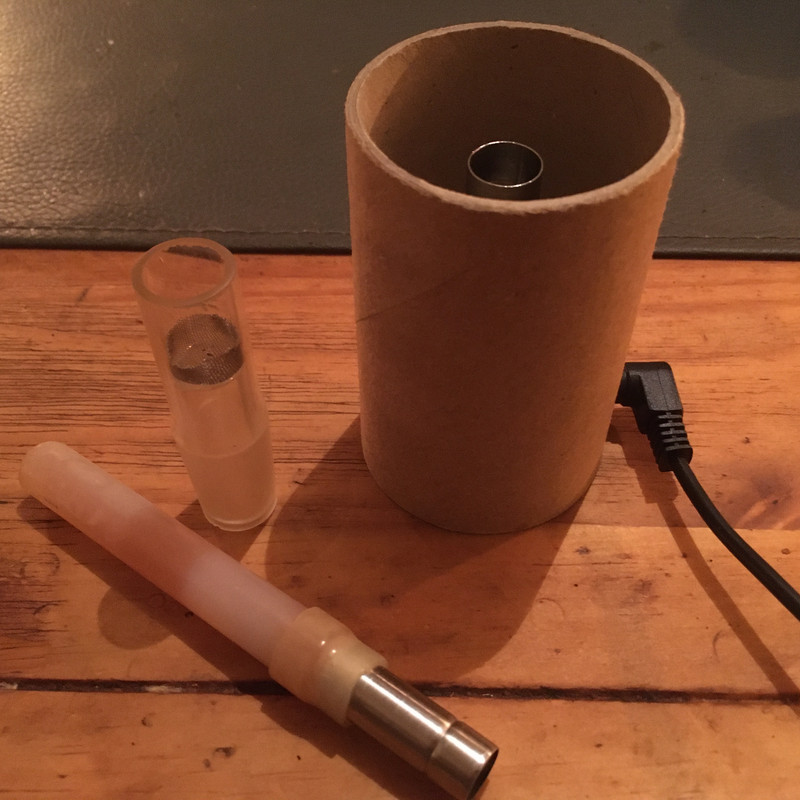
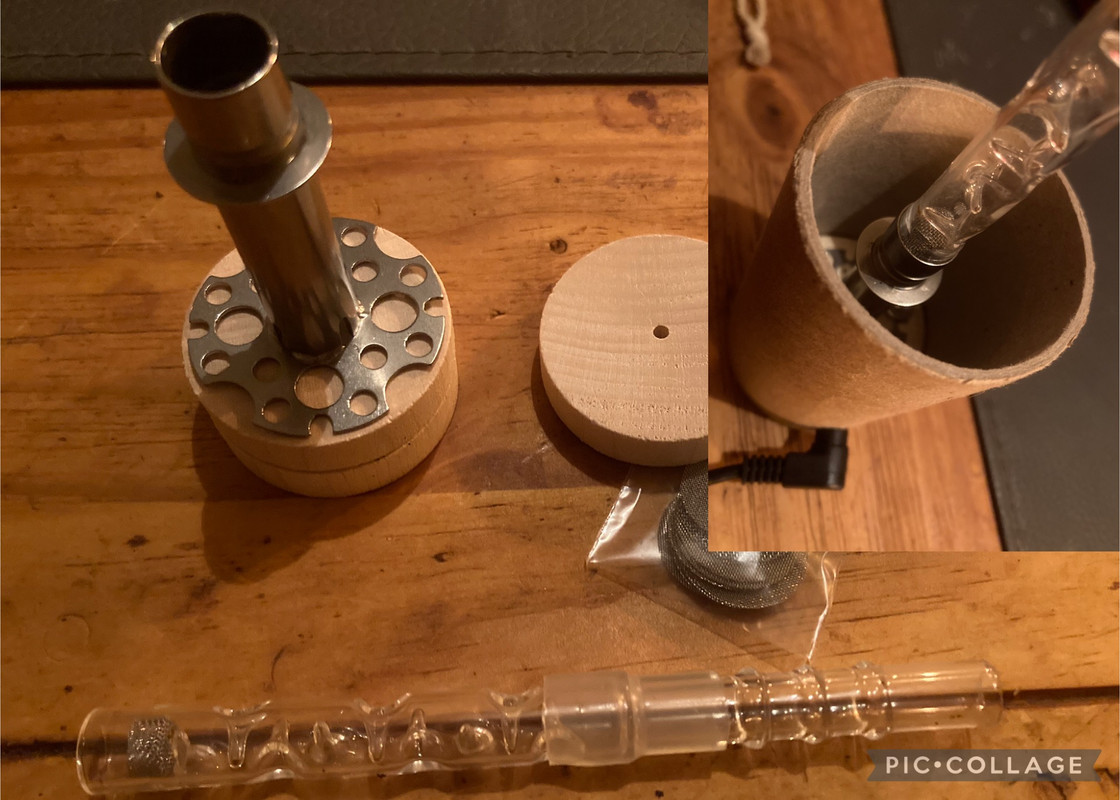
Coming back to the UD cores... I finished the Cardboard Alpha today 😁.

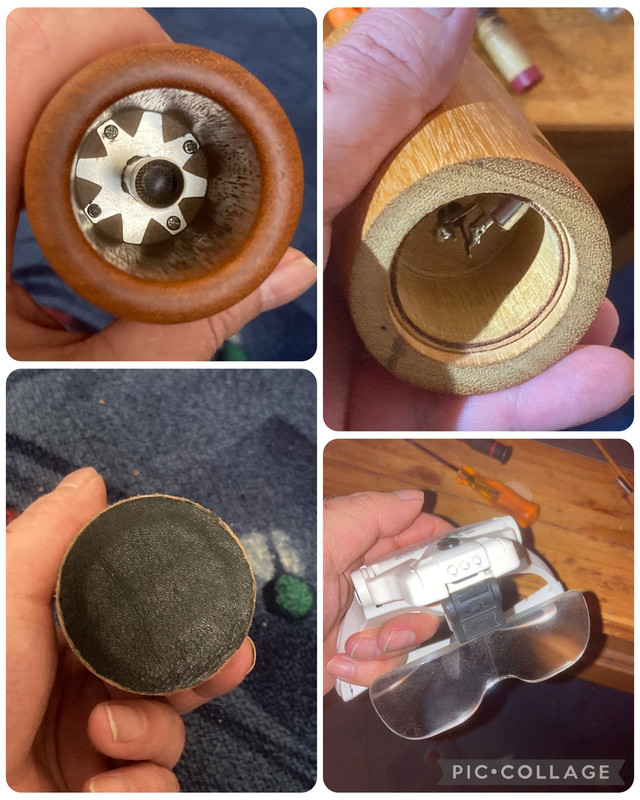
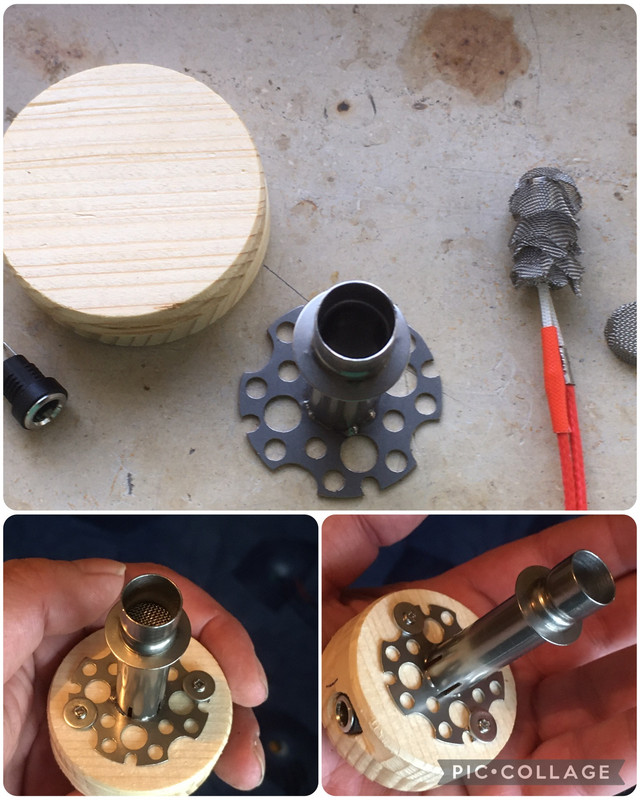
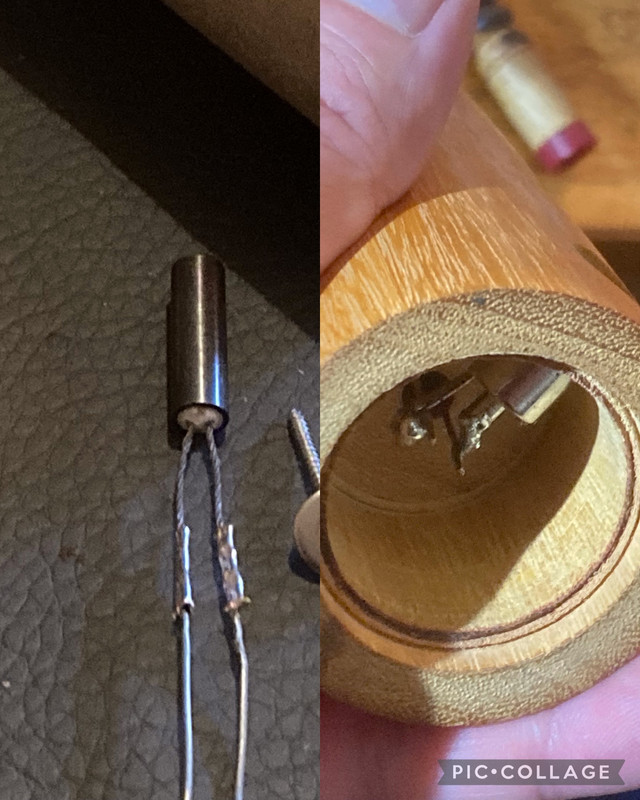
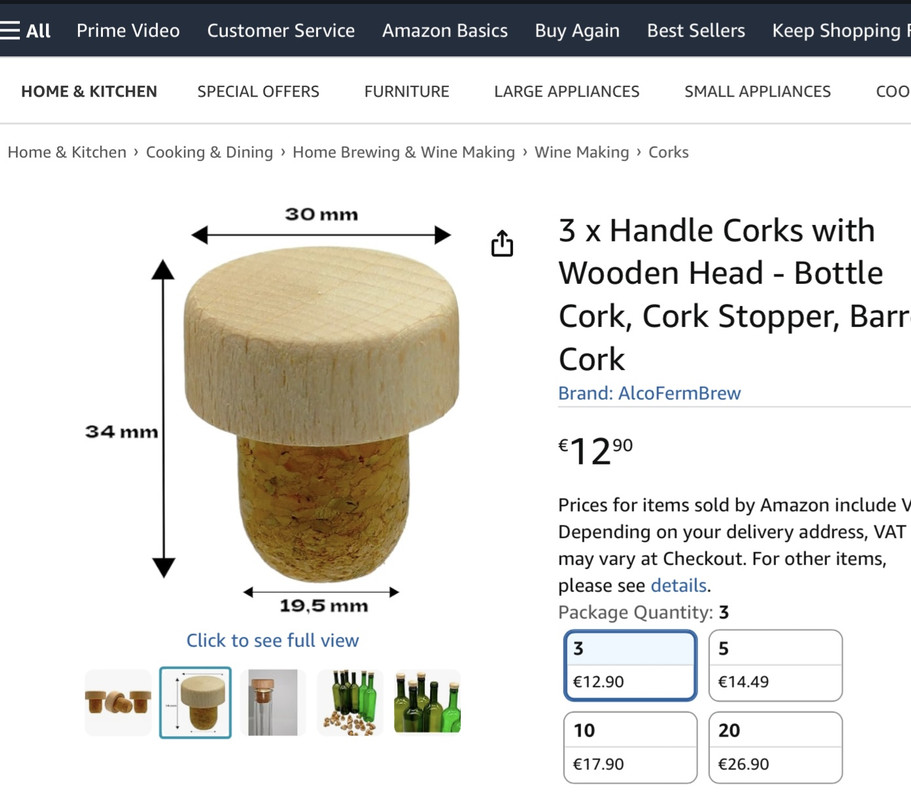
Word to the wise: that ready made spruce plugs/disks I got me there to create the base puck, are not so ideal. Very soft wood, that also easily splits and splinters when treated the wrong way. Broke two disks by just trying to use M3 16mm screws for fastening the heater cover. The M2 ones worked out then, but barely. So better cut/turn a fitting disk from some solid wood πŸ˜‰

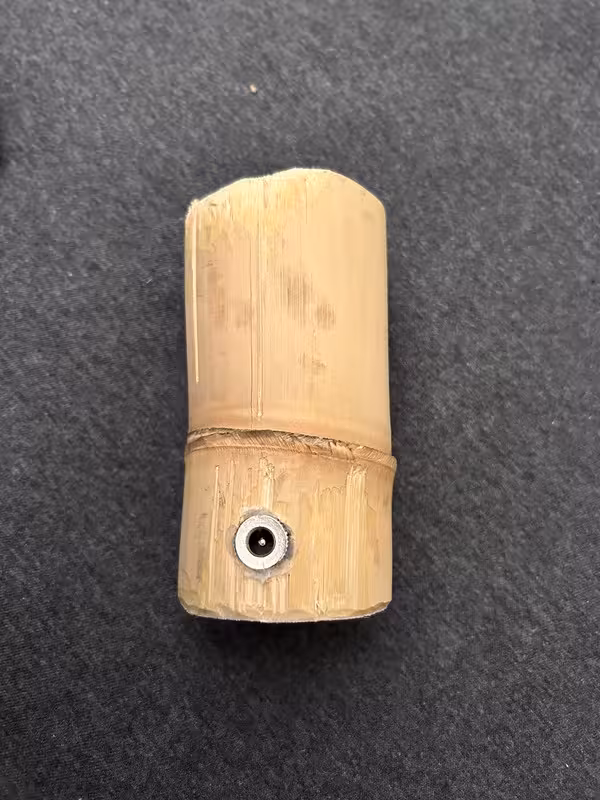
Also better to use the classic ss 2.1mm connector, as that can be threaded in. The smaller plastic connector I used instead, slips out to easily, as it lacks proper threading.

IMG-6783.jpg


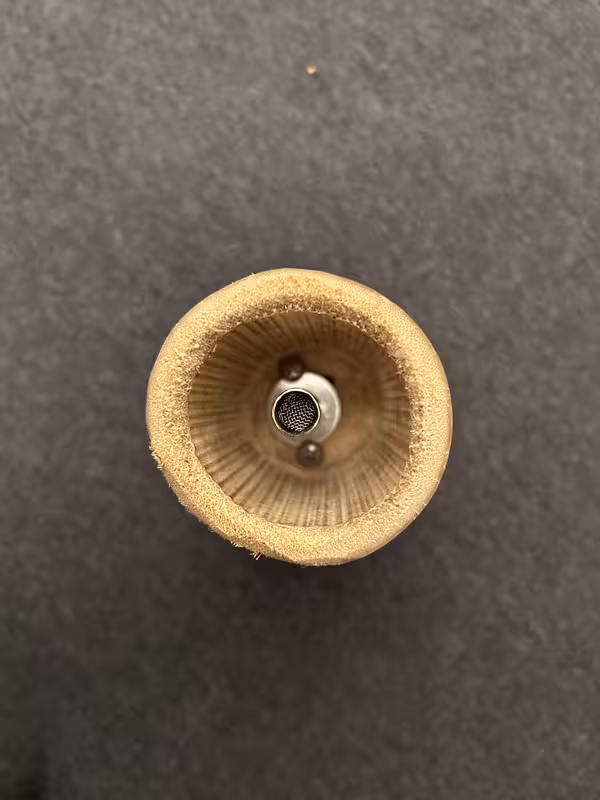
Decided to use Alan's method of stacked screens this time, instead of the ss fine mesh poncho I usually use, to extend the heater's surface area, when working on wider diameter heater covers/cores. The alpha core I got, has an OD of 1/2" and an ID of ~7/16". So I used five 20mm screens to form the hole punched baskets... and kind of messed up horribly πŸ€£πŸ€¦β€β™‚οΈ

a) The screens I used were more on the pliable side and didn't hold their form very well (need to get stiffer screens there), and b) when I stacked the screens onto the cartridge, I had some difficulty to push the hole affair up into the heater cover, with everything staying in place. It worked out in the end, using some 11mm OD tubing, pushing both, screens and cartridge, from below.

Probably formed the baskets wrong in the first place! fitting them to the cover, not to the cartridge and then splaying them out. Will rework that tomorrow, AFAP.

IMG-6784.jpg


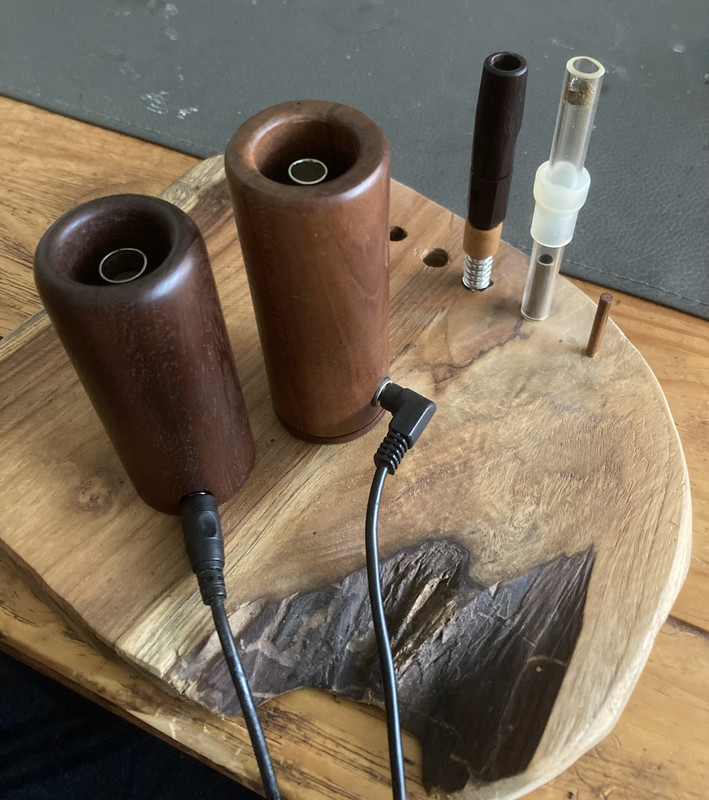
Anyway... despite the messy look of my screen stack and the not so ideal base puck, the Cardboard Alpha works admirably well πŸ˜‹πŸ’ͺπŸ’¨πŸ’¨πŸ’¨

Though my fine mesh ponchos worked reasonably well for extending the heater surface, I've to admit, that Alan's method of stacked screens has a much better airflow, which I enjoy 😊.

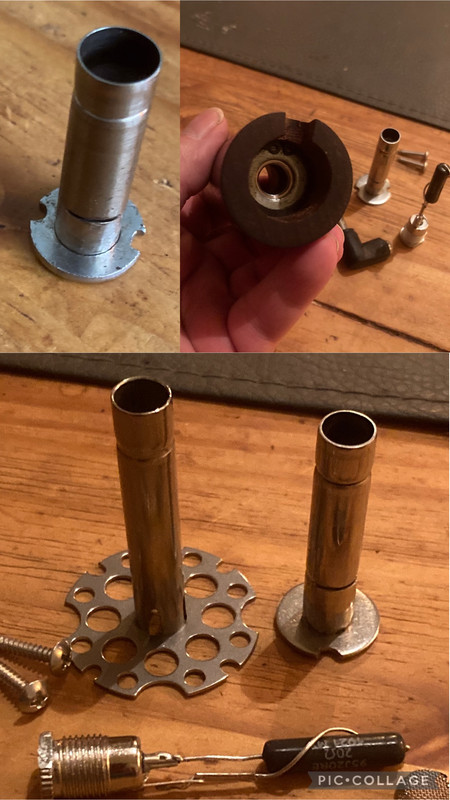
Using a 40w/24v (=10w/12w) cartridge here (as I expected the wider core might need a bit more power), which I'm running at 7.15w at the moment. So the 35w/24v (=7.5w/12w) should also do. Probably will get down the wattage a bit more, once I re-stacked the screens. There is additionally the fact, that Dave's cores have a bit wider crimp for the screen than my own heater covers show, so that the tip is a bit further away from the debris screen.

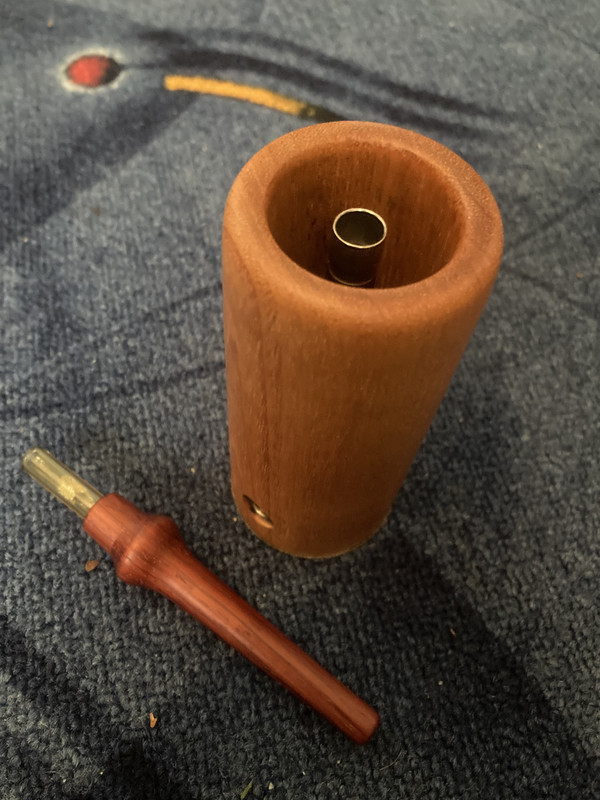
Used 11mm OD ss tubing for improvising the tip for a nylon dd stem and the 13mm ID backend of a standard, male 18mm joint for the GonG.
Side note: the cardboard body stays really cool to the touch.

The 'heater on a puck' method proves all in all a very clever & handy idea πŸ˜πŸ‘

IMG-7138.jpg
 
Last edited:

blokenoname

DIY Log Dabbler 😁πŸͺ΅πŸ’ͺπŸ’¨πŸ’¨πŸ’¨
Evening πŸ˜ŠπŸ‘‹

Some wood & core porn tonight 😁 πŸͺ΅ πŸ’¨πŸ’¨πŸ’¨πŸ’ͺ
The most recent Misty & friends collection!

From left to right: cherry, padauk, tiger wood (UD), maple & walnut (HI), osage orange, padauk, tamarind and wild mango 🀩
(Oops... seems the zebrano is missing from some pics 😳)

IMG-6368.jpg


The cherry unit to the left, I cut from a handrail; all the other bodies (apart from the UD and Square HI) were beautifully turned by @brainiac πŸ˜ŠπŸ‘.
The padauk and zebrano stems/wongs are also from Brainy.

IMG-6362.jpg


Put Dave's SC3 core and two older UD Air Cores to good use in the osage orange, the wider girth padauk and the wild mango.

IMG-6797.jpg


Found that one of my older, 3rd party glass cooling stem for the Dynavaps makes a very nice micro dosing stem for the UD Alpha Core! Slips perfectly into the core tube and you just need to add a screen 😁. As the cooling stem itself was a bit on the short side, I also added a short glass mouthpiece.

IMG-6798.jpg


In further cardboard Alpha news: the stiffer screens for the heater fins arrived today and I also got a handful of 40mm x 10mm beech wood plugs, that'll hopefully help to create a more solid base puck for the improvised cardboard Alpha core.
Now I'm just waiting for the fitting 40mm ID cardboard mailing tube to arrive 😁
 

blokenoname

DIY Log Dabbler 😁πŸͺ΅πŸ’ͺπŸ’¨πŸ’¨πŸ’¨
Morning πŸ˜πŸ‘‹

Nothing like a too long, boring holiday WE, trying to mill your fingers off or meddling in other insane ways with bench grinders & stainless steel... πŸ₯³

Anyway... revived an old (mouse hole) mahogany/sapele Misty body (cut from a handrail) giving it a new DIY OD 11mm/ID 10mm heater cover (plus a 90Β° angle adapter plug) and another old handrail cherry unit also got a new DIY OD 9.5mm/ID 8mm heater cover.

IMG-6840.jpg


For the 'Mouse Hole Misty', I revisited Alan's old idea of a user exchangeable heater (soldering the 95J resistor directly to the DC plug), which then gets simply threaded in & out again from the base well of the unit.

While that 'Mouse Hole Misty' method above works fine in principle, be advised that not all woods hold a threading well, when it goes along the grain and that adding additional ss washers, circlips and nuts, like I did here to hold the threading of the heater core, will finally conduct even more heat to the wood. Looks nice, but better find some wood that actually holds the threading or make longer heater covers 😁

IMG-6841.jpg


IMG-6388.jpg
 
Last edited:

jackrod

New Member
Just tried my first DIY log thanks to the resources posted here by Alan, blokenoname, braniac, underdog. It was a very simple design, using what I had available. Not the prettiest, may need some changes for long term use, but it worked amazingly well on my first test :science: .
IMG-2915.avif
IMG-2916.avif
IMG-2918.avif

Bamboo body, 24V/40W printer heater cartridge, 3/8 SS heater cover, heat island style.

I was able to use the natural divider betwwen segements in the bamboo to mount the heater cover. SS self tapping screws hold down the washer which has 2 notches filed into it. Under there, the SS tube is slit into 8 segments, which are bent out flat to form a base. The tubing available locally to me (US) was about .028 in on the wall thickness, so fits a 5/16 SS stem, but was harder to indent with the tube cutter or flare without slitting. Heater cartridge wires are shoved though a shaved down wine cork, which is used to plug the base of the heater cover. They are soldered to the input jack, which is held in place with a bit of hot glue. Not thrilled about that, but everything in the base seems to stay cold.

Any advice on the insulation/wire lead materials of the heater cartridges? I tried to strip everything off and solder directly to the leads from the cartridge, but they seem to be nicrome and won't take regular leadfree solder at all. So I just put a bit of regular heatshrink on the crimps, and used the existing wires, which are insulated with a red woven material, seems to be maybe silicone coated. I would rather use bare wires, SS, etc, but it seems that the materials are made for high temperatures, and don't get that hot anyway. I suppose the best way would be to use some uninsulated butt splices with tinned copper wire, and glass beads, but maybe the current setup is fine.

At 12v, it drew about 0.76 A, for about 9 W. This seems a bit hot, but I got some light brown ABV. I think the heater may be a bit farther from the herb.

Any tips from the masters in this thread? No lathe here, but going to try for a square drilled walnut body next. Got a 1" fortsner bit and benchtop drill press. And would like to clean up the materials a bit, maybe try a resistor or halogen. What do you use for screens? I used a SS garden hose screen i got from the hardware store, but I think the mesh is a bit coarse.
 

darkstar72

Well-Known Member
img
img2

Congratulations on your log crafting project.

There is no definitive right way to make these but here are some of my thoughts (Hopefully the links to the images work):

Heater:
I use the 24v/30w printer cartridge heater similar to your 24v/40w one. Running these with a 12v 1 or 2 amp wall wort will get only ΒΌ of the rated wattage. So the 24v/30w will produce 7.5 watts and the 24v/40w will produce 10 watts. The 24v/30w is not as popular on amazon and may be more difficult to locate but I think it is more ideal for log building purposes as it still provides ample heat without overdoing it. I’ve ditched power supplies with dimmer knobs as I’ve found they fail after a while. A basic 12v/2 amp wall wort / power supply (at ~$8) works no issue. I recommend a smart plug in front of the power supply as this allows for remote phone turn on and a 30 min auto shut off setting. It takes about 3-5 minutes to heat up.

Heater cover:
I moved from a β…œβ€ to 7/16” outside diameter heater cover preference. This evolution follows the journey/preference that Alan the Heat Island maker has made. Alan built me a β…œβ€ one and a year later I realized I wanted 7/16” heater cover (which he correctly attempted to steer me towards initially). As a side note and reference Underdog offers a β…œβ€ regular and ½” alpha sized heater covers, I believe. The larger diameter heater cover allows for a larger chamber. I prefer the chamber going inside the heater cover which to me makes it still a micro doser or one hitter type of device which I prefer.

The Build – Expanded Instructions​

These are notes I originally wrote a few years ago. I’ve now expanded each step with more detail and clarity for future reference.


1. Cut the Dowel​

  • Take a 12” long, 1¾” diameter wooden dowel (preferably walnut or cherry from Bell Forest).

  • Cut it into three 4” sections using a saw.

2. Drill the Main Well​

  • Using a drill press and a 1⅛” Forstner bit, drill a 3” deep well down the center of each 4” wooden section.

3. Assemble the Heater Cover​

  • Cut the metal tubing to a length slightly shorter than the depth of the well.

  • File two notches on the sides of the washer (for placement of screws).

  • Use a belt sander to thin outer edge of one end of the tube and press-fit into the washer.

  • Splay out the tube walls slightly to help secure it behind the washer.

  • Washer base should now be attached to tubing

4. Drill Screw Holes​

  • Position the heater cover assembly inside the well.

  • Drill two pilot holes at the bottom of the well for attaching the heater cover with screws.

  • Screw the heater cover into place.

  • Remove the heater cover afterward. Drilling and screwing at this stage helps with alignment when reassembling after the base is attached.

5. Cut Off the Base​

  • Cut approximately ¾” off the bottom of the wooden body. This becomes the base puck.

  • This piece will later be hollowed out to house the wiring and hold the electrical jack.

6. Drill for Wiring and Jack​

  • In the wood with the well:
    • Drill a hole at the center bottom where the heater and wires will pass through.

  • In the base puck:
    • Drill out a cavity large enough for the wires to bend and sit comfortably.

    • Drill a side hole for the jack. Tap this hole with a thread tapping tool to allow the jack to be screwed in securely β€” no glue preferred.

7. Reattach Heater Cover​

  • Reattach the heater cover using the previously aligned screws until screws slightly protrude from the bottom. At this stage since the base is not yet reattached.

8. Prepare and Solder Wires to Heater​

  • Remove the original heater wires.

  • Replace them with 18-gauge hobby/art wire (e.g., Artistic Wire).

  • Use lead-free, ROHS-compliant solder.

9. Solder Wires to Jack​

  • Bend and trim wires to appropriate lengths.

  • Slide glass beads over one wire to prevent shorts by keeping wires separated.

  • Solder wires to the jack.

10. Fit Wires In Base and Test Fit with Top Part On​

  • See how high the heater reaches up when the heater cover is on.

11. Add Screen Fins to Heater​

  • For 7/16” heaters:
    • Punch holes in the center of ½” formed basket screens using a leather punch tool.

    • Expand the holes just enough for a snug fit over the heater cover.

    • Slide 4–5 screens onto the heater cover.

    • Insert the entire heater + screen assembly up through the bottom well hole so it sits inside the heater cover.

    • Attach the wooden base and top section together, aligning screw holes and securing with screws through the well.

12. Final Testing​

  • Plug in, turn on, and test the device to ensure everything works properly and safely.
  • Add β…œβ€ debris screen to top of heater.


Herb chamber and WPA
I prefer a wpa on a j-hook or mini bong over the direct draw metal stem idea. As shown in the picture, I have a short glass tube w/ 14mm male joint at one end. This WPA is for pairing with a dynavap tip or other 8mm tip joint (this WPA was ~$5 @ vgooodies). I attach to the top of this glass tube a short paper roasting tube (google β€œpaper roasting tubes fc forum” if curious). To do this I add a piece of ½” od diam silicone which incidentally has a β…œβ€ id diameter and that is the same inside diameter of my 7/16” heater cover. I roll up a piece of paper (RAW Perforated Wide Tips), slip a slim slice of the silicone tubing over it to hold the rolled up paper at β…œβ€ diameter, insert a formed basket screen inside this paper tube (the basket screen is made with ½” screens, ~$5 for 200, pushed through a hole in a piece of wood with the back end of a drill bit filed flat), I then set this roasting tube/herb chamber in the silicone tubing protruding a little above the glass WPA. So short paper tube on top of glass WPA where paper tube tip holds herb and slides inside heater cover.
 

blokenoname

DIY Log Dabbler 😁πŸͺ΅πŸ’ͺπŸ’¨πŸ’¨πŸ’¨
Welcome @jackrod 😊
That looks pretty good already.

Big thanks to @darkstar72 for helping out in the advice department πŸ˜ƒπŸ‘

Experiencing some problems here on FC over the last couple of days, with the site glitching in & out, just displaying the notifications, but otherwise greeting me with a "we're experiencing some problems lately. Please try again later" message.

Will come back to this later, when the site is more stable again.
 
Last edited:

brainiac

log wrangler
Hi @jackrod and welcome.
Great to see a new log maker. Don't worry about pretty - pretty comes later! Building a working log is the first objective and you seem to be managing fine with that.

I'm not going to add much to @darkstar72 's excellent overview of log construction except to add a word about resistors. If you want to build a resistor unit you'll want either the 25J20RE or the slightly beefier 95J20RE. Mouser Electronics are (I think) the cheapest supplier. Resistors are much easier to solder than cartridges.

And if you need screens just google 'screens for pipes' and choose the appropriate diameter. If you need advice on shaping a screen get back to us. Likewise if you decide to build a halogen unit get back to us on that.

Good luck and all the very best.
:peace:
 

jackrod

New Member
@darkstar72 Thanks for the help. I will have to try out the paper roasting tubes and 7/16 heater cover sometime. I used my log with a 5/16 SS stem fitting inside the heater cover. Also prefer microdosing/one hit, and was able to get enough out of the 5/16 tube (1/4 ID bowl). Do you find that a similar small load size works better in the larger heater/bowl? I wanted to try the 7/16 with my dynavap tips or 3/8 SS tubes also, but the tube i got (K&S precision metals) doesn't quite fit them. I think the issue is that its welded not seamless, and about .010" out of round.

I made a small 14mm walnut WPA with a stainless liner. The seal isn't 100% airtight, but better than I thought would be possible. By shoving it into the glass joint and twisting/rocking a bit, you can mark the high spots, and slowly carve them down. Repeating this for a while, and decreasing the amount taken off as you go, eventally makes a pretty nice sealing piece. Kind of like hand-scraped surfaces. Could recommend as a super low-tech way to make a stem or WPA, using a handheld drill and utility knife.
IMG-2919.jpg


Unfortunately, the heatshrink I used on the heater cartridge melted, so that's out. The red insulation just before the cartridge itself also discolored a bit, and that is clamped inside the crimps, so I think it seems best to just remove it all and go to the bare nichrome/stainless/whatever wire it is. Do you log builders typically replace the crimps on those with new butt terminals then? I see why the resistor is easier, for a 3/8 tube at least.

I also saw in this thread that the heater cartridges might be able to be shoved in a halogen socket, so maybe I will try that, and be able to try halogen at the same time. But I may need a different tube size. The ceramic sockets are 9.5mm, but my 7/16 tube is 9.6mm ID. There is some 0.5mm wall stuff here: https://www.amazon.com/gp/product/B0CJRBD6V6?smid=A30WUG2ZDGM0XM&th=1. Maybe the 11mm OD for a 10mm ID is best? Looking back around page 30-34, seems like that's what bloke used for the steel core halogen misty's. The 0.3mm wall seems pretty hard to find here in the US. Of course, there's also glass tubes :hmm:

With all the options and info in this thread and Alan's site maybe we could compile a little table of roughly what heaters/core tubes/stems can fit together, or have been used successfully in previous designs. Thanks again to everyone in this thread, it's amazing how simple and effective these devices can be.
 

Cheebsy

Fermentation Fiend
There some great info about the bulb sockets a few years ago in this thread. Don't buy the cheap ones is basically the rule. There are some suggestions about what brand to go for, I'm afraid I forgot the brand name. They still have brass connectors but iirc the cables were clamped rather than soldered to them and the insulation is high temp silicone.
 

darkstar72

Well-Known Member
There is an omission in my last post (three posts up) on step 3 of the log building outline. There should be another bullet point at the end of step 3 that states:
  • After washer base is attached to tubing, cut two air intake slits near the base of the tube. I widen the slits so they are wider than the hack saw’s blade and air movement in or out the top of the tube feels open when the bottom of the tube is closed.
@jackrod – Happy to help, thanks. I was thinking you may want to purchase a $15 power supply with a dimmer knob just to be able to test different roast temperatures and see what you like.

For wiring, I use non insulated butt connectors crimped on the wires, and drop solder in them when soldering at about 700* Fahrenheit.

Good to hear you prefer microdosing. The 3/8” and 5/16” tubing sizes were the first K&S precision metal tubes I received. For a year or two I was satisfied with the smaller bowl (like you, stem inserted in heater is 5/16” OD with 1/4” ID – width of bowl size). It is small bowl and IMO is the most efficient system. I hear you on the lack of fit with the DynaVap tip too wide to fit inside the 7/16” K&S tubing.

You could try a cork WPA instead of wood as it may be easier to shape to get a good seal. I had a thin-walled glass piece which I fit inside a wine cork that was tapered to fit a 18mm female joint. I added a paper tip roasting tube to it (see image link in previous post). This got the herb closer to the heat source, sealed air tight, and eliminated any conduction roasting. Possibly this paper tip benefit (no conduction and keeps screen cleaner as oil wicks into paper) is overstated but I am a believer and it won the reach test over a metal tip WPA.

Chamber size - ¼” (6.35mm) ID to 5/16” (7.94mm) ID increases the area of the circle by about 50%. You can still load tiny amounts in there and get great results. I load about .04 grams typically (but usage or need is totally personal and changes with time). I find the roasting temperature is most affected by how long it has been heating up, and the amount of herb and how densely packed are secondary influences. At 30 minutes I can get browning or even darker spotting with a good load size. At 5 minutes heat up time it extracts appropriately (where the oils / trichomes have been lifted off and you can feel the load is spent – limited clouds now and flavor gone). The herb changes color from green to yellowish. With convection devices I think near full extraction can occur without browning.

Good luck on your next build!
 

blokenoname

DIY Log Dabbler 😁πŸͺ΅πŸ’ͺπŸ’¨πŸ’¨πŸ’¨
@darkstar72 Thanks for the help. I will have to try out the paper roasting tubes and 7/16 heater cover sometime. I used my log with a 5/16 SS stem fitting inside the heater cover. Also prefer microdosing/one hit, and was able to get enough out of the 5/16 tube (1/4 ID bowl). Do you find that a similar small load size works better in the larger heater/bowl? I wanted to try the 7/16 with my dynavap tips or 3/8 SS tubes also, but the tube i got (K&S precision metals) doesn't quite fit them. I think the issue is that its welded not seamless, and about .010" out of round.

I made a small 14mm walnut WPA with a stainless liner. The seal isn't 100% airtight, but better than I thought would be possible. By shoving it into the glass joint and twisting/rocking a bit, you can mark the high spots, and slowly carve them down. Repeating this for a while, and decreasing the amount taken off as you go, eventally makes a pretty nice sealing piece. Kind of like hand-scraped surfaces. Could recommend as a super low-tech way to make a stem or WPA, using a handheld drill and utility knife.
IMG-2919.jpg


Unfortunately, the heatshrink I used on the heater cartridge melted, so that's out. The red insulation just before the cartridge itself also discolored a bit, and that is clamped inside the crimps, so I think it seems best to just remove it all and go to the bare nichrome/stainless/whatever wire it is. Do you log builders typically replace the crimps on those with new butt terminals then? I see why the resistor is easier, for a 3/8 tube at least.

I also saw in this thread that the heater cartridges might be able to be shoved in a halogen socket, so maybe I will try that, and be able to try halogen at the same time. But I may need a different tube size. The ceramic sockets are 9.5mm, but my 7/16 tube is 9.6mm ID. There is some 0.5mm wall stuff here: https://www.amazon.com/gp/product/B0CJRBD6V6?smid=A30WUG2ZDGM0XM&th=1. Maybe the 11mm OD for a 10mm ID is best? Looking back around page 30-34, seems like that's what bloke used for the steel core halogen misty's. The 0.3mm wall seems pretty hard to find here in the US. Of course, there's also glass tubes :hmm:

With all the options and info in this thread and Alan's site maybe we could compile a little table of roughly what heaters/core tubes/stems can fit together, or have been used successfully in previous designs. Thanks again to everyone in this thread, it's amazing how simple and effective these devices can be.
Nichrome (like stainless steel) is due to its high melting point a PITA to solder πŸ€ͺ It's possible, but requires very high temperatures, the right type of flux and a high temp solder, like silver solder. Your typical soldering iron simply won't get hot enough for that, so you'd need a blowtorch to braze it instead.

Best workable alternative here is forming a mechanical (and thereby solid electrical) connection by simply crimping the exposed nichrome leads to some silver coated copper wire (I use a 0.6mm diameter), serving as an extension, the ends of which you can easily solder to the leads of the DC connector then with a common soldering iron and some led free soft solder. I just use 3mm ssn97cu3 here πŸ€·β€β™‚οΈ

Pic: cartridge heater assembly with crimps and how it stands upright on and soldered with its copper wire extensions to the poles of the DC connector in an SC3 unit.
IMG-6935.jpg


For crimps, I simply use ferrules (see pic below) with a diameter of 0.75mm. Stick the nichrome leads into one end, the copper wire into the other end and give it a good pressing with your needle-nose pliers and maybe give it a second go with the vice for better uniformity. But don't press too hard, as the copper wire will break more easily, than the nichrome 😁
Just test the connection by trying to pull it apart with a moderate amount of force applied.
IMG-6927.jpg


The axial resistors for a heater are a bit easier to handle, because their leads are already composed of some coated and tinned copper wiring (and not of stainless steel, as I falsely assumed for a while) for easy soldering in an electrical surface environment (no one would use stainless steel for leads there, that you'd need a blowtorch for πŸ™„).
So you can solder them directly to the DC connector's poles, or if they need an extension you can either twist some copper wire around one and then give it a short brush with some soft solder and flux, or simply use a crimp, like with the nichrome ones.

Pic: A resistor heater with copper wire extension & crimp on one lead directly soldered to the DC connector. This version has the DC plug in the base, not on the side of the log.
IMG-6380.jpg


Word to the wise regarding safety & short outs! 🧐☝️

If you're working precisely enough and can make 100% sure, that neither one of the uninsulated leads(/crimps/extensions) touch each other and that at least one of the leads doesn't touch the conductive inner surface of the heater cover, when you insert it... you're good. No short out πŸ˜‘

If not (and due to my bad eye sight at the time I started out here in log wrangling years ago, that was more often the case than not in my case 🫀)... use two or three glass beads on one lead, that'll help keeping that lead away from the other one and from the inside surface of the heater cover!

Also heater covers:
Flailing one end of the tube out (if its wall thickens allows), or slitting and folding it at its base, like you did, and then putting a fitting washer right over it was also one of my earliest ideas. Works... but carries the risk of the screws coming loose over time and so allowing the tube to twist... which can result in a short out with an uninsulated heater assembly.
Better there to go Brainy's @brainiac way (slit the base crosswise, fold up in an right angle and drill fitting holes for the screws through each up-folded segment , so that all sits securely and won't twist, even if a screw gets loose) or form a mechanical connection of the tube to the washer, like I and @darkstar72 explained a few posts above (use slightly smaller inner diameter washer as outer diameter of tube, trim down tube with bench grinder or file, stick trimmed end through washer, hammer flat the connection).

As for 'fitting' WPAs... cork is a wonderful & adaptive material into which to set a bowl/tip πŸ˜πŸ‘. It'll seal 100%.
You can even get them with wooden tops.
IMG-6934.jpg


More on bamboo logs later...
 
Last edited:

blokenoname

DIY Log Dabbler 😁πŸͺ΅πŸ’ͺπŸ’¨πŸ’¨πŸ’¨
I also saw in this thread that the heater cartridges might be able to be shoved in a halogen socket, so maybe I will try that, and be able to try halogen at the same time. But I may need a different tube size. The ceramic sockets are 9.5mm, but my 7/16 tube is 9.6mm ID. There is some 0.5mm wall stuff here: https://www.amazon.com/gp/product/B0CJRBD6V6?smid=A30WUG2ZDGM0XM&th=1. Maybe the 11mm OD for a 10mm ID is best? Looking back around page 30-34, seems like that's what bloke used for the steel core halogen misty's. The 0.3mm wall seems pretty hard to find here in the US. Of course, there's also glass tubes :hmm:
Well... that's the 'zâllige Scheiße' ('inchy crap', as we call it here) divide between Europe and the US 🀣

I had a stable supplier for telescopic, very thin walled ss tubing here in Germany for a while, who provided that very delicate 0.3mm wall thickness, but he's out of business for a while now πŸ˜•
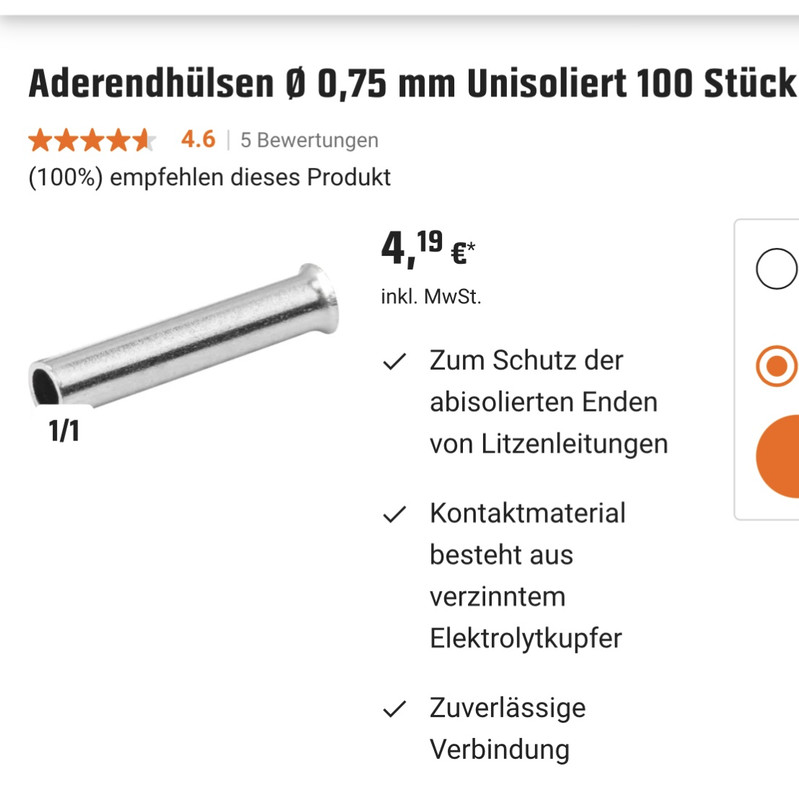
. 0.5mm or wider is also the best now, I can get.
Which also has some advantages, because milling down a 9.5mm (the near equivalent to your 3/8" tube) with a 0.3mm wall to fit the next available DIN washer with a 8.4mm ID... leaves you with next to nothing for a wall πŸ₯³

@Alan used some 7/16" tubing with an ID of 3/8". That was only ~1/2 of a mm short to allow the 10mm OD Vapcap tips to enter. So when I got one his first Square HI's, I disassembled it, took the heater cover to the drill press and gave it a short burst (about 10mm deep) with a steel drill bit, to make it fit for the Vapcaps. Which Alan then adopted or found some more fitting ID staple stock for.
For reproducing that 7/16" heater cover, I can use an 11mm OD/10mm ID tubing (wall = 0.5mm) now, which requires no further drilling out.
 

jackrod

New Member
@brainiac The brand name should help, was just looking for some more details on the bulb holders. Hard to sort through on amazon etc.

@darkstar72 that all makes sense. The 1/4" bowl is cool but I could see how 5/16" is more versatile. I will have to keep trying to carve out a cork. The wine corks that I tried may have been recycled or something, as they only break apart into grainy chunks when I try to cut them.

@blokenoname I wanted to do that hammer method you showed for the heater tubes, but got too big of washers to start. Will have to try again with some smaller ones. The pictures of the crimp/solder method will help too. I actually found some 0.25mm wall tubing on US amazon, but not sure if I will try that or the 0.5mm. https://www.amazon.com/uxcell-Stainless-0-25mm-Thickness-Length/dp/B0B4WYZW8R?s=industriald
 
jackrod,
  • Like
Reactions: Cheebsy

blokenoname

DIY Log Dabbler 😁πŸͺ΅πŸ’ͺπŸ’¨πŸ’¨πŸ’¨
@brainiac The brand name should help, was just looking for some more details on the bulb holders. Hard to sort through on amazon etc.

@darkstar72 that all makes sense. The 1/4" bowl is cool but I could see how 5/16" is more versatile. I will have to keep trying to carve out a cork. The wine corks that I tried may have been recycled or something, as they only break apart into grainy chunks when I try to cut them.

@blokenoname I wanted to do that hammer method you showed for the heater tubes, but got too big of washers to start. Will have to try again with some smaller ones. The pictures of the crimp/solder method will help too. I actually found some 0.25mm wall tubing on US amazon, but not sure if I will try that or the 0.5mm. https://www.amazon.com/uxcell-Stainless-0-25mm-Thickness-Length/dp/B0B4WYZW8R?s=industriald
Well... that 0.25mm wall will be very pliable and easy to work with just twisting some needle nose pliers in it for flaring out its base or top. But for working the 'hammer method' for fastening the base washer... I have no idea what the inner diameter standards for US washers are. Here in the EU it would be an M10 washer with an ID of 10.5mm. Shaving away 0.25 wall from an outer diameter of 11mm... ah... well, that leaves you with exactly zero πŸ€·β€β™‚οΈ

So if you are going to try the hammer method, go with the 0.5mm. Filing the top down and properly deburr it after cutting with the tube cutter, should do the job for a 10mm Vapcap tip to enter.
 
blokenoname,

Flotsam

Well-Known Member
Love all the creativity on here. There is a good number of folks dedicated to spreading the faith so shout out to them. This has sparked an interest for me.

Two questions:
1 went to Underdog's site but can cannot find any of these cores. Are they still available and is there a link?
2 I think what i would like is a square log. Is that strange ? or has there been other examples of this?

inspiration :
il_794xN.3414587317_k9cm.jpg
 
Flotsam,

blokenoname

DIY Log Dabbler 😁πŸͺ΅πŸ’ͺπŸ’¨πŸ’¨πŸ’¨
Love all the creativity on here. There is a good number of folks dedicated to spreading the faith so shout out to them. This has sparked an interest for me.

Two questions:
1 went to Underdog's site but can cannot find any of these cores. Are they still available and is there a link?
2 I think what i would like is a square log. Is that strange ? or has there been other examples of this?

inspiration :
il_794xN.3414587317_k9cm.jpg
Love it! 😊
Shoutout to @underdog & @Alan ... can you help out!? 😁
Be it a UD or HI core, or shape/or other distinguishing features for your log, they've both a whole lot of individual variations to offer for you.
 

Flotsam

Well-Known Member
Thanks blokennoname, you of course are to be commended too. I didn't read 53 pages of posts & didn't want to leave anymore out.

By variations it seems maybe 2 main option, Arizer style stems or DV?
 

Alan

Master JedHI
Manufacturer
Great to see all the new log creations. So many different ways to make them.
I do like the 7/16" ss heater cover, since it has better air flow and larger roasting tube capacity. The hole in the wood needs to be larger than 1" for the screw heads to fit, which makes the unit a little larger in diameter. I found a solution that allows the 7/16" heater cover to fit in a 1" hole and is less work. A star washer can be locked to the heater cover bottom, which eliminates the need to notch a flat washer. The screw spacing is the same as for the 3/8" ss heater cover, so it will fit in a 1" hole. It also minimizes the area of washer in contact with the wood. Have a lot of them left over from the original HI core design. Here is how it looks.
starwasherhc.jpeg

@Flotsam - One of the first logs (Aromazap) was square. I have made quite a few square logs and don't think it is strange to like them. It allows more beautiful wood to be seen and is more stable on the table. The twisted design is cool looking. Would need to leave enough wood for the hole in the middle.
 

Flotsam

Well-Known Member
Great to see all the new log creations. So many different ways to make them.
I do like the 7/16" ss heater cover, since it has better air flow and larger roasting tube capacity. The hole in the wood needs to be larger than 1" for the screw heads to fit, which makes the unit a little larger in diameter. I found a solution that allows the 7/16" heater cover to fit in a 1" hole and is less work. A star washer can be locked to the heater cover bottom, which eliminates the need to notch a flat washer. The screw spacing is the same as for the 3/8" ss heater cover, so it will fit in a 1" hole. It also minimizes the area of washer in contact with the wood. Have a lot of them left over from the original HI core design. Here is how it looks.
starwasherhc.jpeg

@Flotsam - One of the first logs (Aromazap) was square. I have made quite a few square logs and don't think it is strange to like them. It allows more beautiful wood to be seen and is more stable on the table. The twisted design is cool looking. Would need to leave enough wood for the hole in the middle.
Thank you for your response and pure inspiration on your web site. This seems like a great approach as for heater.
 
Flotsam,

blokenoname

DIY Log Dabbler 😁πŸͺ΅πŸ’ͺπŸ’¨πŸ’¨πŸ’¨
Good evening @Alan πŸ˜ƒπŸ‘‹

Ha! Thanks! Now you've done it again! Me... crawling through a couple of boxes with old washers & star washers at 10pm in the night here... and finding ones to fit our European 11mm equivalent to the 7/16" tube 😁

IMG-6942.jpg


Nearly a perfect fit and making it so much easier, to mill down the tube accordingly for a press fit πŸ‘
Have still to find out the exact EU specs of these two star washers to order some more, but I'll save that for tomorrow.

So many interesting ideas and solutions 😊πŸ’ͺ

@Flotsam
As for the options besides the shape of your log... you can have nearly any core & bowl sizes you can envision today in a log. From the classic 5/16" ss bowl size, over 3/8"; 10mm; 7/16"; 1/2" and typical 14mm/19mm male/female bowls for ground glass WPA connections, shaped variably from steel, wood and glass 😊
 
blokenoname,
  • Like
Reactions: Grass Yes
Top Bottom