TinyMight / TM 2

In the long run it is definitely the better idea to screw the cap down fully, makes the contacts inside the device live longer. Also when the device has buzzed when closing the lid, the cap is already way beyond the point where it could cross thread anyway.

Thanks I didn’t push it and things are going great! I’ve got some of the oil for flashlight grooves coming.....
Just don't tighten too much - always by hand without tools for me. I also go an extra quarter turn but never tighten it.

I have had thread problems and this is definitely the easiest way to prevent you suffering the same issues.

Extra tip for free :

Take the battery out when travelling with the unit as it will reduce your battery life due to phantom power and like siebter says, leaving the battery in when shaking it around can cause the bottom "sprung" battery contract to lose some of it's spring which then results in the cap having to be screwed in further to get it to function.

Exactly what I do. If you stop at the buzz I think you may be asking for oxidation on the battery contacts. Mine gets flush with about an extra 1/4 turn.
Oxidation on the battery contacts? It's not airtight in there and the battery contacts are made of aluminium.

I also add an extra 1/4 turn but stop turning before any resistance and definitely not tightened flush, but using the buzz to determine when to add the quarter turn (so I turn it slow)!
 

Vaporific

All who wander are not lost...
leaving the battery in when shaking it around can cause the bottom "sprung" battery contract to lose some of it's spring which then results in the cap having to be screwed in further to get it to function.
Mine lost its ‘sprung’ a while back yet I still turn the cover until the buzz and then a quarter turn more - or until perpendicular with the stem :) I’m too chicken shit to try to pull the bottom contact up and break it or damage something. I tried once with a paper clip but couldn’t really grip it well, and couldn’t find anything else to use. My TM is fine and I’ll leave it that way.:peace:
 

Skinku

Well-Known Member
Battery lid confusion reigns, after my drop and subsequent panic tugging my lid is by happy accident near flush now.
It wasn’t a drop of note, maybe having the lid just snug and not fully down enabled the battery to whack the lower contact?
Maybe screwing the bugger right down is preferable?
On a brighter note I’m over my combustion fears and happily finishing on a 10 these days, rendering my AVB embarrassed.
 

MonkeyTime

Well-Known Member
I hadn't seen this view of the heater - thought I'd share since it might get lost in the original thread:
ulxwp1w8fma51.jpg

Ok, @WisePenny13 or anyone else that's had their heater out.....

It looks like those strips around the top are just friction fit into place? My temp dial was loose again and not engaged, it's one of the early units before he realized the issue. He offered to fix it for me, but I declined at the time having the confidence to disassemble, glue and reassemble the unit. It worked fine, and it gave me a chance to countersink the screw a bit more too. All was good. I've had to reglue the dial once after that and again this week. Unfortunately, while it was in pieces, someone knocked on my office door very loudly and startled me enough to drop the unit about 2" onto my desk.......

20201003-101502.jpg


She popped like a cork! I'm sure I can get that back into place if it's just wound around the top, but wanted to be sure before I spend the time. And I wouldn't put a battery in until that's confirmed anyways, no sense in burning something up from improper assembly. I may also email the maker and ask, but those replies have been coming slow enough that I know I won't have that much patience!

So, for some time now I have been principally using 3 different RBT vapes powered by two battery mods, so I have been keeping 6 pairs of batteries (3 in the units and 3 on standby) charged so that I can swap batteries out and always have a hot set for each. Yes, I was a boy scout.
Anyway, now that I am using the TM quite a lot with a single battery (at a time) I find that I have a lot of batteries fully charged and just sitting. Rather than ruin them (by keeping them unused but fully charged) I am thinking of taking 4 at least out of service.
If left at half charge do they last indefinitely in that state?
This should probably be in the battery thread but since the TM has created the "problem" I'm gonna bug y'all in here. ;)

I do the same thing, 6 Molicel's in rotation, numbered so that I use them in order. I've had no issues keeping all six in rotation, they never sit for more than a day before being used and I don't think that's an issue. Storing them fully charged for longer periods is where the issues start, or at least that's my understanding. Feel free to correct me if you know different!


Edit* Here it is reassembled. Everything looks correct, but the top of that ribbon is only maybe 1mm or 1/16" from the top of the glass, it would be possible for the element to touch the upper metal ring. I'm off to search this thread to see if any other pics show the heater in this condition to compare..... I might have this fixed today at this rate!

20201010-111409.jpg
 
Last edited:

macbill

Oh No! Mr macbill!!
Staff member
In both modes?
yes
Do you have a multi meter to check the resistance of the device?

Edit: Can you measure your wood body the next time you open it?
Thank you for your valuable knowledge. I have another on order due to arrive any day. I get frustrated trying to get things to work: it's easier just to pick up one of the many vapes that surround me in my disordered life. Hopefully TM will find a partner here in the US whereby we might send units for diagnosis and repair.
 

Temple

Well-Known Member
Sounds like selective customer service. My friend reached out and she heard back within a week and here I am going on two months. Not cool. I paid for 2 units and only received one and will most likely not hear back for a while. Pretty bummed out :(
 

slayyou

Well-Known Member
79xYjD9.jpg

Had an unscheduled drop test the other day, my gf launched the unit off the couch when moving a blanket, it fell off and landed stem first! This is my only stem sooo... 🤢😨 
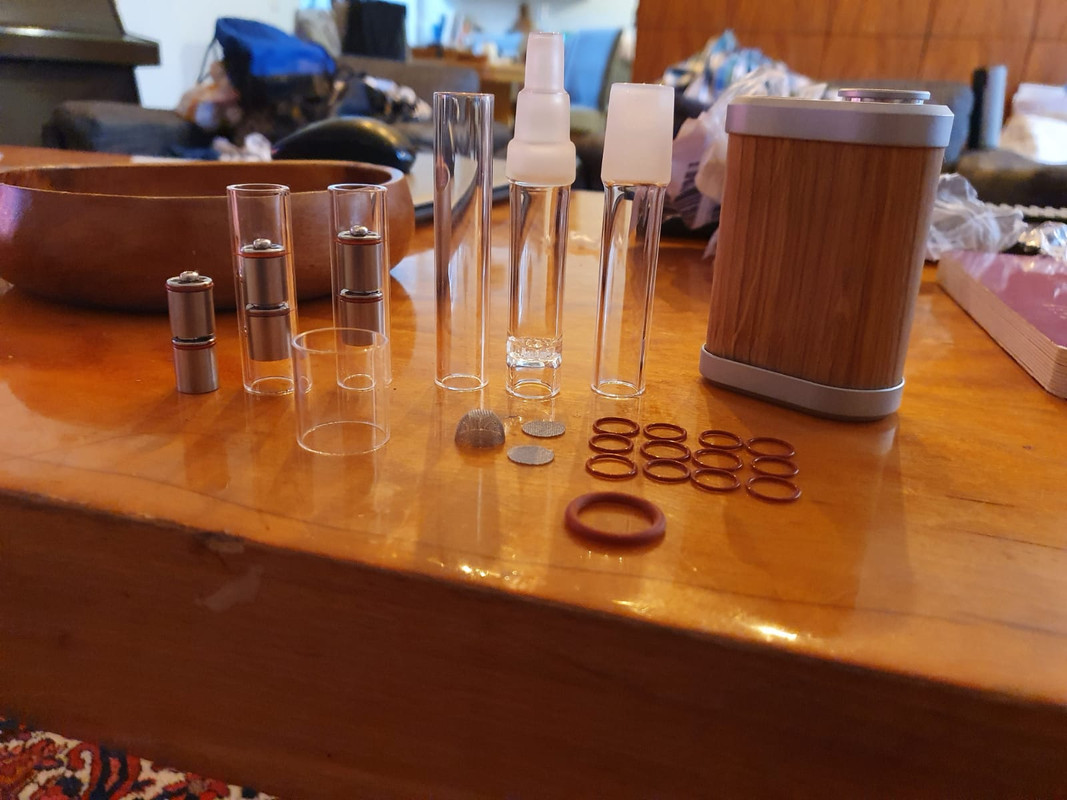
But I'm happy to report there wasn't so much as a scratch, I fully disassembled the unit to check the internal sleeves, those were clear too! TM lives on! On-Demand portable units are the future, and I for one am glad I took a chance on this random device from Finland. How long do you guys think it will take before we see other more established brands compete with this performance?

@MonkeyTime

I have had the heater out plenty of times for various reasons, I never measured the coil offset from the top lip of the glass sleeve, but vividly remember thinking it was super close to that ring too (close but no contact), his tolerances are tight, so I'm sure it's not ever supposed to touch. I'm a bit more concerned by the lopsidedness of your coil, was it always like that or is it just the angle of the photo?
 
Last edited:

Djsleepy

Well-Known Member
First thing first ....minor issue...about stem #12 or so I was gently pulling stem out by twisting and pulling and the metal sleeve it goes into detached from the lid , I can only assume it was not screwed in very much. Screwed in till snug and 1/4 plus then all good.

I wanted to test it out for a good day before I posted my thoughts! First night I was super duper duper baked! Every hit I overdid and coughed up a lung each time....it was great!!!!!

Serious testing (today) WHEW! Man are you guys aware what this thing can do? IMO way more punch than a brand new MV1, not even in same category! I love the simplicity In it as well As the style it has, feels good in your hand and long stem is perfect length just to kick back and draw! And that’s it !!! It’s hands down the easiest to use and What should be trademarked by TM guy “consistent every single time” !

now I do have a question .... best ways to
Clean CU , orings off ...soak overnight ,
USC? Take apart leave together?

I did look for the above answers via search to no avail, so if you have already shared this info a thousand times and sick of people not reading thread , that’s not me pls share and make me one thousand and one! TIA

more reviewing with WPA tomorrow ( I don’t wanna die) 😂 definitely not today!
 
Last edited:

Cheebsy

Microbe minion
Nice one @Djsleepy I'm curious, how many battery fulls are you getting through in a day?

As far as cleaning the CU. I prefer to disassemble because it's so flipping easy, but most don't bother. I don't remove the o rings, contrary to the advice in the instructions, but I only let the CU sit in iso for a very short time. I dunno the bits into ISO bag and put that in a warm ultrasonic cleaner for 3 mins, then I change to a much cleaner bag of ISO for another 3 mins, then rinse under the tap in a jug, then back into the cleaner just in the warm water for a final 3 mins. All the parts dry in 20 to 30 mins with a quick blow out and left on a kitchen towel. Ultrasonic cleaner is optional lol. You can always do the shake method.
 

Djsleepy

Well-Known Member
Nice one @Djsleepy I'm curious, how many battery fulls are you getting through in a day?

As far as cleaning the CU. I prefer to disassemble because it's so flipping easy, but most don't bother. I don't remove the o rings, contrary to the advice in the instructions, but I only let the CU sit in iso for a very short time. I dunno the bits into ISO bag and put that in a warm ultrasonic cleaner for 3 mins, then I change to a much cleaner bag of ISO for another 3 mins, then rinse under the tap in a jug, then back into the cleaner just in the warm water for a final 3 mins. All the parts dry in 20 to 30 mins with a quick blow out and left on a kitchen towel. Ultrasonic cleaner is optional lol. You can always do the shake method.
Started at 8 am cst now it’s almost 5 so 8 hours and I’m on battery number 12 or so , that’s about 1.50 batteries an hour! I’m getting in 3 to 4 stems and hour....testing this is tough luckily I got a second breath😉. Back to it. Have a good night everyone!
 
Last edited:

RustyOldNail

SEARCH for the treasure...
First thing first ....minor issue...about stem #12 or so I was gently pulling stem out by twisting and pulling and the metal sleeve it goes into detached from the lid , I can only assume it was not screwed in very much. Screwed in till snug and 1/4 plus then all good.

I wanted to test it out for a good day before I posted my thoughts! First night I was super duper duper baked! Every hit I overdid and coughed up a lung each time....it was great!!!!!

Serious testing (today) WHEW! Man are you guys aware what this thing can do? IMO way more punch than a brand new MV1, not even in same category! I love the simplicity In it as well As the style it has, feels good in your hand and long stem is perfect length just to kick back and draw! And that’s it !!! It’s hands down the easiest to use and What should be trademarked by TM guy “consistent every single time” !

now I do have a question .... best ways to
Clean CU , orings off ...soak overnight ,
USC? Take apart leave together?

I did look for the above answers via search to no avail, so if you have already shared this info a thousand times and sick of people not reading thread , that’s not me pls share and make me one thousand and one! TIA

more reviewing with WPA tomorrow ( I don’t wanna die) 😂 definitely not today!

Ok, you are now “one thousand and one”


EDIT to add:
I’ve improved my quick but effect cleaning of the CU. I bought a 24 watt coffee mug warmer, use smallest glass jar that you can seal later, as Dark Crystal cleaner is reusable and their instructions say works best when heated. This will appeal to those that don’t like or want to use ISO, works as good or better, and no worries about the orings.
 
Last edited:

Djsleepy

Well-Known Member
Ok, you are now “one thousand and one”


EDIT to add:
I’ve improved my quick but effect cleaning of the CU. I bought a 24 watt coffee mug warmer, use smallest glass jar that you can seal later, as Dark Crystal cleaner is reusable and their instructions say works best when heated. This will appeal to those that don’t like or want to use ISO, works as good or better, and no worries about the orings.
Thanks did my first time your quick iso way, next time I got some Haze cleaner that’s is bio degradeable And cool for orings
 

Summer

Long Island, NY
^^ Wow! From a microdoser's perspective, that's a lot of :leaf:! 🙃


@slayyou, your TM looks fantastic! How'd you do it?


Oxidation on the battery contacts? It's not airtight in there and the battery contacts are made of aluminium.

I remember the days when flashlights were US mfr'd with immeasurably better quality.

This said, am I right 🤔, that in days gone by, the battery contact was a thin gauge of machine of molded ss or is my recollection in err?

Regardless, do you think that the device would be better served if it was? And, would the following circled part below. be better if it were, both, mfr'd in ss & professionally precisioned cut to spec, rather than what appears to be hand formed?

View attachment 3134

ulxwp1w8fma51~2.jpg
 

RustyOldNail

SEARCH for the treasure...
Thanks did my first time your quick iso way, next time I got some Haze cleaner that’s is bio degradeable And cool for orings

Just to add to a previous post, as I promised to expound on the CU. I can clean it easy and fast, but as everyone knows it does slowly get more and more clogged up, reducing airflow. When I first got it I was so concerned about keeping it clean, to increase the time before I felt the reduced airflow, so I tried a few suggested ways of adding a screen to the stem. I started using a small cup screen inverted, so there was a small space between the stock screen and my added inverted cup screen. BUT it didn’t seem to help the slowly clogging airflow.

Then I started noticing some dots of resin collecting on the stock screen underneath my added cup screen, while small, they were REDUCING the airflow, more and more with each load, sitting on that screen.

That’s when I realized the obvious, some of the vapor was collecting on the stock screen INSTEAD of inside the CU on the nuts and washers. So I decided to use the stem/CU in the way it was designed, let the resin collect inside it. Much better now. While it’s fun to experiment, sometimes the simple way is best. Straw suck to load, blow out when done, brush out, ready to go, and since my way of quick cleaning the CU works for me, I am no longer OCD about trying to keep the stock screen clean, as it’s cleaner then when I added the extra screen.
 

Vaporific

All who wander are not lost...
now I do have a question .... best ways to
Clean CU , orings off ...soak overnight ,
USC? Take apart leave together?
When I first got it I was so concerned about keeping it clean, to increase the time before I felt the reduced airflow, so I tried a few suggested ways of adding a screen to the stem. I started using a small cup screen inverted, so there was a small space between the stock screen and my added inverted cup screen.
I take the whole Cooling Unit apart including orings and put everything in a plastic baggie, including the stem (short stock for me), and soak in either ISO or grain alcohol for no more than an hour. I have a small kitchen strainer that I carefully dump everything in for rinsing under hot tap water. Gently shake out everything and let them all air dry on a paper towel. Simple. Used ISO goes in the garbage and grain can be poured (sadly) down the drain. With a second set of stock stem and CU it’s all I need so I have a clean one ready to swap in usually every couple of weeks.

Regarding CU airflow restriction, I occasionally loosen the bottom section of the CU just a bit so the nut above is just a bit loose to let a little more airflow in. If you carefully examine the default CU configuration you’ll notice the bottom nut partially blocks the small holes on top of the bottom section, so loosening this a bit may improve airflow and mitigate clogging a bit. The downside is the CU will rattle a bit but it’s a small trade off. It’s not for everyone but a mitigating method depending on your objective.

As mentioned above I’ve been going natively native and without any extra screens as of late. I lost a couple of new small flat bottomed screens from MistVape to the garbage gods (one of the disadvantages of blowing out AVB pucks with a loose extra screen). Oh well. For me the simpler the better. I still need to order a glass bubbler to replace the only one I had that my cat broke. Yeah, I’m a simple native user 99% of the time.

But the TM works every single time. It’s a DopeCannon(TM)! :peace:
 
Last edited:
The first time I cleaned my CU I removed the rubber rings and broke one immediately so am very interested if it is possible to put the whole lot in ISO without having to perform the fiddly task of removing them! I bought a bag of them from TM themselves and it cost me a small fortune and almost every ring was of a different size, some of which didn't fit at all. Very disappointing.

Does anyone have a good link to a shop that sells the correct sized O-rings for pennies?

I bought some DC Clear but that is not as effective as ISO on the CU but doesn't degrade the rings at all - but maybe a combo of both would be ideal!?

What are people's experiences with O-rings after a while in ISO, do they lose any quality over time?
 
cbd.equipment,
  • Like
Reactions: Djsleepy

Vaporific

All who wander are not lost...
The first time I cleaned my CU I removed the rubber rings and broke one immediately so am very interested if it is possible to put the whole lot in ISO without having to perform the fiddly task of removing them! I bought a bag of them from TM themselves and it cost me a small fortune and almost every ring was of a different size, some of which didn't fit at all. Very disappointing.

Does anyone have a good link to a shop that sells the correct sized O-rings for pennies?

I bought some DC Clear but that is not as effective as ISO on the CU but doesn't degrade the rings at all - but maybe a combo of both would be ideal!?

What are people's experiences with O-rings after a while in ISO, do they lose any quality over time?
If you don’t over-soak the orings they should last a while. Some here just drop the whole thing in as-is and it works for them. I don’t mind taking the CU apart and cleaning it that way, including the orings. The nuts and washers always stick together for me which is why I like taking the whole thing apart but a good soaking should work with the whole CU intact.

I too have ordered 2 separate batches of red replacement Orings for the CU from a couple of different eBay vendors on the advice from a couple of folks on here. I find both orders have variant sized orings - some work and some don’t. It’s literally a penny crapshoot. I’m still using the original ones (6+ months for the first and 2 months for the second) with both my Cooling Units until I have the time and patience to test the replacement orings (zzzzz). I could likely find a few that work. Not ideal but they are indeed cheap - and variant. :peace:

EDIT: with respect to ISO, there are two schools of thought: 70% and 91%. I’ve mostly used the latter - and due to this lovely pandemic I’ve used grain alcohol for cleaning too as I ran out of ISO and couldn’t get any locally - but both ISOs will work. You may need to soak things longer in 70%, that’s all. Grain works very well too - the only positive is you can dump it down the drain unlike ISO (though I’m sure some would make a case that it’s OK too).
 
Last edited:

SquirrelMaster

Well-Known Member
I don't like to soak my o-rings in ISO so I'll push out the cooling unit right after a session (when it's still warm) and after removing the rings I drop it and the stem into a jar of 99% ISO. I let this soak for a little bit (ideally) and then I loosen the two pieces and shake the container around to get in between the nuts and washers. Then I'll pull that entire piece out (which is still connected but loose), give it a quick rinse in water and either separate all the pieces to dry individually or pull out a blow dryer. The o-rings get a quick drop in ISO at most or just some soapy water. I have the clear o-rings and I'm still on my originals, so I'll assume not soaking them and babying them when they are removed has kept their life up.

I was completely separating my cooling unit at first but if it is used for too long before a cleaning the internals are nearly glued together. I also tried soaking it without loosening (but not seperating) the two halves but I need to soak longer or some gunk remains between the nuts and washers.

A small metal mesh strainer is a nice accessory to have while cleaning so you don't drop anything down the sink. With the addition of glass balls to my stems it's become a necessity to keep everything together and stop stuff from going down the drain.
 

slayyou

Well-Known Member
Hi @Summer it's all 3d printed, just something to keep the mind occupied.

I'll add my cleaning routine into the mix, I have 3 cu's in rotation I clean each one as soon as I notice restriction. I clean them by way of a 5 minute ultrasonic cleaning in an isobath (keep iso solution in a jar, use it for months), I don't disassemble the CU's, I see no need.
The photo below was taken after 1 month of frequent use, I disassembled to see if any residual debris remained, as you can see all internal surfaces are clean enough, the o rings are still fine 3 months later(attempting to remove them seems to be what inflicts the most damage), thus I see 0 need for disassembly. Unless of course, you're just into things like that :rofl:

ERRFEME.jpg
 

Siebter

Less soul, more mind
I think the red o rings are said to be more resistant against iso. From their looks they do seem a bit less fragile compared to the original clear ones.

I used to occasionally check for residue by unscrewing the cooling unit after cleaning, but also never found any leftovers (using 99.9% iso, ~15-20 minutes).
 

m0sh

Singer Song Writer Stoner
So the TinyMight has arrived yesterday!

tinymight.jpg


First impressions, I love the packaging. The wooden instructions cupboard are a real nice touch, makes it inviting to read the manual. I will probably use the manual more than often ;)

I've been also impressed by the performance of this vape.
It packs a real punch!
I gotten quite a bit of accessories, but it looks like I'll be mostly using the 10/14/18 WPA adapter with its built in glass chamber. It can hold about .1g to .15g which I find to be ideal. At home, with having a water solution, this is perfect because there is just zero maintenance, just like when using an Arizer Solo! This is everything I hoped for.
I'm going to try and use this vape exclusively for a few days and see if anything changes, but so far, this looks like the real deal.
I am not impressed with the battery as it quickly drained out, but I was using session mode with the WPA, I figure I can use on demand with my water tool, but its a bit annoying, is it worth it tho? I have 5 batteries so I'm I don't have to worry so much.\

Using the short stem with the cooling unit is nice, adjusting the bowl size is interesting, I just wonder if there is a limit to a bowl size that we should not cross?

Now the only thing missing are the dosing capsules, I feel that they would make this vaporizer feel more "portable" in a sense, closer to a solution like the Ghost MV1, but a bit different.
I hope we can get a dispenser or sorts for the capsules, that would be huge.
 

justcametomind

Well-Known Member
So the TinyMight has arrived yesterday!

tinymight.jpg


First impressions, I love the packaging. The wooden instructions cupboard are a real nice touch, makes it inviting to read the manual. I will probably use the manual more than often ;)

I've been also impressed by the performance of this vape.
It packs a real punch!
I gotten quite a bit of accessories, but it looks like I'll be mostly using the 10/14/18 WPA adapter with its built in glass chamber. It can hold about .1g to .15g which I find to be ideal. At home, with having a water solution, this is perfect because there is just zero maintenance, just like when using an Arizer Solo! This is everything I hoped for.
I'm going to try and use this vape exclusively for a few days and see if anything changes, but so far, this looks like the real deal.
I am not impressed with the battery as it quickly drained out, but I was using session mode with the WPA, I figure I can use on demand with my water tool, but its a bit annoying, is it worth it tho? I have 5 batteries so I'm I don't have to worry so much.\

Using the short stem with the cooling unit is nice, adjusting the bowl size is interesting, I just wonder if there is a limit to a bowl size that we should not cross?

Now the only thing missing are the dosing capsules, I feel that they would make this vaporizer feel more "portable" in a sense, closer to a solution like the Ghost MV1, but a bit different.
I hope we can get a dispenser or sorts for the capsules, that would be huge.
Both jack pods and mistvaporizer.com capsules are compatible with TM and come with a tray.
I got my order for jack pods from greendream.shop and they carry the tray+jack pods option.
 
Last edited:
Top Bottom