Below is a cut/paste of the FAQ document so far. You can access the live version
here.
Let me know what should be added or changed.
@fluffhead has editing privileges and will also be contributing to the information.
Oh,
@natural farmer, You made me break down and ordered that DNA75 for my ecig.

Couldn't resist the price.
Eraser FAQs
-Mod Boxes:
Not all boxes have been verified to work and different manufacturers incorporate differences in the behaviour of the heating algorithm. A programmable device with TCR capabilities is highly recommended.
Most boxes may work in a TC configuration and others can be run in power mode with some control via operator changing their airflow speed. The following are the recommended devices all proven to work well and have the same chip set as well as take the same firmware.
- eVic VTC Mini
- eVic VTC Dual
- eVic VTwo Mini
- eVic VTwo
- eVic AIO
- eVic Basic
- eGrip II / Light
- Cuboid
- Cuboid Mini
- Wismec Presa TC75W
- Wismec Presa TC100W
- Wismec Reuleaux RX75
- Wismec Reuleaux RX200S
- Wismec Reuleaux RX2/3
- Wismec Reuleaux RXmini
-What number of Cells are Best:
Really depends on one's needs and preference.
If stealth and size is critical, a single cell unit will do the job. Down side of the single is the battery life is shorter and the last 20% charge is generally not used as performance can start to drop and one will change out the cell for a fresh one.
A dual or triple cell setup will give much more life before changing the cells is needed. A dual cell setup will give about 2.5X the battery life than the single cell. This is do to it can easily be used right down to the change battery warning and beyond which starts at 10% remaining.
-Selecting your Batteries:
The Eraser does not require the most expensive batteries but a rating of at least 25 amperes is recommended. Note, that if the mod box is a single cell unit, a higher rating will give more usefulness at lower battery levels. Since the Mod device has safety circuits installed, flat top non protected batteries are required.
-Firmware:
The Mod boxes above will all take the same “open source” firmware called
“myevic.bin” and has a couple very desirable options over the manufacturer's firmware. All the firmware information can be found
here.
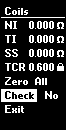
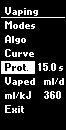
-Relevant Firmware Settings:
For realistic temperature numbers up .55X ohm to .600 ohm for starting point and calibrate further later. Turn Check to “off”. Zero all will force a re-read of actual ohms.
Note that manual entered ohms must be within 10% of actual read ohms or settings will change back when used. Including the check to “on”.
Don’t forget to turn the temp down to around 380F after you manually upped the ohms.
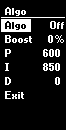
After you alter the ohms by adding .04 ohms, the TCR should be changed to 185 or 190 to help the temperature hold true. If using without changing the ohms and working in the upper temperature numbers, set to 145.
Set up 15 second timeout and ensure Algo is off.
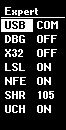
Access this setting if going to use NFE software.
-Disassembly:
Screw the Eraser into the mod with batteries removed.
Pull up on the silicone jacket from the bottom to avoid tearing of the silicone.
Do not squeeze the center portion as the screen will deform. The screen relies on the oven for support.
The steel oven can then be pulled off. Careful not to damage the coil.
To reassemble the oven, moistening the O rings helps if it feels too tight.
-Screen Insertion:
The screen resides in the silicon sleeve inside a wide slot to accommodate it.
To install, hold the sleeve and squeeze it together to make the round hole oval so the screen will fit down into the sleeve.
With the screen position at the wide slot, start to flip to screen into position at the same time as releasing pressure to to sleeve.
Once in the groove, inserting the oven should push it flat against the top of the slot.
Use the stem to flatten if needed.
-Drifting Ohm Measurements:
Make sure the ohms is locked in device setup.
Do initial measurement with mod unlocked and coil at room temperature and remember this measured number for future reference. Generally between .55 and .56 ohm.
Avoid removing atomizer.
If using “myevic” or other third party firmware, turn off ohms checking.
-Device Warnings:
*
No Atomizer:
You have an open circuit.
Ensure 510 connector is clean and clear of debris.
Examine the coil for breaks.
Make sure the nut is tight and coil is firmly mounted.
*
Atomizer Too Low:
You have a short.
Check bottom of Eraser for debris in the 510 that might be causing a short.
Examine coil for shorts to the outer steel sides.
Remove heater casing and see if short goes away.
Check condition of nylon insulator on bolt post.
Lastly, loosen bolt and re-position the lower coil connection.


")


")