Making Draw Tubes... Flower Quince?

TommyDee

Vaporitor
without the 'Y', yes. These shrubs have their lore in ornamental pink flowers on a single yard-long stalk. People come around in late winter/early spring to buy budding stalks for Valentines day IIRC. Mine has been too gnarly to take anything useful from it. That should resolve over the next few years. I need to take it to the ground at some point. For now I'll keep it at 3' for harvesting.

I'm trying to figure out how to make ringlets with pronounced edges. Parting pieces is still on the risky side. I try to get that out of the way early so I know I am running on center based on the core hole. That was an early issue where parting the part would expose asymmetry between the body OD and the core's ID. I let the core hole take on the warp causing this issue. Does that make sense?

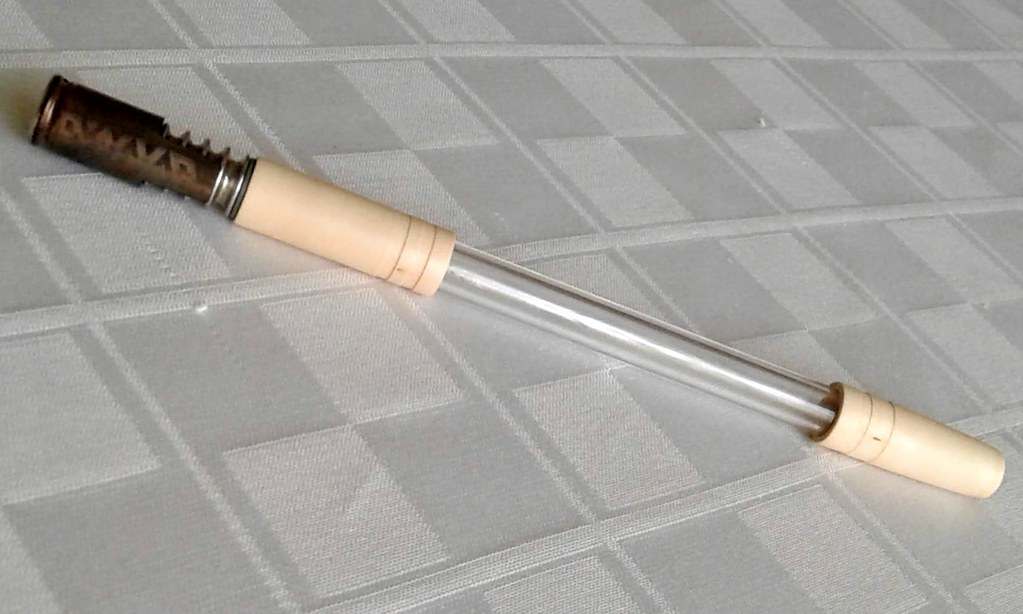
And it is still alive this morning. Did several sessions with it yesterday. The thermal profile is not as expected in the least. I have about a 3/8" gap between the VC and the glass. This was not intentional but that was as far as the wood would let me go when it put a death grip on it. The VC receiver gets hot as expected. The glass past the sleeve gets warm. The markings on the wood remain even cooler.

@TheThriftDrifter - I did another little experiment last night. Really dumb on the one hand but science called for it... okay, I was high :rolleyes:
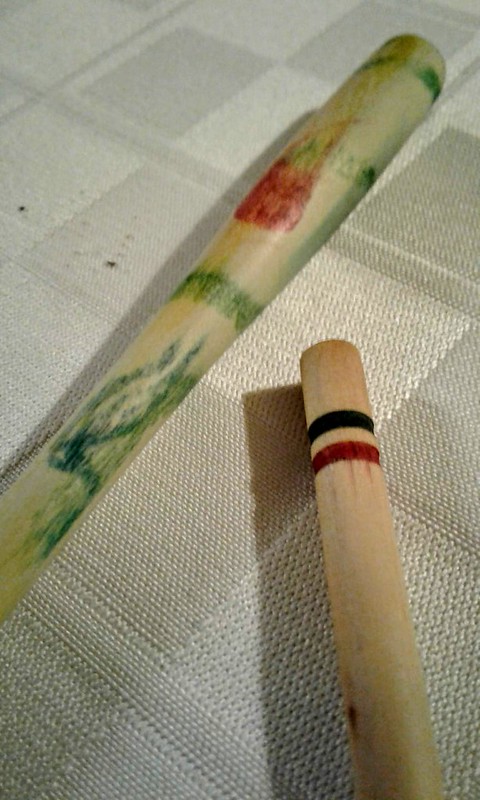
Since I replaced the DD for the time being, I cleaned out the honey... black and thick with pollen from keef. And it had a reek! Undeterred I smeared the goo bare-handed onto an older stem. I wiped and smeared and finally buffed it down with the felt on the lathe. Looks gorgeous! Definitely brought out detail the linseed didn't. Its definitely got that well done ABV scent but it is now merging with the Quince, which has very little scent but this is bringing it out. Obviously I can't do this as a finish for you guys but I still believe our distillates and salvaged honey are non-hardening oils with the only quandary being that hemp seed oil is considered a hardening finish. But that certainly doesn't detract from the idea. The risk is that it could do the same as peanut oil and go rancid. For me, that is a risk worth taking for personal pieces. I just can't ship them with a active resins without risking time in jail. So by all means. Even with a linseed base-coat, pick your favorite Resin or Rosin and go to town! Resins should yield some excellent aromas and rosins will make for some nice staining effects. More on this as I move forward. I have a perfect sacrificial waxy orange resin and some very gooey dark sticky rosin. BTW, that honey'd stem is still mostly clear with a stippled texture only in select regions. It gave the wood a little more of an antique style yellowing. Probably the native color of the vape honey. I'll use a much cleaner honey next time. Working hard on building up some in the glass stem :lmao:
 
Last edited:

TheThriftDrifter

Land of the long vapor cloud
Your on fire dude!
Yes I could imagine the sniffer dogs at customs/border security would be very interested in a rosin stem.:leaf:

Linseed oil sounds like the go.:tup:
 

TommyDee

Vaporitor
I tried a quick inner cooler design for these. I need better tools to do that justice. The twist requires a lot of tension to get a tight spiral. An inherently loose spiral will only lengthen the path to maybe 150%(?). We want 'seriously twisted'.:rockon:

oh, and I found a way to damage vapecaps. Not functionally but mine is now 'mine'. Tried putting it in my shirt pocket... missed... and went straight to the linoleum like an arrow. Glass was fine, sleeve was fine, but the cap now has a dent on the flat face :\

And last but certainly not least - Got food coloring today. Even that is spendy on my budget! I am glad I went for it anyway. When painted on, it penetrates. Wipes are easily removed with a little 600-grit sandpaper. Not sure why but something about a blue highlighted stem... :whip:
 
Last edited:

Planck

believes in Dog
Bee's wax would be the bee's knees for a finish. Dynawax, Bomb ass butter, I belief Dyna wax is beeswax and hemp oil and BAB is beeswax and mineral oil. I'm not fond of the smell of linseed oil and it takes forever to cure unless it is "boiled linseed oil". Boiled linseed oil is not food safe.

Oily rags can combust from the heat generated by polomization. Don't throw wadded up rags in the trash. Spread the rag out preferable in a metal tray or can to dry or in water.

I don't expect the oils slow drying oils we should be using will do this but I must mention this because I must. :nod:
 

TommyDee

Vaporitor
I know about the self combustion. I am using the slow drying linseed oil. And you are right, we spent quite a few laundry loads to clean up the spilled portion to get the smell out.
This is the stuff I'm using - Link

The rag is a napkin. One dab on the napkin and most of that goes to waste. No garbage can fires as of yet but thanks for the reminder. Waxes I haven't done yet and frankly forgot about. I did go looking for some and found white beeswax flakes. Do you think it is a good idea to wax a piece that will see elevated temps near the VC receiver? I don't consider this wood to have a natural 'luster' presenting a natural satin finish. I am looking forward to seeing what you will do with the raw stems.

My toying with the idea of resins and rosins is about the 'flavor'. I can just smell the aromas of a warming stems now. Okay, maybe just in my mind but I can experiment with that. It is obviously safe for home use :cheers:

I also want to play with more 'additives' to see if anything attacks whatever the hold is between the grain. Linseed oil has passed the test. Vape honey has passed the test. I am doing a long-term soaking the early carbless M-sleeve in peanut oil to see if it ever breaks down. Alcohol doesn't seem to affect this stuff either. Food color stain only stains deeply with direct application where the wiped stain sands off with ease using 600-grit. Still a lot to learn on this front. But I do prescribe to less-is-more in this instance. Mouth-contact and heat are real elements in this case. Using VC butter would be more than appropriate. Don't got none tho

edit; Too funny! The food die is working marvelously. This could be a game-changer at some point. Also seems to be finish-proof. I tried the resin impregnation. I used some orange crumbly resin with some seriously potent citrus scent. Damn sticky making for coating a test stem pretty easy. Should use some solvent to make it more workable. A bit of buffing and all is smooth again and it now exudes a very inviting scent. Color was not affected in the least.

As to wax, I won't be waxing anything going out just as a safeguard. That way you guys can use what you prefer including adding finishes that wax would otherwise reject. Other than @Planck 's stems, I will wipe on a single light linseed coating.
 
Last edited:

Planck

believes in Dog
Yeah I thought a general warning about oily rags might add some value. The danger is not apparent and one never knows who is reading these threads or what they might do. :mental:

White beeswax is bleached FWIW. Wiki says beeswax melts at 62 to 64 °C (144 to 147 °F) and if heated above 85 °C (185 °F) discoloration occurs.
Carnauba wax which is also "food safe", melts 82–86 °C (180–187 °F)
Wood is a pretty good insulator so I speculate either would be fine on the outside of a stem. Damn sure I don't want to inhale either as vapor.

Your resin finish is interesting, by all means keep thinking outside the box! Assuming it doesn't remain sticky it's a cool idea. Beeswax and pine rosin was used as a finish and adhesive at one time. Maybe BW and vape honey FTW?

Are your stems all lined now? I totally agree on the issues. :rockon:
All fun ideas to kick around.

A very light coat of shellac will help to preserve grain detail and color. It is food safe. Dye as well compared to stain.
:peace:
 

TommyDee

Vaporitor
You are a library of knowledge @Planck and I am so appreciative of that. I am one of those old dogs that comes up with new tricks with mere bone scraps. Your scraps are invaluable!

We definitely see temps in that range and is the reason to keep finishes on the outside of the stem. That Dynawax on the o-rings probably vapes a little. That discoloration could be a very nice patina of sorts.

I am currently enveloped in this tangy orange smell. The stem took on the smell to no end. It is not sticky but certainly not slick. A wax would resolve that but I do like the more reliable grip. The resin is sensitive to moisture so wax would be recommended for that reason alone. I now have the ugliest stem in the world but it smells like heaven.

I do not add anything to the stems. I had considered a sleeve for the VC port but that turned out to be unnecessary. I keep the VC port oversized. I have a tool that reams the shrinking new stems by shaving the walls. The walls actually have a pretty good finish for the o-rings. The rest of the air path is Quince by way of a 5/32" bore. I am all for vape honey being the protective coating. The more the better :clap: ...until it clogs.

I do have a rosin in my one cannabis species that I use. It is a dark sticky green 'guh'. That will be interesting. It lacks the great scents that resins seem to have. The scent is definitely transferred. Now to find out how long that scent lasts. I could definitely see me mixing up something like that with bee's wax for the occasional rebuffing.
 

TommyDee

Vaporitor
I would be happy with just some space :p I've never really had occasion to work in a group on art-level projects. I can honestly say that is a part of life I am missing out on. Plenty of actual collaboration for real work but never just for fun. Maker spaces are something I fully endorse as a community sponsored activity. These should be as common as libraries. But alas :uhoh: I worry for the youth today. I utilize forums for inspiration but tool and material sharing would be huge!

Today was stain-day. I'll probably still be stained tomorrow :shrug:

Cool results though. Calligraphy anyone? I used a bamboo skewer-tip to ink the stem. Worked really well in the grooves of the Launch Box stem. The LB stem is one of the oldest Quince pieces I have dating back to August. You can see the red die bleed from the recess. Those are micro-fractures from the groove-cut. Doing that cross cut across the grain will need some very sharp tools. The highlight is stunning however! I sanded both pieces with 600-grit. I've got a hand steady enough to paint that groove... it's the twitches that get in the way :disgust:

49295987908_24d117a156_c.jpg


Maybe you can see by the sparse penetration that this wood doesn't just act like a sponge. It takes a deliberate concentration of die to penetrate. I want to see if I can fully saturate a thin wall while still somewhat wet.
 

Planck

believes in Dog
@TommyDee thank you very much for your kind comment, much appreciated. It's super enjoyable for me to watch you wrestle this bear. :)

@Diggy Smalls that would be excellent fun.

Staining Coloring hard dense woods is difficult. A highly polished surfaces also reduce the effectiveness of colorants. Typical wipe on stains from the big box store are pretty much useless on hard (maple for example) wood.

You got some cool things happening with these latest stems. If and when you're ready to step it up these would be a good option. https://www.woodcraft.com/search?q=TransTint&button=search
Very deep rich colors, the concentrates reduce with water of alcohol and will need it. I seen them in smaller cheaper bottles too. ColorFX liquid dye is good to, they may even be the same.

Regarding the bleeding a shellac seal coat on the part you don't wish to dye will help immensely.

Cool beans mate,
Cheers ABrokenRecord :D
 

TommyDee

Vaporitor
I owe the die tests some more opportunity to shine on the body itself. This stem had linseed on it for some time. I am able to get under the die with a quick light sanding.

You have done it again by helping establish this as a hardwood although you will have the chance to confirm. Definitely dense, similar to the image of what I want to remember as plum. I want to call flowering Quince stonewood in the way it shaves after working it.

I also became a little more enlightened about shellac. That has peeked an interest in that it is fast-drying. Great tip for this grooving process! I should finish the body with shellac before grooving it. Thank you again! :leaf:

Bottom line is that I want to know why this is not a good idea. I haven't found a good reason yet. :science: Do you do glass stems?
 
Last edited:

TommyDee

Vaporitor
I'm enjoying this one more than I thought I would. Don't quite trust it standing up though. A drop on a glass table could end it. Shrink rate and fit are all progressing nicely. Monitoring the honey production is worth the price of admission alone. Turns out the surface area in the previous 5-1/4" stem is nearly the same as this glass stem at say 100Lx5ID. Just about 2.5 square inches of surface area. Still quite effective as a cooling stem.

On another note - cross slide is working nicely on the lathe. That's going to be a bear dialing in every time. I'll have to 3D print a setup jig of some sort for that.
 
TommyDee,

TommyDee

Vaporitor
Yesterday I think I made a huge discovery with regards to biology of shrubs if not trees as a species. We all want seasoned wood. We all need bark to be removed from wood or it rots specially for load bearing beams and such. We all know that there are some species that simply don't like the woodworker and just gnarl up the project from the get-go. My little discovery may actually have you thinking about your primary species as well... but only for a little while. Too much 'we know what works' in this world to encourage new discoveries. I have zero argument for those who know their stuff and have their niche. I have no reason to change their world. But my world is different. My world is full of possibilities. Put two things together that don't belong together and you see the rise of the industrial age.

Yesterday I turned a piece intended for a mouthpiece/ 10/19 adapter. I had this piece out for maybe a month cut to a short length and no core. I cored it a couple of days ago and it spit the same wet stuff but maybe half of what I expected normally from true wet or slightly seasoned in the full stalk. This had time on its own for a while. First thing I noticed on the lathe was the dryness. The part had a split at the core so it was purely academic. When I got the part done and put some sandpaper to it, it felt normal but not really. I decided to see what would happened with the die. Turns out this little piece was thirsty to no end. The entire part took on die and deeply!

When I turn green Quince, the bark layer is super moist and pithy. You peel it off with your fingernails and the remaining surface is remarkable. Hard and a beautiful dense texture. These pieces have remained stable in this condition ever since. Still hard, still viable, and no signs of degradation. One thing that makes turning blanks easy is that any remaining bark layer is easily seen as a reddish-brown and peels off easily with a fingernail. Then comes this piece from yesterday. When I was cleaning up the OD, I could no longer see the bark demarcation. It has all gone nearly white. It no longer peeled easily and it was held fast to the substrate. I then remember the conversation on the plum where I asked if the bark was pithy. The reply was that it wasn't. It was harder than expected (TTBOMR). Jeeze, that now sounds awful familiar to me. Now I am curious as to whether fresh plum wood was a pithy bark. That I will find out soon. We have plenty of local plum trees.

But what the heck am I getting at you ask? Basically 'Minerals'. A lot happens to a body the moment it dies. A lot must happened to plants as well. Basically processes that commence when normal processes cease. Obviously seasoning wood has everything to do with letting these processes settle before we try to make use of it. Perfectly logical as to maintaining stock and ready to use raw materials. What I am finding is probably true for other species. You know how trees are sacrificial if one is sick it feeds the forest? This stuff does that. The very few dead stalks in the bush are light as balsa wood. The dead stalk's nourishment replenished the plant. But but the same token, this wood also passes its nutrients into the bark layer continuing its process. The core continues to dry and loose minerals. The only place I can see them going is to the bark. The core begins to split from drying. That tight bonding I am experiencing when girding a rod is gone. The part didn't shrink at all after working.

Now contrast a dry withered piece of flowering Quince to the pieces I've been making. They obviously continue to have vitality. They don't crack on a whim. They are very heat tolerant and saliva tolerant. I've noted the mineral 'blood' of the wood in previous posts. I can only come to one conclusion, it is both the process and, I want to say, the 'active' minerals in the wood that make for a more sustainable medium. I have no doubt that this is playing a part in this. First and foremost, bark removal but closely followed by the forced liberation of the chemical soup that will eventually become a hardener/conditioner of the subsequent piece.

Furthermore I will remind that the bush is growing is clay. Clay is perfect for providing a plethora of mineral in concentration. It is possible that this could be a very unique condition due to soil conditions. Somehow I doubt that though. Clay just makes this a very prolific bush. The behavior of this dry piece is the first I've run across in all the turnings over these 4 months.

However, my long diatribe is not about the flowering Quince this time. This is about nature and the nature of a dying piece of wood. We don't give minerals nearly enough credit for processes. Sure, the conglomerates understand things like this intimately but they won't share. Why does the center of the wood crack? If the bark layers hardens during seasoning, then the center doesn't have a choice. The bark no longer compresses. Obviously there are other reasons, but this adds to it. For instance, why is plum not used as a common furniture wood? Tight grain beautiful stuff! Could seasoning some of these off-species for woodworking have a similar problem in that the mineral content is simply lacking? Is it that the wood splits upon seasoning? I am obviously a novice when it comes to these questions but I am here to say "...is there something to this? Is there a 'there' there?". All you artist out there, this is your challenge :cheers:

edit: Blackthorn - that is a similar grain... not Plum. Link to conversation: link
 
Last edited:

TommyDee

Vaporitor
Introducing "Voker - New Year's 2020" -

49311643848_6e9f2a4778_b.jpg


I need to get a 10/19 adapter to see if this mates. I wasn't getting use to the glass mouthpiece. After a week of daily use I will recycle the tube without the mouthpiece. Still working with China to get the 7mm stems. This one has a little less heat-break and it is thinner. I can see this stuff making a great permanent mouthpiece for the Tinymight as well. Still putting pennies away for that vape. :2c:

Shellac! Where have you been all my life! :lmao:Probably hiding in plain sight. This is what I have been looking for in a conditioner. This will make for a great wood sealer. I'll add it to the final sanding process as a very thin mix. A final thin coat and it should make the stems colorfast. Voker will tell me if I went too thin or if Shellac affects the substrate.

These are just plain fun to make. The glass is perfectly suited as a permanent arbor. The only work that requires the live center to be removed is to finish-sand the mouth port. These endcaps are 35mm long. The final length of the stem ended up being 116mm. I also put a new edge on the parting tool. I'll reserve this one for grooving for a while. Had a slight bit of out-of-round asymmetry on the VC-end. I was able to make the cuts a little deeper. I really do like the contrast without adding any elements. I had several thicker layers of Shellac going when I cut those grooves. It really helped stabilize the surrounding structure. I then wiped it all off with denatured alcohol. I am not sure how much remained with the wood but anything that the alcohol pulled into the wood is a good thing. I finished her up with a single diluted coat wiped on appropriately finished with a spin-buffing. I love this do-over capability of Shellac.
...And all in a morning's work. :smug:

Happy New Year's Vake to All! :rockon:
 

TommyDee

Vaporitor
The original stone-wood or is that wood-stone.

49317946576_199c171493_c.jpg


I am liking this thin application of Shellac for finished stems. I added 800-grit sandpaper to the mix to keep the Shellac buildup at bay.

I now have a clear stem for each of you. Diggy, what length would you like your replacement metal stem?
 

Diggy Smalls

Notorious
The original stone-wood or is that wood-stone.

49317946576_199c171493_c.jpg


I am liking this thin application of Shellac for finished stems. I added 800-grit sandpaper to the mix to keep the Shellac buildup at bay.

I now have a clear stem for each of you. Diggy, what length would you like your replacement metal stem?
I'm not really too picky. As long as it's long enough to cool down that harsh hi temp Vapcap vapor. :)
Did you get the original stem back? It doesn't look like they tried delivering it again.
 
Diggy Smalls,

TommyDee

Vaporitor
Not yet. Not worried about it. I'll get another one started in the 5-6" range. I'll add some 'heat beads'* to this one. I might turn you a long wooden one too. I have several long blanks ready to turn. I want to get good at using this Shellac so I can see some practice time coming up. I don't see a downside to it as yet.

* heat beads as in extra ringlets on the metal near the VC. That gets quite toasty in longer sessions.
 
Last edited:

TommyDee

Vaporitor
Well now, got some more goodies started.
Also ordered some beeswax from Amazon.
Seems the USA just got flooded with cheap wood treating beeswax from China.
I'll trust that you all have some DynaWax available :wave:

Got a really nice turn on a wood stem for you today @Diggy Smalls .
Also started the replacement metal stem.

Could I interest you in a "whittler's" stem @Planck ?
Cored, VC-port, cured and trued?
Two unfinished stems ready for you.

And also @TheThriftDrifter - I have one per your request with a very light Shellac finish on it.
I suspect you can take it from there - wax at a minimum.
I do want to make at least one more for you since it is going half way around the world.

And I'm going to hold back all the linseed oiled pieces.
I oiled all the VC-ports and I'm not comfortable with that anymore.
VC's just get too hot near the end when you really toast your caps in an IH.

Now to restock my blanks :tup:

Large blank: 30 minutes :spliff:
 
Last edited:

TommyDee

Vaporitor
Yesterday I had 2 combustion events in a row with the VC. Something about not respecting the click I guess. That prompted a thorough cleaning.
To be clear, I went from the glass stem back to the long knobbed quill stem which has a coating of Shellac applied.

First thing I noticed with the glass stem - I use the suck-2-draw a bowl full with the VC. Keef builds up on the glass - glass is easy to clean. Strange phenomena.
Then I took some rubbing alcohol to the stem to get it very clean. Yep, Shellac is not IPA-tolerant. ISO is a quick simple way to remove the Shellac finish.
So I refinished the glass stem while I was at it. Took all of maybe a 1/2 hour - less effort than cleaning the VC.

Still amazes me that a 1mm wall is lasting through all this cycling.

I have an XL condenser that I want to make a mouthpiece for. Anyone have the real numbers to hit for making a functional DV mouthpiece?
 

Planck

believes in Dog
Yea, shellac has many virtues, resistance to alcohol is not among them. :)

I can give you the dimensions of the DV titanium mp if that helps.
Amazing and interesting that stem is not cracked.
 

TommyDee

Vaporitor
Soon enough, yep. None of the pieces to date have cracked on the periphery. The biggest risk is on pieces with a bottom to them. Even those are surviving as long as the bark was removed.

I went and cored a piece that is almost 4" long with the 5/16" drill. After a couple of truing bores I got the ID pretty shiny to accept o-rings. I was planning on making an XL body until I realized the XL body is just a standard body with a mouthpiece. Well, I already have that! I may end up making a long 79mm thin-wall stem [62+17] for the XL condenser.

However, I do want to make a FQ mouthpiece so a few dimensions to confirm will help.
The length is 17mm.
The OD is 10mm
The ID is a close running fit to the condenser; 5.1mm?
The mating counterbore for the top o-ring I am assuming 8mm diameter and 2mm deep.
Any special considerations for making good seals on the draw?
The small diameter of the mouthpiece would be nice to know along with the approximate radius of the recess.

Thanks in advance.
 
Last edited:

Diggy Smalls

Notorious
Oh man. Tommy really hooked me up! Both stems are really sharp looking and function exceptionally well. The feel of the wooden sections stems are very smooth almost like plastic.
I'll have to take some photos of these things. The little poker tool was a nice touch. The wood looks very different than the stems.
One stem is all quince and the other has a SS length with wooden ends. I like the feel of the all wood one while the hybrid one cools the vapor even more. Very cool.
 
Top Bottom