Making Draw Tubes... Flower Quince?

TommyDee

Vaporitor
Thanks @Diggy Smalls . I am still trying to figure out the coloration elements. Stems turn out blonde as blonde can get while most of the poker thingies get an antiquing of sorts. I have a few other pieces that did that. No rime or reason as yet. However, yes indeed, the poker too is Flower Quince.
 

TheThriftDrifter

Land of the long vapor cloud
Thanks @Diggy Smalls . I am still trying to figure out the coloration elements. Stems turn out blonde as blonde can get while most of the poker thingies get an antiquing of sorts. I have a few other pieces that did that. No rime or reason as yet. However, yes indeed, the poker too is Flower Quince.
What about a charcoal rub to antique them?
 
TheThriftDrifter,

TommyDee

Vaporitor
Burnishing to heat does one of two things - either it will bring forth the minerals to the surface to give a dull orange marking or it will antique a bit. Basically heat from buffing with the felt pad. I suspect the native 'antique' coloring has something to do with the history of the particular shoot. I have two blanks that are very different in color. One very blonde and a rare one that is maybe a roasted cashew color. There is one other possibility in that color comes from the mineral interaction with the bark. The bark starts out white but almost instantly oxidizes reddish-brown when you get the exterior layer of bark off. Although tannin is an Oak Apple thing, I suspect something like that is going on. Therefore blonder pieces are likely 'fresher'. The outer layer after the bark and pulp is removed is more consistent. It is always a light yellowish hue.

As this stuff sacrifices its elements to the rest of the plant when alive and dying, the stalks become light in weight, brittle, and a dull walnut brown with absolutely no vitality. Think of a dead pine compared to a live one.

Never heard of a charcoal rub. Does it work? How does it work? I've got images in mind of using finely ground charcoal as part of a buffing slurry.
 

TommyDee

Vaporitor
Sweet! Thank you @Planck . 8.8 you say? Interesting. I might bring that in a bit. Got two blanks spinning nicely. This will tell me how long the ID shrinks on this stuff. I drill the stem ID 3 times before shaping and each time it removes quite a bit of material. It also helps polish up the bore. Since letting the blanks cure to take warp out, the through-hole is always curved. A new challenge in the slender stems :)
 
Last edited:

TommyDee

Vaporitor
:D I believe you. The x-ring slides freely in 8mm so the only clearance needed is whatever the ID provides. I should be able to get away with 8.2 and still have it spin freely preserving a 0.9mm wall that has a soft radius to it.

This interface will have to be made with a ID cutter to maintain a flat bottom. I'm looking forward to seeing an all wooden VC-XL :tup:

Is there any end-play in the mouthpiece? I am asking if the mouthpiece is sealed by the two x-rings on either end where Dynawax would let it spin but still seals properly (?).
 
TommyDee,

TheThriftDrifter

Land of the long vapor cloud
I've used charcoal on light color wood to give it a dulled grey weathered finish. Just rubbed it into the grain wiped off the excess, then waxed the surface as a final coat. It was a coffee table I made with rough sawn pine. Looks rustic as.
 
TheThriftDrifter,
  • Like
Reactions: Planck

TommyDee

Vaporitor
Aha... I see. I think you need grain to rub the charcoal into :rolleyes:
I did do a black shoe-polish stain on a piece and I didn't like it. Wrong color.
Something in a blood-red maybe or something in the brown hues.
 

Planck

believes in Dog
I believe you.

I just had the numbers handy (on the wall by the drill press :brow:) and thought they may be of use to you. FWIW it's reasonably simple to reshape twist drills with a grinder and a steady hand. Small cup wheels work well chucked in the drill press.

I don't notice any air leakage with the TI tip. If both x-rigs are seated properly there is no noticeable end play. The best way I've found to put it together is assembling from the mouthpiece end. Seat xring at mouthpiece end, slide on the mouthpiece, Place the next ring near its final position and place the small ring in its groove on the condenser. Now bring the mouth piece and stem together using the MP to seat the ring at the end of the stem. A flat surface behind the tip will hold the xring it place will sliding the stem and tip together.

I don't use the spinny feature, tried it and didn't find it helpful, the added length is what I wanted and like.

:cheers:

ETA did I mention Transtint wood dyes :D
 

TommyDee

Vaporitor
Cool, that tells me what I need to know. The little blanks will be easy to bore for the x-ring. I have good control using the M6x1 tool motion with calibrated dials. The lack of end-play was the last element in the quest.

With the wooden stem, I need to install the lower x-ring first with a tube since it is no longer a loose fit. Easy enough to get the middle one in place. So you're telling me I will have some wrestling to do to get the last x-ring into the mouthpiece. I might have to get a smaller o-ring for the first x-ring as it is simply a centering ring. This will overcome the smaller ID toward the middle of the wooden stems so it will slide easily. In that case, I can follow your instructions as they are clearly superior. Both the carbless and the air port'd M-stems are in tact still. One did a soaking in peanut oil for months and the other has been laying around! Both still viable.

BTW; those Dremel diamond cutoff wheels make short work of cutting off drill bits with excess heat. I kill grinders and tools by just looking at them. These wheels are a savior!
 

TommyDee

Vaporitor
We have reached a milestone of sorts :clap:

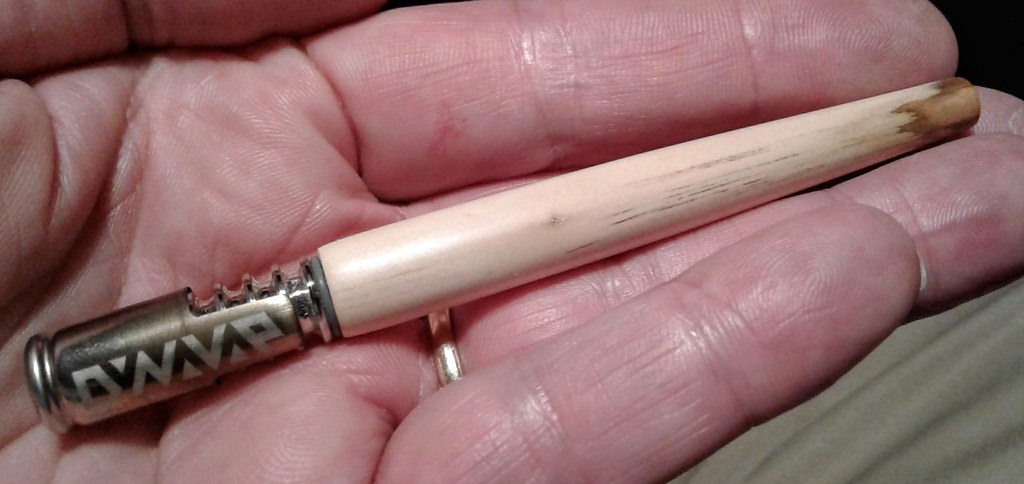
Today I mailed the 4th batch of 'evaluation' stems. As stated, all stems are on a green kick. All natural untreated vape path with a Shellac finish to fix the color on the exterior. Shellac is not IPA, rubbing alcohol, or even Everclear resistant which also makes it a great finish to remove easily as well. I can only think that this choice is the best universal option. And therefore, I am not waxing the piece either as wax can really mess with subsequent finishes. Fortunately, this material is dense enough that it will not ready draw in wax either.

Things I've noticed in care and feeding of Quince stems is a fairly short list.
1) Twist your VC to install or remove the VC to/from the VC port. Dynavap did us a great favor not making the VC just a cylinder with o-rings. there is purpose behind the cut.
2) If ever needed, the color is easily restored with some 600-800 grit sandpaper. A simple oil finish with wax will bring forth the texture of this material. It will dull over time in this configuration but can again be restored with a simple light sanding. I personally believe that even with no finish, these stems will remain viable for years. The texture of the bare wood was the first thing that drew my attention to this species. I urge recipients to experience this for themselves.
3) I am very much counting on the fact that vape oils are a perfect natural protector if the vape path. I might suggest the smaller Bambo skewers to occasionally clear the stem. Of course, if you do your own finish, washing these in alcohol shouldn't bother them a bit. Haven't tried a soak yet in ISO. Need to do that.
4) The wood will get warm to hot near the VC depending on your heating methods and rip requirements. I like a good hot bowl. I have tested this material to extremes. You will notice some 'glossing' of the Shellac near the VC port. No worries, antiquing is in progress.
5) Several of the stems have accommodations to at least try to seal into waterworks. 10 and 14mm adapters may work. Feedback on that will be appreciated. The wood itself lives in clay. I would not worried about it taking on water or swelling. The torpedo style should be most forgiving in a glass port.
6) If for some reason the VC port continues to shrink, the material will let you 'shave' the walls. A 5/16" or 8mm drill-bit will make quick work of restoring the VC port if you got a hand steady enough. Mine aren't but I can still chase the port.

Short of my obsession with thin walls these are fairly robust. Even when I cracked a few early units, the wood doesn't shrink away from the split. They still functioned. Just another example of why this material is so fascinating.

@Diggy Smalls - @Planck - and @TheThriftDrifter Thank you all for encouraging my education and reaching to the dawn of phase 2.
What did we learn in phase 1?
1) Can't just dismiss nature for being universal. Every species has its own miracle bound within.
2) Working with the live elements of wood at the moment of harvest introduces an interesting new medium that can be exploited.
3) Harvest requires action. After 5 months of reasonably careful analysis I've given this material a short vitality window. I haven't decided if the coring is required but the bark removal within a month or so is absolutely vital. Either peeled or turned, all the pulp mass must be removed before it has a chance to harden. A shorter window is available if the harvest are short lengths.
4) I am more than convinced that the mineral content enjoys a transformation. Furthermore, I have greater certainty that this is true of all plant species at wildly varying degrees. In the case of the Flowering Quince, these minerals act as a hardener/stabilizer. My pet name for this material stone-wood. Science has spent a lot of money restoring long-time submerged wooden vessels by having resins replace water over time. I think this material is doing that on the front end.

What is phase 2?
First of all, phase 2 has to be longevity related. More stems in more hands. :rockon:
I also want to further exploit this death grip on the mandrel that occurs during fabrication.
And I'd like to explore enhanced features for presentation like the stripes and dies. That gets back to more of the Artisan bend which I seem to be missing a few of those bones. Good time to enhance those little gray cells.
Phase 2 will consume much of this year. The testing started in Fall and through the winter with little variance in the material. Buds are starting to show up so the Spring season is upon the plants already. I'm looking for any changes the seasons may impart.

And I will state this to be sure - these will never come up for sale by me. I can see promotion for makers to consider this and other materials with background references from these studies going into phase 3. That means extensive testing and clamping down on process control. And a lot of stems being turned :nod:
 

Diggy Smalls

Notorious
I've been using the stems everyday this week on the morning and again at night. I have noticed the shellac seems to thin out at the mouthpiece end, leaving a smooth natural finish. It has a pleasant feel on the lips and has not discolored at all even when I get slobbery lol
They are extremely light and surprisingly durable. I've dropped the stem because I forgot it was on my lap while standing up. No damages of any kind.
Now I wish I had a stem like this for my log vape :) and water adapters, too lol quince stems for every vape!

I really enjoy seeing your progress and your experiments. Hope you keep it up so I can keep following your creative process

Yeah I'm bad at taking photos of stuff lol
 
Last edited:

TommyDee

Vaporitor
Thanks Diggy. Glad to see you finishing up the inside of the stem with vape oil with such determination :clap:
working this material is my charge for 2020. This is something I can do while being in my own space for a while.

BTW, these are the stems that called out to Diggy:

49396425811_4200a2b810_b.jpg

This is where I learned a cross-slide on the lathe helps a lot.

49395945088_62b99f5006_b.jpg


...and of course to keep things moving - first mouth piece. What a fiddly thing. Not spinning yet but will get there on the next one. None-the-less I now have my very own DynaVap "Q-XL" by marrying the mouthpiece to the original "Q" stem. Obviously I'm going to plan the mouthpiece with the stem if I want them matching better.

49396269963_ab52159394_b.jpg


Okay, so I will never use this but it is fun to make. ...and more over, the fact that I can make it is just so cool! :cool:

...note to self: Self, you need to go get some proper files.
 
Last edited:

TommyDee

Vaporitor
Forgot to get files today but had a couple of interesting events happened today. The result of today is a really cool short stem that looks a lot like a Simrell stem. What is unique is that this stem came from the end of a stalk that was weathered and stained within the body of the stem. The material where the stain was darkest was also hard. There are no grain boundaries between the stain and the fresh wood. It's just been mineralized and is still a viable piece of the whole.

But I have to share how this stem came to be and the lessons that have come with it. I've read up on the Flowering Quince and ran into this site: https://www.ncbi.nlm.nih.gov/pmc/articles/PMC3917013/

What I didn't realize is several fold - 1) Flowering Quince is medicinal. Mostly just the fruit but little is known. It has some serious implications in the text as to all the bio-systems it can interact with. It is almost like reading a cannabis attribute list. And this had me thinking some crazy things. and 2) I was reminded I have a connection with someone that extracts herbal 'juice' from bio-substrate for aroma therapy. Someone worth partnering with on some science. This person is also very knowledgeable about trees. That may even be understated. 3) I am reminded of the 'sap' in the freshly turned blanks. Is this medically exploitable?

Looks to me like the Japanese Quince, which is the import and rename to Flowering Quince (non-native in the USA) sold through nurseries. Funny thing is, my lot is smack dab in the center of a now defunct nursery town. They operated through 1958. Considering most FQ is planted on the East coast going West but never reaching the Rocky Mtn's, and the West coast reports a sparse distribution, I am more confident than ever that my 2 shrubs were planted during the business years making them at least 60 years old and could well be centenarians depending on the time they were imported. I say this because my wife also noted several other grows in the area... up to 6 still producing ornamental flowering stems. I'll have to go do an inventory when they bloom. Knowing this adds to my claim of 'Heritage' status ;)

Although the linked document makes clear that medicinal elements come mostly from the fruit. It must be noted that there is a serious lack of any further studies of the rest of the plant matter. I am not so convinced that the medicine is only in the fruit. Like Cannabis, there is medicine in every element of the plant albeit varying degrees. So I am still very intrigued by the mineral water (sap) that saturates the blanks on a lathe-turn of fresh material to remove the bark.

My poor wife suffers from arthritis in her hands something fierce. She takes no medication for this and it is a constant distraction. I feel bad in that I feel helpless to alleviate her suffering. However, I am going to put on a hat that I know I shouldn't... but the risk is minimal and any reward can only be groundbreaking. Anyone guess yet what I am thinking?

This wandering is a side-effort from the longevity phase obviously. This could be a plus however. The stem I made today came from an aging harvested piece out almost 2 months now. It is about 2-foot long with a raw end, aged and weathered for a good decade. I trimmed the top inch off and cut it to about 75mm; one palm's width for my wife (hint). It made for a clean blank but it wasn't as 'vibrant' as fresh harvest, or even a month old harvest. My harvested long-stock is converting the bark layer to stone at around 2 months in the cool of the NW. Fortunately, once the bark was removed and a coreless blank was produced, I gave it to my wife to 'hold in her palm until dry'. Her first comment was 'it's cold!' ...which it always is. This one still had plenty of minerals/sap to share. It is normally just wet rather that sticky or resin-like. This piece was more on the order of 'damp'. When the piece was dried in my wife's hand I turned it on the lathe. This time reversing the core drill operation to after turning the outside diameter. I used the lathe properly to a) drill through the center and b) bore the VC port with a flat bottom rather than drilling the port. The lathe only allows me to do that on shorter stems.

So yep, I am combining making cored blanks with a herbal medical experiment. :science:

Here is the piece in video: https://photos.app.goo.gl/FDMcUnVRk3Dv98WL7

49402745443_a937e0c34d_b.jpg
 
Last edited:

TommyDee

Vaporitor
Someone mentioned waterworks?
I don't have a 10mm adapter but then angles should be close. The straight section is 10mm.

I have not finished the stem. Wasn't planning to. But I wonder if this stuff is a water-tolerant species among the likes of Mahogany and Cypress. If that were true, this piece can be used as a stem in a 14mm adapter. I got to use my cross-slide so both angles are identical.

This piece came from a blank that has been curing for maybe 3 weeks. I machined the VC port with shrinkage allowance. It needs about a week to stabilize.
If there is a USA-based party that this stem speaks to, talk to me in PM. I have more experiments than I have vape-hours.

To be clear, we are talking about the long stem only. A Flowering Quince piece finished today. More robust specifically for water-works.

49412342591_c13d8f06c8_c.jpg
 
Last edited:

Diggy Smalls

Notorious
I have a thin section of silicone that I slip on the end of the all wood stem you gave me, and it fits into a 14mm f. It looks to be 10mm taper, but I can't be sure because I don't own anything that size. Anyway, I alternate. I push the strip of silicone up so there is room to place my lips without touching silicone. I start the bowl with a mouth pull and finish with a high temp pull through a dry bubbler. They still going strong. No taste change that I could find. It seems to ooze the goo out instead of seeping into the wood or even collecting and clogging. I'll have to investigate this further.

Your work looks good as always.
 

TommyDee

Vaporitor
This stuff certainly doesn't suck :lmao:

I am very happy you are giving this a good workout @Diggy Smalls :D Good to know there are options to adapt waterworks. Silicon rubbers... who'd a'thought :rockon:

The angle on both those stems were eyeballed at approximately 3 degrees on the cross-slide scale. I need to make a gauge to fine tune it. I also want to make a 14mm stubby for my Orbiter.
 
Last edited:

Planck

believes in Dog
More lovely stems TD, aka the King of Quince. :bowdown:

Some woods have a clear color delineation between the heartwood and sapwood
like these walnut logs. I wonder if flowering quince does and if so how large the stalks have to be before forming heartwood.

iu


Regarding minerals in wood, they are usually said to be below 1% of the trees mass. Sadly I don't know if that is dry or wet weight. However teak for example contains significant levels of silica and it quickly destroys tooling. FWIW mineral content can be determined by completely burning wood and weighing the remaining white ash.

I use silicone on stems as well and have since the M was released, it works a treat imo. I cut about a 12mm long piece of probably 5/16 tubing, then folded it back on itself to create a double layer. This creates a perfect round edge that seals nicely. As Diggy says you can have it on the stem far enough to no interfere with normal use. Slips on and off of the stem easily too. It does a reasonable job of blocking the airport too. :brow:
 

TommyDee

Vaporitor
I knew there was a word for that center core. Heartwood! Indeed it is there on every piece unless I happened to core it out. Most of the time it shows up at the mouthpiece due to a cross-drilling. That is that hard bit I was describing a few pages back when hand sanding. It always comes up notably proud because of its hardness. These are typically ~1/16" to 3/32" in diameter.

When I turn pieces that are at the end of the stalks, they have 'wound-wood'. I can definitely feel the hard spots in those regions on the lathe. In the short stem in the video, the mouthpiece has a 'clear' section. The lighter brown on the rim. There is no grain structure whatsoever (remodeled [?]) bounded by the darker brown zone and it is clearly noted by delineated grain boundaries highlighted by stains next to it. It will be interesting to see where the moisture content falls. Sap permeates the surface when I strip the bark. The blank turns cold. Within hours it will be dry. What I don't know is if the condition of soil has anything to do with the FQ mineral content. This one is growing in clay.

I can certainly see how a silicon boot can solve the air port problem. :tup:

Once again I owe you @Planck . I uncover the mysteries and you set them to words and definitions. :cheers:

Now I'm going to have to see if this stuff even burns :ninja:
 
Last edited:

TommyDee

Vaporitor
I'll leave it to the Flowering Quince Spirit that is currently my avatar. I'm just the caretaker.

Query: does the Heartwood and the tap-root have anything in common? If so, this could get crazier.

Okay, this stuff burns just fine. Turns out you can put a pretty nice burnt patina on this stuff with a torch too. Maybe some wood-burning adventure might ensue.
 
Last edited:

snamuh

ghost
Nice idea. I know people make pipes from antler, yes indeed.

Huffin' bone dust is a problem?

Anthrax comes from bones. Iirc

What is anthrax?

Anthrax is usually spread in the form of a spore. ... Skin (cutaneous) - Most anthrax infections occur when people touch contaminated animal products like wool, bone, hair and hide. The infection occurs when the bacteria enters a cut or scratch in the skin.
 
snamuh,
Top Bottom