• Do NOT click on any vaporpedia.com links. The domain has been compromised and will attempt to infect your system. See https://fuckcombustion.com/threads/warning-vaporpedia-com-has-been-compromised.54960/.

Making Draw Tubes... Flower Quince?

phattpiggie

Well-Known Member
Accessory Maker
@TommyDee great to see where your VC inspired creativity is taking you.

I looked up quince and all the info seems to be from knife makers. It looks very different to the stuff you are using.
Not turned any myself.

Most unusual 'wood' I've made a stem from was a stalk from a weed plant a friend grew.

Your use of the brass tube is the method pen makers use.
Personally I don't like it. To get nice slim stems you have to turn the wood very thin which leads to cracking.

Ambient temps and humidity put a lot of stress on the very thin wall.
I recently saw a display of pens and 3 out of 8 had cracked very badly. This was down to a warm, dry environment.

Now factor in the heat generated by the tip and its a recipe for disaster. You may get lucky and have some pieces may hold up just fine, but....

The other thing is most wood blanks are cut from logs in a specific manner so as to avoid the natural shift in the wood as it dries and the change you get with the stress turning causes.

If you are using branches and following the line of pith to centre the drill this will cause problems.

The best thing to do is cut and season a pieces that's at least 2" or 3" diameter. Once it's dry split it into 4.
Drilling the centre of one of these quarters is better and should be less prone to cracking.

Have fun.
 

TommyDee

Vaporitor
I am honored in your joining this thread @phattpiggie :bowdown: How did those weed stalks turn out? The analogy is fairly close with one significant variation. A Quince is a tree that grows lemon like fruits. A flowering Quince is an ornamental shrub. By design, it is suppose to stay a shrub by trimming it to the ground every 3-4 years. This 'shrub' is nearly 5 decades old and I hadn't given it a serious look for at least 2 decades. It has other positive attributes and strangeness like preferring clay and basically depending on a root system to grow more massive as apposed to bigger. That is to say they have qualities of trees growing where serious water saturation is the norm. As in the weed analogy, they are 'shrubs'technically but unlike the weed plant, a 1" stalk is well over 40 years old. Although it's sheathed in a soft pulpy bark, the wood snaps when broken with outer layers splintering. The center is solid wood rather than then the pith of a rapid growing species. Funny enough, this shrub puts out a similar fruit to the like-named Quince tree on occasion.

I was thinking this stuff would make killer pens. Working with it is like playing with those old wooden chess sets. Light colored wood that has a pretty tough shell. And that is without a finish. My sister has made her share of custom pens. I should get her opinion too.

I had remembered all you mentioned except the quartering. That is why my life hadn't gone with woodworking... I have zero patience! From growing in the ground to having vape puffed through it in under 3 hours is just freakin' awesome :spliff: But alas, you are absolutely right in that this is high risk for every turn with an unknown expiration date. And that is why I am doing it :whip: I have a day job. I can't afford to do this for income. And face it, there is only so much shrub! But the shrub needs to come down to the ground. I trashed nearly 3x what is left to get a handle on it. And I'd love to get a few pieces in your hands so you have some in your collection. So far, its made some really nice pieces for my kit :smug:

I started this with the Launch Box stems where I did find my first and biggest challenge... shrinkage. The LB needs a stem at .260" exactly if you want a good fit. And the hole is not round. What do you know; Flowering Quince is flexible at this scale. 260" OD and .141"ID, moisture and heat have not affected those stems. It has only been a couple of months but their 1-1/2mm wall is holding nicely. No splits or warps and definitely dimensionally stable within a week of turning. And using peanut oil for a finish (any oil probably) on this material is like doing a die inspection as any cracks whatsoever will glow bright gray. In the last couple of weeks I certainly put a few pieces under serious stress. Placing the VC in a green cut to size 1mm thick stem and letting it shrink fit was a feat I would have written off too failure. Not only did it survive but it came apart without failing. It has other problems but that wasn't one of them. Shrinkage on the x-ring side is. Stems that need o-rings for condenser tubes either need to be lined or honed when stable. Again... no patience. And finishing the ID is not something I am tooled for. For what it's worth, I am running a small jewelers' lathe. Making fine cuts on larger shallow ID's and OD's are slow going but precise. I can minimize the machining stress. But I do prefer shaping with plain sandpaper. The real challenge has been keeping both final inner diameters concentric to the OD. I think I got that down now. But driving a .141 diameter 8" drill bit through the core... arrrrgh.

1" is about the usable limit of this material on the few ancient stalks. I'd love to do more of the natural under-bark textures if I could go straight through. That will take some more fixturing. Considering there is not enough wood to quarter, I don't have much choice but to work on the center of the log. And in all good conscience I would never do that with one critical exception; I'm coring the material. To be clear, in this case scale has everything to do with it. I am treating this wood as a 50 y/o tree. If you core a 12" tree with a 4" hole, it will shrink fairly consistently. Put another way, a board, say 2x8 with the center of the tree in its middle would split in two as the center splits, which it will, and so will this quince. Change perspectives and yes, a thin bottom on a FQ stash will crack from the center out just like a pine log will. I have to maintain a reasonable thickness in the bottom. But when you remove this core, you also relieve the stresses that the shrinkage of the core present. Therefore I am treating this material as a very small log that is maybe 1/10th the scale of its cousins.

I freakin' bought this camera for a reason... and that reason is not to keep it in the freakin' box!

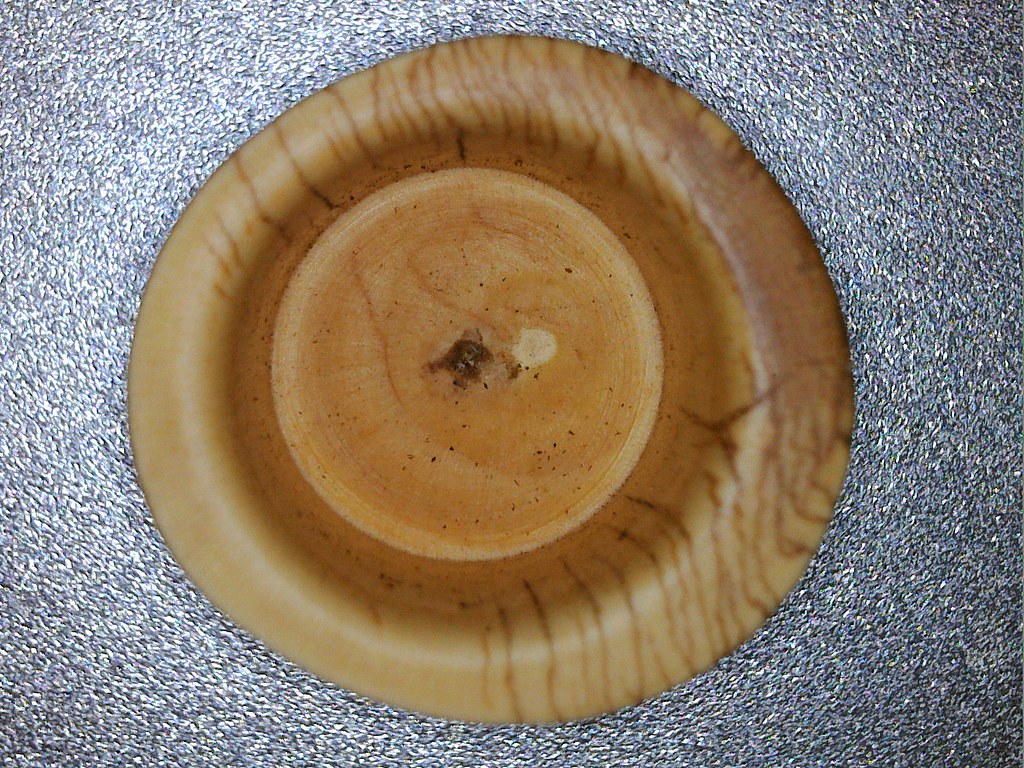
Okay, I made this piece precisely for making these images when it became the BVC (been vaped cup). This piece was a scrap from the top 1-1/2" of an old stalk maybe 3' long. It was sheared probably 2 years ago causing all the parallel stress cracks. The stain is from outdoor aging. The bark was hand-peeled. This piece was oiled. As best I can tell, the gray stains are machining stresses. Much of the color comes from burnishing with felt. A interesting way to antique this material.

49116887022_cac65fefc8_b.jpg


You can see that I happened to maintain the bottom right where the stress cracks finished.

49116694571_776bc6597d_b.jpg


One last characteristic I would like to add; when machining .01-.02 deep cuts, it comes off stringy. Not necessarily haphazard but like a veneer. It leaves a perfect cut while the waste curls out of the way while still throwing chips. Not something I am use to in turning wood.

@Planck - Canada is only 10 bills :ninja: Postage is weird. I can ship up to 1/4" thick envelopes costing $1.15. After that the cost is $10.50 and up. We may have to try to send a slightly thicker envelope to Canada. Maybe one to NZ too. I'm itchin' to make a few more slightly shorter carbless stems. :D
 
Last edited:

Planck

believes in Dog
@Planck - Canada is only 10 bills :ninja: Postage is weird. I can ship up to 1/4" thick envelopes costing $1.15. After that the cost is $10.50 and up. We may have to try to send a slightly thicker envelope to Canada.

I'd cheerfully cover the postage. :D And I am no carb guy.
I'm really curious about this material. I too though it would fail. So many rabbit holes in my life. :hmm:

Not directed this at anyone, interesting for some and old news for others.
Wood shrinks differently in radial, tangential and longitudinal planes.
Radial shrinkage is roughly double tangential shrinkage and longitudinal shrinkage is near zero. Also wood is stronger in compression than tension This why fully rounds crack. Hollowing the blank can allow the radial shrinkage because the tangent material is no longer preventing it. The interesting bit to me is this material seems unusually strong in tension for wood.

Frame and floating (not glued to the frame) panel construction addresses these constraints as does plywood though in a different manner.

I could go on and on and on but... :goon::lol:

@phattpiggie Your stunning wood stems are metal lined aren't they?
 
Planck,

TommyDee

Vaporitor
I love the way knowledgeable people talk. They make sense with very few words :D I've been working with inference and spirits.

You're definitely on the Beta list @Planck . Beta list of course being a euphemism for "what the hell do I do with all these spare stems?"! :lmao:

I'll give this stem some time to show its true colors. I'm feeling a whole lot more confidant about this material now than just two weeks ago. I need to get this shrinkage down to reliably mate to the VC. The quill held the mandrel tube pretty tight by the time I was done. That is 5/16 OD from a starting point of a .323 drill. I want to try the 21/64th bit (.3281). I need it to stop shrinking between 5/16" and 8mm. Roundness isn't quite as critical but consistent wall is so they go hand in hand. If nothing else, I could let it shrink onto a thin wall stainless steel sleeve. But that seems like cheating :rofl: ...or work sourcing tubing.
 

Planck

believes in Dog
Tommy I am so sorry I have not replied till now. I have a bit to much on my plate ATM and want to give the proper response your post deserves.

For now (it's 1:30 AM) I'll just say thank you, I am flattered and thrilled to be a beta tester for you.
 
Planck,

TommyDee

Vaporitor
No worries @Planck , I'm in the same boat. The good thing is these curiosities are what makes life worth living. Yesterday I tested the 21/64th drill bit. Still shrinking too much. Got stuck on the mandrel. But learned something important about the material. It really takes an effort to split this stuff. Also found a 5/16" collet that will make things easier on the lathe.

edit: I am a real idiot. When I made the stem I used drill "O" rather than "P"! I need more light in the shop :uhoh: Not that it matters much at this point. The quill stem is still holding up perfectly. 21/64th over-shrank yesterday so now we are on to drill bit "Q". Also found a much more efficient way to make blanks. I need to see if shrinkage is greater with thinner walls and by how much. I'm seeing how far this test sample will shrink by only boring the center and not turning the OD yet. Worst case, I core and rough cut the OD so I can chuck it up to machine the ID perfectly when it is dry. That would be the only way this would work for stems utilizing condensers. But then I run into that patience thing. :mental:
 
Last edited:

TheThriftDrifter

Land of the long vapor cloud
@TommyDee I'm in as a beta tester too. :nod:

If you could PM me an estimate on postage that would be great or instead we could do an exchange and you could beta test one of my stems?
 
TheThriftDrifter,

TommyDee

Vaporitor
Alrighty then. Got to playing with a few more pieces today. Also did some tooling upgrades. But this little beast has been in my way for a few days.
It -was- a nice long piece until a dumb fixturing move split it almost a 1/2" up. Cut that off quickly to avoid propagation.

Today I decided to see if I could cut the bore for the VC o-ring. There is actually a step in the lead-in. It buries the last o-ring on the VC which is present in this case.
Considering this had already dried a few days, I feel pretty good about this holding up. This second step also helps relieve pressure from o-rings on the ID near the end. That can only be a good thing.

Introducing this light weight bat-style carb-less VC stem;

LFB - Little Fuckin' Bastard.

49138609476_33935cd1ba_b.jpg


I like this style of stem. A little longer would be good. They also lend themselves to be being stronger than the thin-wall quill stems.
But I have a question for those that do like this style... does it need a knob at the mouthpiece end like the knob'd quill stem?

I put some peanut oil on it to bring out some of the grain after I made the image. I hope you good people are not allergic to peanuts. I can't think of a more pleasant tasting finish at the moment. Ideas welcome.

And a FC Quiz - Does Flowering Quince sink or float in peanut oil? What's your lucky guess and why?
 
Last edited:

TommyDee

Vaporitor
That sounds interesting. Any particular brand I could find locally?

I have a couple of spare VC's coming to help test these stems over time. Cannot ship used pieces as the core is wood and no way to clean them sufficiently. I can see a pretty good collection growing very quickly at this rate. This is just plain fun to spin these out from dirt-2-vape in an afternoon.

This is a long stem in the making :leaf:

49138640403_bb67143465_b.jpg"
 
Last edited:

TheThriftDrifter

Land of the long vapor cloud
I get mine from a bee keeping friend. You can get pure beeswax candles at various places though. I gently heat some oil then add some bees wax and stir till mixed, take it off the heat let it cool. You can add more or less wax to get the consistency you prefer.
 

TommyDee

Vaporitor
Oh, nice. The proper oil from what I gather is linseed oil. But I don't have any of that. I have olive oil too! Interesting about mixing in wax. That should work well as a preservative. I know some shops locally that carry organic bees wax. great tip, thanks!

Okay, I was a bit slow on this one after making the cored blank. Last time the brass tube got stuck in the VC end of the core when things shrunk while working this material. This was based on using the 21/64th drill bit. I used this same bit but I changed the mandrel to a solid stainless steel piece. Polished it up as best I could to facilitate sliding off the stem without damage. Bring in the collet holder and you have a winning combination. What-do-you-know - it worked! Again the stem shrunk to the mandrel but I could twist it off with effort. I can also shove it out more forcefully if needed using an 1/8" rod through the vape tube. The core is still a 5/32" bit that is quickly shrunk to a lesser diameter.

The new mandrel really works well for chucking this up. The end of the rod clamps the work-piece to the live center on the tail-stock. The mouthpiece end is at risk with the live center but this will be trimmed some to square it anyway. Without a positive drive engaged, this is a manageable setup for the blank. All the stresses on the VC end are at the end of the stainless rod well within the work-piece and a waste-end on the work-piece at the tail-stock. This waste-end also doesn't care about absolute centering yet. I turn the whole thing down on friction drive adjusting the tail-stock as needed. It is very slow going on a jeweler's lathe but it does help manage machining stresses. If I did a good job on the coring, I can salvage a bark-free blank at ~5/8". That is where I recenter the blank by sizing the piece on both ends. Now the smaller hole will center perfectly and the VC end can be inspected for centering if play is remaining, which there will be at this point if this is all one session. If for some reason I still have bark at this point, I will start sizing the small-end until all the bark pulp is gone. That pile of duff-sawdust (almost looks good enough to vape!) is from shaping this material, in this case, from a complete 9/16" OD blank. 100-grit to 600 grit and a felt dry polish at hyper-spindle speeds. These shapes pop out in no time at all if the prep is out of the way.

This one should make my wife a nice robust hemp-stem if I can convince her these are much better than the stogies she gave up...

49139007998_9ce5f4b1d0_b.jpg


Yes, just this morning this exquisite piece was sucking water from the ground. Nature's Blessings :leaf:
 
Last edited:

el sargantano

Well-Known Member
Olive oil and citrus aromes tend to the rancid sooner than coconut.
I mix wax30% + cocooil 70%.

All my wood vapes are treated perfect with this and you can use for everything from coco lipstick to beard enthusiasts
 

Planck

believes in Dog
Alrighty then. Got to playing with a few more pieces today. Also did some tooling upgrades. But this little beast has been in my way for a few days.
It -was- a nice long piece until a dumb fixturing move split it almost a 1/2" up. Cut that off quickly to avoid propagation.

Today I decided to see if I could cut the bore for the VC o-ring. There is actually a step in the lead-in. It buries the last o-ring on the VC which is present in this case.
Considering this had already dried a few days, I feel pretty good about this holding up. This second step also helps relieve pressure from o-rings on the ID near the end. That can only be a good thing.

Introducing this light weight bat-style carb-less VC stem;

LFB - Little Fuckin' Bastard.

49138609476_33935cd1ba_b.jpg


I like this style of stem. A little longer would be good. They also lend themselves to be being stronger than the thin-wall quill stems.
But I have a question for those that do like this style... does it need a knob at the mouthpiece end like the knob'd quill stem?

I put some peanut oil on it to bring out some of the grain after I made the image. I hope you good people are not allergic to peanuts. I can't think of a more pleasant tasting finish at the moment. Ideas welcome.

And a FC Quiz - Does Flowering Quince sink or float in peanut oil? What's your lucky guess and why?

That is stunning T. Really attractive shape.

Bee's wax and hemp oil FTW.
Pure Tung oil is another food safe choice.
Most oils darken and yellow the wood fine detail in the grain is often lost as well, you can prevent that by sealing with a very dilute clear coat. Blonde shellac is probably the best choice for a stem. You only need a very light coat, so light one could barely tell there is any finish. Then add the oil and wax. Some woods are better without the sealer, usually dark woods.

Most edible oils, olive, peanut etc can go rancid.

Such a sweet looking stem. :love:
 

TommyDee

Vaporitor
How can I argue with hemp oil :love: How did I not go there in my own mind! CRS :whoa:
That should be at the same place that has the organic bees wax.

Hey, I have some live rosin I am not using... will that work? :clap:

I will stop using the peanut oil on your advise. The inside will be well treated with vape-honey. I'll go do some shopping. Would you treat the ID or just let that ride and let usage catch up? Definitely want to stick with all-organic solutions.

@Planck - what kind of hemp oil am I looking for. There's a lot of 'cold press hemp seed oil' food grade stuff. There are some extracts... ? eBay works for me. Also found some white bee's wax. Is the Hemp oil available in a light color?
 
Last edited:

TheThriftDrifter

Land of the long vapor cloud
I've used hemp seed oil before, i didn't like the color it imparted to some of the lighter color woods I've used.

Maybe do a test patch on a spare piece of wood before hand. :leaf: :)
 
TheThriftDrifter,
  • Like
Reactions: Planck

TommyDee

Vaporitor
I was afraid of things glowing green indeed :\ I should try a true stain on this stuff to see how much oil it is really taking on. :huh: I did go get some linseed oil for now. True to the color and slow drying. Proceeded to spill half of it :doh: but I got it at 50% off :shrug: ...can't be coincidence.

I turned two pieces yesterday. I'm testing shrinkage of two pieces turned with a VC ID of 21/64th and one using drill "Q". I hope the "Q" turns out as it came to be an interesting piece. These also started from smaller, more plentiful sizes.

Yesterday I put 2 and 2 together for an interesting finding. I am quite certain this is true of all woody material. More or less a science project but something wood seasoning won't give you. Most likely this is not even a useful attribute for fabrication, but it is part of the life-blood of a tree. Ever hear of 'wound-wood'? Described to me from an arborist as twice as hard as the natural wood. Normally you would see that on the outside of a tree near splits are scars. But wound-wood is an interesting phenomenon. The second relative part of this is how this quince behaves. Obviously wet when coring because the wood is spitting on the far end of the bore. First thing I do on the lathe after some truing cuts size the ends. When I take it off lathe to clean up the cut, the smaller ID is bright orange and very wet. It carves clean beautifully with a razor blade. It is about a 1/32" wide annular ring of a beautiful translucent non-descriptive damage/healing zone. Normally I would just write that off to 'interesting'. On the first piece yesterday, I trimmed away the very end and let a small diameter to remain at the live center to trim away later. I did exactly that. By the time I had finished turning the piece, maybe a few hours had passed, to trimming this end, the wood had turned not just hard but very hard. The color is akin to the center of an oak trunk; brownish-gray. So now I know why this wood exhibits strength even at very slender turns. Even the month-old seasoned material is still quite wet. This does help explain that feeling of work-hardening this material as I turn it. Basically, we are working together to forge the piece into a new purpose.
 

Planck

believes in Dog
Interesting TD, paragraphs are interesting too. :o:lol:

Some wood is known as reaction wood, one place it forms in big limbs.
It simply will not stay straight, everytime some wood is removed it warps in some other way. Doesn't matter how old or dry. Limbs are typically not made into lumber because of that. Beautiful burls are a reaction to stress and disease.

Pacific northwest eh. You got wood there to die for. Soft maple, burls, blisters, curly, quilted, just one example. Me jelly.

Wood is always trying to reach equilibrium moisture content. Regardless of age and for the most part finish. It moves, it's near impossible to stop it. Want a flat table top, finnish both sides the same.

Air dried wood is always nicer to work then kiln dried wood, less brittle, smells better, has better color.

Really enjoying your adventure, carry on! :tup:
 

TommyDee

Vaporitor
That isn't all one paragraph? :tup:

I did not know that about burls. I do know we have some very interesting things that grow on trees but nothing workable... and probably from the shroom fam. Also didn't know that about branches but that makes perfect sense. Branches have been fighting gravity all their lives. Remove gravity and strains of old are relieved.

Reaction wood, huh. That I need to look up. In this case, drilling the core seems to produce a new hard core. The orange saturated element has little concern where the original core was located. This is pretty much like a dopamine rushing to the damaged region in droves. I am likening it to restoration of an old sunken ship where you continually rinse the structure with a resin impregnated solution to replace water with something to hold the wood together. In this case, it is flooding the damage area with a fast acting hardener and some kind of reaction. I need to get a decent picture of this.

It really is sad to live here and not even recognize the things you know are here. Of course, those cuts would come from someone else's tree so budget alone would make that a short project for me. I only know one arborist and he moved to Cali.

Fortunately, this stuff has a habit of growing straight. If only I could drill this stuff straight. I put the VC on the best centered end. It may not be the plant's center, but it is the center of a stalk. By the time I get through 5" of log, I've walked off-center by about 1/8"-1/4". Spin that on the lathe and I can see what kind of workable piece remains. However, this offset is producing an interesting anomaly. The waterline of these twigs is about 1/16"+ in diameter. Being off-center exposes this near the mouthpiece. There are also minor artifacts of branches and other cores within the piece. If I machine the diameters, these features just get smoothed with the body. But if I sand the form from a full 1/2" log, these features are a little bit harder than the general woody stuff. Although the piece may look perfectly smooth, these artifacts act like 'textures' you can feel but not see. I find that fascinating! This "lifeline" through the center, whatever it is known as, is becoming a prominent feature in these turns. This 'tracer' quickly becomes the darker hard element identifiable in most of these stems.

Maybe now you see just how small this operation is. A bush, a saw, and a small lathe. Not quite as disposable as an apple pipe and not nearly as durable as glass. Certainly falls in the dainty family of things. But watching a VC jump up from the table and remain standing upright is priceless. So yea, a couple of hours turning is well worth the effort even if I can get 3 months out of a stem. I know that's possible because my Launch Box has been used daily with a Quince stem. And that little stem is aging with class.

....

Here is a section showing the wet orange damage zone; And that is not the center of the stalk.

49148283793_10d3f35bb7_b.jpg


Describing it is futile. I want to say 'raw mineral asbestos' in texture; warmed-over orange Jolly Ranchers in translucency and consistency; and the crisp satisfying smooth track left behind using a sharp razor on a heavy beard's daily stubble as you trim up the raged edges.
 
Last edited:

TommyDee

Vaporitor
Today was a sad day for several stems including the DD. I had several stems curing with the linseed oil. And today my DynaVap order came in. Now I have some virgin tips for fitting. Also got a solid number on the OD of the VC. -.311" at the head only. Reduces at the o-rings. That is not good for shrink fit. I've had a few good dismounts on my DD but today it failed because the fit was too tight and I tweaked it. Split another thin-wall stem that got too small. And two others are not usable anyway.

All good learning pieces. Got a very slender test case that is intriguing. Clubs are strong and forgiving. Pieces warp (no surprise). Patience has virtues. <sigh>

However, I am not stemless. The Hound's Tooth is bullet proof and fully sized. And the long stem on the lathe above helped with a final piece of the puzzle - sizing the hole. I need .312 min! I'd like .315" ID. Since the wood squirms with a drill bit, I ream it up to the 21/64th bit -VERY CAREFULLY- a step at a time from 5/16". Of the pieces that failed today, I tested this technique a couple of times with success. The material removed rather than just mush out of the way. That means it is hard and workable. This is a manual effort for now as this won't fit on my setup. And the piece was finished. I can see cured blanks being done differently. I have one chucked up now. However, I am very happy I salvaged the long stem. Good fit at 21/64th and now easily accepts the 5/16" drill bit. The two 'wings' on the drill bit obrounds the pocket so getting a real size is almost as hard as wet-shaping. But this material is now hard. I wonder if this wet machining is dosing the entire remaining stock with those hardening hormones I was seeing in the core drilling. Maybe a last-ditch dying 'sweat' just saturated mineral hardener into the wooden blank. That would be an awesome chemistry trick :science:

Two improvements I am entertaining. These will test my patience. One - pre-drill the VC w/"Q" and core a blank and let dry on the mandrel.
Machine the blank to remove all bark and pulp layers. End pieces trimmed. Center on VC-end not yet firm. -Age- ... .. .


<snooze> sorry, that's where we are now... waiting.

I need to turn that VC-ID true to the blank. VapCap o-rings are very forgiving but the very end is not. It must be a 5/16" minimum diameter.
Once the business end is taken care of (today I ran the drill back through the core) I can learn what awaits me with a harder material against the sandpaper. I suspect there will be more surface variation on grain and features. The piece already told me the shape it will take on. Something of a torpedo.
 

TommyDee

Vaporitor
I am quickly making up for the collection loss. I am now testing a 1-week cure and a 1-day cure. This short wait ferrets out warp and more importantly, options on the VC bore. Basically, when I make the VC bore (21/64"), it is rarely axial to the through hole (5/32"). Then shrinkage takes over where I have another chance to align the bore. Well, making blanks helps even more because I chuck up the blanks, run a truing cut, and put it back in the 3-jaw chuck to hold the VC end square to the bore. Now I can do an internal cleaning of the VC diameter. A bit touchy, but doable. Now the wait will see if it continues to shrink and by how much. I've got a fairly weak hold right now. More than sufficient but anticipating a little more shrinkage. I also get to re-drill the core diameter. That just smooths out the bore to no end. It is almost a glaze if it all work perfectly. But I do this to 1) again align the core drilling, and 2) for a cleaner bore's wall as well as possible.

And a word about them style :2c: . As I started this for the Launch Box, the intent was to simply make straight 1/4" straws. But then DynaVap came into the mix, it opened up a world of possibilities. First of all, simple accessories are cool to make with this material, It has enough nuances to make this material 'interesting' if nothing else. I really like how quickly you can make some interesting pokey tools for our daily endeavors. But stems are another animal. Stems have dimensional and functional requirements. The VC diameter matters obviously where depth is not critical as long as a minimum is met. Turns out the core diameter too is somewhat important as it will reduce with use. How often do you want to push that hard earned honey out of the stem? And then there is warp. I didn't know it but a bent stem on a VapCap is annoying! You are always spinning it with lighters and IH setups. So having a stem run true on its axis is more important than one would first glean. Length too seems to have a huge difference in draw quality. I started out with a shorty with no a-hole (M-length); very hot on the tongue. Medium length (3-3/4") produces a hot draw but a bit more subtle. Going in the right direction. But with the 5" super long stem, now I've actually got some cooling going on. I'm not getting hot vapor to the tongue anymore. I am getting that candy-coated shell in the tip of my tongue from the vape condensing. I didn't realize that just the longer stem would make that much difference but it does. Definitely a new consideration for me. And even though it is 5" long, it still weight near nothing. One last style comment is with the 'knob' I seem to keep making at the VC end. This kind of 'bulbous' feature is working very well to avoid accidental burns. The same as DV put the warning rings on the '19-M, this feature gives pretty good innate feedback for when you are about to burn yourself. The stems that didn't have that got me a lot more often than these new stems.

I am still planning on an XL style thin-wall tube. I got a condenser for the XL VC so that will be the target. This is just a proof of concept thing but I really want to know if it can be done. The two wooden M equivalent stems are still in prefect shape... just not smooth enough on the ID to be usable as everyday devices. In other words, its a bitch to get the condenser o-ring back in the right place.

BTW, I am loving the 5" stem. Not from a style perspective although it is a beautiful shape but the quality and the coolness of the vapor. Almost like sipping on a thick milkshake without the brain freeze.

Now I have to remember to prepare new blanks when I use one up.

edit: This came out a bit kaddy whompus. I peeled the bark away and it left this interesting piece. I like the 'cubical' cut but the natural texture really sets this thing off. What do you think?

49175475508_c715e07268_b.jpg
 
Last edited:
Top Bottom