VapCap Induction Heater for Desktop and in Car Use

stark1

Lonesome Planet
:cheers: That’s OK. We are all brothers/sisters, deep in VAS.

Mine went South, to Providence

Such comedians:spliff:

I think mine gets here tomorrow or Friday.

What's the best way to get that slow roasted temp being discussed, with the PSM? Pulse heating, or pausing for a sec before the click?

Donno if you can use it, or if you are on the right side of the pond, the magheater guy seems to have a voltmeter
Of sorts

Doesnt seem to be USB, however


TommyDee

Vaporitor
That is one of the oddities to the USB chargers @stark1 ... The USB contacts are directly connected to the battery via an inductor.

This is a typical boost circuit; The diode will give a false reading on the meter.

The-basic-circuit-of-DC-to-DC-boost-converter.png
 
Last edited:

BabyFacedFinster

Anything worth doing, is worth overdoing.
You have to do a complete drain for the first 2-3 times to condition the battery, but after that, that is why it's recommended to just keep topping it off every now and then. If you are always after a complete drain, you're never gonna know for sure when it's gonna die. Even the PSM's indicator really only gave you a ballpark of how much left.

I will say the HS holds a charge for a long time. My Caldron has always been a lifeboat for when the battery died mid-session.
 

despeRAWdo

Fan of Hot Air Makers.
My hotshot isn't charging, I am using a 2 amp plug. The charging port was a little pushed in when I received it. Any suggestions?
 
despeRAWdo,
  • Like
Reactions: Bologna

Pipes

Addicted DIY Enthusiast
Accessory Maker
If it's getting inserted and feels good, you should try a different charger. It's the charger that needs at least 2 amp and not the cord. What brand is the charger? If a china cheapy, it might be misrated.
 

Bologna

(zombie) Woof.
If it's getting inserted and feels good, you should try a different charger. It's the charger that needs at least 2 amp and not the cord. What brand is the charger? If a china cheapy, it might be misrated.
Legit Apple blocks are fine tho, correct...?
(I mean, I would assume so... as they are 2 amps, well made and ubiquitous...)
 

Pipes

Addicted DIY Enthusiast
Accessory Maker
I'd say they should work fine. I've used Samsung as well as various other ones I could find and if they were rated at least 2 amps, worked fine. I also tried a couple of really old ones from cheap products that have a 500 mA - 1 amp output and they crap out. :science:
 

despeRAWdo

Fan of Hot Air Makers.
If it's getting inserted and feels good, you should try a different charger. It's the charger that needs at least 2 amp and not the cord. What brand is the charger? If a china cheapy, it might be misrated.
Its a Samsung and it says 2 amps on the back, ill try with a different charger when I get home, but it's the same one I use for my phone. Should I PM you the results?
 
despeRAWdo,

stark1

Lonesome Planet
Have two Samsung 2A chargers, and they both are real McCoys, charging.


~~~~~

That is one of the oddities to the USB chargers @stark1 ... The USB contacts are directly connected to the battery via an inductor.

This is a typical boost circuit; The diode will give a false reading on the meter.
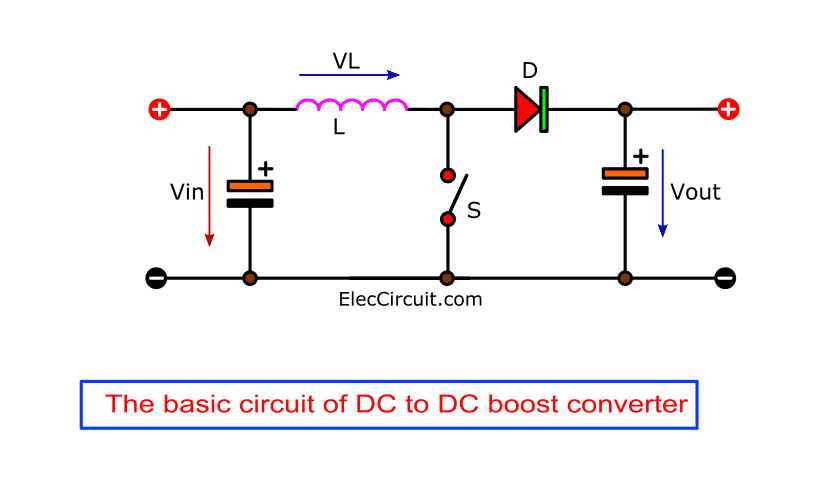
The-basic-circuit-of-DC-to-DC-boost-converter.png

Are you saying that a USB port is incompatible with a voltage indicator, or that a diode in the voltage
boosting cxt with a diode will give false readings,TD?

So, unless there is a diode inside the IC, this voltage raising cxt
Should give proper voltages when a plugin voltage indicator is used?

 
Last edited:
stark1,

TommyDee

Vaporitor
There is a thing known as a "Diode Drop" which is normally considered to be 0.6V when a diode is inline with one of the legs from input to output, including if it goes through an inductor. I have no idea how that simple regulator is working. There could well be an internal diode. You would measure for a voltage drop across one leg with a voltmeter to be sure.

Oh and no, it becomes a push for power when you apply a lower input voltage. The inductor does all the work managing the difference.
 
Last edited:

stark1

Lonesome Planet
You have to do a complete drain for the first 2-3 times to condition the battery, but after that, that is why it's recommended to just keep topping it off every now and then. If you are always after a complete drain, you're never gonna know for sure when it's gonna die. Even the PSM's indicator really only gave you a ballpark of how much left.

I will say the HS holds a charge for a long time. My Caldron has always been a lifeboat for when the battery died mid-session.

Yoh. BabyFace, how many cycles/clicks in conditioning your battery are you getting, before it is completely drained.

Mine keeps on going, like that rabbit.....


BabyFacedFinster

Anything worth doing, is worth overdoing.
Being delivered today, can't wait! Looking forward to the slower heat up as mentioned.

My HS is the slowest heat up to click of all the other Pipes IH's. However, at first, when the click arrived the load was a bit hotter than what I preferred. I then put one of the included spacers in between the switch and the heatshield/friction pad. That has done the job perfectly and gives me the perfect temp when it clicks. All that varies from unit to unit I assume.

Yoh. BabyFace, how many cycles/clicks in conditioning your battery are you getting, before it is completely drained.

Mine keeps on going, like that rabbit.....


I didn't count, but I have run about 2-3 bowls a day (maybe 4 on Thursday :ko:) through it since it arrived on Tuesday and it just died about an hour ago. :)
The PSM came to the rescue.
 

Jozin88

Well-Known Member
My HS is the slowest heat up to click of all the other Pipes IH's. However, at first, when the click arrived the load was a bit hotter than what I preferred. I then put one of the included spacers in between the switch and the heatshield/friction pad. That has done the job perfectly and gives me the perfect temp when it clicks. All that varies from unit to unit I assume.


I didn't count, but I have run about 2-3 bowls a day (maybe 4 on Thursday :ko:) through it since it arrived on Tuesday and it just died about an hour ago. :)
The PSM came to the rescue.

Wow. It makes heck of a difference, it was a little too hot for my liking, now it's just perfect.
 

BabyFacedFinster

Anything worth doing, is worth overdoing.
Wow. It makes heck of a difference, it was a little too hot for my liking, now it's just perfect.

I like mine where it is also, but for even more fine tuning you could probably swap out the plain wood spacer for the extra heatshield/friction pad which is a mm or two thicker. Having the two combos in there together would be another possible setting.

In either case remember that for the combo, you position the silicone downward facing the switch and the wooden portion facing up towards your vapcap. @Pipes clarified this for me.
 

Pipes

Addicted DIY Enthusiast
Accessory Maker
The rubber one is a friction pad which purpose is to hold the wooden heatshield in place. It goes under the heatshield. The wooden disc is the heatshield but doubles as a spacer. To use as a spacer, it goes under the heatshield and friction pad. The friction pad is stuck to the underside of the heatshield and is stuck on slightly offset so one side providing friction against the glass to keep everything from falling out. :science:
To remove the heatshield, use tweezers and push down on the heatshield closest to the glass on the side that is closest to the glass. The disc will flip enough that you can grab with the tweezers to remove,
 

Jozin88

Well-Known Member
The rubber one is a friction pad which purpose is to hold the wooden heatshield in place. It goes under the heatshield. The wooden disc is the heatshield but doubles as a spacer. To use as a spacer, it goes under the heatshield and friction pad. The friction pad is stuck to the underside of the heatshield and is stuck on slightly offset so one side providing friction against the glass to keep everything from falling out. :science:
To remove the heatshield, use tweezers and push down on the heatshield closest to the glass on the side that is closest to the glass. The disc will flip enough that you can grab with the tweezers to remove,

When I added the extra one as a spacer I put it directly on the switch (without the red friction pad) and the one that was already installed when I got it, on top of that.

Would you recommend removing the extra one to put on the red friction pad on the underside?
 
Top Bottom