darkstar72
Well-Known Member
If interested in the hand railing idea, consider the 1 and 3/4 inch diameter wood dowel from Bell Forest, linked here.

Shouldn't be afraid of a little torch action when solderingAnd please don't ask me, how I managed to solder the connector pole to the nichrome... had s/thing to do with me getting pissed with the soldering iron & taking the jet flame to it
 I use it to get the solder off of the barrel jacks for reuse, or preheat big stuff. All about getting the heat where it needs to be.
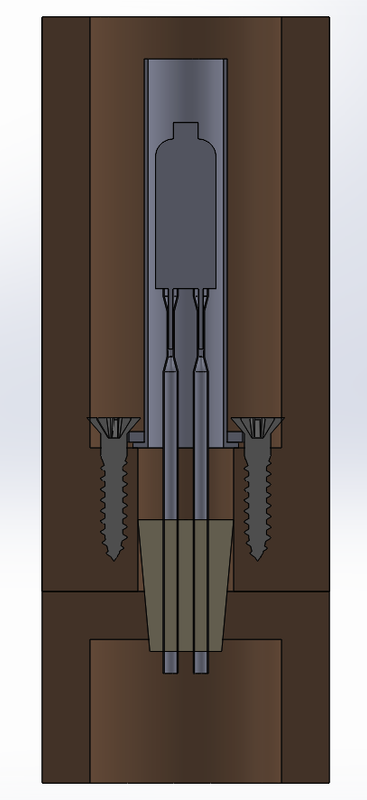
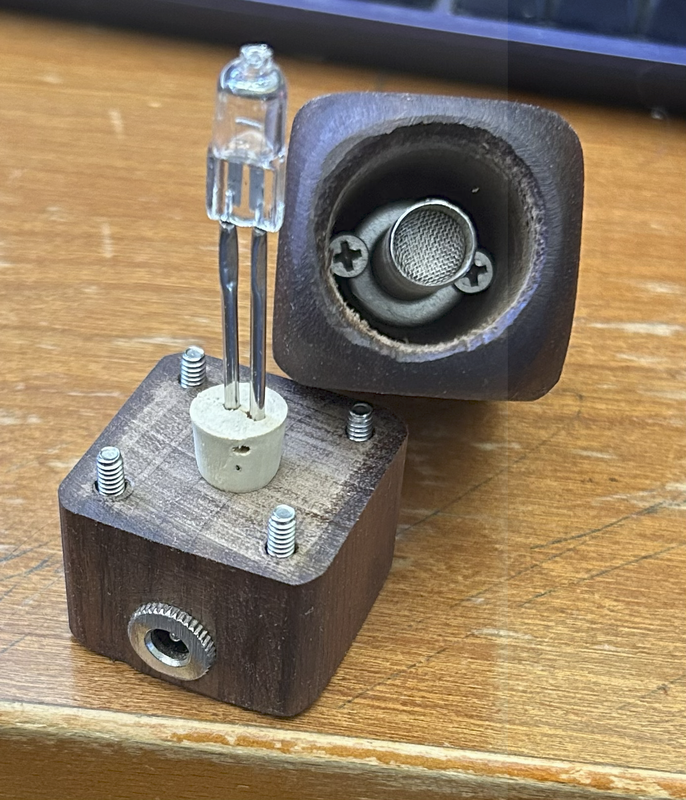

") . These press into the 2mm OD, 1.7mm ID SS tubing nicely. The insertion/removal force on the bulb is light much lighter than the formed contacts, and lighter/smoother than the G4 sockets. The bulb pin goes in a little less than halfway. No scratching of the nickel plating on the bulb pins, or sockets, after 10-20 cycles. I think they will hold up very well, could reccomend them to try out. But I still might prefer a plain SS tube with a formed socket, though, since this fully covers the bulb lead, and feels more secure.
. These press into the 2mm OD, 1.7mm ID SS tubing nicely. The insertion/removal force on the bulb is light much lighter than the formed contacts, and lighter/smoother than the G4 sockets. The bulb pin goes in a little less than halfway. No scratching of the nickel plating on the bulb pins, or sockets, after 10-20 cycles. I think they will hold up very well, could reccomend them to try out. But I still might prefer a plain SS tube with a formed socket, though, since this fully covers the bulb lead, and feels more secure.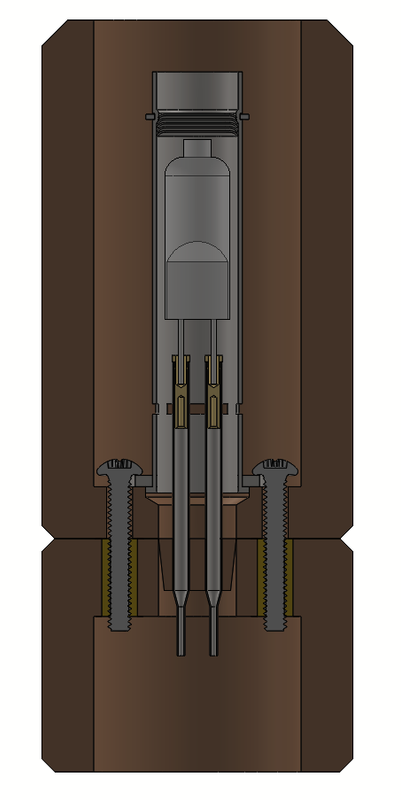
 and stood up to a very hot burn in at around 12.3V overnight. No visible oxide discoloration on the bulb tubes, pins, or contacts. While the heater cover and screens got that slight yellow tint. So it seems that system isn't getting too hot, like the cheap ceramic sockets did.
If you go to @underdog 's vape archive and search for teak you'll find a few examples there. Sadly though, nothing in stock.So I was thinking about woods and in particular which types of wood I like. Iam really font of Scandinavian style and specifically teak. I take note that teak never seems to be used in vaporizer. I am guessing because of all the oils teak wood has?
Those are some really interesting points. All of my halogen projects so far have centered on low DC voltages.Been thinking about logs and halogen bulbs some more, and looking back at my heat transfer textbook, trying to understand what is happening in logs/other vapes. I think I found some interesting ideas/observations.
Anyone try using some high-power (AC) bulbs way below their rated voltage? This should shift a lot of the output to IR by lowering the filament temp. There are also screw-base type bulbs available, at least here in the US, which would be easy to replace. I think someone mentioned this earlier in the thread, for possibly using the 20 or 50 watt bulbs.
For example, something like https://www.amazon.com/dp/B00NLO3TN2 is 250W, 120V. So should run at at least 7W at 20V. It should be more than that, since the bulb is not ohmic, it has higher resistance at higher filament temp. If the filament is 3000K at the rated power, it should be about 1200K at 7W, which is a dim red hot, almost all IR. Glass is more opaque at those temps too, so it may help to keep the heat in. I guess this probably wouldn't be as viable for 220 or 240V bulbs/countries, though. I did a little experiment with my 10W bulb running on my power supply, and resistance increases about 6% per watt between 2-7W (while allowing time for the temp to stabilize). The current decreases during warmup and increases a bit during a hit.
It also seems like halogen/radiant heating gives a unique possibility for closing the loop on temp control. While it is not capable of heating the air significantly, it can apply heat directly to an opaque surface. And the surface is also the only place that heat transfer by convection can take place. I think that taking advantage of this could create a device that can keep up with changing draw rate, and heat up very quickly, while using power efficiently. Effectively, the need for high thermal mass to keep the heater surface temps up during a draw could be eliminated. Could be good for a portable.
Thanks for bringing up brass I have been researching this topic of brass safety for months. I wrote up something regarding this topic months ago for a different thread so i will copy that first:Nice! Sounds like a cool build. What kind of clips for the bulb leads/wires? I looked around for crimp contacts but ended up being satisfied with using tiny SS tubes (2mm OD, 0.15mm wall) to hold the bulb. They support the bulb well and can run without insulation, low thermal conductivity so they stay pretty cool near the bottom of the heater cover.
Some may take issue with brass, and the lead content. I remain skeptical that it would be a major risk at the temperature range we deal with, but everyone has to draw their own line. The thermal conductivity is really good compared to SS. Though not as good as aluminum. Not sure how the machinability of lead-free compares to the leaded version. But I have to wonder if aluminum might be an improvement over brass on thermal conductivity, machinability and safety. Of course, this is moot if you are using the off-the-shelf fitting.
The arizer stems fit over the 11mm OD heater cover pretty well, or 7/16". The capsule and reflector bulb sound interesting. What wattage of bulb? Might need a lot of heat if there's a large surface area.
I have been quite satisfied with the 10w bulb, 11mm OD/0.5mm wall SS heater cover combination, I would suggest trying it out. I run it around 10-11V for 7-8 watts. Takes about 5 minutes to heat up fully. 1.5Ah battery could get you 2 hours or so of use. I've been thinking about a portable running on a 12V battery with a 50W bulb. Testing on my last log, full power can get the heater cover up to temp in only about 45 seconds, which seems better for battery use. I want to see if that can be pushed down further with a thinner heater cover