The Mighty/Mighty+ by Storz & Bickel

simplywonderful

Well-Known Member
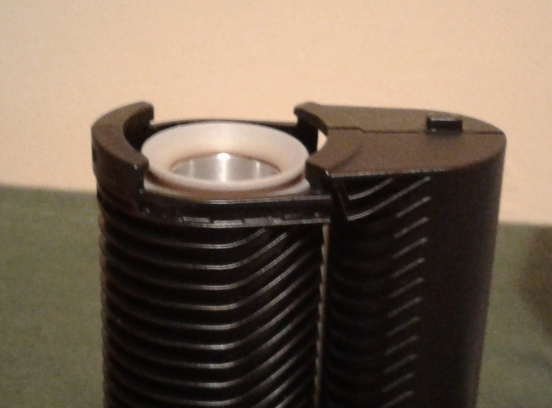
I want to disassemble my mighty, followed this video and Im on this port. I do not understand what the person in that video is implying and why he is showing the top around the CU, the way he pops housing is quite aggressive and I would like to avoid chipping anything around the CU. Im stuck basicly here my mighty halfway opened :
what does the guy in the video push on the top?
Im wondering how should I proceed, I would be very happy if it would be possible to remove the bowl and to get it deeply cleaned in some hot iso. I always heat my iso since the cleaning power seems to be much better and cleaning much quicker. I would be very grateful if you can help me with this , thank you very much
 

vapviking

Old & In the Way
I want to disassemble my mighty, followed this video and Im on this port. I do not understand what the person in that video is implying and why he is showing the top around the CU, the way he pops housing is quite aggressive and I would like to avoid chipping anything around the CU. Im stuck basicly here my mighty halfway opened :
what does the guy in the video push on the top?
Im wondering how should I proceed, I would be very happy if it would be possible to remove the bowl and to get it deeply cleaned in some hot iso. I always heat my iso since the cleaning power seems to be much better and cleaning much quicker. I would be very grateful if you can help me with this , thank you very much
This may be helpful. There are interlocking tabs at the top of Mighty's halves, so the halves must be vertically slid apart, while prying the bottom open just slightly. I did not do that part full photo treatment, but in one pic of case you can see the tabs:
EDIT; Also, see my notes about the internal o-ring around the chamber, and consider trying to have some selection of spares on hand to replace that.
 

simplywonderful

Well-Known Member
This may be helpful. There are interlocking tabs at the top of Mighty's halves, so the halves must be vertically slid apart, while prying the bottom open just slightly. I did not do that part full photo treatment, but in one pic of case you can see the tabs:
EDIT; Also, see my notes about the internal o-ring around the chamber, and consider trying to have some selection of spares on hand to replace that.
so should I just do the thing like the guy on the video, splitting the bottom part more open and creating pressure on the top of the cu? I do not get fully how the interlocking mechanism works and I would like to avoid cracking it. By pushing the lower part it basically unhinge? Thx for the link for the thread really nicely documented, your air intake and airpath is really gunky, have you ever had problems with clogging? I had, it was like sucking throught straw which was clogged but very small hole was still there,draw resistance was very hard. once I cleaned it with a needle it was like a different device :D
 
simplywonderful,
  • Like
Reactions: Vitolo

vapviking

Old & In the Way
so should I just do the thing like the guy on the video, splitting the bottom part more open and creating pressure on the top of the cu? I do not get fully how the interlocking mechanism works and I would like to avoid cracking it. By pushing the lower part it basically unhinge? Thx for the link for the thread really nicely documented, your air intake and airpath is really gunky, have you ever had problems with clogging? I had, it was like sucking throught straw which was clogged but very small hole was still there,draw resistance was very hard. once I cleaned it with a needle it was like a different device :D
In the second photo of my post, at the top of the back cover, are four rectangular "hooks" that engage four rectangular slots in the case front (the video guy clearly points out those slots). In order to slide those tabs (hooks) and the back cover upward, the lower part of the case has to be slightly pried apart so it can clear the bottom of motherboard and plugs that are mounted down there (the cover is also being pried loose from the snug fitting batteries). So, both things happen, gently, incrementally, at the same time. A danger comes if you pry the parts apart too much, the tabs can break the slots off.
Just go slow and deliberate, you'll be okay.
The part where the c/u mounts is not in danger from this procedure; it is those tabs and slots that need to be handled carefully, there is nothing else holding the case together at that end!
 

simplywonderful

Well-Known Member
In the second photo of my post, at the top of the back cover, are four rectangular "hooks" that engage four rectangular slots in the case front (the video guy clearly points out those slots). In order to slide those tabs (hooks) and the back cover upward, the lower part of the case has to be slightly pried apart so it can clear the bottom of motherboard and plugs that are mounted down there (the cover is also being pried loose from the snug fitting batteries). So, both things happen, gently, incrementally, at the same time. A danger comes if you pry the parts apart too much, the tabs can break the slots off.
Just go slow and deliberate, you'll be okay.
The part where the c/u mounts is not in danger from this procedure; it is those tabs and slots that need to be handled carefully, there is nothing else holding the case together at that end!
I remember reading years ago about the danger of damaging those tabs/hinges, that is why Im so hesitant with it. Mine is basically pried apart and almost opened as on the video, but not with the unhinged top
so at this exact moment, does he create pressure on the top of the cu pushing in direction of the ending of mighty where the display is or in direction to the top of the cu? is he pushing it while taking the bottom apart more? I might already getting it a little bit but I just want to avoid any stupid mistakes with this baby :D
 
simplywonderful,
  • Like
Reactions: Vitolo

entirely_foreign

Well-Known Member
Hello, new mighty owner here. I'm sure this is a common question, but search is failing me. In order to minimize damage to the plastic and minimize chance of cracking, is it best to remove CU when the device is hot or cold? Thanks very much
 

darbarikanada

Well-Known Member
Hello, new mighty owner here. I'm sure this is a common question, but search is failing me. In order to minimize damage to the plastic and minimize chance of cracking, is it best to remove CU when the device is hot or cold? Thanks very much
people have posted that to (try to) avoid damage, you should press down on the CU when you put it on and when you remove it. makes sense.
 

ChooChooCharlie

Well-Known Member
Feel like I'm playin a tune and no one is listenin
 

simplywonderful

Well-Known Member
Hello, new mighty owner here. I'm sure this is a common question, but search is failing me. In order to minimize damage to the plastic and minimize chance of cracking, is it best to remove CU when the device is hot or cold? Thanks very much
I had huge problems with cracking of the CU previously, I now always gently push when removing the CU and I always remove it when Im done. It seems to help a lot + a padded case from Ryot brings protection on the go if you take it with you.
Or maybe its just that, that SB cooked some special material for this anniversary edition ? :D :D

So I almost cracked my housing and the tabs which holds the housing together on top, on the video I posted the guy just pry the mighty it cracks and its opened. Maybe that worked for him but not for me, I got to pry it just a little so you can see from the top of the CU that the lifted side of the plastic is bending a little bit there, then push towards the cu and up and it will uhinge, not pushing down towards the display as on the video that does nothing at all.
 

simplywonderful

Well-Known Member
yeez guys why I have this feeling that mighty is a device that was not designed to be disassembled? trying to remove the heating rod cover pulled the tabs on the bottom and now im trying to stick razor blade into that very small gap on the bottom of the heating rod cover, where the tab is also located :D I know my explanation is little crazy, mighty needs a service video similar to thinkpad vids from lenovo service :D
I realized this is the best approach to disassembly :
I was very shocked to find a small black charcoal like piece in the air intake hole, not sure what it is but i cared for the device really well, not letting it get dirty, this seems to like an oil byproduct or something else, really looks like charcoal. The air intake hole should be easily cleanable and the chamber easily removable to clean, then no improvements are needed for the mighty :D
I got the charred out extra gunky chamber into flawless state by soaking it in iso and then scrubbing it with baking soda and toothbrush + liquid detergent for greasy stuff. Im now wondering what works for the plastic grey cover part, mainly around the ring(top of CU mount)
 
Last edited:

Green Kiwi

Well-Known Member
yeah, i know unfortunately what you mean, with destroying those tiny tiny tabs of the heather.
but once you know you know and I have done several cleans on mighty's after that and thank the vapelord ,never broke them again.
And I also have been surprised , and shocked about the dirt and filth amounting around the airinlet.
and after a while(when it's time to put other batteries in)in all my mighty's it was serious grouse.:o
the inlet gets yuck, quickly if you leave the mighty on your bong between hit's, it's in my experience very much worth the effort to take her(I love her so must be a she:D)of the bong/water tool just before ending ending your pull on the bong..(only delta 3 studios adaptors last years..)and with doing that the air inlet stay's way more clean for way longer:2c:.
and as other tip ,and off course that also is for the crafty, never blow in your bowl, all that dust and whatever is now clued (resin is sticky)to your heating element, and will make me bark and cough badly .:2c:

Trough the years S&B made small changes to this powerhouse, and I found that after having opened 3 mighty's(so yes I destroyed the first one..:rolleyes:.)I again destroyed a housing (to swap in new batteries)on the 4 th, mighty in my possession, because they changed how the body opens.first only sliding, now introduced having to wobble it open too(if not you destroy the tiny tiny(0,5 mm)pins they placed.
And then I discover on number 8 in my possession they fucking changed again:mad:.
I havent been able to find what was changed, but it definitely, did come apart in a different way again.
.:(:\.

but sounds with Taffee on the block , there IS finally competition.:love:.............
Sorry by the way of not been able to help you over the last week,i could read but not write, because of being in the middle of shit , so coverage very poor.(besides that I don't post often, besides likes, because I am badly dyslexic, and writing a reply like this cost's me seriously nearly two hours:ninja:...)

one last but totally not relevant thing,: that you tube link, man I doo miss listening in person (and mumbling a few word's I suddenly remembered back😏), to that beautiful French language.
so , how shall I say sophisticated, so nice, etc........

peace and health to all🙏:wave:.
 

blackstone

Well-Known Member
:clap:sounds with Taffee on the block , there IS finally competition.:love:.............

Sorry by the way of not been able to help you over the last week,i could read but not write, because of being in the middle of shit , so coverage very poor.(besides that I don't post often, besides likes, because I am badly dyslexic, and writing a reply like this cost's me seriously nearly two hours:ninja:...)

one last but totally not relevant thing,: that you tube link, man I doo miss listening in person (and mumbling a few word's I suddenly remembered back😏), to that beautiful French language.
so , how shall I say sophisticated, so nice, etc........

peace and health to all🙏:wave:.

Nice to see new vapes but I really dont like an exposed glowing metal coil as a heater, even the GH has a heat exchanger. Also the shape and unnecessary accessories are a turn off, so I'll hold on for the next big thing or a Mighty+:clap: I think.
Maybe it's just me but even heavy hitting convection desktops can't seem to match what a Mighty/Crafty(+)/Hybrid can do for me in efficiency and effects, and taste btw!
I mean why would they make Volcano a hybrid, if convection could be stronger and more efficient!?

Also fair play on the posts! I take a long time writing mine too sometimes, but they can turn out a bit long then!
 

ray_

Well-Known Member
I just joined FC yesterday. I'm a long time vape user and just recently bought a Mighty. I'm loving it so far. Every other vaporizer I've owned has a certain technique that needs to be mastered for best use. The Mighty is dead simple. Turn it on. When it buzzes breathe in. Fast or slow works just fine.

The only downside for me is the time and effort needed to keep it clean. I don't see any way around that. It's just not a Solo 2 (the easiest I have to keep clean). The day to day is easy; just brush it out. I will be taking apart the cooling unit and soaking it in ISO once a week. Anything easier?
 

Moses Baca

Colorado State Reformatory #8755
Troy @ 420vapezone suggests using a Q-tip while it's warm
This works great, I do it every few days or so.
Vape a bowl or two to warm it up, pull it apart and wipe it down with a couple clean dry q-tips. It's not perfectly clean but it gets most of the gunk out. I only iso clean it every couple weeks when I'm doing all my vapcaps.
I've only used caps in mine, too.
 

ray_

Well-Known Member
I've seen Troy's advice on wiping a warm cooling unit with dry q-tips at the end of a session. I think I've seen every mighty video he has done. But if I'm going to soak it in ISO once a week it just seems like more work to me. I also wonder about wear and tear on the Mighty, taking the cooling unit apart every day.

The dosing capsules make some sense. I guess I've not been thinking of using those just becase I never have before. I may need to rethink that.

Does anyone use their Mighty for concentrates? I want to at least try it to see how it is. I have other methods for concentrates that I'm happy with. And it seems like that may be a good way to get the bowl really dirty.
 

blackstone

Well-Known Member
The dosing capsules make some sense. I guess I've not been thinking of using those just becase I never have before. I may need to rethink that.

I like them, have no issue with taste from them or anything. And they really do work for that reason.
Shitty picture here but this is the bowl of my first Crafty+ (same bowl type) after over 100 hours or 6 months use.
Capsules only, and just wipe the odd time with dry cotton, I never really use Iso there in case it thins or spreads any oil around.
20201106-033932-crop.jpg

Another great tip is to permanently remove the CU screen and mop the port with dry cotton periodically, paying attention to mopping the screen groove with cotton and a sharp implement too.
As I'm sure some staining was from oil dripping from the CU rim above.
I throw away and replace 4 capsules every month or two and the insides can be very grimy.
 
I just joined FC yesterday. I'm a long time vape user and just recently bought a Mighty. I'm loving it so far. Every other vaporizer I've owned has a certain technique that needs to be mastered for best use. The Mighty is dead simple. Turn it on. When it buzzes breathe in. Fast or slow works just fine.

The only downside for me is the time and effort needed to keep it clean. I don't see any way around that. It's just not a Solo 2 (the easiest I have to keep clean). The day to day is easy; just brush it out. I will be taking apart the cooling unit and soaking it in ISO once a week. Anything easier?

Separate all the components in the cooling unit, put everything except the blue rings in a glass jar with lid. Poor over enough IOS to cover, top up with hot water and soap. Finally add a big table spoon of dried rice in there. Put the lid on and shake repeatedly, leave to soak for 30/60 mins. Put the blue rings in for a rinse at the end. This method removes 95% of the gunk inside the cooling unit. Also buy a few spare cooling units there are cheap. ✌️👁✌️
 

vapviking

Old & In the Way
I've seen Troy's advice on wiping a warm cooling unit with dry q-tips at the end of a session. I think I've seen every mighty video he has done. But if I'm going to soak it in ISO once a week it just seems like more work to me. I also wonder about wear and tear on the Mighty, taking the cooling unit apart every day.

The dosing capsules make some sense. I guess I've not been thinking of using those just becase I never have before. I may need to rethink that.

Does anyone use their Mighty for concentrates? I want to at least try it to see how it is. I have other methods for concentrates that I'm happy with. And it seems like that may be a good way to get the bowl really dirty.

Separate all the components in the cooling unit, put everything except the blue rings in a glass jar with lid. Poor over enough IOS to cover, top up with hot water and soap. Finally add a big table spoon of dried rice in there. Put the lid on and shake repeatedly, leave to soak for 30/60 mins. Put the blue rings in for a rinse at the end. This method removes 95% of the gunk inside the cooling unit. Also buy a few spare cooling units there are cheap. ✌️👁✌️
Hi, guys, welcome to the forum.
Capsules are the way to go for long-term cleanliness, but a personal preference in terms of ease/time etc. They are great for out and about or travel, road trips etc. Hot swapping for reload is simple.

****Important is to keep scratches from happening in the chamber, it is aluminum and can develop scratches, which over time are collection spots for resin buildup, and make it much harder to keep it super clean in there.

Concentrates can be done and if you really want to try, you can, but you are correct about cleanliness being a bigger issue. Other, dedicated devices can work better, imo.

@SailingShoes cleaning method sounds effective, but a little more work than necessary. I think the soap and water may just weaken/dilute the effect of the alcohol so, if at all, I'd use those after the iso (I rinse with cold water only).
I do iso (the 91% or 99%) soak in baggie, put that into hot water about 20 minute soak with one or two interim shakes. The only disassembly is split two halves apart and remove mouthpiece. I leave screen and o-rings in place. Once in a while I'll put a new screen in and maybe once a year some new o-rings all around.

But lately, I don't use c/u at all if I can avoid it. I'm using a wpa and in-line hyrdatube, dry. Nice, open draw, tasty, and I think more of the goods are delivered to me rather than condensing in the c/u.
 

Moses Baca

Colorado State Reformatory #8755
I've seen Troy's advice on wiping a warm cooling unit with dry q-tips at the end of a session. I think I've seen every mighty video he has done. But if I'm going to soak it in ISO once a week it just seems like more work to me. I also wonder about wear and tear on the Mighty, taking the cooling unit apart every day.

The dosing capsules make some sense. I guess I've not been thinking of using those just becase I never have before. I may need to rethink that.

Does anyone use their Mighty for concentrates? I want to at least try it to see how it is. I have other methods for concentrates that I'm happy with. And it seems like that may be a good way to get the bowl really dirty.
Wipe it down regularly and you don't need to iso so often. I only iso soak when I'm cleaning all my vape gear. My wife and I have 6 vapcaps in rotation. I only clean when they're all dirty so maybe once a month.

I suppose the o-rings could possibly be damaged somehow during reassembly. I've never had it happen to me but I guess it could. I always keep extra o-rings on hand anyway. Stuff like that doesn't last forever.
 
Top Bottom