The HI

HoneyAir

Well-Known Member
I was on the list a year and 2 months before I got mine... that of course includes a long downtime in which Alan moved and setup a better workshop that moves along at a much better pace. So it won't be that long for you.

It costs nothing to get on the list, so send Alan an email to get yourself on the list. You can always turn it down when your number comes up if the timing is bad, but I don't think anyone has done that yet. ;)
 

Papa Woody

"The vapor is strong with this one"-Obi Onda Woody
Time flys when you're having fun and watched pot never boils so stop watching it and have fun with it so time flys! Just get in line and soon you will have your Hi saber in hand. I've got about 2 months or so to go!
In the meantime...


Jeppy

Pure Vaporist
I once worked with a guy who had a stalker named Sherri. :lol: At times I could see the stress in his eyes from this situation, and it was at this precise time that I would lead in with my best 'Steve Perry' voice, "Well you shoulda been gone"!! :lmao:He would usually reply with, Fu@k You!!


And of course a little humor as weed head into the weekend.


Alan

Master JedHI
Manufacturer
Thanks Ace, Jam, and Vapinghole. This new design opens up a lot more possibilities. Keep watching for some more interesting units.

Glad to have you on the list chib. Sorry to hear you are having to combust. Hope I can fix that.

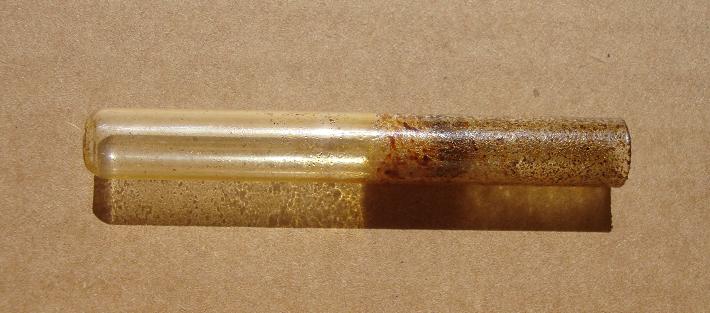
Here is a photo of the cotton filter in my Turbo Tube since it is easier to explain this way. I positioned it a little ways away from the screen so that the hot air wouldn't cause the oil in the cotton to vaporize. I tried it closer to the screen, but then could never tell when the load was finished because I was still getting vapor from the cotton. The open end (right side) of the glass tube acts as the stop for the screen (silicone bowl not shown).
This cotton filter is about ready to be placed into the roasting tube to fully extract all the oil. How is that for efficiency? So nice not to breath those particles or admit them into the water.

ttcottonfilter.jpg
 

jambandphan03

in flavor country
Thanks for posting that Alan. I stuck some cotton in to the lower portion of my glass stem last night, was also thinking about how the Sublimator uses some kind of atomizer to diffuse the vapor as it passes through and I started to wonder if the cotton would act as a sort of atomizer... it definitely collects oils/particles. I have found the hits to be thicker and smoother since adding it. I think it adds just a bit of resistance to the air flow which allows the vapor to cloud up a bit more maybe?
:tup:
 

Alan

Master JedHI
Manufacturer
Thanks for posting that Alan. I stuck some cotton in to the lower portion of my glass stem last night, was also thinking about how the Sublimator uses some kind of atomizer to diffuse the vapor as it passes through and I started to wonder if the cotton would act as a sort of atomizer... it definitely collects oils/particles. I have found the hits to be thicker and smoother since adding it. I think it adds just a bit of resistance to the air flow which allows the vapor to cloud up a bit more maybe?
:tup:
You are welcome. Glad to hear you are having luck with a cotton filter. I think it is the added air flow resistance that is causing more clouds rather than any atomization. Energy must be added to the process to get atomization. The temperature is hottest at the heating element and gets cooler the farther away you get. The oil will only condense after vaporization. It cannot re-vaporize. That would violate the laws of thermodynamics.
 

HoneyAir

Well-Known Member
I planned to make a post about my HI, but have been putting it off while I struggle to master my battles with Darth Combustion.

I've been using the LED dimmer to bring the voltage to 11.8v under load and have had wonderful non-combustive sessions... but then just combusted out of the blue.

They all have a pattern-- it happens at the start. It builds up heat when it has been sitting for a while, so I have to bleed it off carefully before daring to push further.

Alan, a difference I have noticed between the PD and your HI is that the resistor sits higher, so it is closer to the tip. When the charring in my PD made my metal unit sink lower, that meant the resistor was now closer to the tip, so I no longer could rest it on the crossbar but had to keep it higher to avoid combustion. What I am wondering here is whether you have already experimented with the resistor being placed lower in the tube?

I didn't struggle as much with excess heat causing combustion at the start of the draw with the PD, so I was wondering whether it was due to its heavy heatsink design as opposed to the HI or whether it really was about keeping the resistor far down enough so that no matter how much heat built up, it would cool down enough by the time it reached the tip-- avoiding excessive scorch?
 
HoneyAir,

toros23

Well-Known Member
I planned to make a post about my HI, but have been putting it off while I struggle to master my battles with Darth Combustion.

I've been using the LED dimmer to bring the voltage to 11.8v under load and have had wonderful non-combustive sessions... but then just combusted out of the blue.

They all have a pattern-- it happens at the start. It builds up heat when it has been sitting for a while, so I have to bleed off that excess heat carefully before daring to push further.

Alan, a difference I have noticed between the PD and your HI is that the resistor sits higher, so it is closer to the tip. When the charring in my PD made my metal unit sink lower, that meant the resistor was now closer to the tip, so I no longer could rest it on the crossbar but had to keep it higher to avoid combustion. What I am wondering here is whether you have already experimented with the resistor being placed lower in the tube?

I didn't struggle as much with excess heat causing combustion at the start of the draw with the PD, so I was wondering whether it was due to its heavy heatsink design as opposed to the HI or whether it really was about keeping the resistor far down enough so that no matter how much heat built up, it would cool down enough by the time it reached the tip-- avoiding excessive scorch?


Have you experimented with smaller loads and a less-fine grind? I believe that is all that is needed to get to where you want to be. Would you mind sharing how much you are loading and remind us which roasting tube you are using?
 
toros23,

HoneyAir

Well-Known Member
Stainless steel roasting tube tip with poly, just like the PD [old habits die hard with me]. It is loaded to the tip then I use my finger to remove the excess and push in/roll a bit to reduce any stray bits seeking combustion.

I have combusted unexpectedly with the PD from switching to a different herb, so that does seem to have an impact. I presume my coffee grinder is too fine a grind.... I just love the ease of grinding that way especially after dealing with a poorly made [cheap] hand grinder for too long.
 
HoneyAir,

toros23

Well-Known Member
I think you just figured it out yourself.. With such a fine grind you are going to be working hard not to combust if you are cramming it in tight. I know we all have different techniques and they all seem to work, but I would try a less fine grind and make sure you get decent airflow before putting it to the heat. Once it breaks down, airflow is only going to get more restricted.

There is also Alan's full-bud technique (no grind) but I never had the patience to master that one since I love my 14mm roasting tubes so much.

You are definitely onto something with the heat being higher when the HI has been sitting idle, but I don't think that is as much of an issue as your grind and lack of airflow. Different strains also perform differently but if you grind less fine and pack looser to allow for plenty of airflow, you can learn to control the heat very nicely.
 
Easy solution for preventing combustion:

As has been mentioned, you're most likely to get combustion when your HI has been sitting idle for a while, building up heat.

Blow into the center tube for a second or two before you take your hit. This dissipates a lot of that heat and allows you to start your session combustion-free, without having to crank down to a temp that you know will be too low to fully extract the bowl on your last hits.
 

Alan

Master JedHI
Manufacturer
The air flow will generally be the best on the first draw and degrades after that. I almost always stir (unless I pinch and roll the silicone) so it is constantly being broken down to smaller pieces. I have been loading my stainless steel tubes about half full so there is just enough for two draws. I have to reload more often, but then I also get that first hit taste more often. There are so many different roasting techniques. Better to start small and work your way up to just the right size.
 

u bwade wunner

Well-Known Member
How is that for efficiency? So nice not to breath those particles or admit them into the water.
I agree Alan.Maybe it will get rid of a wheeze ive had in my throat lately & allow me to continue enjoying that sweet flavour you only get with direct draw.

glass roasting tube. I hope everyone who purchases a HI, gets one

second that,also if you can,dont forget a wong, unbreakable, doubles as a stem and would be my choice with the Hi, when the zombies hit:rockon: :ninja:

last night, was also thinking about how the Sublimator

Me too.I would love to see if this tech would work in a log effectively.


Damn what a fine Sunday this is turning into:D Have fun everyone:wave:
 

HoneyAir

Well-Known Member
Easy solution for preventing combustion:

As has been mentioned, you're most likely to get combustion when your HI has been sitting idle for a while, building up heat.

Blow into the center tube for a second or two before you take your hit. This dissipates a lot of that heat and allows you to start your session combustion-free, without having to crank down to a temp that you know will be too low to fully extract the bowl on your last hits.

I was having a lot of frustration as I did not want to have to be tentatively and slowly bleeding off heat with the start of the inhale, hoping I don't run into Darth Combust! I want to jump right into it, inhale as fully and freely as I want with zero worries.

I'm happy to report that this method works perfectly! I've bumped myself up to 12v, I push it as far as I can go daring it to occur and still no Darth Combust! [Will keep trying higher voltages until I find the ceiling].

I tried this method on the PD when my metal unit sank lower into the PD but that didn't work out so well. With the HI, its open top design plus the resistor sitting up higher [that I was worrying about before] makes it a plus being able to blow off that heat!

:tup:
 

Alan

Master JedHI
Manufacturer
Jam - Thanks for posting the great video.

slowandsteady - Thanks for the suggestion. I also fixed the index file on the website so the home page now shows both the Toasty Top and the Heat Island.

ubw - Having a tough time turning the wood you sent me. The red gum wood smells just like a hotdog with mustard when I turn it so I get hungry and have to stop and go eat. It has some very interesting grain patterns. The cotton filter has been working very well. I recently replaced it and roasted the plugged / oily one. I got the darkest vapor I have ever seen from it. I thought there must have been combustion it was so dark white, but it was all vapor and so potent. Looking forward to getting the cotton filter all dirty again.

HoneyAir - The heating element does sit higher in the HI / TT which does contribute to its higher temps. I'm glad to hear you are able to push the voltage a little higher without combustion. The lower temp hits are tasty, but the higher temp ones are more satisfying to me.
 

Alan

Master JedHI
Manufacturer
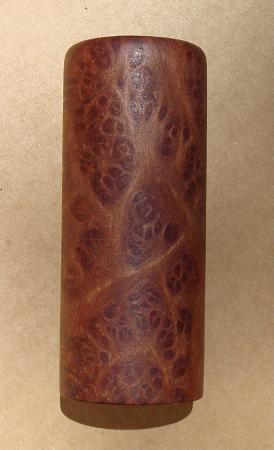
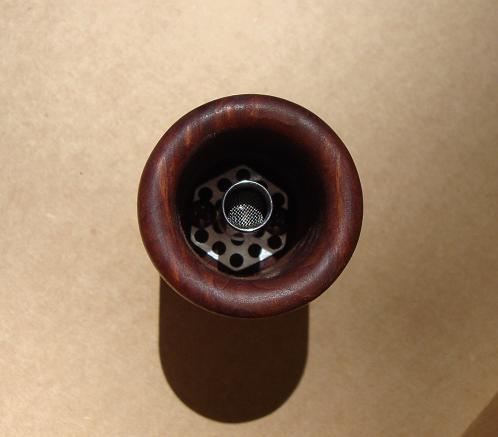
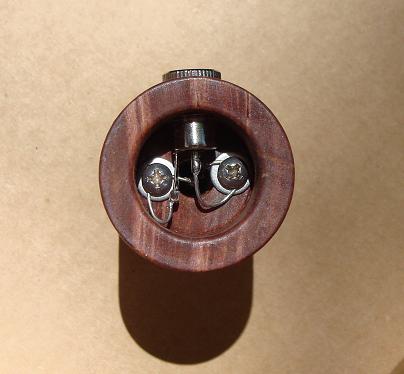
Here is a new design Redwood Burl HI I just made that will not be getting a bottom cap. Thought I would show everyone how it looks from the top and bottom. Not much to it. Works just as well without the bottom cap. The heating element is still replaceable, although not quite as easy as before.

rwbside.jpg
rwbtop.jpg
rwbbottom.jpg
 
Top Bottom