DIY Induction Heater Builds and References

AWistfulNihilist

Well-Known Member
You could make the head quite a bit smaller if you wanted.

I love the concepts but the size is problematic. There is an opportunity to put only the coil and the black capacitor near the bowl. The connecting leads need to be sizable, and they need to run nearly parallel and close together, but they can be be conventional 12 gauge wire pair. The circuit board and inductors can remain remote. Limit the lead-length, of course. The lead-wires are still part of the active inductive circuit. That is why the lead-wire pair needs to run close together. Look at silicone hobby wire for flexibility.

Theory behind this - the work of the IH is done with a signal bouncing back and forth between the capacitor and the work coil. That is where all the high current happens. The feed-circuit, the energy stored in the inductors, is buffered by the inductors themselves stretching out the time domain. The capacitor's discharge is nearly instantaneous and is the reason for the high current pulse directly into a 1uh inductor, a virtual short circuit. Pay attention and you can fashion a nice little heater-head with a remote circuit box.
This is my current path of research, I want to move the coils away from the inductor. I have several units I'm testing with, I'll take a unit and remove the capacitors from the bottom of the unit, solder them to the work coil and wire then to the inductors as you suggested (I think I have that right). I only have 16g at largest, I'll give it a shot with those while I get some 12.

I think to make it really versatile I need 1' of cable between the heater and base (lift onto high bowls). I'll test with a couple lead lengths. 3"-12" and see when I start heating the coils more than the work.

You are appreciated as always Tommy!
 

Marlox

Well-Known Member
Marlox,

TommyDee

Vaporitor
Exactly. I run an 18.5V supply that does 72 watts and I can power an IH effectively anywhere from 8 volts to going up to 13.8V (car battery charging) as long as the cap doesn't demand more than 72 watts. If you watch the power meter, you have a simple constant that you can rely on. A watts reading on a meter for IHs is very useful.

This is my current path of research, I want to move the coils away from the inductor. I have several units I'm testing with, I'll take a unit and remove the capacitors from the bottom of the unit, solder them to the work coil and wire then to the inductors as you suggested (I think I have that right). I only have 16g at largest, I'll give it a shot with those while I get some 12.

I think to make it really versatile I need 1' of cable between the heater and base (lift onto high bowls). I'll test with a couple lead lengths. 3"-12" and see when I start heating the coils more than the work.

You are appreciated as always Tommy!
Thank you. I like the project you are slating this for. Start monitoring your gain ratio on your coil development. A very useful piece of data to know how much energy you are passing to the load. Gain ratio is the measurement of current being drawn with a load over power being drawn without a load. A gain ratio of 3:1 or 4:1 is a good target for your project. Simple reduce the voltage to the IH until it reads 1 amp. Then add the load. The current with the load is the gain ratio "LOAD CURRENT:1[amp]". As the lead-wires get longer, you will loose out on gain ratio.

I might suggest a trip to the hardware store and pick up 12 gauge stranded wire for you 2x1' lead-wires. Attach the 16 gauge coil and one capacitor to the end of the ends of the 2 lead-wires. Does this extra copper in the lead-wires help maintain a decent gain ratio?

Gain ratio is one constant I found that follows a linear trajectory as power levels increase. Another constant that is pretty darn consistent is 'imparted energy' to get some semblance of efficiency from the readings. I am finding that a reasonably efficient IH for a DV VC draws about 150mwh of energy from an IH to the click. It is completely independent on tip or cap! And that is key information that is easy to track. For reference, a full cap of flower in a VC should be under 1WH of total energy consumed. This is not about being green, obviously, but rather it is about knowing your circuit is happy or not. These things have all kinds of reasons to be angry when things are not 'tuned'. They express that anger in heat from various components. And since you only have 3 basic components, they all have to share heat nicely.

I'm really curious as to where you end up with managing the remote coil. Should the driver also end up at the head? Maybe. That will be the result of the experiment.

BTW - would something like this be useful?
IH_DRIVER.PNG
I think that's about 1:1 :cheers:
 
Last edited:

AWistfulNihilist

Well-Known Member
I might suggest a trip to the hardware store and pick up 12 gauge stranded wire for you 2x1' lead-wires. Attach the 16 gauge coil and one capacitor to the end of the ends of the 2 lead-wires. Does this extra copper in the lead-wires help maintain a decent gain ratio?

Got 12awg in the mail today, experimentation continues. I was driving myself crazy the other day trying to figure out what I wired wrong because I was only getting heat on the work coil. I had a couple piece of uncoated touching and they were causing a short. In hindsight the weird whining noise should have clued me!
 

TommyDee

Vaporitor
LOL yea. Fortunately the design is based on high current. High voltage is what kills them. ..until they hit their limit of course.
 
TommyDee,

maremaresing

Well-Known Member
Accessory Maker
I come to you hat in hand, and hope this is the right place.

My IH isn't working. I got this one:

Even when I wire it up straight to the power supply and plug in manually, it doesn't do anything. If I use the 12v5a supply, the light on the brick dims and there is a dim purple light on the board. If use a 12v6a supply the same way, i get a brief flick of purple led on the board then nothing, and the power supply shuts off. I get the same results with the coil removed, too.

I've wired it + to +IN, and - to -JP1.

Did I just get a bad board?

edit: So maybe the board is asking for more amps than my power supply can provide? I thought all of these were "pretty much the same" spec, and 4-6A was fine? I intentionally reduced the coils to 6 from 11, and haven't put anything in it yet.
 
Last edited:

TommyDee

Vaporitor
Without a VC inserted, the blue light should glow bright when activated @maremaresing - if all was good, it draws less than 2 amps without the cap inserted. I suspect your module is blown. This normally happens when you try powering the module without a coil or the coil glitches during a firing. I recommend -always- soldering the coil to the board 1st thing! After that, these are very robust. Good luck.
 

maremaresing

Well-Known Member
Accessory Maker
Thanks for the fast knowledgeable reply! I feel like it was always screwed in first thing, but just ordered another one from a different supplier. This time I'll DEFINITELY solder it first thing.
 
Last edited:
maremaresing,
  • Like
Reactions: TommyDee

badbee

Well-Known Member
Here's my random thought for the day: why not build an IH with the coil suspended in the air about 8 inches off the table so you can leave a small water piece under it permanently, you fill the tip, slide it up into the coil then down into the piece and not touch it again until it's time for a refill. In fact I'm surprised it hasn't been done yet. Any reason why that wouldn't work fine?

Make things adjustable for height, cut the coil down to say 6 wraps and then add 12 or 14 gauge extensions to reach down to the board (shouldn't be too much extra resistance).

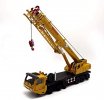
I'm thinking of mounting the board on the deck of this 8 inch long bad boy and hanging the coil from the crane arm. It's so ridiculous that it really needs to be done by somebody.

DieCastCrane.jpg
 

tokenknifeguy

Well-Known Member
Don't want to shift through 15 pages, but is there an updated parts list to make a induction heater on a certain page? Or is the parts in the OP still the best? Thanks yall
 
tokenknifeguy,

TommyDee

Vaporitor
I do not know of a specific parts list other than the BeastHoss circuit available all over Reddit. Everything here is based on the various releases of the standard Mini ZVS module. Even BeastHoss has some under-specified components.

@tokenknifeguy - if you want to consider a build, it would be good to know what your aim is first to give you best advice to current knowledge. There are many options many of which are budget or capabilities oriented. Please post here and lets see what we can create together.
 

tokenknifeguy

Well-Known Member
Just a basic induction heater I guess? Got a 2020 and 2018 M if that matters but yeah just something to heat it up in 5 or so seconds. Just looking for parts but I don't mind spending money on higher grade parts if I can make the overall unit smaller.
 
tokenknifeguy,
  • Like
Reactions: TommyDee

TommyDee

Vaporitor
I have some questions - what is your DIY skill level? Can you tell a soldering iron who's master and are you prepared to do so?

The basic induction heater and a switch capable of 10 amps - momentary would get you inducting! These get hot fast if left on so for safety 10A momentary switch to fire with.

After that, the world is your oyster limited only by skill or dollars. The switch can be replaced with a MosFET switch or the circuit could be hacked to use a very small switch. You can have multiple fire switches wired in parallel [other question - how up are you one wiring stuff?]. The coil should have an insulator and a stop. The 18M/14F adapter glass is common. The required the coil remains 3/4" ID for this common adapter. Smaller coils would need a resources or skills.

Lights? Wire them in. Mains switch? Again, I say go 10 amp capable and you are covered. Google image searches are your friend for commonly used solutions. There are so many small variants available at wild price swings that learning what to search for pays off. I hound eBay.

Power source - 12V 8A min is not crazy. 12V 6V minimum for the 3/4" coils.

Don't trim the length of the coil wire. You can rewrap it once or twice. Copper work-hardens meaning it gets harder to bend the more you bend it.

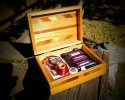
Cases - man, I am for stealth and I went to town on eBay for a box to make my Box Troll. Love this heater!

20201005_144226.jpg
I aim for a 6-8 second bake.
 

badbee

Well-Known Member
Don't want to shift through 15 pages, but is there an updated parts list to make a induction heater on a certain page? Or is the parts in the OP still the best? Thanks yall

Here is a list of parts from an Amazon order, you'll find many variations similar to this. This doesn't include a momentary switch (if desired) or a glass tube.


Items Ordered
Price
1 of: Treedix 5-12V ZVS Low Voltage Induction Heating Power Supply Module with Coil Power Supply Heating Power Supply Module
Sold by: Treedix (seller profile)

Condition: New
$10.99​
1 of: ALITOVE 12V 8A 96W Power Supply Adapter AC to DC Converter AC 100V ~ 240V to DC 12V 8amp Transformer LED Driver with 5.5x2.1mm DC Jack for 5050 3528 LED Strip Module Light, CCTV
Sold by: ALITOVE (seller profile) | Product question? Ask Seller

Condition: New
$17.29​
1 of: XLX 10PCS High Power 5-36V 400W MOS Field Effect Transistor Trigger Switch Driver Module PWM Regulator Electronic Switch Control Board DC Motor Speed Controller
Sold by: XLX (seller profile) | Product question? Ask Seller

Condition: New
$14.99​
1 of: APIELE [3 Year Warranty] All New Design 10 Amp 22mm Latching Push Button Switch 12V Angel Eye LED Waterproof Stainless Steel Round Self-Locking 7/8'' 1NO 1NC (10 Amp/Red Led)
Sold by: API Electric (seller profile)

Condition: New
$15.59​
 
It is definitely worth learning how to solder correctly. A colleague used to say that in soldering there are 3 most important things: flux, flux and flux :myday:

I see that the topic about IH has over 150 pages, probably the biggest one on the DIY forum. Created in 2016, I only own a VC since about 09.2019 and started experimenting with the standard IH module from the beginning of the year. I noticed the potential in IH, and at the end of March I created the first prototype:


If I had known about you before, I would have been reading furiously! Better late than never. Hello DIY enthusiasts :)
 

Rei_Gado

Here to plan my next project: Tiamat
Hi, Reddit transplant here via TDTG posts on r/inductionheaters. Really want to build my second IH to replace my Orion & really loved the look of the Half Pint module but wasn't aware what actually has to be done & might be too much too soon for me. Is the initial part required for the HP or are those steps needed to be able to make the MOSFET redundant? Have built a battery VapOven kit using their instructions last year but she's far too bulky for my jollies & I can only dream of getting a Fluxer Flite right now.
 
Rei_Gado,
  • Like
Reactions: TommyDee

TommyDee

Vaporitor
Hey there @Rei_Gado and welcome to FC. HalfPint requires a higher level soldering skills in order to effectively splice a high draw conductor to the very center of the inductor winding [choke in days gone by]. It is both craftmanship and experience that lets you make that connection reliably. Part of the trick which may become apparent, when you read the text, is having a solution on the other end. Tapping a lead-wire to the inside of the coil also coincided with the convenient hulky pad that makes the inductor rigid as well. It is a 5-handed operation at times. I've tried my best to explain. You could unwrap 1-turn and the tap would be to the outside. The circuit would tolerate that. There is a convenient pad on the outside as well.

You can still use a MOSFET switch or a momentary high current mains switch. The gate circuit mod is quite optional. I find it convenient as everything downstream becomes simpler.

Shows us what you got in soldering skills. Big Clive will help you if you have doubts. Flux - Flux - Flux is more than a statement. I use a RadShack 20/40W iron and it cooks the coil in place in seconds.
 
Top Bottom