
-
SCAM WARNING! See how this scam works in Classifieds.
-
The Frolic by Limelight Giveaway is over. Winner to be announced shortly.
You are using an out of date browser. It may not display this or other websites correctly.
You should upgrade or use an alternative browser.
You should upgrade or use an alternative browser.
DIY Induction Heater Builds and References
- Thread starter TommyDee
- Start date

so sweetIt is definitely worth learning how to solder correctly. A colleague used to say that in soldering there are 3 most important things: flux, flux and flux
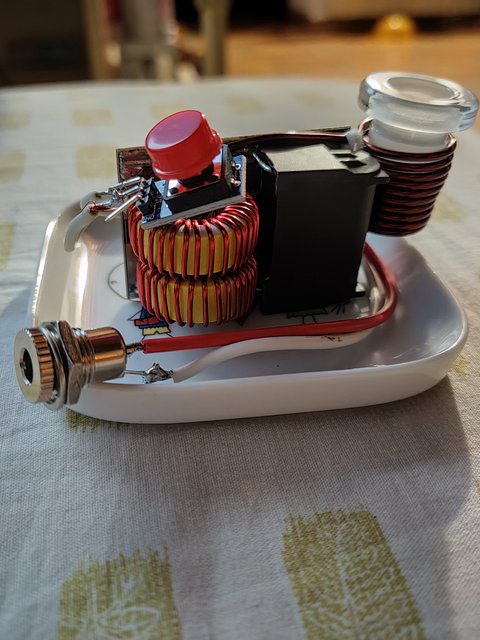
I see that the topic about IH has over 150 pages, probably the biggest one on the DIY forum. Created in 2016, I only own a VC since about 09.2019 and started experimenting with the standard IH module from the beginning of the year. I noticed the potential in IH, and at the end of March I created the first prototype:

If I had known about you before, I would have been reading furiously! Better late than never. Hello DIY enthusiasts")

Rei_Gado
Here to plan my next project: Tiamat
Still not able to finish my first attempt at a HalfPint build, I've been extremely fussy & wanted a particular case in green. Living in the UK & the only place who sold my case is a place in Scotland which is closed due to covid restrictions. So having to wait for one to arrive from Germany. In the meantime I'd thought it would be rude to not use the backup ZVS I didn't need. So started my third 
On the third build then.
On the third build then.
Last edited:
Rei_Gado
Here to plan my next project: Tiamat
Decided to call this build Artemis, she did kill Orion after all 
https://www.reddit.com/r/Dynavap/comments/lwto8a
Probably will have this one done before my 2nd build as I am only waiting on a 15mm dowel to arrive to wrap the coil.
https://www.reddit.com/r/Dynavap/comments/lwto8a
Probably will have this one done before my 2nd build as I am only waiting on a 15mm dowel to arrive to wrap the coil.
Fosterqc
Member
Read pretty much every post on the threads here and searched on the inductionheaters subreddit, did not find any discussion of the true voltage limit of the ZVS module. I have not seen anyone use 4S li-ion so I assume it has issues at that point? I know as voltage rises it draws ever more power so I also don't know if there is too quick of heating at some point.
I will get myself a FPF shortly, thanks for being here everyone.
I will get myself a FPF shortly, thanks for being here everyone.
TommyDee
Vaporitor
Love the name @Rei_Gado - That is a tight fit!
@Fosterqc - The Mini ZVS circuit could tolerate 13.6V, automotive charge voltage [max], without too much issue with the OG coil. You would add turns to the coil to offset the voltage at a rate of one turn per volt. Technically, there are voltage limits that the FET can tolerate.
@Fosterqc - The Mini ZVS circuit could tolerate 13.6V, automotive charge voltage [max], without too much issue with the OG coil. You would add turns to the coil to offset the voltage at a rate of one turn per volt. Technically, there are voltage limits that the FET can tolerate.
Fosterqc
Member
here is the crude model of the Altoids tin based build I have been working on.
the battery is this one sold in 20, 30 and 40C
the base is 80x64 and I am aiming for only 42mm high with a printed lid.
here you can view the model online or download it to modify

Fosterqc
Member
Thanks for the appreciation! It really seemed to just work itself out.
After I removed the useless input screw terminals but left the 3 pin one as it seems perfect to reinforce the induction coils, it left a perfect space to put the induction coil. I was aware that you could mess with the windings but I want the most simple to assemble design as possible for newbs. I spooged on some high temp neutral cure silicone and it seems really solid, already dropped the thing.
Once that cured I had it next to the empty Altoids tin on my desk and from there it just clicked
Batteries I am somewhat of a expert on and figured a lipo would fill the rest of the space well. It turned out to be the perfect size actually.
Last edited:
TommyDee
Vaporitor
I love Shoe Goo for fixing parts. It comes off much easier than silicone. Turns out Shoe Goo is a super-super-super-slow curing epoxy of sorts. I used some for fixing parts on my old RC race cars and the Shoe Goo shrank and crystalized. Held like the dickens anyway and did not damage. I was still able to clean it off by chipping at it. I've removed a lot from older modules that needed repurpose. Get's a little dicey when it gets on wires or mixes into the choke wires. But for the most part, Shoe Goo is my go to fixing paste.
Removing the 3P blue connector will let you push the two chokes back a little from the coil. Easy way to remove these is to drill the hole where the screw is so you can pull the screw out. Best done with the chokes removed. Once the screws are out, the plastic cage slides off and you can pull each pin individually.
Remember that the Altos can is tin. It will inductively couple to the coil and heating the tin. 3D print and aluminum, no problem.
Fosterqc
Member
I think you all might like this other part I got made.
It simply threads into place on the coil, the coned top centers it and it is held tight by the coil that is kept held extra tight by the silicone. This is gen 1, made from only conversation and designs sent over a day on FB. Revision two will be slightly longer and have better features for interfacing with the lid.
It simply threads into place on the coil, the coned top centers it and it is held tight by the coil that is kept held extra tight by the silicone. This is gen 1, made from only conversation and designs sent over a day on FB. Revision two will be slightly longer and have better features for interfacing with the lid.
Fosterqc
Member
ha, started to think about that earlier, thankfully the case has not been the main part of what I have been designing. (just tested, hot as balls in seconds)Remember that the Altos can is tin. It will inductively couple to the coil and heating the tin. 3D print and aluminum, no problem.
Bending a sheet metal alu box seems like a fun idea. Anyone tried that?
TommyDee
Vaporitor
Protocase Designer� Free Downloadable 3D Enclosure Design Software
Protocase Designer� is the fastest and easiest way to design, price, and build custom electronic enclosures. No prior CAD experience is required � just simply chose a template, select a face, and add cutouts and fasteners.
I might consider wood since it is so much easier to work and comes with style built-in.
Last edited:
I continue my jurney with new modification as said before, when i have time.Hi,
This is what i done since now, quite basic IH like many tutorial around do, it works but is too fast heat, but it's fun to move the vacap in or out and find different way to heat, like a torch.
Anyway, i would go from here to an half-pint, but need practice, when i done this i unsolder many thing and then resolder again just for practice.
So the next step i would like to do is leave one cap and move the other up for a more compact form.
So i ask, it's right to: remove one cap, move the other near the 2 coils cut the trace and use the little mom switch on the trace and remove the mofset or i need to do other modification ?
Thanks,
Please, tell me if i have to post in a new thread or can stay here, i don't want to waste threads.
@GI - yes, you can keep two of the yellow coils; move one capacitor, cut the trace, and use a momentary switch to the +IN terminal. You can use the -IN for the current carrying negative input. 18awg recommended.

Now, what i need to implement a basic battery ? Lipo ? something easy ?
Thanks
EDIT: soon i see why battery :-) the 12v brick it's maybe 4 times big....also for a desktop use.
EDIT 2: i made mistake and post an incomplete post, now it's ok, sorry.
Last edited:
Fosterqc
Member
I got really worried that I did something wrong because when I was testing my module was getting extremely hot... I realized later this is normal and whenever the module is powered but nothing is inserted in the coil that it will heat itself instead.
I really think this information should be included in any of the documentation of how to build your own induction heater. It only became clear to me once I was hiding stuff up that material inside prevents the coil itself from getting hot, and it makes sense why good devices have the button trigger only when something is put inside.
I really think this information should be included in any of the documentation of how to build your own induction heater. It only became clear to me once I was hiding stuff up that material inside prevents the coil itself from getting hot, and it makes sense why good devices have the button trigger only when something is put inside.
Rei_Gado
Here to plan my next project: Tiamat
...and this part of my journey is complete.
Thank you @TommyDee & @badbee for the help on Reddit, would not have been possible without all of you really
https://www.reddit.com/r/inductionheaters/comments/lzg6si
https://www.reddit.com/r/Dynavap/comments/m33e32
https://www.reddit.com/r/inductionheaters/comments/m336z2
Thank you @TommyDee & @badbee for the help on Reddit, would not have been possible without all of you really
https://www.reddit.com/r/inductionheaters/comments/lzg6si
https://www.reddit.com/r/Dynavap/comments/m33e32
https://www.reddit.com/r/inductionheaters/comments/m336z2
RustyOldNail
SEARCH for the treasure...
An ODD, new IH. Thought TD might like to take a peek.

 www.getispire.com
Accessories
Venice, California based Ispire Inc. is a global provider for Award-Winning premium custom Vape Carts, Pods, Disposables, & Batteries. (US Stock Available)
Fosterqc
Member
Here are the battery options I am considering at the moment.
I am thinking about making the battery module detach very easily and have multiple battery or wall power options.
Working on the mechanical and electrical connection at the moment.
I am thinking about making the battery module detach very easily and have multiple battery or wall power options.
Working on the mechanical and electrical connection at the moment.
berserk6996
New Member
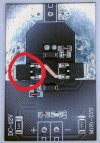
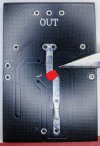
Hi everyone! I have been watching this thread and the /r/inductionheater reddit sub for a while and I just tried the halfpint mod.
It worked for a while but one of the MOSFET burned and released the magic smoke so I was wondering if you guys have any idea where I went wrong.
I attached pics showing which MOSFET burned and also all the trace I removed.
Thanks
It worked for a while but one of the MOSFET burned and released the magic smoke so I was wondering if you guys have any idea where I went wrong.
I attached pics showing which MOSFET burned and also all the trace I removed.
Thanks
Attachments
TommyDee
Vaporitor
Hey @berserk6996 , sorry to hear a FET fried. FETs still give up the ghost for two reasons - a coil glitch or too much draw. Coil glitches are taken care of with soldering the coil to the board. I popped one unit by simply sticking a metal straw in a small coil. It just quit immediately and then started cooking.
The best way to ensure that the build will last is to know the power levels that they are pulling for each VapCap.
@Fosterqc - I was going the battery pack direction as well with 3s 18350. Looking forward to see how you move forward with this.
The best way to ensure that the build will last is to know the power levels that they are pulling for each VapCap.
@Fosterqc - I was going the battery pack direction as well with 3s 18350. Looking forward to see how you move forward with this.