Arizer Solo II

BigJr48

Well-Known Member
I received my replacement Solo 2 and charger about an hour ago with two extra stems for my trouble. Perhaps I should send them to @ataxian? :) Thanks, Arizer. It's plugged in now for it's initial 5 hour + charge as per @OF's advice.

I look forward to rejoining the ranks of happy Solo 2 owners.

Now charge, Baby, CHARGE!!!
Congrats!!!
Arizer with outstanding customer support, keep up the good work!!!
 

AJS

Calm Consistency
@OF
Was nearly 31 second warmup to 350 with stem inserted, and nearly 27 second warmup with stem not inserted. Just fyi.

Also people ... why has no one posted about this yet? Is it new? Seems like a steal !!
Krglrbz.png

http://www.puffitup.com/Arizer-Air-Solo-H2O-Filtration-Stem-p/qtqc.solo-bubb.htm
 

Custom Flower Hardware

Well-Known Member
Manufacturer

AJS

Calm Consistency
For those who don't know .. battery bar drops to literally nothing before shutting off (after a few seshes at nothing). Idk how many seshes once it drops to nothing until fully empty, never went for it. I have done 1-2 bowls successfully though for energencies. Not something I'd do often.
ugPOFqJ.jpg
 

OF

Well-Known Member
For those who don't know .. battery bar drops to literally nothing before shutting off (after a few seshes at nothing). Idk how many seshes once it drops to nothing until fully empty, never went for it. I have done 1-2 bowls successfully though for energencies. Not something I'd do often.

This is basically what we see with Solo I. I've not had a chance to check such stuff out (run Solo on a bench power supply rather than battery so you can try different voltage and current settings) Solo I held about 15 or 20 % in reserve, enough for 2 or 3 'emergency sessions'. This is, of course, thin ice country. IIRC Solo I cut off at about 3.1 Volts per cell if the pack is perfectly balanced. That it it locks out at about 6.2 Volts total. But that could be 3.3 and 2.9 Volts? That will be extremely hard on the weak cell, sure to make it worse still.

There's hardware protection too, a protection PCB.

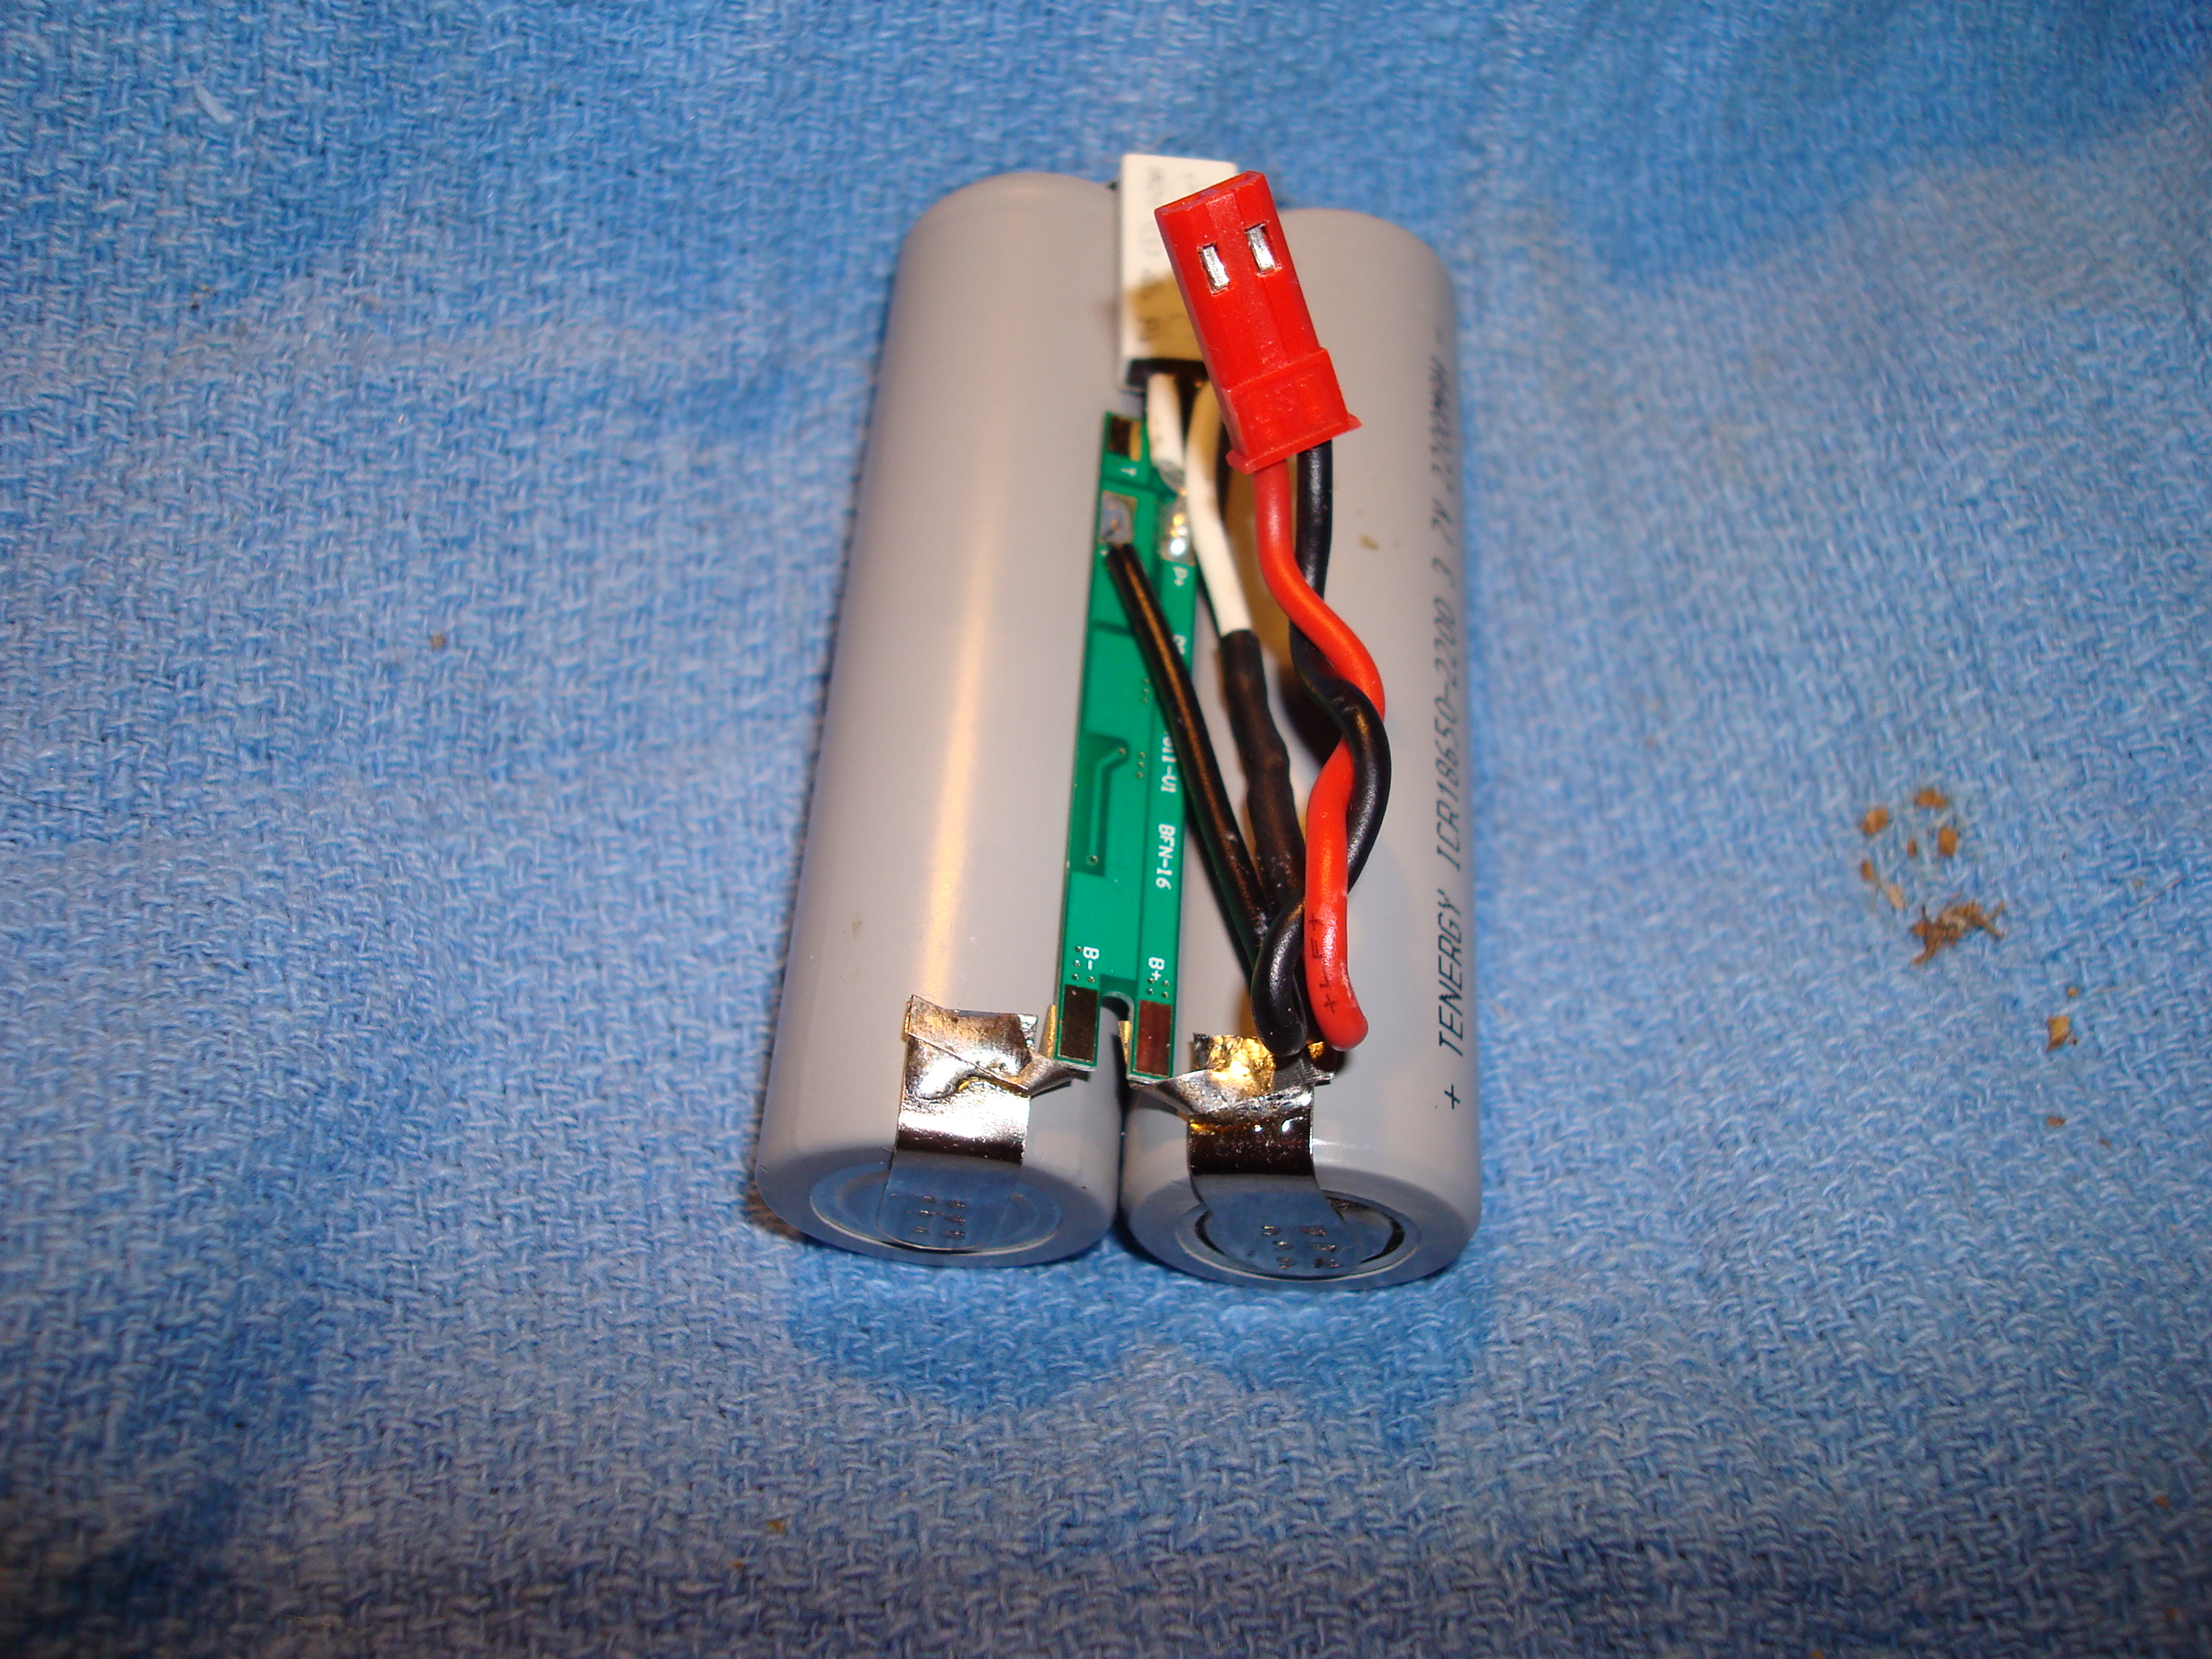
JpNbVuU.jpg


That's it, between the cells. It monitors each cell (two channels) and allows the pack to output power or take charging, as long as both cells are 'in range' voltage wise. These schemes are usually better protection from over charging, as the trip point has to be set so low (typical numbers are 2.7 Volts or so IIRC) some damage is usually happened by then. BTW the white thing is the thermal safety, it too disconnects the pack on fault, it however automatically resets.

My advice with Solo I is to recharge after the session that only lights one LED and cautiously dig into the reserve if necessary remembering it's a risk to do so. Even if Solo stops you first, when the total drops too far, one of the cells or the other could be on the edge or worse.

By way of reference I ran mine down to 'a bit under 1/4' and charged it back up again. It took 2400mAh to do so (my rig measures total recharge current) so it looks like there's a fair reserve there but the proof is in the checking of that point we've no proof the 'meter' is even linear. Remember, Solo I is not, the top step is twice as big as the others. And, as we just discussed, there is a reserve charge below 'empty'.

I'm with you, nice to know it's there, but not something you want to routinely use. That advice may change when I get a chance to investigate more and measure some stuff, but I doubt it.

OF
 

ataxian

PALE BLUE DOT
This is basically what we see with Solo I. I've not had a chance to check such stuff out (run Solo on a bench power supply rather than battery so you can try different voltage and current settings) Solo I held about 15 or 20 % in reserve, enough for 2 or 3 'emergency sessions'. This is, of course, thin ice country. IIRC Solo I cut off at about 3.1 Volts per cell if the pack is perfectly balanced. That it it locks out at about 6.2 Volts total. But that could be 3.3 and 2.9 Volts? That will be extremely hard on the weak cell, sure to make it worse still.

There's hardware protection too, a protection PCB.

JpNbVuU.jpg


That's it, between the cells. It monitors each cell (two channels) and allows the pack to output power or take charging, as long as both cells are 'in range' voltage wise. These schemes are usually better protection from over charging, as the trip point has to be set so low (typical numbers are 2.7 Volts or so IIRC) some damage is usually happened by then. BTW the white thing is the thermal safety, it too disconnects the pack on fault, it however automatically resets.

My advice with Solo I is to recharge after the session that only lights one LED and cautiously dig into the reserve if necessary remembering it's a risk to do so. Even if Solo stops you first, when the total drops too far, one of the cells or the other could be on the edge or worse.

By way of reference I ran mine down to 'a bit under 1/4' and charged it back up again. It took 2400mAh to do so (my rig measures total recharge current) so it looks like there's a fair reserve there but the proof is in the checking of that point we've no proof the 'meter' is even linear. Remember, Solo I is not, the top step is twice as big as the others. And, as we just discussed, there is a reserve charge below 'empty'.

I'm with you, nice to know it's there, but not something you want to routinely use. That advice may change when I get a chance to investigate more and measure some stuff, but I doubt it.

OF
@OF know's!

nHXIaaF.jpg

SOLO 1 will not die?
 

OF

Well-Known Member
It takes a little over an hour for the last bar on the Solo II to fill she charging.

Makes sense. Not only is the top bar likely to be 'wider' (Solo I top step is twice the others), I suspect so it doesn't go off 'full charged' too easy and worry owners, but the charge current is constantly diminishing for the last 15% (or so) of the charge.

That is the controller allows 'full current' (about 1300mA for Solo II, 800 for Solo I) until the voltage reaches max (about 4.20 Volts per cell, 8.4 total in our case). It's still not fully charged, if you take it out the voltage will drop .1 Volt or so. But you can't let the voltage get too high, so the controller starts to throttle back to maintain the max allowed voltage. It goes from 'constant current' to 'constant voltage' modes for the last part of the charge.

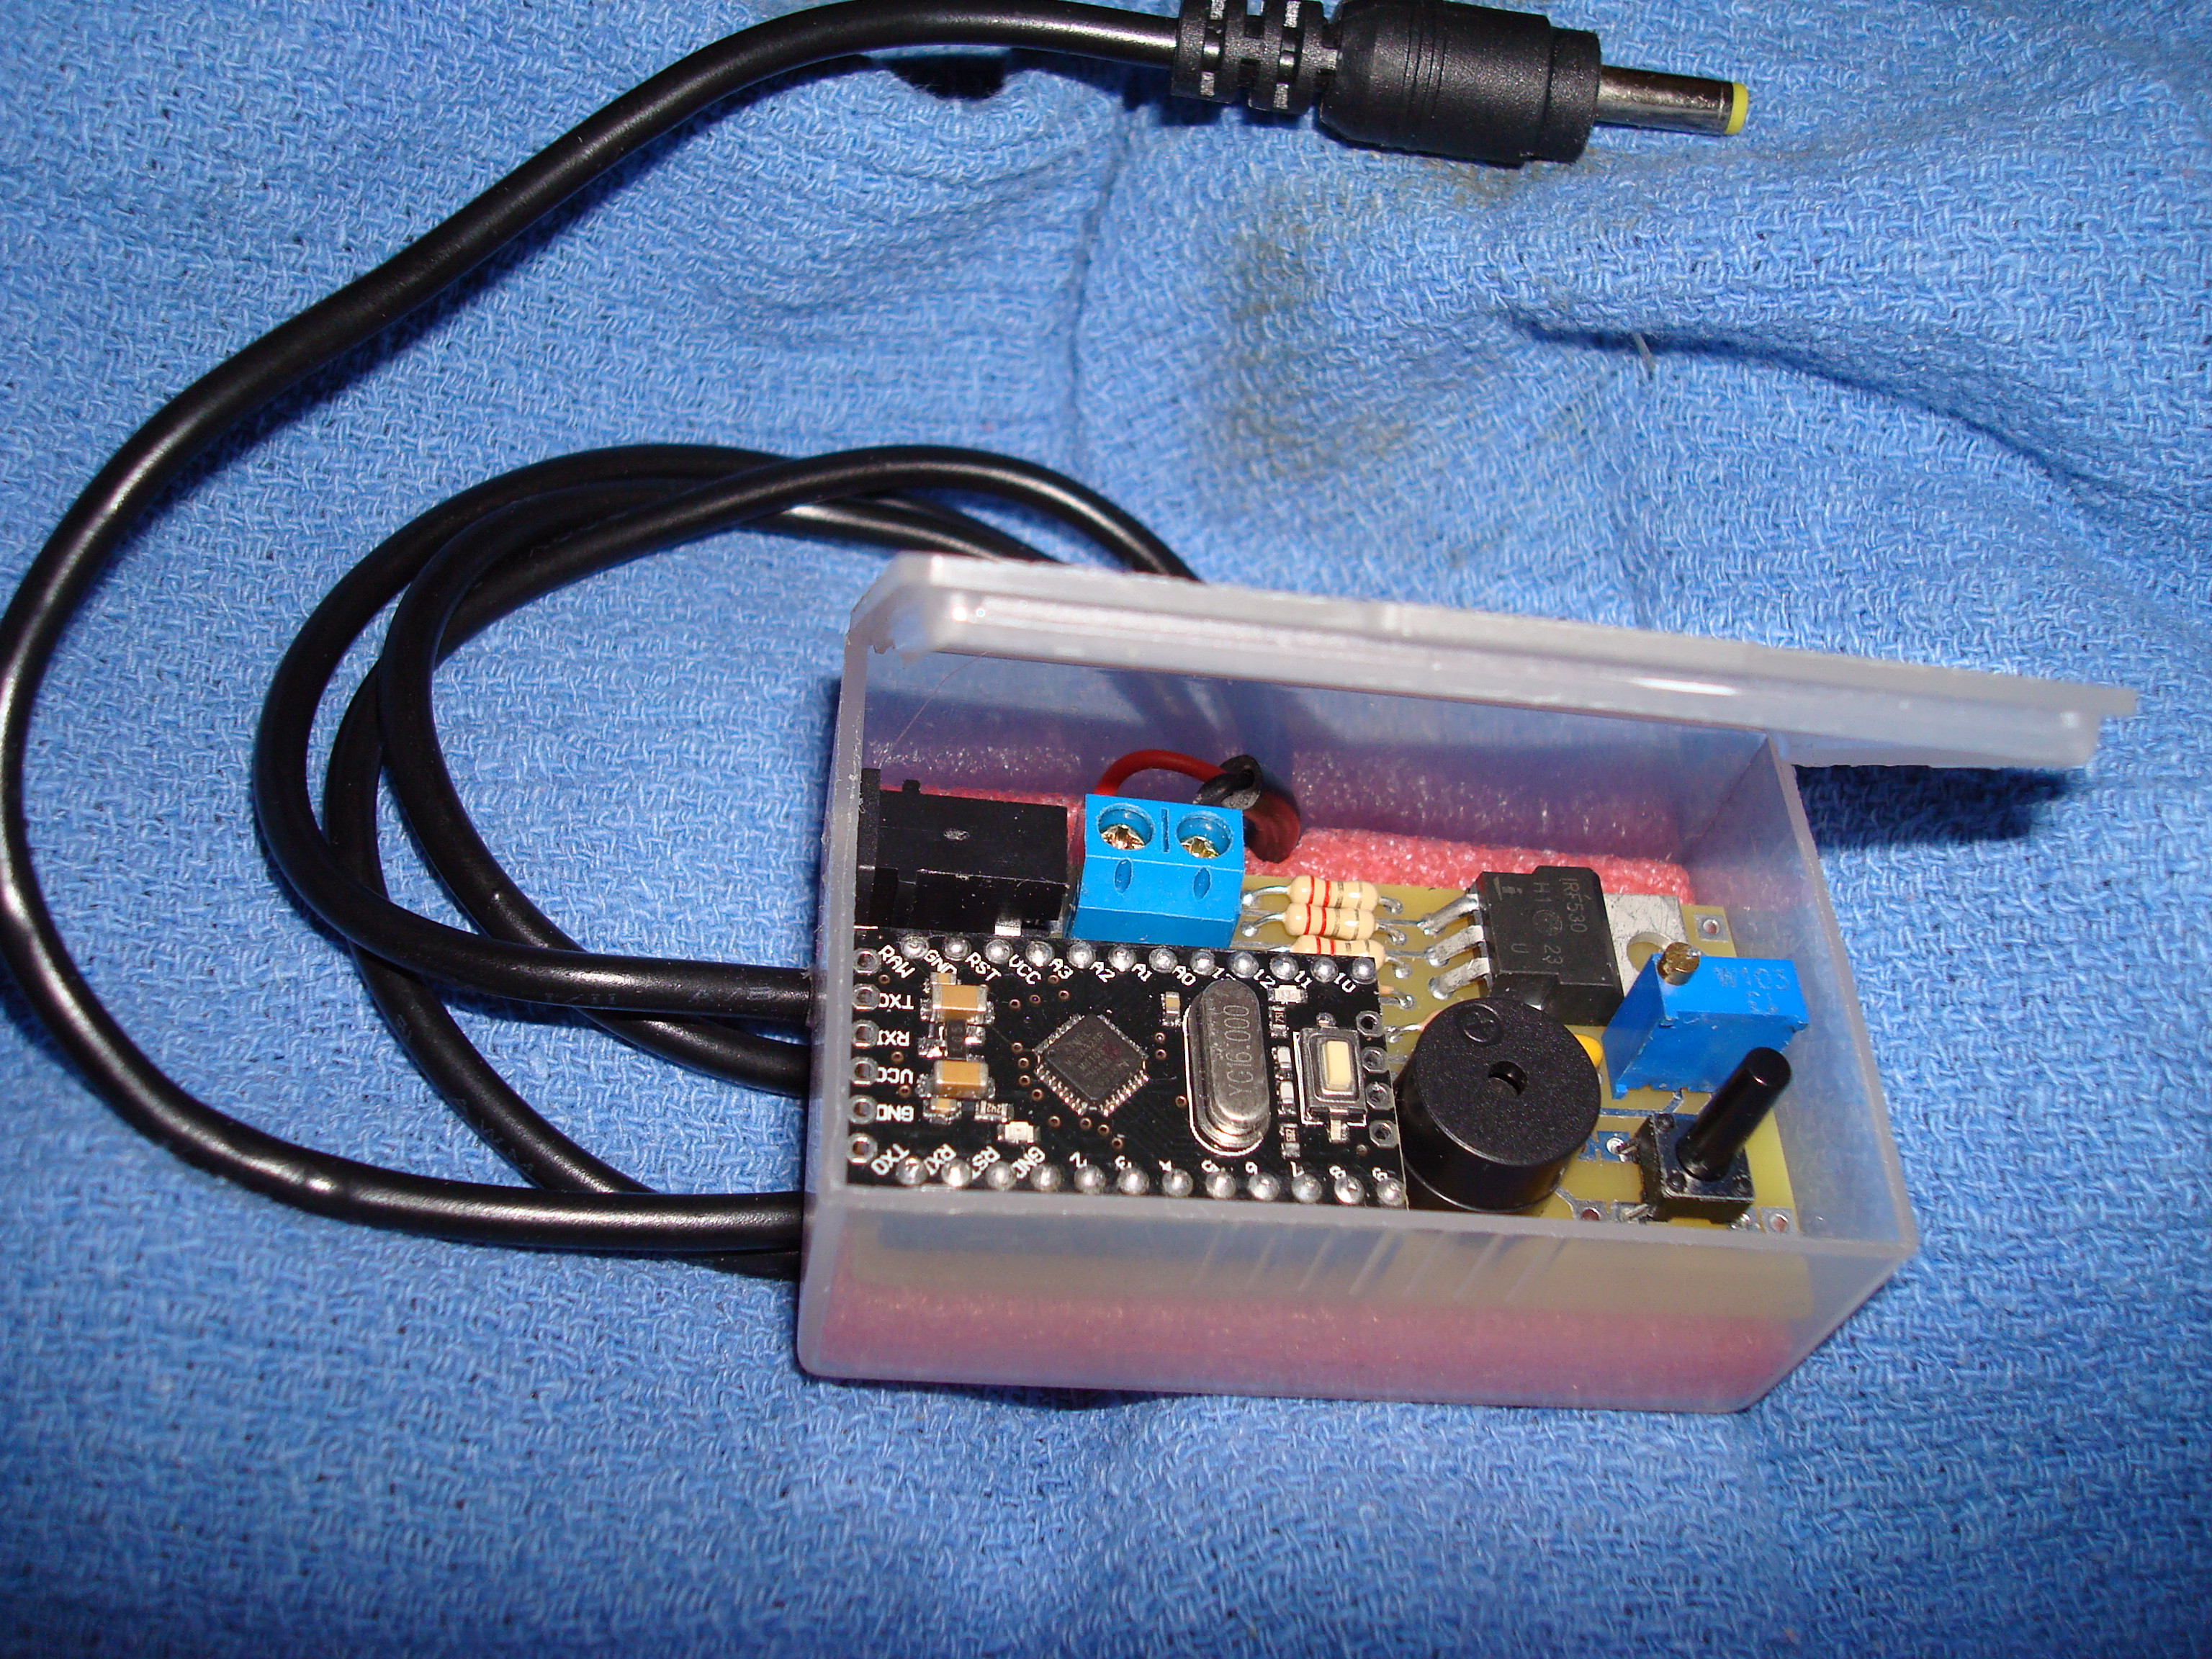
This is how my 'Gadget' works:
jy0w0hN.jpg


When energized the Gadget monitors the charging current by the voltage dropped across the 3 resistors in the center of the top edge. It 'memorizes' the peak current and 'looks for' a drop of 10% or so (set by the blue adjustment above the push button) and when it drops below that value (meaning the last 15% or so of the charge is happening) it cuts off the transistor in the corner, stopping charging early, and runs the beeper to wake me up. In Solo I this cuts a bit over 20 minutes OFF EVERY RECHARGE. If you only go a couple of sessions and don't need much recharging, this can be a very nice feature. 40 minutes instead of an hour?

Like I said, I haven't yet poked around with power management in Solo II but I expect it to be much like Solo I?

OF
 

Pappy

shmaporist
Guess the air might not be suitable for heavy daily use. I might be a little biased from being spoiled by previous Vapes bc I as well confine myself to portables and have used each heavily, when I say heavily I mean each bowl would last maybe a timeout and a half. Let's Say 15 minutes a bowl. ( I say bowl out of habit but I mean one stem lol) and I'd vape an upwards of 10 sessions a day. With that use every vape has lasted me besides the air.

Edit: Another great selling point, I'd have to flip thru batteries nonstop on the air. Ecstatic to see the solo lasted 18 sessions yesterday with still some juice left
:myday: Hello!
Although I got a limited first edition orange EVO presented to me by Seibo and an OG Cloud which I prefer, I rarely plug either in. You know me, too old, too stoned, and too lazy. And with 2 Airs and 2 Solos in the house I never run out of juice. So in keeping with my love for Arizer portables just scored a Solo 2 on that PV promo. Good to see you all! :wave:
 

OF

Well-Known Member
Gentle Friends,

I've a couple of random stem seal thoughts. Nothing firm, but perhaps of interest.

First, please look at PIU's teardown photos:
http://blog.puffitup.com/2017/06/solo-2-the-teardown-we-take-vaporizers-apart-so-you-dont-have-to/

First, notice the bottom photo in the 'Removing the Shell' section. The one with the oven still attached to the PCB on the left, with the cover in the center and the top seal on the right. Notice that it's very clear here that the hole in the top seal is smaller than the cover it snaps on or the oven below. The stem tips on this seal, it's a pivot of sorts like Solo I. Air doesn't tip because there are 3 same size ribs. While the heaters are similar between Air and Solo II, this is an important difference.

Hold that thought.

Now, please, check out the two bottom photos in the 'Getting it Open' section, one with the top plate removed, the other looking down into the top of the unit. This can be done by removing the two front screws (T5s) only. The rods attached to the top plate are threaded on the ends for these screws so the top plate and rods can be slid out leaving the works intact (retained by the other two screws as always). First off, I suggest this (removing two screws and sliding the top plate off) might be a way for owners to periodically blow/brush the collected debris, ABV, spiders and whatever that collects around the oven (like we do with Solo I by unscrewing the cover to expose the oven.

But, here's the fun part for the stem fit obsessed perhaps, from this point it's possible to take the seal off 'in situ' (in place). It's not easy, you have to pry (I used a special tool.....a fingernail file) carefully since there's a hidden lip. But you can get it out and put it back from above. Getting the lip back in the groove in the cover is a bit fiddly, I ended up 'walking it in' by going around and around pressing in at right angles with my thumbnail and the same fingernail file. This means, perhaps, owners can replace 'too loose' seals? Those with the necessary skills and the right size Torx driver of course. And, most importantly, IF ARIZER WILL SELL US SEALS.

Food for thought kind of stuff. While you're thinking it should also be possible to make a replacement seal of any size and hardness (therefore grip) you'd like instead. Being a round part, a Machinist with excellent skills could no doubt 'turn out' (make on a lathe) a few for you from rod stock? Or, in the extreme, you could even make the tooling (not trivial....) and mold up a pile of them for a few cents each like Arizer does?

Making aftermarket ones is a long shot, of course, but perhaps the maker will sell factory parts as replacements (even if they don't consider it failed in warranty terms)........and if they do I suspect it'll make a lot of owners happy. Meanwhile, for those of us 'old school stem tippers' it seems we're really in luck as stem tipping is still an option......however the widened ports in the floor make that less important. FWIW I got onto this because I noticed I was 'automatically' tipping Solo II anyway.

Regards to all.

OF
 

CarolKing

Singer of songs and a vapor connoisseur
The fit between the heater and glass tube is better. Be sure and heat the unit up first before trying to insert the glass tube - its a tight fit..

The stem stays in place even when I turn the Solo 2, it doesnt fall out. It sounds like may loosen over time.

@Pappy glad to see you here. I will be interested in hearing your feelings after you get your unit. I've been very happy with mine. I love the digital temperature read out display window and the easy to use menu. The temperature changes quickly if you like to stair step your higher temps towards the end of your session. The battery will last a long time - about 2 hours or maybe more....

It's made for the cannabis user that loves flavor, ease of use and convenience of a portable. Better yet it's a company that has a very good track record.

Edit
@OF Thanks for the explainatiin. Is there any testing that can be done for the vapor coming from the Solo 2? It would be nice to have something to say about the unisolated airpath for fanatics that are spreading rumors. Folks that have no special experience they just like to feel important. Some folks revel in being the bearer of bad news. Or think they have bad news.

Is there a GonG that's attached to that little water tool above @AJS? The one from @PuffItUp

That sounds OK by me if the stem gets more loose over time.
 
Last edited:

Little Bill

Oldest stoner on FC

stoneleopard

Well-Known Member
Super impressed with the battery life, especially coming from an Air. Took the Solo II on a week long camping trip and still had some charge left after I got back. Heat up time is also a huge deal. Only thing I really find myself wishing for was a bit less draw resistance.

Also might need to get a coarser grinder because sometimes little bits make it through the stems. Does anyone find inserting screens into the stems negatively affects their experiences? (more draw resistance? worse flavour?) I hear temperature needs to be stepped up slightly to compensate.
 

AJS

Calm Consistency
Sorry but I don't understand from the picture how a stem can have water filtration built in?
It's a little bit of physics magic. When you feel the bubbler in from the top with just a tiny bit of water, the air at the bottom (or some magic shit like that) stops the water from falling through but still lets you pull vapor through the water.

Here's a video of me using one with another vape ... fast forward to 1:10
 

CarolKing

Singer of songs and a vapor connoisseur
@Pappy the glass Solo OG stems are suppose to fit. My wooden stem/WonG from @Ed's TnT is too tight for the Solo 2 though.

That little WT looks like it would work well for my GH as well as the Solo. I'm wanting to get a car charger so I've been waiting before I order from PIU. The car chargers for the Solo 2 isn't out yet. I might need to order a couple of the cute little bubblers then order again later

@OF thanks for the info about the car charger. I do have one for the OG. Eventually I will buy another sometime this one stops working then I move the Solo and it starts charching again. I changed the little fuse inside. I'm not too much of an electrical tinkerer, like yourself. Little wires probably arent touching somewhere.
 
Last edited:

OF

Well-Known Member
The car chargers for the Solo 2 isn't out yet. I might need to order a couple of the cute little bubblers then order again later

Same car 'charger' (it's really only a simple cord with two connectors....) for Solo I should work just fine on Solo II. Both mine (home made) do. Same voltage (12) same connector.

I'd suggest you try yours for Solo I, if you don't have one go ahead and order one from PIU with your Bubbler order. No need to wait. You can get in line behind my two bubbler order....

OF
 

Pappy

shmaporist
@Pappy the glass Solo OG stems are suppose to fit. My wooden stem/GonG from @Ed's TnT is too tight for the Solo 2 though.

That little WT looks like it would work well for my GH as well as the Solo. I'm wanting to get a car charger so I've been waiting before I order from PIU. The car chargers for the Solo 2 isn't out yet. I might need to order a couple of the cute little bubblers then order again later

Must've broke a dozen PV GonGs since last posting here. All I got left are OG stems.
 

OF

Well-Known Member
Must've broke a dozen PV GonGs since last posting here. All I got left are OG stems.

Only a measly single dozen? @ataxian can do that on a 3 day weekend....without help.

Still, it's a credible effort viewed on it's own. Easily in contention for second runner up? We need a plan in case Ataxian can't, for whatever reason, fulfill his duties (like opening a new Head Shop or something) you can cover for him?

Sorry to be harsh, but the very admission that you still have original stems unbroken doesn't speak well of your dedication now does it?

Regards,

OF
 

CarolKing

Singer of songs and a vapor connoisseur
I talked with Sam at PIU and he said the little bubbler the H2O water filtration system that they have will directly fit into the unit without a GonG. I just ordered two. I also ordered another car charger for the Solo OG. I tried the one I have and it died.
 
Last edited:
Top Bottom