yes, the air flow goes through the two sets of holes. it is not hard to draw at all. i take a very slow inhale of 15 to 20 seconds. gf just tokes it like a pipe or a joint.

-
SCAM WARNING! See how this scam works in Classifieds.
You are using an out of date browser. It may not display this or other websites correctly.
You should upgrade or use an alternative browser.
You should upgrade or use an alternative browser.
The Bud Toaster - (currently: Model 14, version 3)
- Thread starter Hippie Dickie
- Start date
stickstones
Vapor concierge
I love how small it is. How tall is it with the box enclosure?
Nope, you got it ... tweezers. close tweezers, insert into the vial, the tweezers spring open, withdrawl the vial. i'll do a video when the Bud Toaster is finished.owin said:How do you refill it? Do you have to use tweezers or something to pull the glass vial out and refill it? Or is there an easier method that you use?
i also use the tweezers to strip bits of material off the bud and stuff into the vial.
Overall height is 1 3/4". The metal chassis is 1 1/4" tall and the top and bottom cherry wood plate are 1/4" thick.stickstones said:I love how small it is. How tall is it with the box enclosure?
This is a drastic change in form from the previous 8 models, where the batteries were separate and there was a cable going from the batteries to the heater coil. That worked fine, but i fucking hate the cable. And it needs to be fairly high gauge (16 ga minimum, but 12 ga is best - a very thick cable, indeed) to get the fastest temperature raise. Below 16 ga really restricts the current flow.
Notice the copper in the battery compartment. This is highly refined copper, 1/16" thick, 1/4" wide. No restrictions on current flow with this setup. The pcb is the limiting factor for this prototype. When i get the boards made at the foundary, the traces will be thick and wide. Then i'll be satisfied the temperature response is as fast as it can be with this configuration.
Jikaboom123
Well-Known Member
Very nice. Keep us updated, please.
Thanks for your interest in my vape project.
Status: results of a physical iteration
Well, the four PCB design shown in the images doesn't physically work -- the enclosure is just too tight, and this is just not a design that allows manufacturing on a larger scale.
So i stewed about this for the last several days and decided to completely redesign the pcb to fit behind the firewall that holds the heater coil. So there will be two PCBs - one for the 12F683 PIC and the DC current control and a second board for the user i/o -- buttons and LEDs.
This is going to work out so much better -- electrically and mechanically and thermally. And assembly should be faster and easier.
i also found a reference to making PCB etchant from 1 part muriatic acid to 2 parts peroxide. And a method for using a laser printer toner and a clothes iron to transfer the toner to the copper board. This should allow a much better PCB design. Using a Sharpy to draw the traces on the copper results in a lot of dropout of the traces. The toner method should fix that and the new etchant will take only 5 minutes instead of the 30 minutes using ferric cloride.
At least that's the theory. Details to follow ...
time to bump the thread ...
i am trying the "toner" method for making PCBs. This involves printing the trace diagram on glossy paper and then ironing the toner onto the copper board.
Here is the toner image for the top of the command and control pcb. This is the where the surface mount devices are installed:

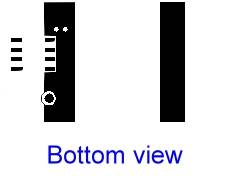
And here is the bottom of the same board. The battery pack will attach to the two vertical bands. The pattern on the left is where the 8-pin DIP socket for the PIC processor (12F683) sticks through. Next iteration i'm going to get some surface mount DIP sockets, and that part of the pattern will go away:
i'm very excited to try this fabrication technique, because drawing these fine traces with a Sharpie just doesn't cut it. GF is out of town for the next two days, i'm completely on my own, this project is burning a hole in my brain, i may actually make some progress ... except i have too much real world (pay the bills) work to do ... it's all a matter of choices, eh?
edit: i think i'll choose some sativa to go along with my Merlot.
i am trying the "toner" method for making PCBs. This involves printing the trace diagram on glossy paper and then ironing the toner onto the copper board.
Here is the toner image for the top of the command and control pcb. This is the where the surface mount devices are installed:
And here is the bottom of the same board. The battery pack will attach to the two vertical bands. The pattern on the left is where the 8-pin DIP socket for the PIC processor (12F683) sticks through. Next iteration i'm going to get some surface mount DIP sockets, and that part of the pattern will go away:
i'm very excited to try this fabrication technique, because drawing these fine traces with a Sharpie just doesn't cut it. GF is out of town for the next two days, i'm completely on my own, this project is burning a hole in my brain, i may actually make some progress ... except i have too much real world (pay the bills) work to do ... it's all a matter of choices, eh?
edit: i think i'll choose some sativa to go along with my Merlot.
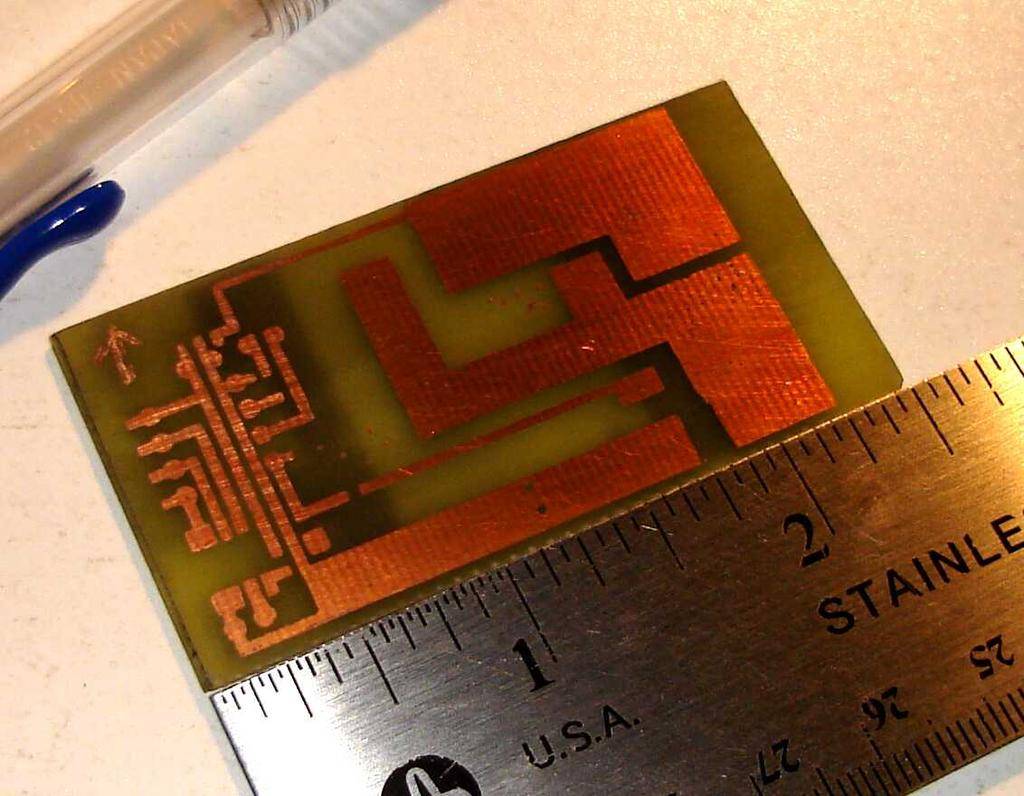
well, it took 4 tries to get the pattern "ironed" onto the copper pcb, but it finally worked. i found very heavy glossy paper was the best. the laser printer was set to make the graphics as dense as possible and i see very few dropouts.
here is the surface mount devices side:
and here is the back side that connects to the battery pack:
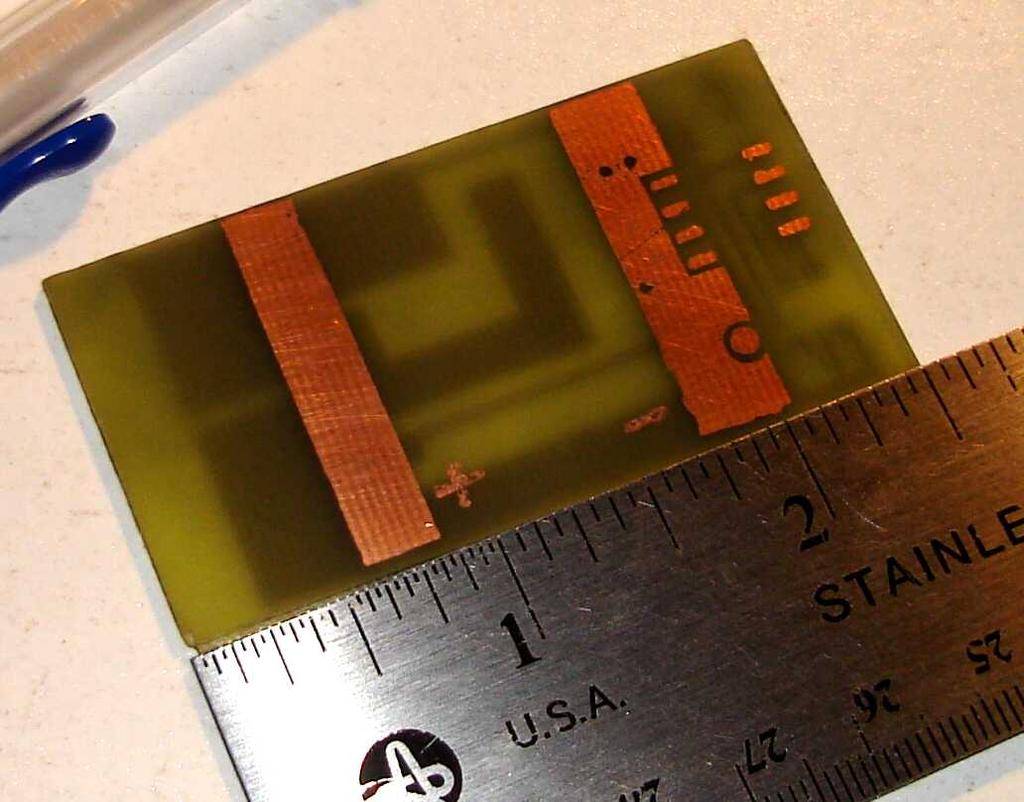
also, the registration (alignment) of the two sides looks very nice. the only critical area is for the 8-pin DIP socket. sure beats using a Sharpie. the trace definition is very fine.
now i just need to drill the board, trim to fit the enclosure, and populate with the chips.
here is the surface mount devices side:
and here is the back side that connects to the battery pack:
also, the registration (alignment) of the two sides looks very nice. the only critical area is for the 8-pin DIP socket. sure beats using a Sharpie. the trace definition is very fine.
now i just need to drill the board, trim to fit the enclosure, and populate with the chips.
stickstones
Vapor concierge
wtf? I'm high as hell right now, but that sure looks like you are putting McGyver to shame!
nah ... i'm just a tool, McGyver was cool!
Survivalism
Weapon Enthusiast
I cant wait to see more on this dude, what you did here was pretty awesome 
quite a few of my prototypes look ridiculous, but the vapor is always beautiful. which i attribute to the glass.
I meant ridiculous in a good wayHippie Dickie said:quite a few of my prototypes look ridiculous, but the vapor is always beautiful. which i attribute to the glass.
")
marcuss
above the clouds
Go on Hippie D this proto vape looks very interesting and small......i can see you in the Vape Makers OlimpusHippie Dickie said:quite a few of my prototypes look ridiculous, but the vapor is always beautiful. which i attribute to the glass.
already.....You are doing a great work and i'm happy that you choose the glass way...i support you 100% and if you need a beta tester here I am

one step forward ... two steps back
after i drilled that pcb, there were some damaged traces, so it is pointless to try to use that board.
So i doubled the width of all traces that have a through-hole. Now i'm going to take the rest of the day off and do some work in the shop.
after i drilled that pcb, there were some damaged traces, so it is pointless to try to use that board.
So i doubled the width of all traces that have a through-hole. Now i'm going to take the rest of the day off and do some work in the shop.
Hey Bubar!
i'm using the simplest insulation there is ... an air gap -- all around. i also have a tin foil shield as a reflector. But really, that's just overkill.
the nichrome wire coil is really quite nice ... even the ends of the coil are far less hot than the middle of the coil (several hundred degrees, i'm guessing, but i haven't measure it -- yet). Even the glass the coil is wrapped around is a very localized hotness.
even when the coil is resting on the cherry wood (bottom cover), the wood doesn't get too hot -- warm, but not hot.
Althought the heat was a problem when i had an enclosure made of three separate pieces of wood that were fastened together with long screws. [Sidebar: this enclosure was a two inch cube when assembled.] The heat of the coil caused the middle section to expand -- not a lot, but enough to not align perfectly. So, it became clear to me that this was not a viable enclosure.
Then i had the bright idea of using a tube of stainless steel as the middle section, with a circular groove in the top and bottom wood pieces for the tube to fit into. This arrangement had the added advantage of not needing fasteners -- the ultimate user repairable vaporizer -- no screw driver needed.
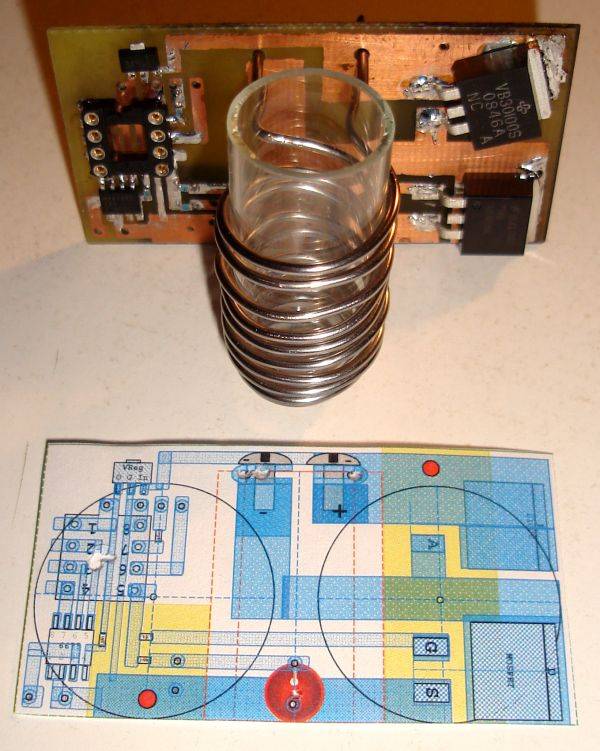
Another idea that i had set aside and just yesterday resurrected, was dealing with the "problem" of the heater being hotter in the middle of the coil. However the bud falls to the bottom of the vial during a vape session, which is at the bottom of the coil. The bright idea here was to bend the length of nichrome wire in half before winding the coil. That way the middle of the coil is at the bottom and the two ends of the coil are together at the top of the oven tube. i'm using that configuration in this next model.
All in all there is far too much handicraft work required to assemble this combustion fucker, but i'm hopeful i can find places to get the pieces/parts stamped, or formed, or machined.
But that's an issue deferred until after i get this next unit running. The next step is to get the PCB manufactured. Etching the pcbs is getting rather tedious and takes too much time. But i do like the "iron the toner onto the copper clad" technique -- very nice traces if i keep them > 1/32" wide.
Anyway, in answer to your question, i found out that less mass allows less heat buildup, and the first step to insulate the heater is to avoid all physical contact (if possible). This new coil will have only the wire ends in contact with the circuit board, and the bottom of the oven tube resting on the wood base.
How's your project coming? Are you working the glass okay?
i'm using the simplest insulation there is ... an air gap -- all around. i also have a tin foil shield as a reflector. But really, that's just overkill.
the nichrome wire coil is really quite nice ... even the ends of the coil are far less hot than the middle of the coil (several hundred degrees, i'm guessing, but i haven't measure it -- yet). Even the glass the coil is wrapped around is a very localized hotness.
even when the coil is resting on the cherry wood (bottom cover), the wood doesn't get too hot -- warm, but not hot.
Althought the heat was a problem when i had an enclosure made of three separate pieces of wood that were fastened together with long screws. [Sidebar: this enclosure was a two inch cube when assembled.] The heat of the coil caused the middle section to expand -- not a lot, but enough to not align perfectly. So, it became clear to me that this was not a viable enclosure.
Then i had the bright idea of using a tube of stainless steel as the middle section, with a circular groove in the top and bottom wood pieces for the tube to fit into. This arrangement had the added advantage of not needing fasteners -- the ultimate user repairable vaporizer -- no screw driver needed.
Another idea that i had set aside and just yesterday resurrected, was dealing with the "problem" of the heater being hotter in the middle of the coil. However the bud falls to the bottom of the vial during a vape session, which is at the bottom of the coil. The bright idea here was to bend the length of nichrome wire in half before winding the coil. That way the middle of the coil is at the bottom and the two ends of the coil are together at the top of the oven tube. i'm using that configuration in this next model.
All in all there is far too much handicraft work required to assemble this combustion fucker, but i'm hopeful i can find places to get the pieces/parts stamped, or formed, or machined.
But that's an issue deferred until after i get this next unit running. The next step is to get the PCB manufactured. Etching the pcbs is getting rather tedious and takes too much time. But i do like the "iron the toner onto the copper clad" technique -- very nice traces if i keep them > 1/32" wide.
Anyway, in answer to your question, i found out that less mass allows less heat buildup, and the first step to insulate the heater is to avoid all physical contact (if possible). This new coil will have only the wire ends in contact with the circuit board, and the bottom of the oven tube resting on the wood base.
How's your project coming? Are you working the glass okay?
Here are some pix of the new PCB and coil with the middle at the bottom ...

Bubar
Well-Known Member
I broke all my glass bits... but i do have 2 working bowl pieces left.
For my insulation I cut up an emergency blanket. It looks like mylar or something, but the packaging says it reflects 90% of heat.
The vape is coming along, I successfully tested it a few days ago. Right now I have knob control of set point plus LCD display of temp. I'm not trying to threadjack though, so I'll post something of my own in a few days.
well, i appreciate your comments so feel free to post them up here. And i look forward to your thread.
i've stayed away from temp display ... it requires too many pins on the PIC to drive the LCD array for my taste.
i've stayed away from temp display ... it requires too many pins on the PIC to drive the LCD array for my taste.
Maybe, it's time for a new main FC Forum (one that would permanently host multiple ongoing threads) to host these discussions. Perhaps, it could have a title along the lines of "Hobbyists Discussion," "Building Your Own Vaporizer," "Technical/Engineering Aspects," etc. Doing this would separate discussions of commercially marketed vaporizers, now in the "Vaporizer Discussion" forum, from discussions of those not yet or ever to be commercialized or available to others, separate out technical discussions of parts and designs, etc.Hippie Dickie said:well, i appreciate your comments so feel free to post them up here. And i look forward to your thread.
Is anyone familiar with how to suggest this to the person or persons that manage FC?
We certainly have had a lot of very productive, informative discussions is this and related threads, such as "Building a Digital Vaporizer (Brain Dump)." In my opinion, one of the best things that could be done by FC to advance the state-of-the-art and availability of a diversity of vaporizers would be to encourage those building and tinkering around with these on their own to share and discuss their work.
I am probably not the only one hesitant to start a new thread about experimental, non-available vaporizers within the mainstream Vaporizer Discussion forum that is dominated by discussions of marketed products. Giving hobbyists, developers and techies our own little corner could well draw out more who are now just lurkers, facilitate initiation of more threads (more topics), etc.