Definitely going to try to widen the hole down the road. So currently charging with the cable and the included brick, the cable works (charged a portable charger) but haven't noticed any warmness coming off the hotshot. Edit: hopeful it will finish charging with two house to useI took mine apart and 'squared it up' a bit. I also made the charge port hole a bit bigger so whatever motion the internal have are matched with the hole.

-
SCAM WARNING! See how this scam works in Classifieds.
-
The Frolic by Limelight Giveaway is over. Congratulations to the winner: Numerous_Nothing!
You are using an out of date browser. It may not display this or other websites correctly.
You should upgrade or use an alternative browser.
You should upgrade or use an alternative browser.
VapCap Induction Heater for Desktop and in Car Use
- Thread starter Pipes
- Start date
-
- Tags
- dynavap induction heat vapcap
My hotshot hasn't charged. After about 2 hours of being plugged the charge brick hasn't been warm to the touch nor with the hotshot. So I was like eh, and I used it. Died after 2 cycles.These are very fast chargers. I suspect the charger will get warm before the HS.
Be careful of the internal BMS/Charger wiring as it includes solid copper wires. Don't pull on the battery leads to get it apart. The included j-hook is a tool for disassembly.
I hope, I messaged him.;[ Well that sux. I'm sure Pipes will fix you right up.
almost there
Well-Known Member
Does any one have a link for a replacement battery for the Hotshot? I fear my battery was never conditioned correctly when I first received it, the usb piece broke off after an incomplete charge. I get 9 heat cycles with a full charge before it goes dead, would love to add a little more usage perhaps with a new battery
I bought my replacements here:Does any one have a link for a replacement battery for the Hotshot? I fear my battery was never conditioned correctly when I first received it, the usb piece broke off after an incomplete charge. I get 9 heat cycles with a full charge before it goes dead, would love to add a little more usage perhaps with a new battery
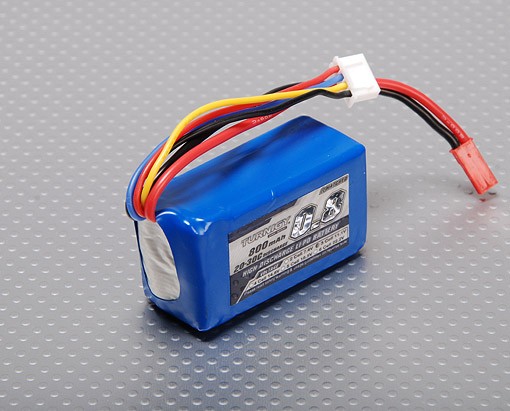
Turnigy 800mAh 3S 20C Lipo Pack (E-flight Compatible EFLB0995)
Turnigy 800mAh 3S 20C Lipo Pack (E-flight Compatible EFLB0995)
 hobbyking.com
Just got my hotshot in the mail, after sending it back for warranty repair. The magnet is sticking out there top and has wiggle when a cap sits on top is that normal? Also USB is unaligned, should I push the it up (the battery from the bottom and push the magnet down from the top?) I don't want to mess this up
Last edited:
Below are the answers you seek. 
The USB can be moved vertically a tad by opening the bottom and push against the battery. If it needs to be lowered, push against the magnet. Do not try and push the connector itself through the hole as it will break off the board. It cannot be moved horizontally but I had checked them before packing for clean insertion.
We also had the well-known, less critical, magnet comes off or is a crooked syndrome.
I no longer glue at all but rather have the magnet stick to a metal disc insert I added to the top on the inside. It’s a thin 15mm metal disc affixed to the top of the module by double-sided foam tape. The reason for using foam is that it acts like a spring and will self-level the disc when pushing it against the inside top under the magnet hole. You can easily remove the magnet with something more attractive than the disc underneath. VCs do not have near the pull needed to remove the magnet, so no worries there. Again, so far, no more complaints.
chimpybits
Well-Known Member
Well I just received my Hotshot and also can't get the USB in. Off to a rough start. I'm supposed to open the bottom which according to instructions is complicated and will probably result in a broken piece?
Last edited:
This is an easy fix.
It can be moved vertically a tad by opening the bottom and push against the battery. If it needs to be lowered, push against the magnet. Do not try and push the connector itself through the hole as it will break off the board. It cannot be moved horizontally but I had checked them before packing for clean insertion.
It can be moved vertically a tad by opening the bottom and push against the battery. If it needs to be lowered, push against the magnet. Do not try and push the connector itself through the hole as it will break off the board. It cannot be moved horizontally but I had checked them before packing for clean insertion.
chimpybits
Well-Known Member
Ok it actually took quite a bit of force on the battery to see and insert into the port. Charging now 
Looking forward to comparing it to my fairly recently purchased Caldron
Looking forward to comparing it to my fairly recently purchased Caldron
Bing2UrBong
Member
How many of yall even have a working one lol?
NYKnicks212
Active Member
I have two
SomnusViduus
you want the wizard or the skull?
hey y'all
sooo, i have a PSM and i had to replace the glass.
i know (think?) @Pipes uses fasttech to get the piece you need (a cloupour cloutank m3 glass replacement) but alas, i live in the good old USA where now you can't order one without crypto currency, which i do not use. Stupid vape ban extends to glass tubes, apparently...
BUT
this other site vapeglasstank.com worked!
i just got 3 replacements for about 8 bucks. they arrived today. it took awhile bc i believe they ship from china, and they pop up on scam alert sites if you google them because the site owner is unlisted, but i took an eight dollar gamble that paid off. they're the right part and i'm back to using my all time favorite induction heater.
to be clear, i'm not getting hooked up to say this or anything.
just a workaround if you're stuck in my boat.
nadavaigen
New Member
Dear Mr. Pipes, I’m wondering which JBWeld product as there are many, but none seem to be for electronics. The black one in the photo looks solid. Also wondering about method; do you hold the piece and glue or glue first and then set the part? Please advise…Hey guys, I think it's time for some NEWS and UPDATES
First off, Thanks to the community here for all the ongoing support and trust. A special breed of people for sure.
So the HotShot has been quite the hit and has had many great reviews and feedback. The biggest likes are towards the ease of use and the handheld size.
Unfortunately, the HS's days are numbers. The bad news is that my enclosure supplier no longer makes this model. Apparently, the mold broke and is not worth fixing/replacing. Although, the vagueness of the broken English replies I get, when I actually do get a reply, is very confusing. I’ve been on their case since last December so I think we’re fucked there. My current inventory is it. I’m down to 30 black ones left but still have lots of silvers to last for a few months.
The good news is that I’m already on the case for a replacement and with what I have learned from the Hot Shot, it should be a Brute! This new endeavor is still a while off before it becomes a reality. Please no probing. All I can say is it won't be as small as the HS.
As for the Hot Shot, there have been a couple of weaknesses that I want to go over.
We all know the doors can break easily and are more of a cosmetic issue rather than a functional problem.
If the top door breaks off, the spring and whatever is left can be removed by pushing the retaining pin out with a pin or small paperclip. If you look carefully along the top of the side panels, you will see the pinholes. Push ½ way and grasp the other side while holding the door spring so it doesn’t fly into the unit. Although, it will likely end up on the magnet.
If the bottom door loses its plastic side pins, the easiest fix is a couple of strips of black electrical tape. Lay a strip on a clean cuttable surface, so it can be sliced lengthwise. ¼” thick is good, you need one strip to go lengthwise along the center of the door between the feet and going up the sides by ¼” on each side. A second strip can then go around the bottom circumference embracing two ends and securing it all together. This strip should not be stretched too tight as it will slowly pull apart if it is. You will end up with a black stripe around the bottom but actually very secure and more worry-free.
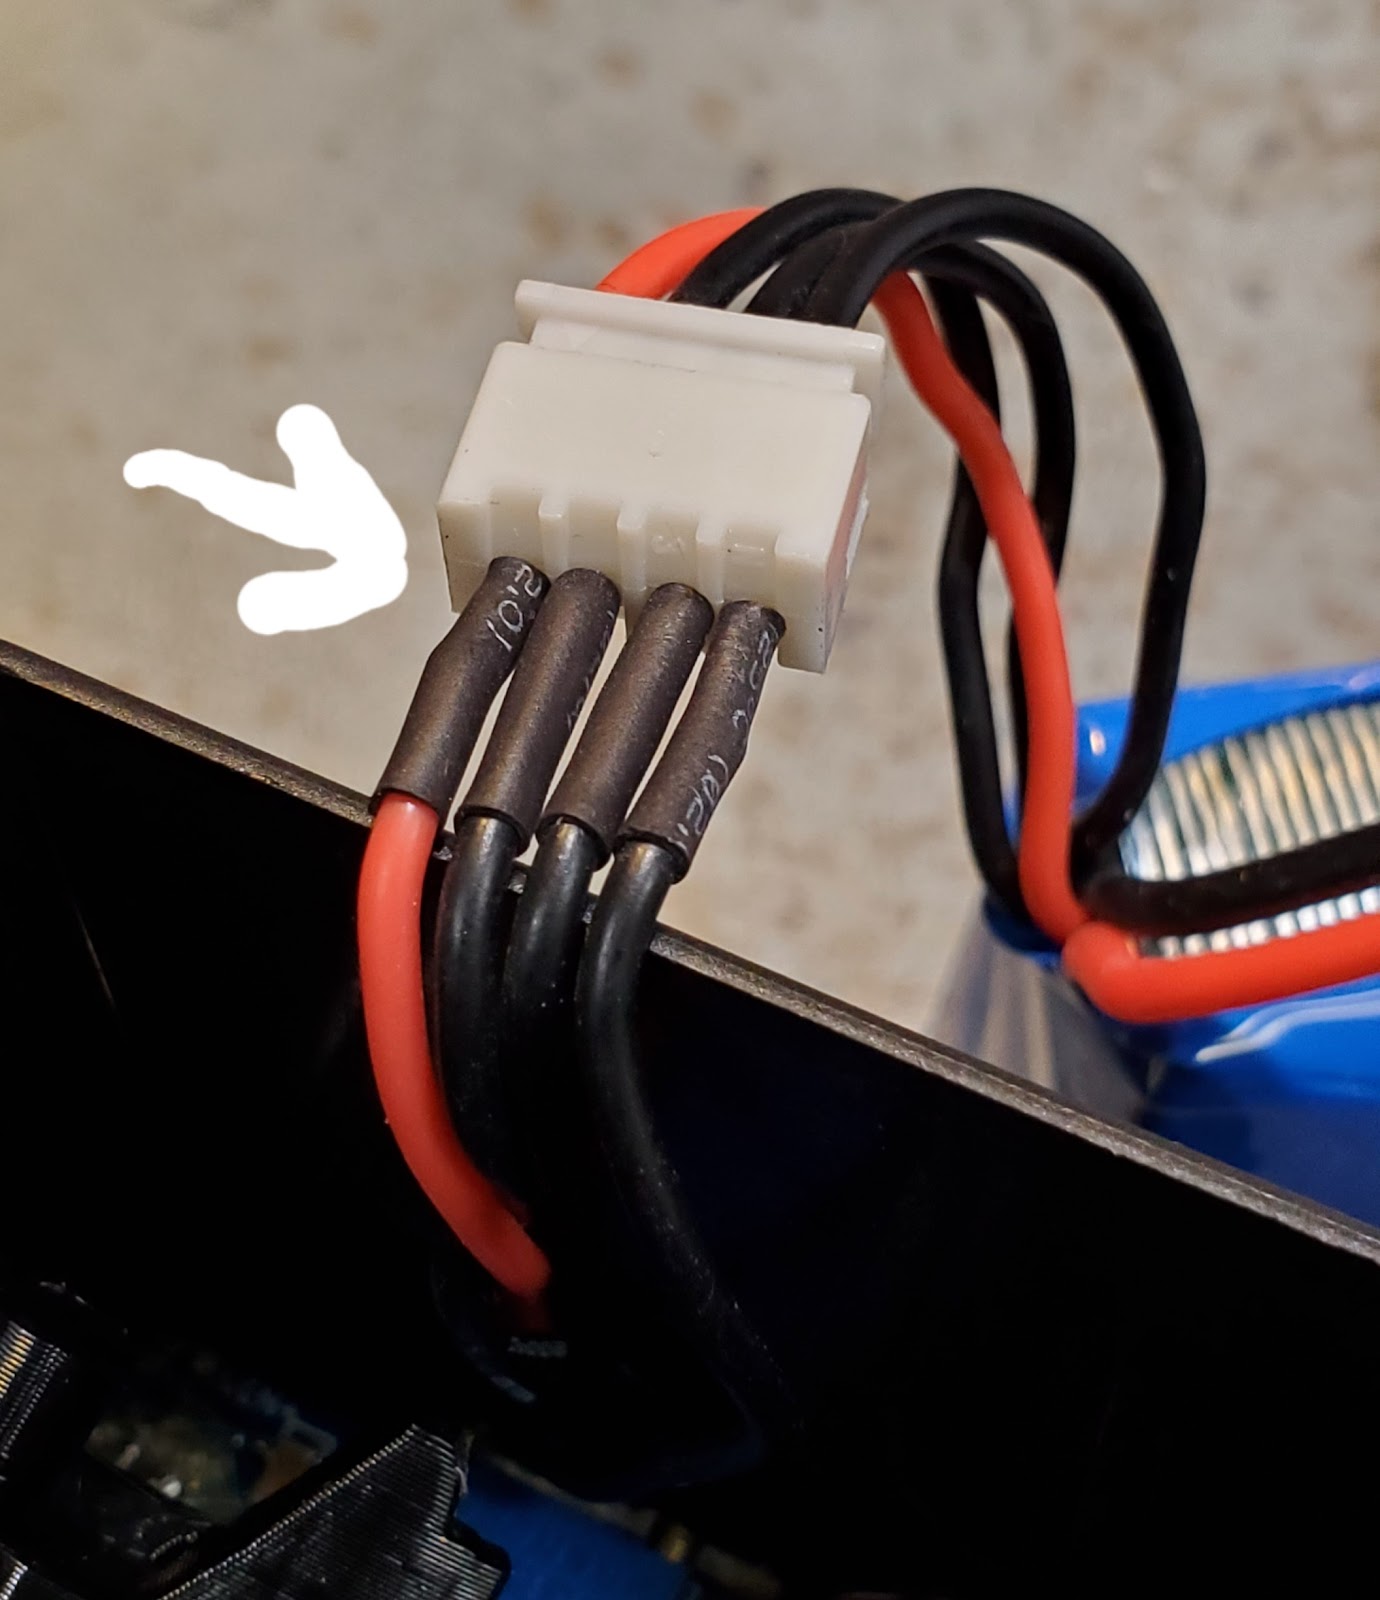
The main weakness and the real thorn in the ass for all that it happens to, is the USB connector breaking off the board. These DC-DC boards are cheaply made and these connectors can’t take much abuse. However, the weaker ones do go very fast. There have been a few reasons for the failures so I can’t totally blame the cheap boards. The connector to enclosure alignment would shift sometimes in shipment, and the user then tries to move it via the opening. This pretty much instantly breaks it off. The proper way to align is to push hard against either the top magnet to move down or open the bottom and push hard against the battery.
To help remedy this, I started applying JBWeld to all the connectors for the last while as well as any units coming back for repair. So far none of these have failed. Yah!

We also had the well-known, less critical, magnet comes off or is a crooked syndrome.
I no longer glue at all but rather have the magnet stick to a metal disc insert I added to the top on the inside. It’s a thin 15mm metal disc affixed to the top of the module by double-sided foam tape. The reason for using foam is that it acts like a spring and will self-level the disc when pushing it against the inside top under the magnet hole. You can easily remove the magnet with something more attractive than the disc underneath. VCs do not have near the pull needed to remove the magnet, so no worries there. Again, so far, no more complaints.
One last but not least is if the unit won’t charge and acts like there is no battery in it. I found this happens if the user has removed the battery to have a looksy inside. What can happen fairly easily is the wires going into the connector can pull out a tad and this trips the BMS safety circuit. This can be resolved by pushing the wires back into the connector tight.
Here are a few FAQs that have come up frequently.
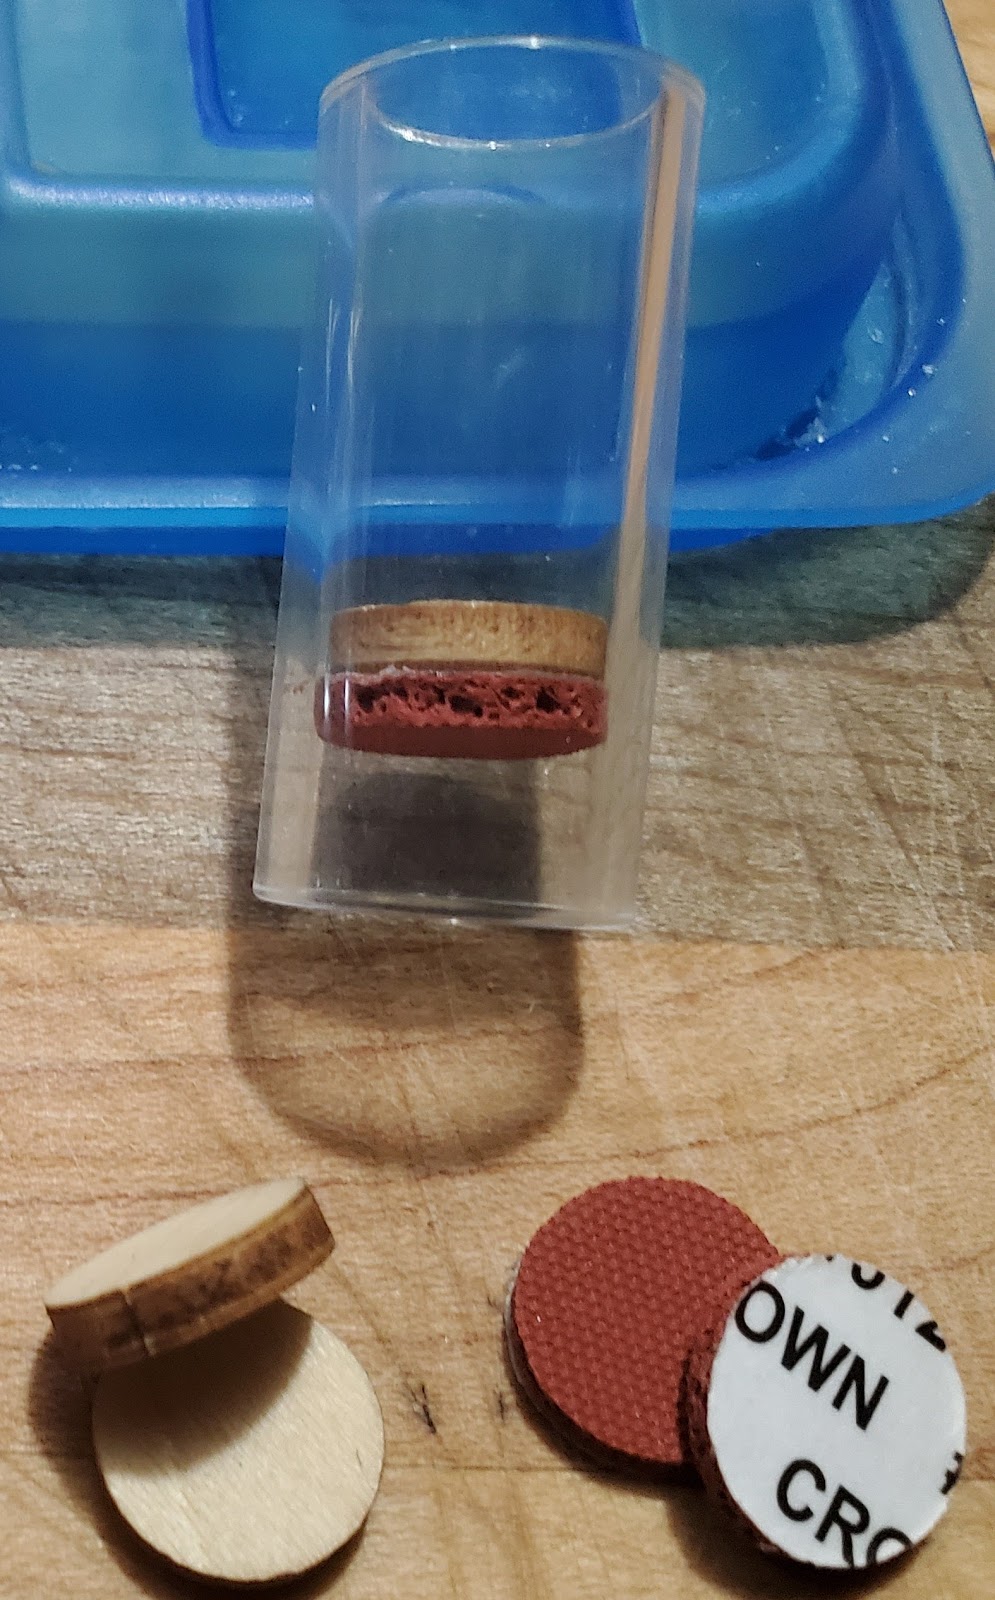
What is the packet of discs that come with the unit for?
The wooden disc is the “heatshield” which can double as a spacer and the heat-resistant rubber cushion is a “friction pad” which is attached to the underside of the heatshield to keep it from falling out of the tube if inverted. The pad is affixed offset to the disc so some protrudes along the side. This protrusion acts as a kind of hinge by pressing against the tube pushing the wooden disc against the tube on the opposite side. The pressure is adjustable by increasing/decreasing the offset by peeling away the pad and reseating it.
To use the wooden disc as a spacer, it should be installed under the heatshield/cushion pad combo so it resides closest to the actual switch.
To remove the heatshield from the tube, you need tweezers. Push down on the side of the wooden disc closest to the glass tube. The disc should flip up enough to be able to grab with the tweezers and remove. To re-install, push down evenly with a VC cap.
How can I tell if the HS is charged 100%?
The charging circuit in the HS gets quite warm while charging. This warmth can easily be felt on the rear around the USB connector while charging. It will stay warm for the duration of the charge cycle and go cool when complete. Note that if the connector is not feeling warm after 5 minutes, it is not receiving a charge and investigation is needed.
My HS charger buzzes while charging, is this normal?
Yes, this is normal but can vary between chargers. Generally caused while under heavy load and coil winding are oscillating causing a buzz.
All in all, the HS has proven to be excellent in its performance and portability. With the early problems improved upon, the overall concept will continue into the next model. I’ll get more into that once I get more into its development. So, 2021 will be the year of the HotShot, remember I do still have quite a few silvers so not dead yet. Black was definitely the favored colour. I also still have Silver B grade units if anyone is interested.
Pipes out!

I use JB-QuickWeld. It is not conductive at all.
The USB connectors are already mounted and functional as the epoxy just adds additional reinforcement to help with minor abuse in plugging in the USB cable.
If the connector comes off, it cannot be easily put back on as the solder pads are very small and likely will not hold up well even if lucky enough to get back working.
However, if soldering skills are very good and you have a very fine iron, you can give it a go. I'd recommend clipping the connector in place with a paperclip so all is aligned. Now add a dab of solder to the side of the connector and ground. This is generally dry and had not been previously soldered. Be careful as if any solder runs inside the connector, you will not be able to insert the cable. Once the sides are soldered securely to the board, the paperclip can be removed and the connection pins soldered. Since the sides are soldered, no JB-Weld will be needed.
Good luck and if all else fails, you can send it back and I'll fix it up.
nadavaigen
New Member
Thank you Mr. pipes , I used gorilla glue but I guess there wasn’t no contact so I broke it off and clean the glue with alcohol and sand paper and then I tried glued it again and it workes when I plugged it in but I got too excited and didn’t wait long enough and broke off again, so now a 3rd time but I accidentally got the black plastic cover so it’s no going back now and…..it works! Better than before, first charge gives me 5 x 3 rounds so far and counting… it’s a miracle, god bless!I use JB-QuickWeld. It is not conductive at all.
The USB connectors are already mounted and functional as the epoxy just adds additional reinforcement to help with minor abuse in plugging in the USB cable.
If the connector comes off, it cannot be easily put back on as the solder pads are very small and likely will not hold up well even if lucky enough to get back working.
However, if soldering skills are very good and you have a very fine iron, you can give it a go. I'd recommend clipping the connector in place with a paperclip so all is aligned. Now add a dab of solder to the side of the connector and ground. This is generally dry and had not been previously soldered. Be careful as if any solder runs inside the connector, you will not be able to insert the cable. Once the sides are soldered securely to the board, the paperclip can be removed and the connection pins soldered. Since the sides are soldered, no JB-Weld will be needed.
Good luck and if all else fails, you can send it back and I'll fix it up.
nadavaigen
New Member
Maybe I spoken too soon…Thank you Mr. pipes , I used gorilla glue but I guess there wasn’t no contact so I broke it off and clean the glue with alcohol and sand paper and then I tried glued it again and it workes when I plugged it in but I got too excited and didn’t wait long enough and broke off again, so now a 3rd time but I accidentally got the black plastic cover so it’s no going back now and…..it works! Better than before, first charge gives me 5 x 3 rounds so far and counting… it’s a miracle, god bless!
 I use it until it’s dead and I plug it in for an hour and still nothing. Can you please lmk how to send it to you for repair or replace parts?
The Stray Fox
Separated from the group
Welcome friend! You are in good company. We are glad you made it to FC. Pipes has always done me right.Just wanna say, I reached out to Pipes to purchase a Caldron and the shipping/processing was crazy fast for intl shipping. this is my first IH and so far I am loving it!! crazy how much more efficient/reliable an IH is.
Hey guys. I have some good news to convey.

The BRUTE has arrived. As promised I have added the Brute to my product line-up that is another portable similar to the HotShot but without the internal USB converter. Since this was the Achilles heel of failures for the Hotshot I can foresee the Brute being more reliable as well as very robust with its extruded aluminum enclosure.
The size is slightly larger than the HS and has more weight to it but the robustness can’t be denied. It is more like a switchless PSM baby.

The insides are very solid as well. I still used my 3D printers to make up the framework which can be taken apart for switch replacement or other maintenance.
There is a metal disc on the top to which the magnet sticks to. The magnet has now been upgraded to 4mm thick. The HS was 3mm and the PSM was 2mm so it is double the strength of the PSM and 50% more than the HS.


Below are the two supplied charging options. The home charger is the same as what came with the PSM and will charge the Brute in under an hour. The second is a USB adapter that will charge at a lower charge rate of 400-500mA and takes upwards of 5 hours to charge. Good for overnight charging. Both supplied chargers have an LED charge indicator. Red means charging and turns green when complete. The USB charger is not as picky about the USB source like the HS was and all the chargers I tested work. Not to say some will not as time will tell.
There is also an optional car quick charger that plugs into the accessory plug. The same as was with the PSM.

The Brute will be priced at $120 USD the same as the HotShot and comes with the same carrying case as the HS.
The HotShot has been reduced to $110 USD while quantities last.
The BRUTE has arrived. As promised I have added the Brute to my product line-up that is another portable similar to the HotShot but without the internal USB converter. Since this was the Achilles heel of failures for the Hotshot I can foresee the Brute being more reliable as well as very robust with its extruded aluminum enclosure.
The size is slightly larger than the HS and has more weight to it but the robustness can’t be denied. It is more like a switchless PSM baby.
The insides are very solid as well. I still used my 3D printers to make up the framework which can be taken apart for switch replacement or other maintenance.
There is a metal disc on the top to which the magnet sticks to. The magnet has now been upgraded to 4mm thick. The HS was 3mm and the PSM was 2mm so it is double the strength of the PSM and 50% more than the HS.
Below are the two supplied charging options. The home charger is the same as what came with the PSM and will charge the Brute in under an hour. The second is a USB adapter that will charge at a lower charge rate of 400-500mA and takes upwards of 5 hours to charge. Good for overnight charging. Both supplied chargers have an LED charge indicator. Red means charging and turns green when complete. The USB charger is not as picky about the USB source like the HS was and all the chargers I tested work. Not to say some will not as time will tell.
There is also an optional car quick charger that plugs into the accessory plug. The same as was with the PSM.
The Brute will be priced at $120 USD the same as the HotShot and comes with the same carrying case as the HS.
The HotShot has been reduced to $110 USD while quantities last.
Last edited: