
You are using an out of date browser. It may not display this or other websites correctly.
You should upgrade or use an alternative browser.
You should upgrade or use an alternative browser.
DIY Bulli Vaporizer
- Thread starter Pipes
- Start date

Ok, been a while. Slow project this time as the concentrate I have is only once in awhile as my AVB accumulates. Problem is the initial load up seems to take most of my supply right away so extensive testing is hard to do. But at least I hope these posts are at least entertaining. Maybe even give some ideas for perks to have some fun.
I decided to try a slightly different approach in that using the encapsulated fish bubble stone sponge in a much smaller setup.
This is the concept I am trying to achieve.

Basically the element is surrounded by the fish bubble stone and the air inlet follows one of the element leads down out the bottom.
Started with making a cylinder and center post from the stone. This stuff is actually pretty easy to work with. I use a hacksaw to do the initial cuts and rough sand paper to shape it.


Made a disk to cover the bottom and one leg of the element comes out the side. (The hole in the disk was by accident and serves no purpose.)

I then bent that leg up and put a piece of insulator from a wire to form the inlet air channel. Then started applying the less porous ceramic.

Once hardened I removed the wire insulator and the air channel inlet was established. Keep in mind it go down then across in hopes to help with leakage.

Next was to start the other end which needs to be built up to give a generous lip in which to help in filling and air flow.

Decided to use a peice of straw to form the upper chamber. worked out pretty good.


So all looked good. Performed some tests. Blasted it with heat to ensure it wasn't going to explode on me. This part always reminds me of the shuttle re-entering the atmosphere.

Gave it different voltages to ensure I would not burn if up using a VV mode.

All seemed to check out so ready for the big test..........
Hit the max picture limit.
Continued next post.
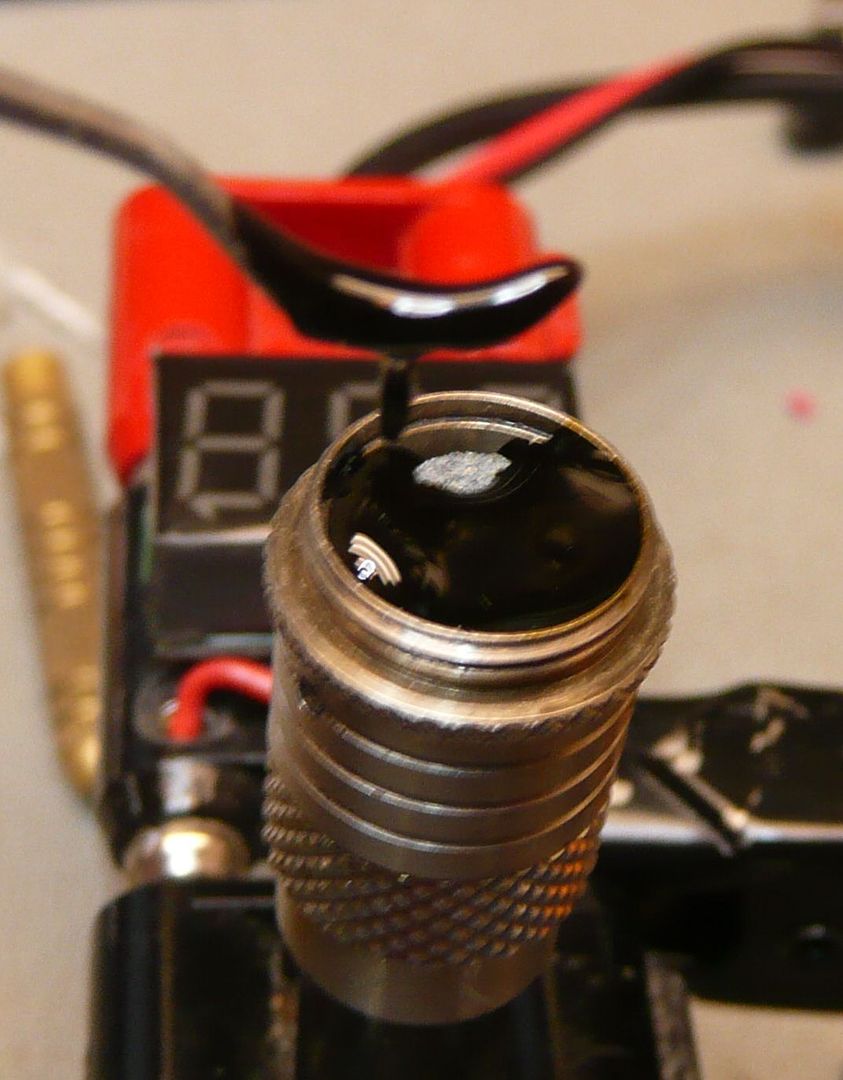
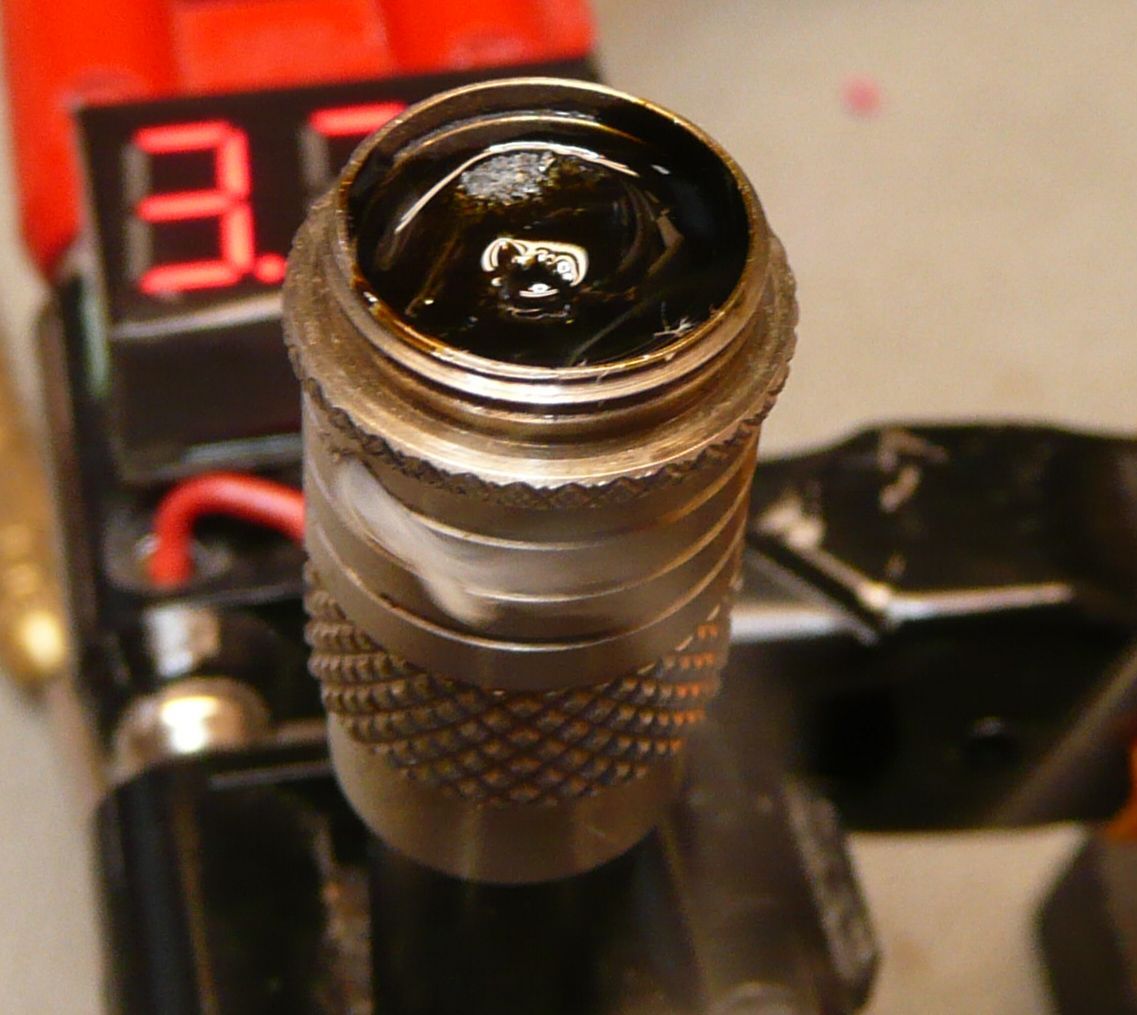
Part 2: The Big test.


Got it all loaded in and melted down into the sponge. Achieved by pulsing the the power.


And had a few really good hits. Was very happy until it started running dry and I removed the drip tip and found this.....


Yeah, somehow it broke.. Maybe the drip tip touched it or ???? Maybe I should have not torched it so fast? Who knows. But it was a good lesson and one step closer to total success.
I think my next attempt will be to use an empty carto tube for the outside enclosure and just use the less porous ceramic for the bottom seal only. Going to end up that could be adapted to a simple 510 connector and tube.? But for now a tube inside a tube kind of thing using the Bull.
Now I can only imagine what this will remind Tweak of. The smores and marshmallow look are gone.
Enjoy,
Pipes
upsetter21
Active Member
I just signed up today to see if anyone has figure some of this out. I've checked FC for the last year or so and today I find this discussion. Awesome! So I decided to actually join because I've been vaping all day on a rebuildable atomizer, using amber oil on a fish tank ceramic. Here a cross link to what I wrote:
http://fuckcombustion.com/threads/terminator-tank-for-oils.8927/
Gonna come back and share more. I'm right there with you guys on this though.
http://fuckcombustion.com/threads/terminator-tank-for-oils.8927/
Gonna come back and share more. I'm right there with you guys on this though.
Welcome to FC ups, Think your going to enjoy the folks and information here.
I believe you are onto something with the Rebuildable Bottom Coil (RBC) clearomizer as a good device for concentrates. In fact I have had my ear the the web waiting for that perfect fit.
The Bulli has proved to be great for herb but I've been beating myself up trying to made it work for concentrates. I've gone back to my DART and REV since I discovered the fish bubble stone can replace the ceramic inside them. I do love those devices but with low quality concentrate, like the crap I make from AVB, tends to gunk them up very quickly.
Back to a good RBC unit. I have been tempted to try the Kanger T3 RBC but would like a smaller tank made from pyrex and an easier or "true" rebuildable style. Thus have just been looking now and then when I visit ecig sites.
The unit you have found appears to be a good fit and look forward to seeing and hearing more about it. Might be a good idea to start a new "DIY Concentrate Vaporizer" or whatever thread as I think the Bull have been proven and continues to be my true portable on the go vape and the "how to" can be put to pasture. Although I think I've said that before.")
I believe you are onto something with the Rebuildable Bottom Coil (RBC) clearomizer as a good device for concentrates. In fact I have had my ear the the web waiting for that perfect fit.
The Bulli has proved to be great for herb but I've been beating myself up trying to made it work for concentrates. I've gone back to my DART and REV since I discovered the fish bubble stone can replace the ceramic inside them. I do love those devices but with low quality concentrate, like the crap I make from AVB, tends to gunk them up very quickly.
Back to a good RBC unit. I have been tempted to try the Kanger T3 RBC but would like a smaller tank made from pyrex and an easier or "true" rebuildable style. Thus have just been looking now and then when I visit ecig sites.
The unit you have found appears to be a good fit and look forward to seeing and hearing more about it. Might be a good idea to start a new "DIY Concentrate Vaporizer" or whatever thread as I think the Bull have been proven and continues to be my true portable on the go vape and the "how to" can be put to pasture. Although I think I've said that before.
upsetter21
Active Member
Thanks Pipes!
I'm fairly passionate about this (my friends think I'm ridiculous). I'm going to have to read back on this thread because I've not tried any sort of Dry Herb rebuildable, and it looks like you did 'bout all the work on that one. Trouble is the concentrates have my tolerance through the roof. I'm one of those guys that gets normalized by inhaled MJ Meds.
I have a burning question: can I rebuild my TV Revolution cart's? You mention replacing the ceramic. I've tried to find this info on FC for a long time, but find mostly banter about a lot of other stuff. Also seems people have moved onto the Cera. I still am a little sore over my TV experience. I've honestly never gotten a good rip off the Evo. Going to try again tho. Can you direct me a little if there is a "how-to" for the TV carts? I have a burned out Revo.
I live adjacent to Oakland, CA, so you'd think I've been getting quality concentrates, but truly it's hit and miss. I'm still not great at visually determining what makes the good stuff. I've been wondered a long while if that's the crux of my prob's with the Revo's. I'd love to use Pure Gold all the time but where the heck is it? I see it once in a blue moon, but usually a little unaffordable.
Over the next days, I'll photo a dismantle of the build I posted about. I already want to re-design and re-implement. I think a "PORTABLE DIY Concentrate Vaporizer" thread is needed here on FC. My only hesitation is I haven't hung around here long enough to get a feeling for the overall attitude of the forum. I can't stand getting beat up on over the Internet. You have had a pleasant experience in the thread however.
Reminds me of the colour of broken dreamsVery cool stuff Pipes!

Thanks Tweek, it's nice to know I can be entertaining while having fun all at the same time. Actually, I even use this thread for forgotten recipes. Was considering going back to a pulse mode unit but forgot that would have to go too low in resistance (well under 1 ohm IIRC) or go back to 6 volt supply. Which is where I started from initially. And now not really needed as my FV fills the hole for the need for speed, so to speak.
Thanks Pipes!
I'm fairly passionate about this (my friends think I'm ridiculous). I'm going to have to read back on this thread because I've not tried any sort of Dry Herb rebuildable, and it looks like you did 'bout all the work on that one. Trouble is the concentrates have my tolerance through the roof. I'm one of those guys that gets normalized by inhaled MJ Meds.
I'm in the "your nuts" boat myself. Welcome aboard!!!
Gets asked about all my little jigs and odd things I buy all the time. Sometimes I step back and think, yeah I'm nuts but having fun and a happy nut. And you know, at the end of the day the same folks are the ones that come to ask if I can do it for them too. That's when the real satisfaction hits home.
I have a burning question: can I rebuild my TV Revolution cart's? You mention replacing the ceramic. I've tried to find this info on FC for a long time, but find mostly banter about a lot of other stuff. Also seems people have moved onto the Cera. I still am a little sore over my TV experience. I've honestly never gotten a good rip off the Evo. Going to try again tho. Can you direct me a little if there is a "how-to" for the TV carts? I have a burned out Revo.
I live adjacent to Oakland, CA, so you'd think I've been getting quality concentrates, but truly it's hit and miss. I'm still not great at visually determining what makes the good stuff. I've been wondered a long while if that's the crux of my prob's with the Revo's. I'd love to use Pure Gold all the time but where the heck is it? I see it once in a blue moon, but usually a little unaffordable.
For most the rebuilding of the REV or DART is NOT an option. If one can rebuild a normal old type 510 arch top atomizers, then it would be a different story. In your case and because of where you live I would just get TET to rebuild it. They have a rebuild service for just a few dollars. $15-$20 type of thing.
If you have the balls for it, best to google "rebuilding 510 bridge atomizer" should get some disassembly techniques down. Mainly removing the 510 connector from tube.
Inside the DART/EVO you will find the following:
One end of coil is compression fit to center pin with a brass collar. Kanthal pinched between collar and post of center 510 pin.
The upper ceramic disk which fits between the mid collar ring in the tube and the wound Kanthal element. Newer versions had the side(s) shaved to leave a gap for better draw.
An inner ceramic cylinder which acts as a reservoir along with the upper disk. The center hole in this cylinder is about the same as the hole in the bottom of 510 connector without the center contact in place. The diameter is such the wound coil get fed up through it for assembly. Outside is sized to snugly fit into the 510 connector leaving just enough room above to accommodate the Kanthal element which fits horizontally across the top.
The Kanthal element gauge depends on the voltage and vintage of the device. But the setup is the same. As stated one end starts at the center post then wound around a ceramic post and is terminated by compression between the outer tube and 510 connector tube. The end of the wire is fed through one of the small holes around the top of 510 connector and bent down the side so when inserted into the main tube it gets squeezed for the ground contact.
Now the things that can and will go wrong. Losing parts like base collar or ceramic pieces.....so small and can "flick" accidently.
The porous ceramic breaks very easily. Unit must be as clean as possible before disassembly. Cleaned again after connectors disassembled and before removing ceramics. Once ceramics are out they can be torched clean. These ceramics are the pieces I found can be replaced with the porous bubble stone material and acts the same as original material.
In conclusion attempting this can lead to problems but then again, fun for the right kind of guy.
My preference here is running 3.7 volt 30 AWG Kanthal at 1.2 + ohm so most ecig PVs will drive it.
Over the next days, I'll photo a dismantle of the build I posted about. I already want to re-design and re-implement. I think a "PORTABLE DIY Concentrate Vaporizer" thread is needed here on FC. My only hesitation is I haven't hung around here long enough to get a feeling for the overall attitude of the forum. I can't stand getting beat up on over the Internet. You have had a pleasant experience in the thread however.
Hey, no need to be shy here as long as you keep it within reason and can benefit others. There's lots of great folks here and you will find out whos whos before long. Some are very well know and love to help perks out and make a habit of it which is the beauty of the folks here.
You can always take your time and put a post together in notepad or whatever to get it right before cut and paste into a thread when you're happy with it.
Watch out for that Tweek though. He's a smooth talker for sure.
I know I was going to move on from using the Bull for concentrate, but took a step back and simplified things a bit.
Got away from a reservoir made from ceramic and layed two 2 ohm, 32 AWG (1 ohm end result) heating elements along the bottom on both sides of the mounting screws.
Making it a dual core unit. Used the hard ceramic for center of coils. The reservoir this time is simple silica wick pulled between the screws and wrapped around the underside of elements. The remaining length is wrapped around the outside while screwing mid section on.


Note: Straitened and evened out the coil before finial assembly.
I still made a ceramic top disk with a hole in it which more or less rests on top of the screws and against elements. This is curved from the fish bubble stone. Fits under the inner lip of mid section.


From here the fun began. Have to admit that I cheated a little in that I primed it somewhat before I put the ceramic in place and screwed the mid section on. I screwed this on as tight as possible and wrapped the remaining silica wick around the insides while screwing. I do not think it can be unscrewed once used as it will be mucked up too much inside.

Pulsed it on til vape started and cycled a few times til it melted into the ceramic. Put it on my modded Bolt and wow.

It hits with no restriction and sipping is just awesome. Way bigger clouds then I can handle. Been testing on and off for a week. Top er up way before it goes dry and it has not leaked one little bit. I was expecting it to but nope. The mid section I used has two holes in it. One it the off the shelf holes which was put in from manufacturer and the other is lower and was added by myself. Have been trying to determine which position is best for leaking but neither hole have leaked. Also, the mess has not even gone up past the ceramic meaning the top part has remained clean. The space at the top of ceramic and lip of mid section make for topping up easy as pie. I use a flat ss dental tool and it scraps clean across the opening. So far it has gone through roughly 3 grams and still going strong. Very promising for sure.
Happy modding....
Pipes
Got away from a reservoir made from ceramic and layed two 2 ohm, 32 AWG (1 ohm end result) heating elements along the bottom on both sides of the mounting screws.
Making it a dual core unit. Used the hard ceramic for center of coils. The reservoir this time is simple silica wick pulled between the screws and wrapped around the underside of elements. The remaining length is wrapped around the outside while screwing mid section on.
Note: Straitened and evened out the coil before finial assembly.
I still made a ceramic top disk with a hole in it which more or less rests on top of the screws and against elements. This is curved from the fish bubble stone. Fits under the inner lip of mid section.
From here the fun began. Have to admit that I cheated a little in that I primed it somewhat before I put the ceramic in place and screwed the mid section on. I screwed this on as tight as possible and wrapped the remaining silica wick around the insides while screwing. I do not think it can be unscrewed once used as it will be mucked up too much inside.
Pulsed it on til vape started and cycled a few times til it melted into the ceramic. Put it on my modded Bolt and wow.
It hits with no restriction and sipping is just awesome. Way bigger clouds then I can handle. Been testing on and off for a week. Top er up way before it goes dry and it has not leaked one little bit. I was expecting it to but nope. The mid section I used has two holes in it. One it the off the shelf holes which was put in from manufacturer and the other is lower and was added by myself. Have been trying to determine which position is best for leaking but neither hole have leaked. Also, the mess has not even gone up past the ceramic meaning the top part has remained clean. The space at the top of ceramic and lip of mid section make for topping up easy as pie. I use a flat ss dental tool and it scraps clean across the opening. So far it has gone through roughly 3 grams and still going strong. Very promising for sure.
Happy modding....
Pipes
upsetter21
Active Member
Nice Pipes! We're still thinking along the same lines. It seems the ceramic disc is easier to create, and heating from below - more like an AVA is a good call. I think in terms of preserving flavor, it is best to avoid allowing the concentrate to come in direct contact with the heating wire, or at least limit the amount since it goes where it wants to.
I know I said I'd post photos of my Terminator dripping atty in a similar config, but the camera proprietary batteries decided they're done. I'm working on it. I did dismantle my build - and smoked the stone. That was interesting.
My setup is very similar to yours, although I'm using 1 coil - wrapped over an oxidized SS mesh roll instead of the ceramics. This eliminates the silica as the SS mesh has its own wick ability. Also a SS mesh conducts heat faster than ceramic and I believe the heat reaches the fish bubbler disc faster. In my experience the silica can either impart unwanted flavor, or collect the terpenes & flavonoids and then impart the burning plant flavor over time as the crud builds up. The SS clears itself more readily under operation as I think it just disperses enough heat to vape everything.
My current challenge is to figure a way to secure my fish tank stone. Initially I was wrapping the resistive wire around a stone cylinder which had a pair of grooves machined in the sides for the wire to lay in and the tension of the wire once fixed to the elec posts held the ceramic. However my second method w/ mesh does not include any attachment to the stone... DIY'ing some more and will update hopefully w/ photos. Unfortunately I have knee surgery this week, so I might be away for a bit.
Nice Pipes!
My setup is very similar to yours, although I'm using 1 coil - wrapped over an oxidized SS mesh roll instead of the ceramics. This eliminates the silica as the SS mesh has its own wick ability. Also a SS mesh conducts heat faster than ceramic and I believe the heat reaches the fish bubbler disc faster. In my experience the silica can either impart unwanted flavor, or collect the terpenes & flavonoids and then impart the burning plant flavor over time as the crud builds up. The SS clears itself more readily under operation as I think it just disperses enough heat to vape everything.
My current challenge is to figure a way to secure my fish tank stone. Initially I was wrapping the resistive wire around a stone cylinder which had a pair of grooves machined in the sides for the wire to lay in and the tension of the wire once fixed to the elec posts held the ceramic. However my second method w/ mesh does not include any attachment to the stone... DIY'ing some more and will update hopefully w/ photos. Unfortunately I have knee surgery this week, so I might be away for a bit.
Hope your surgery has gone well. Recovery is always best with a good vape in hand.
You certainly have my interest in the SSM. I get the inner SSM roller tube but its the outer side of coil which I am a little confused about. The fish bubble stone disc lies on top of coils. How are you handling the other open areas? The reason for the silica rope is the collect the concentrate and keep from running all over. The getting gooed up is IMO part of the priming process to help keep the concentrate close to the coils.
The oil I have been using really doesn't have a great taste to start with so can't comment on any added bad taste from the silica.
Looking forward to see your creation for sure.

My Bull mod is still working well after I's say 5 1/2 grams. Had one minor leak which was my fault as was actually seeing just how much I could fit it. Got over 1/2 gram in and did not leak till I forgot it on for a few too many seconds. Finished a few more puffs and noticed later on it had a very minor leak from the top hole. Just wiped clean with a kleenex and ISO. Not even enough to actually run anywhere. But worth mentioning.
So I'd call this edition a success!!!
I swear I'm gonna come in here one day, and Pipes will have created a vaping Frankenstein.
Looking over the specs now.

Olympus Mons
Probation Officer
Sure I speak for everyone when I say, Thank You, Pipes, for posting this wealth of information. It is NASA quality and exactly the kind of research I am looking for.
The illustrations are great. Just have to sort through it all and set my own Apollo Program in motion.
And thanks again to Tweek for turning me on to this thread.
The illustrations are great. Just have to sort through it all and set my own Apollo Program in motion.
And thanks again to Tweek for turning me on to this thread.
Why thank you for the compliments. Not really sure about the Nasa quality though.Sure I speak for everyone when I say, Thank You, Pipes, for posting this wealth of information. It is NASA quality and exactly the kind of research I am looking for.
The illustrations are great. Just have to sort through it all and set my own Apollo Program in motion.
And thanks again to Tweek for turning me on to this thread.
I tried to keep the thread up to date while the experiments were going down. This thread also acted as a journal for myself since the methodologies were changed up so many times.
The Bull proved to be a very versatile platform for this type of experimenting and passed all the objectives very well.
Herbal in 2 modes: pulse mode (6 volt 2.6 ohm) and continuous mode (3.7 volt 1.2 ohm) operations.
Concentrate in "on demand" mode (3.7 volt 1 ohm dual coil).
It's even a fair ecig which it is actually intended for.
Only real drawback is the initial cost of the Bull is not cheap but IMO worth the extra. Considering I rebuilt the + connectors a couple times where other rebuildables may have packed it in. What I actually considered one of the biggest "finds" which made a huge difference was those little stainless steel screens. The normal screens worked but were also a pita when they occasionally fell out.
I would really enjoy tuning into an Apollo program to see other ideas take form. Some really fun stuff for the right people.
Tweek just enjoys the read. Not sure if I'd give him a screw driver or not.
 He's good with a video camera though.
Happy modding, Pipes
Olympus Mons
Probation Officer
I'm just a janitor in this Apollo Program, along for the ride like Tweek, though handy with a graphics program if you ever decide to brand anything - even just for fun, not necessarily profit. The way you share all this info freely, can't see you as the type just out to make a buck. You are of course Mission Control and much of your work is way over my head, but I need to thank you again for practically reading my mind and telling me exactly what I needed to know about batteries.
Kinda figured my ego-C upgrades would only be good for e-juice, which I am enjoying. Will bite the bullet and get the Bull. Power, like RAM, usually = more fun! And with all your amazing mods to try out, I'm sure I'll find something that fits my modest needs. All these little parts and wires and wicks and stuff are pretty cheap to experiment with, a big plus.
Did I read ... way back somewhere ... that you only had some reclaim oil to test these devices with?
Will someone please get this man some good C02 oils and clean waxes?! He is far too brilliant and his work far too important to be left to substandard lab materials of any kind.
If you are ever in the Oakland hood, Pipes, vapes are on me. Peace.
I think you will enjoy your adventure ahead. Don't forget a more local supplier here.
Never did business with them myself but was the only other retailer I could find. Also, remember to request the mid section not to be pre-drilled if possible. Not a showstopper but nice to decide on your own where you want them. I believe they ordered some extras from previous request but not sure.
Again, thanks for your kind words and thoughtful intentions. Note that I have used my 2 herb vapes now for many months without having to give them a second though. Rarely need cleaning and very low maintenance once all together and working. Reliability is definitely a strong point.
Although the concentrate vape is not long term test driven, it seems to have high promise. And with the last design, rebuilding would not be all that hard considering you can burn clean the ceramic disc to be re-used.
Currently getting more into other vapes and my attention has been shifting elsewhere but these guys will always have a place in my line up.
Olympus Mons
Probation Officer
.... Note that I have used my 2 herb vapes now for many months without having to give them a second though. Rarely need cleaning and very low maintenance once all together and working. Reliability is definitely a strong point.
Although the concentrate vape is not long term test driven, it seems to have high promise. And with the last design, rebuilding would not be all that hard considering you can burn clean the ceramic disc to be re-used.
Currently getting more into other vapes and my attention has been shifting elsewhere but these guys will always have a place in my line up.
Unbelievable, your assistance is again of superior potency. I have ordered some erector-set/chemistry-set parts/materials and will let ya know how it goes. Thanks again for all the help and encouragement! I may even buy a multimeter! (Bet you just wanna slap me now.) Oh, and extra special thanks for the Bull link. Wasn't sure if it was cool to discuss retail in this thread or not.
vape4health
Well-Known Member
DUDE, I was felling cool cause I can rebuilde nova and genny style atties with 2 part wire (resistance and non resistance). I'm sure you have come acrossed the 'Sparkomatic' just a disposable camera flash to weld wire, maybe you got a use for it.
As all before have said, thank you for sharing. I really enjoy this stuff too.
As all before have said, thank you for sharing. I really enjoy this stuff too.
Thanks. I have tried using charged capacitors for attaching wires with some success but not very reliable results. Have also attempted to make a variable battery tab arc welder but that got put on a back burner.
Actually the disposable flash camera, or any flash circuit I would assume, sounds like an easy alternative method. Going to have to check into that. Cool, thanks.
Now where did I put that old Vivitar from the 80's....or was that the 70's...
Knowing me I still have it.
Actually the disposable flash camera, or any flash circuit I would assume, sounds like an easy alternative method. Going to have to check into that. Cool, thanks.
Now where did I put that old Vivitar from the 80's....or was that the 70's...
Knowing me I still have it.
vape4health
Well-Known Member
Wow, I helped.
I dont really know much about the stuff youtube and some reading and I got it. My take is the transformer and cap(s) are the only parts used then you connect a 15k resitor to one momentary button and a second button is a momentary power in, throw a meter on it and you can now controll volts with the buttons and capacitance is set by cap size or numbers. For me 3 caps at ~100v weld 32 kanthol to 99 silver after some practice and really good cleaning with iso.
I dont really know much about the stuff youtube and some reading and I got it. My take is the transformer and cap(s) are the only parts used then you connect a 15k resitor to one momentary button and a second button is a momentary power in, throw a meter on it and you can now controll volts with the buttons and capacitance is set by cap size or numbers. For me 3 caps at ~100v weld 32 kanthol to 99 silver after some practice and really good cleaning with iso.
Olympus Mons
Probation Officer
Oh how I want that Bulli but gonna have to wait, maybe bug the wife for a xmas gift! But, thanks to all the info and help from old Pipes, I'm having some fun with a few cheaper pieces (just messing with a Phoenix clone, really ... getting pretty high just playing around and odds and ends! I'm not gonna repost what Pipes already did much better than me, instead just thank him again for all the ideas and inspiration.
Oh and I gotta ask you this: Can you please shoot down this crazy idea I have, with some of your experience, so I can get it out of my head? Okay, I had a whim that something like a little dram hash oil glass bottle could somehow be fitted with a coil/ceramic as per your experiments, but like sitting inside the bottle. Does this even have a remote chance of working? Can that glass be heated to vape temp or would it need to be made of Pyrex? Would oil just bubble out all over the place like a volcano? (I don't mean the name-brand vape, I mean like a real volcano - in a bad way?) I kinda like the idea of using glass as a bowl or reaction chamber and just had a crazy notion ... I mean, just imagine a portable device that could fit a bottle of oil, with a heating element that simply dips into it -- I don't even care too much about portability but wow, that would be slick!
Oh and I gotta ask you this: Can you please shoot down this crazy idea I have, with some of your experience, so I can get it out of my head? Okay, I had a whim that something like a little dram hash oil glass bottle could somehow be fitted with a coil/ceramic as per your experiments, but like sitting inside the bottle. Does this even have a remote chance of working? Can that glass be heated to vape temp or would it need to be made of Pyrex? Would oil just bubble out all over the place like a volcano? (I don't mean the name-brand vape, I mean like a real volcano - in a bad way?) I kinda like the idea of using glass as a bowl or reaction chamber and just had a crazy notion ... I mean, just imagine a portable device that could fit a bottle of oil, with a heating element that simply dips into it -- I don't even care too much about portability but wow, that would be slick!
Using glass for this would be excellent but think there are going to be some bumps to overcome.
You already know the basic answer here as you stated the volcano effect. Air flow would be the main obstacle to figure out. The air would need to be channeled through the glass such that air pockets can not form to produce a volcano. And if these air inlets ever become blocked, well, Saint Helens again?
Not saying can't be done but would have to really think it out and keep the safety aspects in the equation. I don't think heat would be a problem as we have lots to work with. It's airflow and breakage that would be the pita.
Thanks again for the kind words.
Happy modding.
vaporonly
living in a van down by the river
I would also like to say thank you for posting your journey through this.
so these airstones are kinda like what's used in the vapor genie and the healthstone? (or maybe that's an assumption because I don't know how they react to flame...did you try torching these airstones?)
so these airstones are kinda like what's used in the vapor genie and the healthstone? (or maybe that's an assumption because I don't know how they react to flame...did you try torching these airstones?)
Olympus Mons
Probation Officer
I see your point to all the potential trouble spots using a glass vial, I would not presume to debate you. Perhaps enclosed or sitting in some kind of metal chamber or "double boiler" type device would be the way to go, and air-flow could be designed into the outer unit. But now it's just sounding like more trouble than it is worth ... a project for the back-burner and a rainy day for sure.
I like when you said your pieces are low-maintenance. Technology should be something the end-user shouldn't have to think twice about, or even once! Best technology is when people think there is no technology at all. I sometimes lose track of the end-game and forget to get high in all of this.
I like when you said your pieces are low-maintenance. Technology should be something the end-user shouldn't have to think twice about, or even once! Best technology is when people think there is no technology at all. I sometimes lose track of the end-game and forget to get high in all of this.