The Nomad From Morwood

Shit Snacks

Milaana. Lana. LANA. LANAAAA! (TM2/TP80/BAK/FW9)
This finished convection Heater Module (HM).

This example is steel and brass but the final version, as stated earlier, will be silver. Obviously no glue used here, just silver solder. Once assembled, the HM cannot be disassembled. The insulating disc shown here is cocobolo.

Each part is locked in place mechanically, so it's quite robust, you don't have to worry about it rattling around in your pocket. It'll definitely be fine if you drop it.

JbMUXSC.jpg


The all mighty wave heater.

The wave form creates airways of exact size between each peak so that the air is forced through uniformly. This also gives massive surface area in contact with the air. And no "dead spots" where air can slip around the heater.

Since there are no lead wires, there is less wasted energy.

Any heat conducted away from the coil by the central pin and shell is in direct contact with the incoming air...so there is a sort of cooler effect where the heat cannot travel down to the air inlet side of the module and all available heat exits the heater.

With this design, I've found that even a low consumption of around 25 watts will get you ~3 second heat up time and plenty of heat, more than enough actually.

After use, the heater can be handled immediately, it barely gets warm. Unless, of course, the heater is kept on without any airflow.

YLjrTeB.jpg


The air inlet end. I am still playing around with the shape of these air holes... One idea I have is to sandwich a thin perforated metal disc between the brass pin and wood disc.. you can turn this metal disc to adjust the inlet air flow from fully closed to fully open. This will really give you the ability to micro adjust the heating characteristics of each HM.

I could also play around with making holes on an angle to spin the incoming air into a vortex... I doubt there will be any performance gains, but it sounds cool.

In the production units, these holes will most likely be curved slots cut out on the mill.

SLGi8aD.jpg


zUnJjGf.jpg


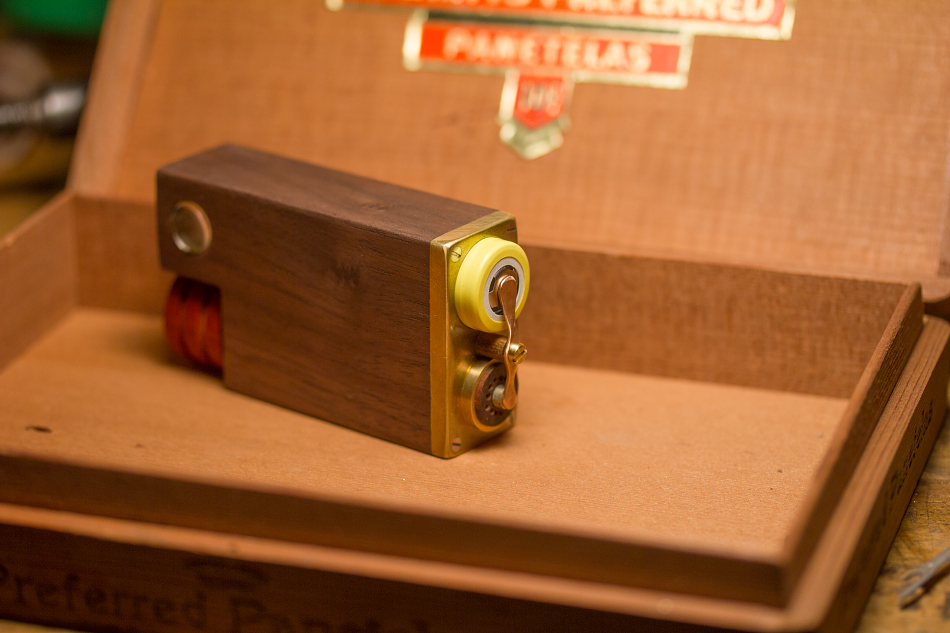
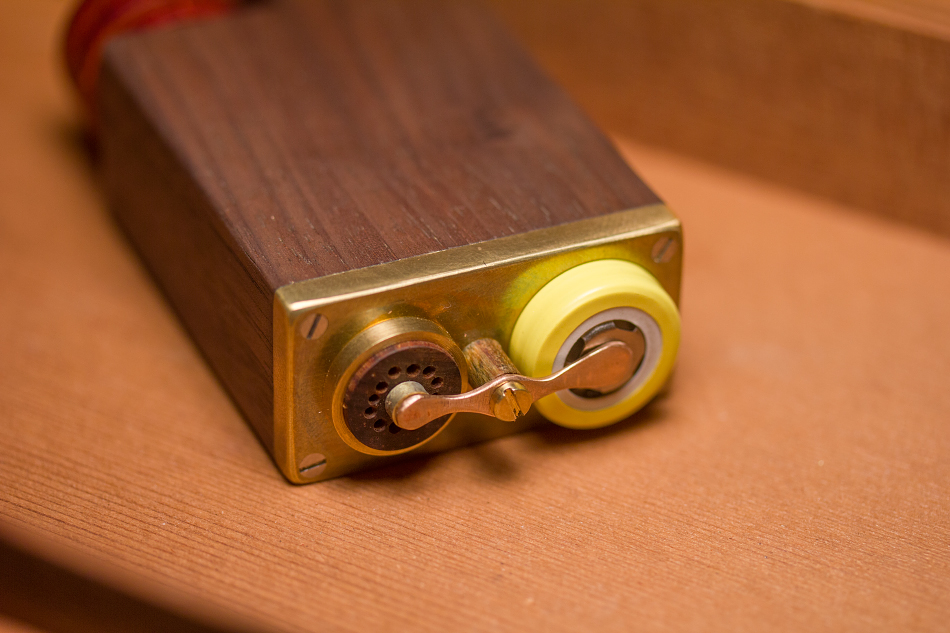
The battery and heater module are connected directly to each other via a copper bridge, spring loaded with adjustable downwards pressure. Very secure. Yet, with one hand, you can just swivel the bridge with your thumb and remove the battery or heater module. No fuss.

When you want to lock the unit for safety, just swivel the bridge to disconnect, no need to remove the battery or HM.

In the production RM-1 I will be making this bridge out of a different metal, and maybe a different shape.. not sure on that detail yet...

JipRk7E.jpg


The tension adjustment screw, shown here in brass, is only used for adjusting the pressure of the contacts. It doesn't spin with the bridge, so the threads will not wear quickly. In any case, the threads go deep into the main body with a steel thread insert. So the brass screw will wear before the steel thread, and then can be easily replaced.

Because the downwards pressure of the screw is applied at the center point between the two contact pads, the two contact spots work against each other to evenly distribute the force... And if one battery is a bit taller than another, the bridge is able to tilt slightly and still give equal solid pressure on both contact pads.

Also shown here is a verawood spacer/insulator under the bridge screw, but this will most likely be black Delrin or African blacwood in the production units.

hyWuOFL.jpg


Now I just have to finish the sleeve and bottom plate and we're pretty much there!

Oh My Damn Dan!

Finally seeing your heater module has like opened up a new level to this already heavily wonder-filled project, I can see how that would make for an extremely effective heat source and oh so tiny! The design is simple yet solid, everything function and style seems to be delivering in spades on the original goals

I think I may be clinched for one of these asap now, should start preparing moneywise lol
 

mephisto

Well-Known Member
Hey Shitty, I will front you the money for your very own if you are tight.
Dan, thank you for making all of us part of the production experience. You are a Samurai Master, perhaps your newest piece of functional art should be called the "sensi" . This would represent the wisdom and knowledge passed from the master to the pupils........
Or you can call it peanut butter and jelly, either way, I am getting me one of these beauts! Its so nice to look at, its hard to believe that it will be a vaporizer.........
 

nosmoking

Just so Dab HAppy!
I too eagerly await this vape. I really can't wait to see what you come up with for a concentrate specific heater module. I realize the convection HM will already do a great job of vaping concentrates with the use of a ss pad or cotton or whatever such method but I am hoping for a HM that does not require me to add such material.

I love all that you have done with this project thus far. Its art but its form and function too!
 

KeroZen

Chronic vapaholic
I think @mephisto meant to write "sensei" (martial arts teacher) but "sensi" (as in the often used misspelling of "sinsemillia" and the name of one of the first Dutch seminal seed banks) is also more than appropriate! I love both, even better than the "modular"!

Anyway, this is genius Dan: you created another kind of high surface area heater without copying RBT's design. At first glance it made me think about the cigarette lighters in cars hehe!

Just one remark, you know I love to nitpick: I would insert the battery the other way round, with negative terminal facing out. The reason being to minimize tear and wear near the insulation ring on the shrink wrap due to friction from the "sprong". If you shear the shrink wrap and the little white cardboard disc falls out, you end with a dangerous situation (with + and - very close and a shorting risk) So it's better to shear the wrap on the negative side, it just exposes more of the negative terminal (which is in fact the entire cell body)

But will there really be a bottom cap @PPN? Looks like it could be used as is.
 

Dan Morrison

Well-Known Member
Manufacturer
@PPN , This was a design question of mine as well... I could seal them off from one another.. but it would take an extra gasket part that would really be a pain in the ass...it also means that the seal has to be made around the copper bridge... do-able, but the bridge needs to be stationary for the seal to work... so you cant swivel it to give you the safety "OFF" position...

In use, the air inlet is away from the battery, so the flow of air does not touch the battery area.

I assume that your concerns are with battery venting. I figured.. if your battedy is venting, it will shoot gas out the safety venting port, and not up into the airway. Also... if your battery is venting, you've got a big problem.

Thoughts?

@Shit Snacks , @mephisto , Thanks for following along, and all the support guys! :)

@nosmoking , An ideas? What's your favourite method currently?

@KeroZen, Thanks! And yes.. it does take from the cigarrette lighter design a bit! It's similar in geometry to catalytic converters... My thinking was... the catalytic converter was designed to put as much surface area as possible in contact with as much gas flow as possible...

Haha, i always like your nitpicks! I would just call that constructive criticism, and it's the whole point of showing your work! Keep it coming!

And the battery placement is up to the user...but i'll tell ya why I put it this way. For one, the 'high point' on the positive side is the metal contact pad, which is above the wrapping. The high point of the neg. terminal is the wrapping itself. So much more likely to snag the wrapping on the neg. side.

The bridge swivels and clears the wrapping without touching it. Sure you could snag it by accident by applying downwards pressure as you swivel..but i don't see it happening often. I've rounded the bottom edges of the contact pad as well. So it doesn't really have the ability to snag, only glide across.

But the most important thing would be safety in case of critical battery failure and venting. You need the gas to be able to vent outwards into an unrestricted space. It vents from the pos. end.

And yep, it's fully functional without the sleeve/bottom cap. But, everything is a bit exposed for my liking. The main function of the sleeve/bottom plate is to provide protection for the internals.
 

VaporSipper

Well-Known Member
I assume that your concerns are with battery venting. I figured.. if your battedy is venting, it will shoot gas out the safety venting port, and not up into the airway. Also... if your battery is venting, you've got a big problem.

Thoughts?

I'm not a battery expert, so I wonder if battery venting is an all or nothing thing or do batteries sometimes vent "a little"? My concern is that if batteries do indeed vent "a little," you would likely be sucking in those fumes if the paths aren't separated. Especially if the battery is inserted as shown, with the vent holes in the same area as the air intake...

Maybe the bottom cap could have a notched separation at the swivel point of the bridge and this notch could be lined with a felt material to form a seal? Not completely airtight, but maybe good enough?
 

Puffers

Micro-Climate Mastermind
I'm not a battery expert, so I wonder if battery venting is an all or nothing thing or do batteries sometimes vent "a little"? My concern is that if batteries do indeed vent "a little," you would likely be sucking in those fumes if the paths aren't separated. Especially if the battery is inserted as shown, with the vent holes in the same area as the air intake...

Maybe the bottom cap could have a notched separation at the swivel point of the bridge and this notch could be lined with a felt material to form a seal? Not completely airtight, but maybe good enough?

Battery venting is all or nothing. If a battery vents you won't be left wondering if it vented out or not, it's unmistakable. There's a burst ring or cap that when catastrophe strikes and when that burst cap goes..... it goes. It's a one time, irreversible occurrence that ends with you buying a new battery.

 
Last edited:

VaporSipper

Well-Known Member
Battery venting is all or nothing. If a battery vents you won't be left wondering if it vented out or not it's unmistakable. There's a burst ring or cap that when catastrophe strikes and that burst cap goes..... it goes. It's a one time, irreversible occurrence that ends with you buying a new battery.

Thanks for the clarification! If that's the case, then I see no problem here. :)
 

GreenHopper

20 going on 60
@PPN , This was a design question of mine as well... I could seal them off from one another.. but it would take an extra gasket part that would really be a pain in the ass...it also means that the seal has to be made around the copper bridge... do-able, but the bridge needs to be stationary for the seal to work... so you cant swivel it to give you the safety "OFF" position...

In use, the air inlet is away from the battery, so the flow of air does not touch the battery area.

I assume that your concerns are with battery venting. I figured.. if your battedy is venting, it will shoot gas out the safety venting port, and not up into the airway. Also... if your battery is venting, you've got a big problem.

Thoughts?

@Shit Snacks , @mephisto , Thanks for following along, and all the support guys! :)

@nosmoking , An ideas? What's your favourite method currently?

@KeroZen, Thanks! And yes.. it does take from the cigarrette lighter design a bit! It's similar in geometry to catalytic converters... My thinking was... the catalytic converter was designed to put as much surface area as possible in contact with as much gas flow as possible...

Haha, i always like your nitpicks! I would just call that constructive criticism, and it's the whole point of showing your work! Keep it coming!

And the battery placement is up to the user...but i'll tell ya why I put it this way. For one, the 'high point' on the positive side is the metal contact pad, which is above the wrapping. The high point of the neg. terminal is the wrapping itself. So much more likely to snag the wrapping on the neg. side.

The bridge swivels and clears the wrapping without touching it. Sure you could snag it by accident by applying downwards pressure as you swivel..but i don't see it happening often. I've rounded the bottom edges of the contact pad as well. So it doesn't really have the ability to snag, only glide across.

But the most important thing would be safety in case of critical battery failure and venting. You need the gas to be able to vent outwards into an unrestricted space. It vents from the pos. end.

And yep, it's fully functional without the sleeve/bottom cap. But, everything is a bit exposed for my liking. The main function of the sleeve/bottom plate is to provide protection for the internals.

Personally I agree that the positive end venting outwards is not a concern of mine, for all the reasons you state.

However I do like the idea of a bottom enclosing cap just so you can place the vape down on a flat surface and have it stand up straight.

It's looking great man, this is definitely one of those vapes that exudes so much style and soul.
 

PPN

Volute of Vapor
Hi @KeroZen here a quote from Dan about the bottom plate:

Now I just have to finish the sleeve and bottom plate and we're pretty much there!

Sorry just realized I missed your reply Dan.... I understand it is not an issue if used with correct battery in good shape. Although I would prefer a bottom cap for a matter of design and to separate properly batterie from airpath in case... Is it possible to replace the swivel with a bottom cap making contact while in place (and maybe incorporate a switch to close or not the circuit) using magnetic strength (not sure if it's enough to make a good contact)? It is doable without any wire too...

Don't misunderstood me please;... I consider a lot all this vape engineering you made and I'm very excited to see (and maybe test) the final product when it will come out from your hands!
 
Last edited:

RelaxedNow

Well-Known Member
I'm with @PPN on his latest post.

I'll take it any way it comes, just because of the beautiful design and craftsmanship (and I think it'll actually work well too, which is a bonus!). However, I like the idea of the cap making contact, so there's no need to remove it unless replacing the battery. The downside is the need for a switch, unless @Dan Morrison comes up with another brilliant idea.

On the other hand, the contact only needs to be broken for transport. And, since my vapes don't leave the house often, it's not really a big deal for me.

No matter the final decision, I'm certainly looking forward to getting mine! :)
 

nosmoking

Just so Dab HAppy!
@PPN , This was a design question of mine as well... I could seal them off from one another.. but it would take an extra gasket part that would really be a pain in the ass...it also means that the seal has to be made around the copper bridge... do-able, but the bridge needs to be stationary for the seal to work... so you cant swivel it to give you the safety "OFF" position...

In use, the air inlet is away from the battery, so the flow of air does not touch the battery area.

I assume that your concerns are with battery venting. I figured.. if your battedy is venting, it will shoot gas out the safety venting port, and not up into the airway. Also... if your battery is venting, you've got a big problem.

Thoughts?

@Shit Snacks , @mephisto , Thanks for following along, and all the support guys! :)

@nosmoking , An ideas? What's your favourite method currently?

@KeroZen, Thanks! And yes.. it does take from the cigarrette lighter design a bit! It's similar in geometry to catalytic converters... My thinking was... the catalytic converter was designed to put as much surface area as possible in contact with as much gas flow as possible...

Haha, i always like your nitpicks! I would just call that constructive criticism, and it's the whole point of showing your work! Keep it coming!

And the battery placement is up to the user...but i'll tell ya why I put it this way. For one, the 'high point' on the positive side is the metal contact pad, which is above the wrapping. The high point of the neg. terminal is the wrapping itself. So much more likely to snag the wrapping on the neg. side.

The bridge swivels and clears the wrapping without touching it. Sure you could snag it by accident by applying downwards pressure as you swivel..but i don't see it happening often. I've rounded the bottom edges of the contact pad as well. So it doesn't really have the ability to snag, only glide across.

But the most important thing would be safety in case of critical battery failure and venting. You need the gas to be able to vent outwards into an unrestricted space. It vents from the pos. end.

And yep, it's fully functional without the sleeve/bottom cap. But, everything is a bit exposed for my liking. The main function of the sleeve/bottom plate is to provide protection for the internals.
I really think a cup design is the best way to go with concentrates. A cup with sloped walls and a heated floor and walls is what I would like to see. Walls need to me 15mm high to avoid spillage IME. The heat does not have to be direct contact but should get the cup warm enough to boil the concentrate at the bottom. Would be nice if the heat came from the top somehow but I dont see how. Ceramic seems to be the go to for portable flavor but quartz and Silicone Carbide would be even better. I would consider talking to @cannabis.pro about his top hats he made for the Milaana. If he made some of these without the holes in them, they may make the perfect dish that could be dropped into a convection HM. Just a thought.

Another thing to consider is making sure it can be sealed at the top of the cup so there are no leaks if someone turns it on its side.
 

marduk

daydreamer
I am still playing around with the shape of these air holes... One idea I have is to sandwich a thin perforated metal disc between the brass pin and wood disc.. you can turn this metal disc to adjust the inlet air flow from fully closed to fully open. This will really give you the ability to micro adjust the heating characteristics of each HM.

This just keeps getting better and better. Adjustable airflow = the bee's knees! :love:
 

Dan Morrison

Well-Known Member
Manufacturer
@PPN and @RelaxedNow, I actually tried to go the cap route, with a cap that simultaneously bridged the connection and also sealed the battery off.

As with any design choice... You gutta weigh the compromises to benefits.

The difficulty with a cap design is in the mechanism for easy removal. I considered magnets, but with the available space, the magnets wouldn't provide sufficient downwards pressure. Remember that contact resistance is dependant on contact force. A screw attachment is needed.

With small screws, you always have the issue of using a tool for removal. And there just isn't enough room for a thumbscrew, even a tiny one.

There are other attachment methods that came to mind, but all had issues.

Also, an extra switch is just not ideal. It adds contact points (circuit resistance) and would take up far too much room.

With the swivel contact bridge as shown in my photos, there are just less compromises when compared to alternatives I've been able to come up with. The main one being, no separation between air inlet area, and battery area. My conclusion was that this was a compromise I could live with.

Also keep in mind that I am designing for future compatability with accessories and heater modules. The more complex this bottom area becomes, the less able it is to conform to future add ons.

And with this design the vape can be used without the sleeve/bottom plate. This is required if you have the vape in the upside down position, in a watertool, and you're using the e-nail heater module.

On some heater module designs, the contact pin can't be in the center, so the contact point must change position. With the simple change of a single part, the contact bridge, you can accomodate different types of heaters. This wouldn't be as easy with a more complicated setup.

Maybe the bottom cap could have a notched separation at the swivel point of the bridge and this notch could be lined with a felt material to form a seal? Not completely airtight, but maybe good enough?

This is exactly the solution I had in mind. I think it would be worth it to ease any anxious minds, I'll try it out!

@nosmoking, Thanks man! That's super helpful. That area is definitely murky waters to me.. But I've got some ideas in the back of my head...

@GreenHopper , Yep! that's what ill be doing. with the sleeve/bottom plate on, the vape will sit upright on a flat surface.
 

Dan Morrison

Well-Known Member
Manufacturer
What is the enail heater module? It sounds like you already have this one thought up or something from the way you just casually bring it up. I like the way it sounds!

Just theory at this point... but I was imagining a clapton coil built into a spiral cone shape. The entire vape is turned upside down, with the HM exposed, showing an inwards facing cone coil. You now have full access to load the cone, which acts as the heater, reservoir and wick in one. The cone will be wrapped tight enough so that no drippage happens...hopefully.

To help fight splatter, I was thinking of some sort of shield that allows a loading tool to pass, but keeps most of the splatter at bay... also, placing the cone deeper into the shell of the heat module...

Okay, so technically not an enail, I should change my terminology.

I will also be playing around with SiC deep dishes wrapped in heater ribbon, with the ribbon both on the outside and isolated from getting gunked up, and on the inside, where it could deliver more heat, but be more difficult to clean.
 
Last edited:

RelaxedNow

Well-Known Member
@PPN and @RelaxedNow, I actually tried to go the cap route, with a cap that simultaneously bridged the connection and also sealed the battery off.

As with any design choice... You gutta weigh the compromises to benefits.

The difficulty with a cap design is in the mechanism for easy removal. I considered magnets, but with the available space, the magnets wouldn't provide sufficient downwards pressure. Remember that contact resistance is dependant on contact force. A screw attachment is needed.

With small screws, you always have the issue of using a tool for removal. And there just isn't enough room for a thumbscrew, even a tiny one.

There are other attachment methods that came to mind, but all had issues.

Also, an extra switch is just not ideal. It adds contact points (circuit resistance) and would take up far too much room.

With the swivel contact bridge as shown in my photos, there are just less compromises when compared to alternatives I've been able to come up with. The main one being, no separation between air inlet area, and battery area. My conclusion was that this was a compromise I could live with.

Also keep in mind that I am designing for future compatability with accessories and heater modules. The more complex this bottom area becomes, the less able it is to conform to future add ons.

And with this design the vape can be used without the sleeve/bottom plate. This is required if you have the vape in the upside down position, in a watertool, and you're using the e-nail heater module.

On some heater module designs, the contact pin can't be in the center, so the contact point must change position. With the simple change of a single part, the contact bridge, you can accomodate different types of heaters. This wouldn't be as easy with a more complicated setup.


This is exactly the solution I had in mind. I think it would be worth it to ease any anxious minds, I'll try it out!

@nosmoking, Thanks man! That's super helpful. That area is definitely murky waters to me.. But I've got some ideas in the back of my head...

@GreenHopper , Yep! that's what ill be doing. with the sleeve/bottom plate on, the vape will sit upright on a flat surface.

Like I said, I'm good with whatever you decide is best. This stuff is so far outside my area of expertise (Clapton coils?, SiC?, Contact resistance?) that I'm almost afraid to comment. :hmm: Heck, I just want to USE it. :lol:
 

Marihuana

Iso Tensei
Thirding the SiC dish concept! I don't really vibe with the majority of the portable concentrate vapes out there. I'm the type of person who doesn't want to make any sacrifices in form or usability, and as a Liger user, I would absolutely love a similar experience in a handheld.
 

tepictoton

Well-Known Member
How about using threaded ceramic rods for the enail option? Then one could use any type of dish that can be threaded on there...? a bit like the 510enails
 

Dan Morrison

Well-Known Member
Manufacturer
@stickstones, yes.

How about using threaded ceramic rods for the enail option? Then one could use any type of dish that can be threaded on there...? a bit like the 510enails

I think I understand.. but transferring heat from a coil..to female thread..to male thread..to dish..oh man, thts going to take way too much power/time for a single 18650, I think. Unless I misunderstood.
 
Top Bottom