The Nomad From Morwood

cannabis.pro

aka 420EDC
Accessory Maker
Also, if anyone out there has a 19/22 male joint, with straight stem, and a ruler.. perhaps you could measure the OD of the straight tube section. I suspect that there will be a small difference between glass manufacturers... and it would help to know the deviation +/- from 15mm.

I could choose a softer O-Ring to help compensate for OD deviation.

Thanks!
All color is Chinese origin
Amber Stem = 16mm
Cobalt Stem = 17mm
Emerald Stem ≈ 16.2mm
China Clear = 15.5mm
Schott Clear = 17mm
 

grokit

well-worn member
The 14mm basket screens with rims are just a bit to small for me. The bigger 18mm ones like arizer could be a little smaller though. Is this the sweet spot that we're talking about with the 15mm size here?

I have to say I'm a bit concerned about using an o-ring on this, rather than a tapered gg joint :shrug:
 
Last edited:

Dan Morrison

Well-Known Member
Manufacturer
All color is Chinese origin
Amber Stem = 16mm
Cobalt Stem = 17mm
Emerald Stem ≈ 16.2mm
China Clear = 15.5mm
Schott Clear = 17mm

Hmm.. interesting. I figured that it would be a bit more standardized than that. Guess not. Seems that this will be supplier specific. Will report back with what I will be able to offer.

@grokit, I am all ears, what are your concerns?
 
Last edited:

grokit

well-worn member
@grokit, I am all ears, what are your concerns?
Wear and tear and ease of use, and of course we all seem to prefer our glass vapor paths. It sounds like the o-ring will be technically be outside of the path but could get quite hot, like I said just a bit concerned. Imo gg joints are the way to go, like with the rbt vapes but maybe a little deeper for compatibility reasons.
 
Last edited:

Dan Morrison

Well-Known Member
Manufacturer
@grokit, Ah, I see.

Welp, it's too late now, haha.

Perhaps I can alleviate your concern with my reasoning behind the O-Rings.

-Much more compact design, smaller overall dimensions possible
-Replaceable
-No glass to break in case of drop
-No glue required
-Wider tolerance allowance
-Ability to compress gives a good seal between dissimilar materials
-Versatility of stem materials, metal, glass, wood, ceramic
-More secure hold of stem

Keep in mind that the O-Rings are on the outside of the glass stem, so no chance of coming into contact with vapor path. And well away from the heat source, so the temperatures experienced by the O-Rings barely scratch their rated maximum operating temperature of 400F.

The only downside is cost, I will be sourcing PTFE encapsulated silicone O-Rings. These give the comprehensibility of silicone, with the very low co-efficient of friction of PTFE.

The goal here is a glass stem that glides effortlessly into place, but is held securely. Bare silicone on glass gives quite a bit of friction, which just doesn't slide that nicely....

With the reduced friction, these O-Rings really should last the life of the vape. But time well tell...
 

grokit

well-worn member
I will be sourcing PTFE encapsulated silicone O-Rings. These give the comprehensibility of silicone, with the very low co-efficient of friction of PTFE.
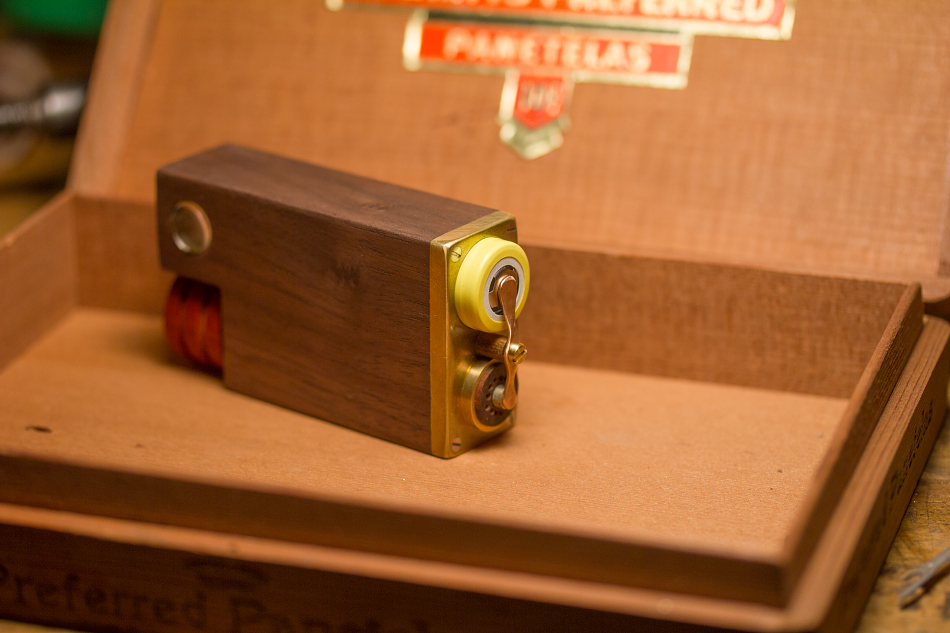
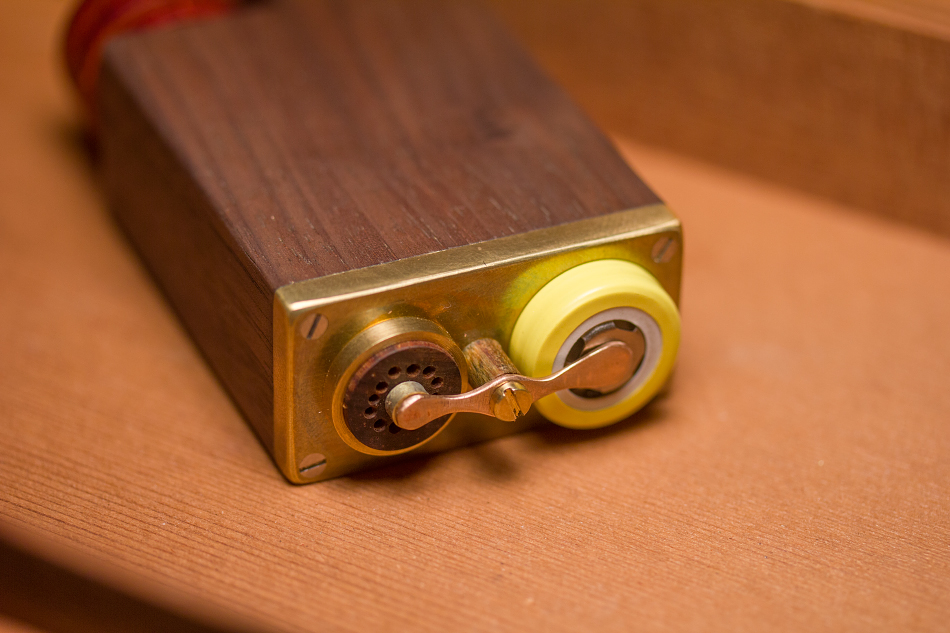
That's cool. The ptfe should take care of any ease of use concerns. We'll be inserting the tube with the o-ring on it, into a wooden hole rimmed with brass? I like the part about no glue, and of course unbreakable is always good. This is in the interest of keeping use as simple as possible, as the o-ring presents another variable like screen and stem choices. I'm wondering if a groove on the inside of the hole to secure the o-ring might be another design choice, but that may affect other variables that I haven't considered.
 

Dan Morrison

Well-Known Member
Manufacturer
I'm wondering if a groove on the inside of the hole to secure the o-ring might be another design choice, but that may affect other variables that I haven't considered.

This is exactly the solution I went with. There are O-Ring grooves cut into the inside of the wooden stem collar. See image.

oxChMm5.jpg


There are three grooves here, but for the production model I am going down to two grooves, ditching the groove in the middle. It's just not needed.

The O-Rings slide against the smooth glass stem, pretty much the best possible situation for low wear and friction.
 

KeroZen

Chronic vapaholic
As long as it's not wobbly and the stem doesn't fall when you put the vape upside down...

I don't like when the stem moves, forces me to hold it with one hand while the other holds the vape. And when they are not secured, "lipstick incidents" are too frequent, it's a bit of a pain.
 

Shit Snacks

Milaana. Lana. LANA. LANAAAA! (TM2/TP80/BAK/FW9)
I am placing my bulk glass stem order for the production units. And before I place my order with my local lab glass blower, I want to make sure I have my specs correct...

Here is where I need your help, FC.

The wooden stem collar will hold the straight glass stem with O-Rings, no taper joint.

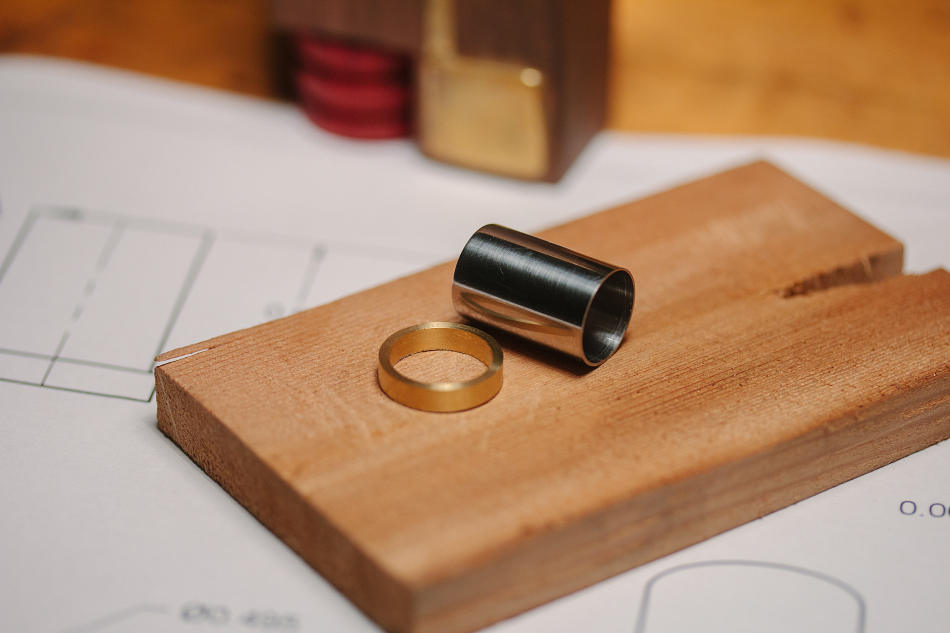
The glass stem outside diameter is what I am torn about.

I have two choices. 12mm OD, and 15mm OD.

12mm OD will play nice with 14mm (14/20) ground glass male adapters.

15mm OD will play nice with 18mm (19/22) ground glass male adapters.

Depending on the tube wall thickness,

12mm OD tube allows for herb chamber inside diameters of 10mm, 9mm, 7.6mm.

15mm OD tube allows for herb chamber inside diameters of 11.4mm, 10mm.

To adapter to a water tool, this will be used, inserted with the straight tube down into the vape, and the male taper joint to be fit into whatever matching female joint you have on your water piece.

RRCpcBA.jpg


The O.D. and I.D. pictured above are the numbers in question.

Obviously the 12mm OD tube gives you a smaller diameter herb chamber.

The 15mm OD tube allows for a slightly larger herb chamber.

Currently I am leaning towards the 15mm OD tube, for larger diameter chamber.

Thoughts?

Also, if anyone out there has a 19/22 male joint, with straight stem, and a ruler.. perhaps you could measure the OD of the straight tube section. I suspect that there will be a small difference between glass manufacturers... and it would help to know the deviation +/- from 15mm.

I could choose a softer O-Ring to help compensate for OD deviation.

Thanks!

And@DarkSm0ke, thank you guys so much for all of those nice comments! Really makes my day. I can't think of anything to say, but just know that your words mean a lot to me! Truly! :D

Same goes for all of the above posters! So much kindness here on the FC!

Insane work as always you make kindness easy Dan ;) and I definitely agree 15mm, 12mm seems a hair too narrow for my preferences using 14mm and 18mm stem vapes at least
 

Andreaerdna

If God is the answer, then the question is wrong
Great choice to not use a ground connection, i believe that how it is used in a portable vape (dry inserted and pulled off) it isn't really safe (glass dust)

I would have preferred a small chamber (12mm isn't so small BTW), as it better allows microdosing and keeps everything smaller
 

Dan Morrison

Well-Known Member
Manufacturer
Well, after some consideration. The 18mm taper (19/22) is too large. It's usually made on 16mm-17mm OD tube, won't fit.

I have to go with a manufacturer that works to some tight tolerances if I want the O-Ring seals to have a consistent feel.

Schott makes glass tube with an OD tolerance of +/- 0.20mm. That's good enough for me.

I won't be able to source Chinese glass, too much deviation. So no coloured glass unfortunately.

Schott makes their 14/23 Taper joints on 13mm OD x 1.5mm Wall Thickness Tube. They also make a heavy wall version with 2.2mm Wall Thickness.

This gives two bowl size options when using the glass stems with 14/23 Male taper. 10mm Inside Diameter, and 8.6mm Inside Diameter.

Now, when using the stock straight stem, I can source Straight tubing in more variations. 1mm, 1.5mm, and 2.2mm thickness. Giving Inside diameters of 11mm, 10mm, and 8.6mm.

I actually prefer the smaller bowl sizes, so that works for me.

So that's that!

EDIT:

For those of you who like the size of a 19/22 (18mm) stem. Consider this. That taper is usually made with a wall thickness of around 2-2.5mm. Which works out to an inside diameter of around 11mm, depending on manufacturer.

Very confusing stuff... I know.

So a thin walled 13mm OD x 11mm ID tube will have the exact same herb chamber size as a standard wall 19/22 (18mm) male taper.

So fear not, big bowl lovers.
 
Last edited:

KeroZen

Chronic vapaholic
For what it's worth, here's the digital caliper measurements of the ID of my various 19/22 joints:

11.9, 12.1, 10.8, 11.0, 11.1, 11.8, 10.9, 12.0, 11.9, 11.3, 11.2, 11.5 (mm)

If you can manage to source a 11mm ID tube, I think that would indeed be good enough for us 18mm lovers.

And if you could also source a thicker walled tube with a smaller ID to accommodate 14mm fans... everybody would be happy.

You'd just have to handle inventory for both styles. Maybe an option when ordering?
 

Dan Morrison

Well-Known Member
Manufacturer
It's heater module time!

After some lathe work... you've seen enough of that. Steel and brass. This will be all sterling silver in the production model.

GoBOLLB.jpg


After silver soldering.

VHiIZKV.jpg


And cleaned up on the lathe again.

rewCR2s.jpg


This is how the heater modules are inserted, along with the battery. All of this is hidden once the sleeve and wooden bottom plate are on.

ZrUtUsI.jpg


Heater module and battery in place. The internals of the heater module are next.

vvAtUuE.jpg


For scale. Pretty tiny.

BSsu3Gg.jpg
 

Dan Morrison

Well-Known Member
Manufacturer
This finished convection Heater Module (HM).

This example is steel and brass but the final version, as stated earlier, will be silver. Obviously no glue used here, just silver solder. Once assembled, the HM cannot be disassembled. The insulating disc shown here is cocobolo.

Each part is locked in place mechanically, so it's quite robust, you don't have to worry about it rattling around in your pocket. It'll definitely be fine if you drop it.

JbMUXSC.jpg


The all mighty wave heater.

The wave form creates airways of exact size between each peak so that the air is forced through uniformly. This also gives massive surface area in contact with the air. And no "dead spots" where air can slip around the heater.

Since there are no lead wires, there is less wasted energy.

Any heat conducted away from the coil by the central pin and shell is in direct contact with the incoming air...so there is a sort of cooler effect where the heat cannot travel down to the air inlet side of the module and all available heat exits the heater.

With this design, I've found that even a low consumption of around 25 watts will get you ~3 second heat up time and plenty of heat, more than enough actually.

After use, the heater can be handled immediately, it barely gets warm. Unless, of course, the heater is kept on without any airflow.

YLjrTeB.jpg


The air inlet end. I am still playing around with the shape of these air holes... One idea I have is to sandwich a thin perforated metal disc between the brass pin and wood disc.. you can turn this metal disc to adjust the inlet air flow from fully closed to fully open. This will really give you the ability to micro adjust the heating characteristics of each HM.

I could also play around with making holes on an angle to spin the incoming air into a vortex... I doubt there will be any performance gains, but it sounds cool.

In the production units, these holes will most likely be curved slots cut out on the mill.

SLGi8aD.jpg


zUnJjGf.jpg


The battery and heater module are connected directly to each other via a copper bridge, spring loaded with adjustable downwards pressure. Very secure. Yet, with one hand, you can just swivel the bridge with your thumb and remove the battery or heater module. No fuss.

When you want to lock the unit for safety, just swivel the bridge to disconnect, no need to remove the battery or HM.

In the production RM-1 I will be making this bridge out of a different metal, and maybe a different shape.. not sure on that detail yet...

JipRk7E.jpg


The tension adjustment screw, shown here in brass, is only used for adjusting the pressure of the contacts. It doesn't spin with the bridge, so the threads will not wear quickly. In any case, the threads go deep into the main body with a steel thread insert. So the brass screw will wear before the steel thread, and then can be easily replaced.

Because the downwards pressure of the screw is applied at the center point between the two contact pads, the two contact spots work against each other to evenly distribute the force... And if one battery is a bit taller than another, the bridge is able to tilt slightly and still give equal solid pressure on both contact pads.

Also shown here is a verawood spacer/insulator under the bridge screw, but this will most likely be black Delrin or African blacwood in the production units.

hyWuOFL.jpg


Now I just have to finish the sleeve and bottom plate and we're pretty much there!
 
Top Bottom