
-
SCAM WARNING! See how this scam works in Classifieds.
-
The Frolic by Limelight Giveaway is over. Congratulations to the winner: Numerous_Nothing!
You are using an out of date browser. It may not display this or other websites correctly.
You should upgrade or use an alternative browser.
You should upgrade or use an alternative browser.
VapCap Induction Heater for Desktop and in Car Use
- Thread starter Pipes
- Start date
-
- Tags
- dynavap induction heat vapcap
Andreaerdna
If God is the answer, then the question is wrong
100 clicks is like 200 hits on three AA batteries?
GW
3 18650 (lghe4), no AA (would be a dream)
") you need 18650 that can withstand peak of 10-15A to be sure (mines are 2500mah and 20A IIRC)
you need 18650 that can withstand peak of 10-15A to be sure (mines are 2500mah and 20A IIRC)are any of the first batches still available?
does the first batch also run on DC? or ac only?
Thanks @Pipes!
How much of the first batch do you still have in stock?
Are there any needs of improvements visible up to now?
Is there anyone here from the EU who is able to turn stone, especially serpentine?
Would like to have the desktop version in a serpentine case.
Yes, I have a few left.
Here is the first Portable. Working like a charm.

Sitting beside my ECig.

Placing order for more of these boxes shortly.
Finally sat down to figure out my pricing outside of my head.
-----------------------PortSide------------------Skeletor---------------------Kit----------------------DeskTop(Jarhead)----
Parts:------------------$56----------------------$43.70--------------------$42.50--------------------$34.50---------------
Labour:---------------$40-----------------------$18------------------------$18------------------------$32------------------
==================================================================
Totals:---------------$96------------------------$61.70--------------------$60.50--------------------$66.50---------------
Real Charge:--$95-----------------$60-----------------$60------------------$65-------------
Shipping:---------Continental US, -$20 with tracking. International will be up to the buyer to pick but seems $20 slow boat without tracking will be the norm as jumps like crazy after that. $30 Air and $40 Air with tracking.

I've been using the shit out of my jarhead plug in. The heat up times for my Omni are pretty much in line with what @Andreaerdna posted for the battery unit. 14 seconds from cold and 9 seconds for subsequent heat ups. @Ratchett's NU adapter has been working great with my bubbler/Omni combo. I should do a video, but all this "testing" makes me kinda lazy...

Talked about it last post. It's to take into account those with skill sets and ideas to put together their own versions.
Jarhead, ready to go in a jar, AC required.
Kit. basic battery powered with components pre-wired and ready to install into ones imagination.
Skeletor, Same as KIT but pre-wired and configured into the smallest format, one needs to build around it.
PortSide, the ready to go no modding needed battery unit.
That verifies my findings as well. Got well into the triple digits on number of puffs before I stopped counting.
Just to let everyone know, I still have Jarhead Desktop units for sale as seems most want to wait for the portable. Can't blame the bums though. So anyone feeling the VAS eating at them, shoot me a PM.
On the portable front, I've received my enclosure for fit testing and it all fits very nicely. Also, I now have all the other parts, so just have to verify this enclosure is the one and I'll order some quantity. The parts all perform as expected and the charger charges the battery pack very well and shuts off when pack is full. It also has an LED to know if charging or battery full.
The BMS board fits perfect on the rear of the battery holder. I used a good gauge hook up wire to join the appropriate connections. It's held onto the holder by the solder connections as well as double sided rubber tape.
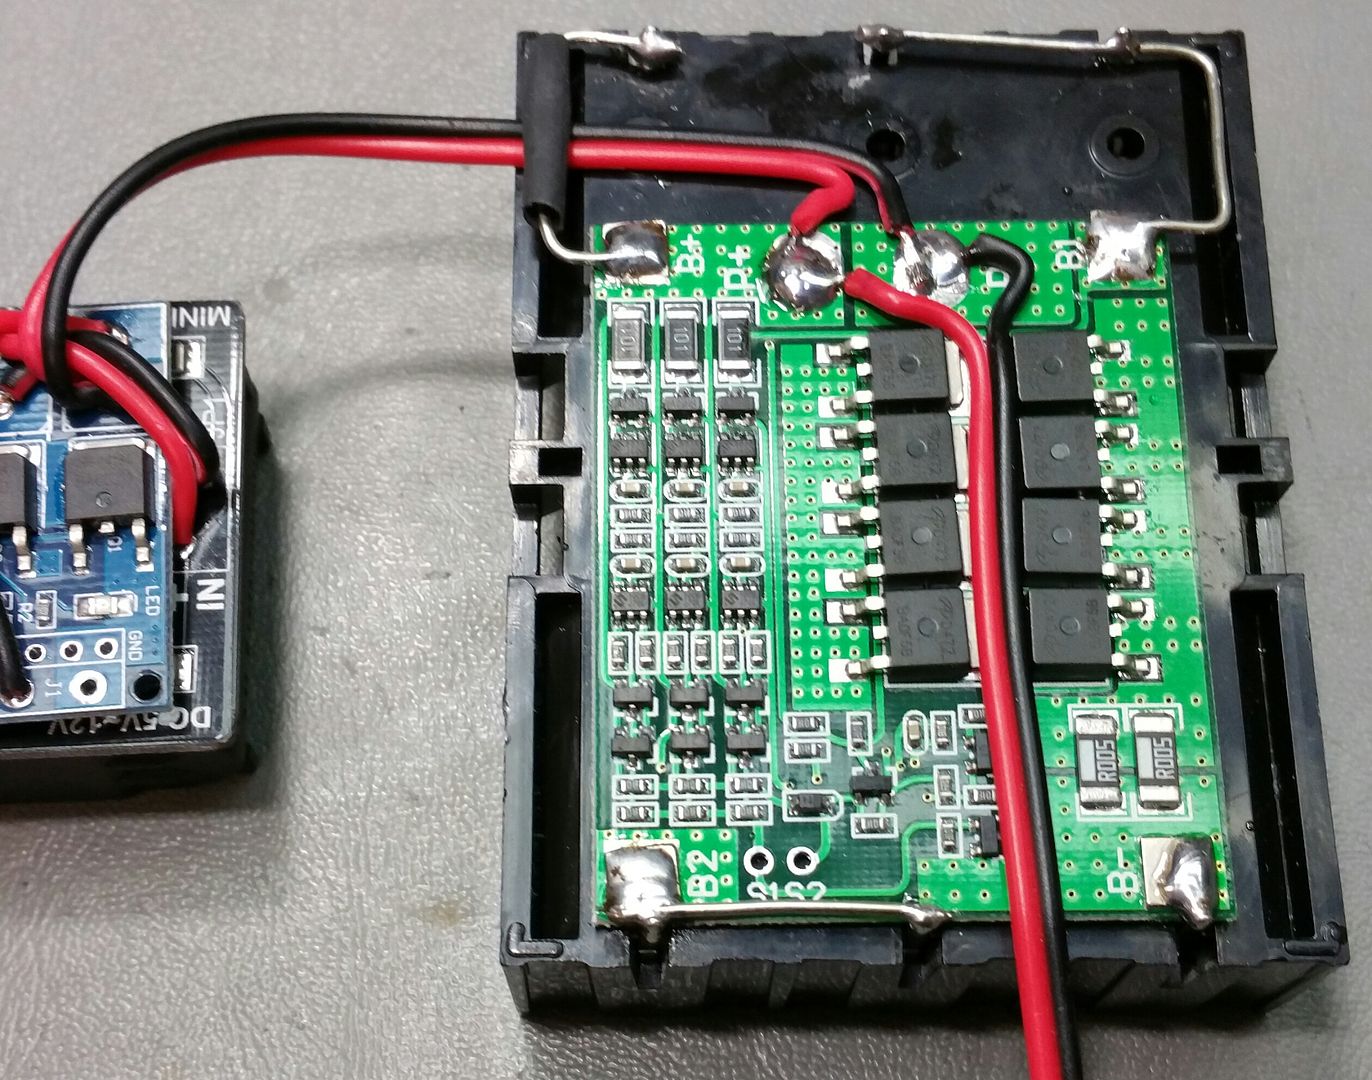
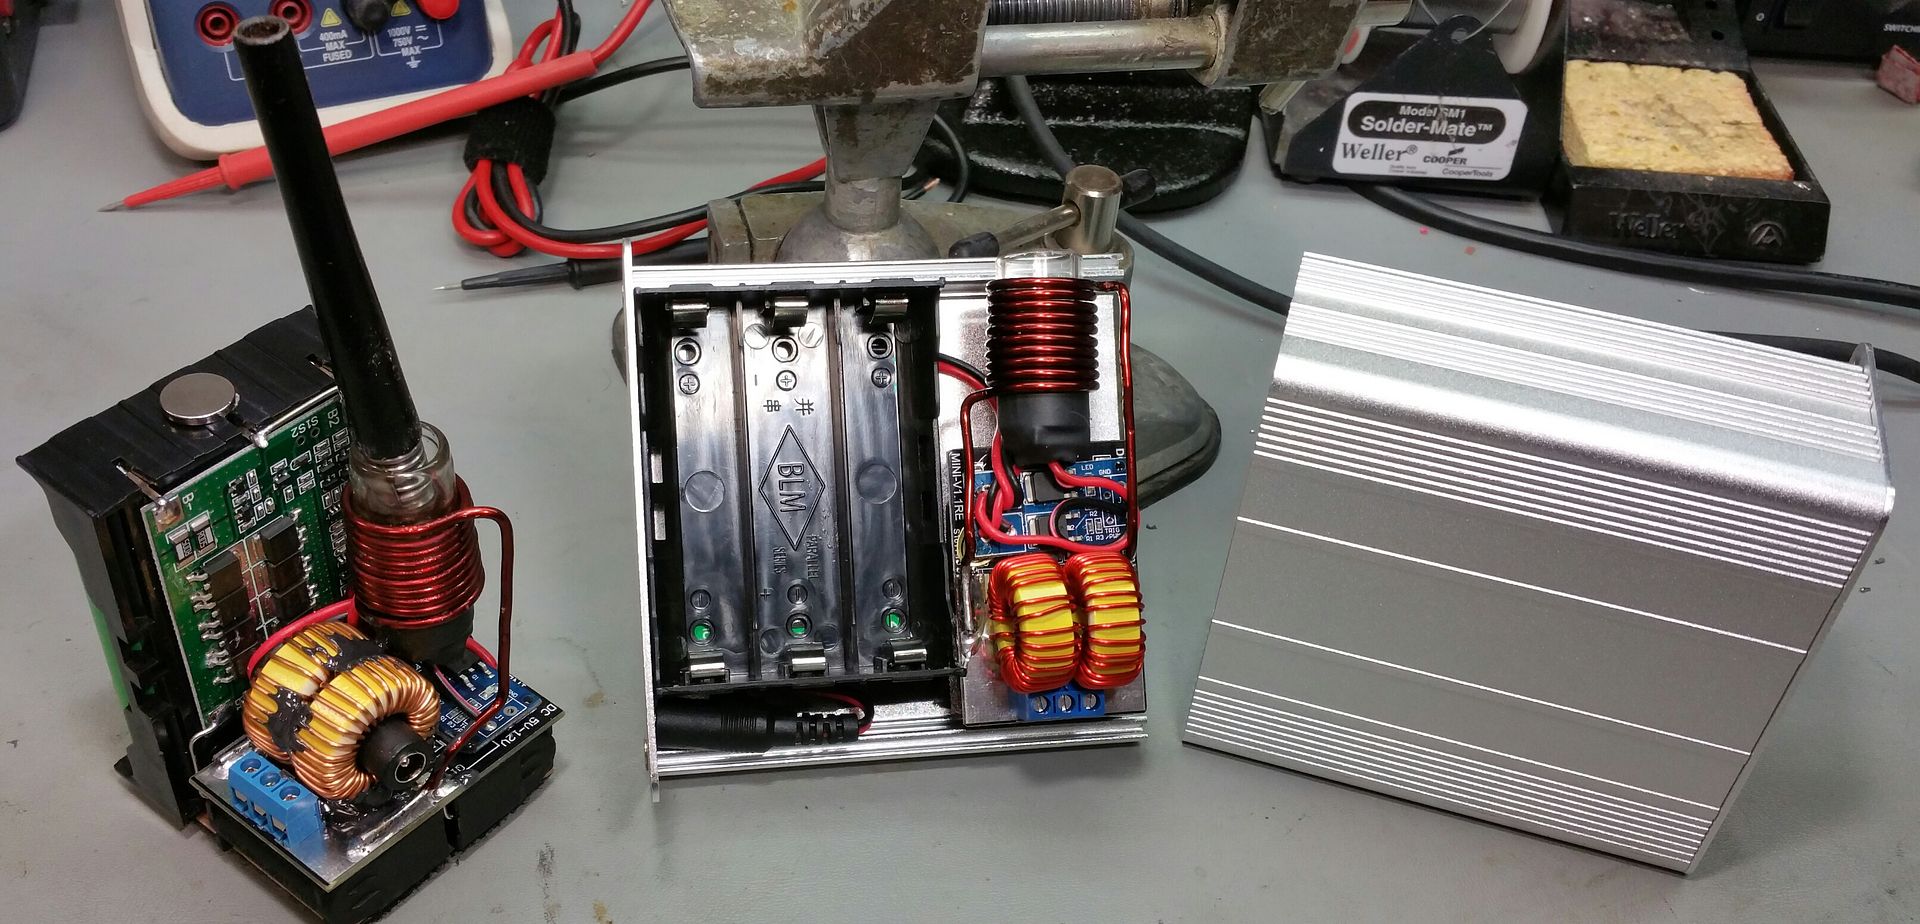
The enclosure is on the right and a skeleton mock up functional unit on the left. Yes, the pieces are joined by sharing a piece of perf board. Ideally, an enclosure measuring 65mm X 65mm square and 80 mm high would be absolutely perfect, but can't find anywhere. Skeletor could just drop right in. Not to be the case, pardon the pun. However, the extra space in the test case above the battery holder measures 18mm X 54mm X 100mm depth could be utilized for storage..? A couple of those plastic VC tubes would fit perfect and leave the snap lids protruding. We'll see, maybe something similar.
I still have to finalize the hole placement but have a good idea on how I want it. Going to orient it on it's side so it can be placed wedged beside a car seat more easily and takes up less surface area.
All in all, I'd say the Porta Induction Heater is coming soon. Maybe under a month away!!
Now, I've also had inquiries about a kit form of this. Basically, the components pre-wired with enough wire lengths to allow perks with different skill sets to make their own enclosures. To this I say Bravo!!, No problem as saves me some work. Or even sell the Skeletor type units like the one above, and one can build around it. Again, fine by me.
A kits would consist of a package like the following. Arranging the coil could be done by request on orientation or done by recipient.
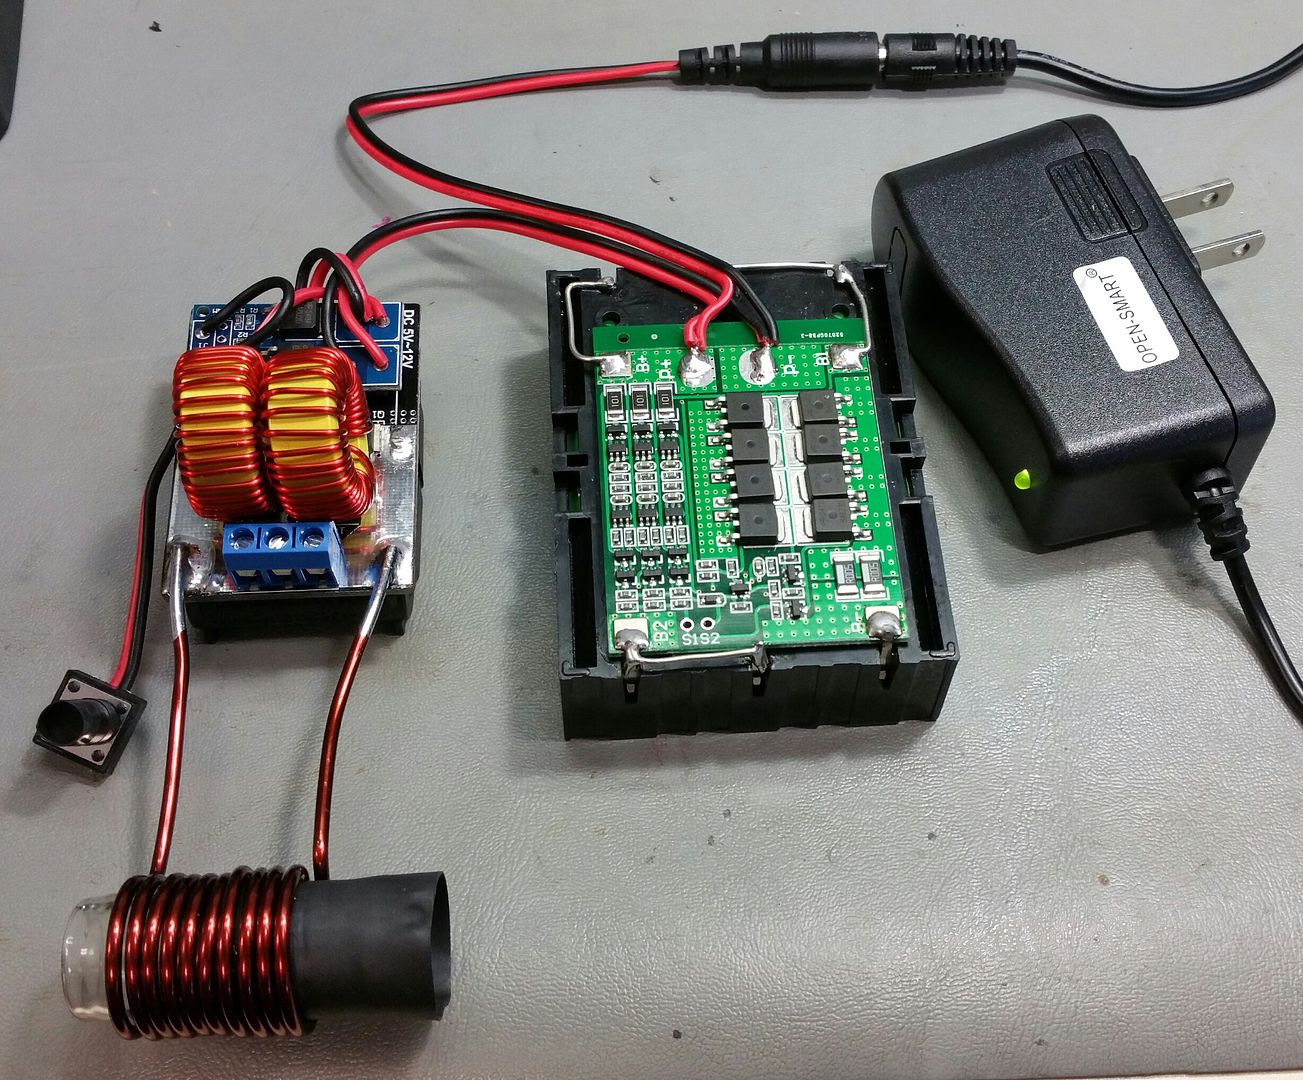
Lots of options.


flotntoke
thoroughly vaped
Talked about it last post. It's to take into account those with skill sets and ideas to put together their own versions.
Jarhead, ready to go in a jar, AC required.
Kit. basic battery powered with components pre-wired and ready to install into ones imagination.
Skeletor, Same as KIT but pre-wired and configured into the smallest format, one needs to build around it.
PortSide, the ready to go no modding needed battery unit.

Portside for us who are squeamish with soldering and whatnot, I guess. Sounds like me.
Portside me soon please, you incredible genius! Ready and anxiously waiting to be poking my VCs into one of these beautiful units.
GodDamn, I love this place and the wonderful mad scientists here! A toast to you, good sir.

Sorry to be redundant but the port side model can be run with the batteries as well as being able to plug into a cigarette car adapter and a wall plug?
If so what specs should we look for in an adapter?
When plugged in does it bypass the batteries?
I believe you said there's a charging light...
I was thinking it would be nice if there was a light inside so that it would be easy to find the hole in the dark.
Does the Portside come with the batteries?
And lastly just to be sure... The Desktop unit cannot be used with a cigarette car adapter?
Thanks.
There is a charging port. A 1 amp charger unit comes with it. Not to be confused with the 60 watt power supply that comes with the Desktop.@Pipes You stated the Portside is a self contained battery unit, is it also AC compatible?
I seem to see a wire coming to/out of it.....
The charger has an LED indicator that is red while charging and turns green when done.
The unit can still be used while charging as well.
Sorry to be redundant but the port side model can be run with the batteries as well as being able to plug into a cigarette car adapter and a wall plug?
If so what specs should we look for in an adapter?
When plugged in does it bypass the batteries?
I believe you said there's a charging light...
I was thinking it would be nice if there was a light inside so that it would be easy to find the hole in the dark.
Does the Portside come with the batteries?
And lastly just to be sure... The Desktop unit cannot be used with a cigarette car adapter?
Thanks.
A led constantly on would be nice but also would be an unneeded drain on the battery.
Hole is easy to find, even if feeling for it.
No supplied batteries. There have been many regulation changes regarding shipping of Lithium batteries and creates a big pita to get clearance.
I recommend 25 amp drain as a minimum cell. VCT3s or 4s would be fine.
Batteries are never bypassed unless you physically pull them out. Once removed the unit will run like a desktop version if you had the correct power supply supply.
No need for supplying power from car and not recommended as will overcharge the internal batteries. Only the supplied charger can be used while batteries are installed.
u bwade wunner
Well-Known Member
@Pipes .Look at You hammering away at it...sleek so compact.amazing work...i would love to see a sexy black version of the aluminium portable.

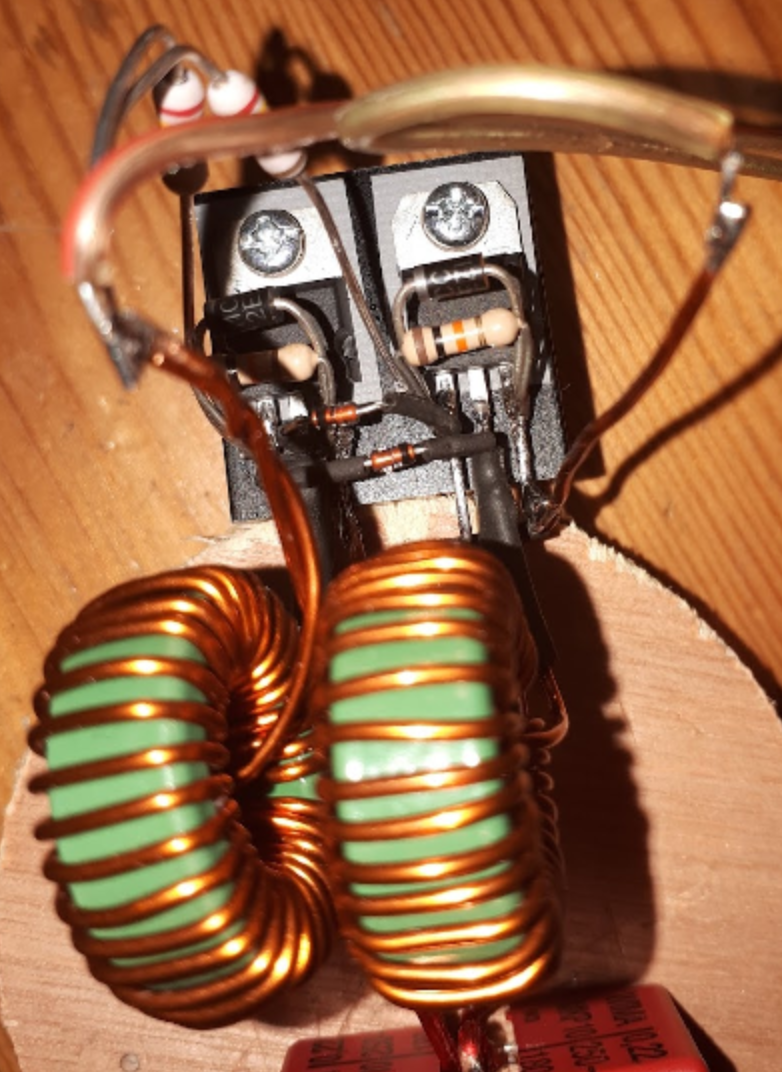
This is how far ive got with my coil...not very far considering ive had it for a good while now.its plugged directly to a 10amp 12V supply.currently just plug and play.
ive had a few mishaps during use ..mostly leaving my vcap in the heater and forgetting about it.thanks for taming this beast with switches and battery safety @Pipes
i can say You guys and ladies are gonna really love this thing.i would recommend using a Ti tipped vapcap though, glass og did nt work nearly as well as a TI.it works extraordinarily well with the TI tipped models.i also love not having to spin my vapcap any more.just pop it into the glass tube and wait for the click.i use it all the time pretty much.
i almost have everything i need to complete my heater.i would like to mount mine in a cheap stash tin if i can.
Something like this :


@Andreaerdna thanks for your posts
This is how far ive got with my coil...not very far considering ive had it for a good while now.its plugged directly to a 10amp 12V supply.currently just plug and play.
ive had a few mishaps during use
..mostly leaving my vcap in the heater and forgetting about it.thanks for taming this beast with switches and battery safety @Pipesi can say You guys and ladies are gonna really love this thing.i would recommend using a Ti tipped vapcap though, glass og did nt work nearly as well as a TI.it works extraordinarily well with the TI tipped models.i also love not having to spin my vapcap any more.just pop it into the glass tube and wait for the click.i use it all the time pretty much.
i almost have everything i need to complete my heater.i would like to mount mine in a cheap stash tin if i can.
Something like this :
@Andreaerdna thanks for your posts
Last edited:
guyonthecouch
Well-Known Member
There is a charging port. A 1 amp charger unit comes with it. Not to be confused with the 60 watt power supply that comes with the Desktop.
The charger has an LED indicator that is red while charging and turns green when done.
The unit can still be used while charging as well.
Batteries are never bypassed unless you physically pull them out. Once removed the unit will run like a desktop version if you had the correct power supply supply.
That first Portside is lookin FRESH!!
 ..what is the correct power supply for the Portside without batts? A 60w like the Jarhead?
Portside with the extra power supply would be my ultimate package

@u bwade wunner, now that's DIYing!
This is the 1A charger.
The 60 watt supply is bare minimal rating for the Desktop application.
Wood is possible as the heat build up seems very minimal. This is in part, from no active current flow while not in use and when in use it's only for seconds at a time. However, to be on the safe side, you should get something like this stuff to make the insides fire proof. Most premixed fire retardant paint seems to come in huge gallon containers so this seems like a good idea as can mix into any latex paint in small quantities.
Guys, as a reminder, please reach out via PM with your requests. Skeletor units can be made anytime now. Only units on hold, are the Portsides. Ordered 17 enclosures for them yesterday.
TeeJay1952
Well-Known Member
Point at person's avatar/Left click/Start Conversation.
grokit
well-worn member
What do you think of this one, more bang for the buck or..?
https://www.amazon.com/gp/product/B01ICNS44K/ref=oh_aui_search_detailpage?ie=UTF8&psc=1
It's a two-pack so they're $3 less and twice the amps, unless you need the 12.6 rather than 12v

Hogni
Honi soit qui mal y pense
@Pipes, Bro, I believe you would do yourself a favour to sample all important informations on the different devices in one post! This would prevent a lot of questions, asked again and again.
BTW back to my still open question some posts ago, how are the measures esp. of the Kit and the Skeletor?
BTW back to my still open question some posts ago, how are the measures esp. of the Kit and the Skeletor?
I'll put together a FAQ doc once things come together a bit more. Similar to the FAQ for the Eraser in one of my signature links.
The Skeletor measures 64 x 64 x 78mm height. Smallest arrangement.
Portside 100 x 50 x 100 height.
Kit is separate pieces to be arranged by owner in their custom configurations.
The Skeletor measures 64 x 64 x 78mm height. Smallest arrangement.
Portside 100 x 50 x 100 height.
Kit is separate pieces to be arranged by owner in their custom configurations.
It oscillates!
When with my current limited 5A supply which goes down to 9.5V (~47W), first click is just under 10s, second clicks in about 4. It's controlled by a MCU which can also read temperature via IR. PWM works well so I can reduce idle current to almost nothing, though PWM driving circuit doesn't work too well when PS voltage drops (with vc in). I still have lots to do.. (buck booster for parts of circuit?). still waiting for some battery parts.
Experimented with coils a little and also settled on one with double winding. Got lots more wire to play with
More info to come..
Edit: This thing rocks. Thanks @Pipes for inspiration, I've needed incentive to build something for a while and when it's THC related I'm all in
Last edited:
u bwade wunner
Well-Known Member
Took tools to my old magic flight tin today and did a little recycling. Had lots of fun with the switch..they are damn delicate 
I punched holes in the tin with a leather hole punch and hammer..no drilling holes or mess
had a quick go.Hits are quick and thick...i am going to spread the coil or adjust the dowel a lttle to delay the click.
all will ve revealed when you get your jarhead or portable.it opens a whole new chapter for the vapcap.. i promise You.
nice to be back to nice,laidback medicine ..ive been without my coil for a few days and i really missed it.

Below..If i move the heater coil and power port a battery pack should fit in there too.

its a copy of @Pipes desktop model with heatshrink holding the switch & glass and the little dowel etc .
Ive used Clear epoxy to hold the switch and glass tube to the base of the tin.it will hold 54 kilos of force apparently.
I used Fire proof silicone to hold the induction coil PCB in place.its solid as a rock,but i will fix a bracket to secure it better soon.
I kept the blue blockconnectors on the coil board because the wiring i bought was too heavy to solder direct to the board.Nice and easy though .learned heaps and had a laugh especially at the end...thanks @Pipes for your help...
the onboard led on the coil pcb transmits some light to make the glass glow in the dark when the switch is actuated.i should be able to improve on that.
having the ccd in the induction area really fires up the vapcap some more .you could add extra bits ss paperclips etc inside the bowl to get conduction firing even fiercer i guess.

Yep my coil is toast.im going to order a few more.still getting to click in 5 seconds or so .

Lastly how awesome is it that the VapCap electrical solution is diy & open source...
there just isnt any better than that
looking forward to seeing what people can come up with especially with tins or boxes.
The humble stash tin has become one of those icons for me..its been great to use it for such a good project.
I punched holes in the tin with a leather hole punch and hammer..no drilling holes or mess
had a quick go.Hits are quick and thick...i am going to spread the coil or adjust the dowel a lttle to delay the click.
all will ve revealed when you get your jarhead or portable.it opens a whole new chapter for the vapcap.. i promise You.
nice to be back to nice,laidback medicine
..ive been without my coil for a few days and i really missed it.
Below..If i move the heater coil and power port a battery pack should fit in there too.
its a copy of @Pipes desktop model with heatshrink holding the switch & glass and the little dowel etc .
Ive used Clear epoxy to hold the switch and glass tube to the base of the tin.it will hold 54 kilos of force apparently.
I used Fire proof silicone to hold the induction coil PCB in place.its solid as a rock,but i will fix a bracket to secure it better soon.
I kept the blue blockconnectors on the coil board because the wiring i bought was too heavy to solder direct to the board.Nice and easy though .learned heaps and had a laugh especially at the end...thanks @Pipes for your help...
the onboard led on the coil pcb transmits some light to make the glass glow in the dark when the switch is actuated.i should be able to improve on that.
having the ccd in the induction area really fires up the vapcap some more .you could add extra bits ss paperclips etc inside the bowl to get conduction firing even fiercer i guess.
Yep my coil is toast.im going to order a few more.still getting to click in 5 seconds or so .
Lastly how awesome is it that the VapCap electrical solution is diy & open source...
there just isnt any better than that
looking forward to seeing what people can come up with especially with tins or boxes.
The humble stash tin has become one of those icons for me..its been great to use it for such a good project.
Last edited: