New member here, looking for DIY advice

Hi everyone, someone suggested I come here to discuss vaporizer stuff. :)

I was checking out these plans for a DIY vaporizer and it looks pretty good. The only thing missing is a thermometer. I was thinking I could solder a wired probe kitchen therm onto the bowl if I want to get fancy.

Any advice or suggestions would be much appreciated. I'm on a really tight budget, so $50 or less is about my limit. I was also looking at some generic box-types on Amazon, but I'm liking the DIY idea better.

Thanks :)
 
@AGBeer: Thanks for that link, very cool! I saw the heat gun design, but the guy says to use the $200 model. For that price I could just but a decent vaporizer, lol.

I've also seen those pipe-style vapes around. Do they work? It seems like half the time you'd end up smoking the herb, not vaping it...

Thanks again :)
 
austintexican,
  • Like
Reactions: Madri-Gal

Hippie Dickie

The Herbal Cube
Manufacturer
I was thinking I could solder a wired probe kitchen therm onto the bowl if I want to get fancy

that's sort of what i do (use a BBQ thermometer, about $10) but the probe is insulated with a glob of glass, so it can't be soldered. i just use a bracket to hold the probe against the heater. Works fine, except the thermometer has fairly slow response -- takes several seconds to settle on the actual temp.
 

Squonk

Well-Known Member
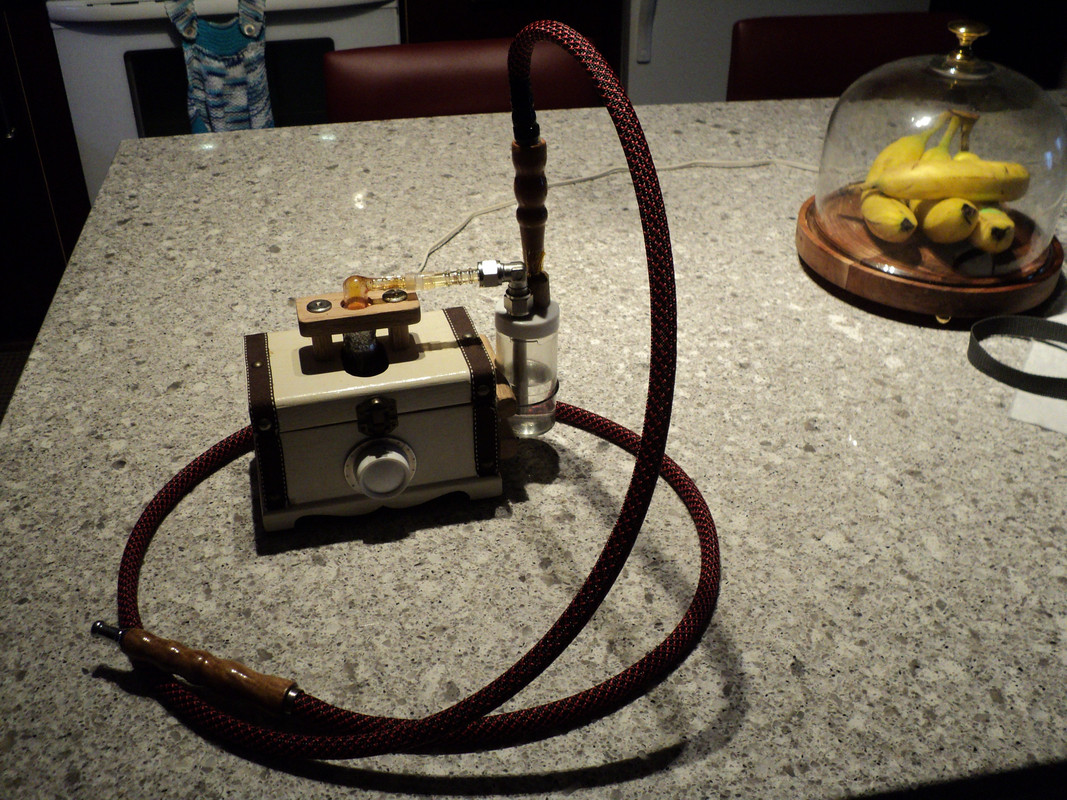
@austintexican: I built my own and it was less then $50 dollar. I've been experimenting with it for over a year now and I am very satisfied. It is mostly convection, the heater is a 20 watt halogen lamp inserted inside a modified Arizer cyclone bowl. A simple dimmer is used to control the temperature. It hits very smoothly with good airflow. I added a small homemade bubbler to filter out small particles and to cool down the vapor. The ABV is evenly cooked without stir but I do stir once during a session and I get a little bit more out of it. I usually vape with the dimmer set at the 1 o'clock position and I get a light brown ABV. If you like darker ABV simply crank up the dimmer. If you are interested I can take a picture.
 

Abysmal Vapor

Supersniffer 2000 - robot fart detection device
Squonk said:
@austintexican: I built my own and it was less then $50 dollar. I've been experimenting with it for over a year now and I am very satisfied. It is mostly convection, the heater is a 20 watt halogen lamp inserted inside a modified Arizer cyclone bowl. A simple dimmer is used to control the temperature. It hits very smoothly with good airflow. I added a small homemade bubbler to filter out small particles and to cool down the vapor. The ABV is evenly cooked without stir but I do stir once during a session and I get a little bit more out of it. I usually vape with the dimmer set at the 1 o'clock position and I get a light brown ABV. If you like darker ABV simply crank up the dimmer. If you are interested I can take a picture.
Yes please . Do some pics ! A DIY device is always welcome. Have isolated the halogen bulb wires and slot with smth ? ? Check the Aromed vaporizer it uses a cheap glass capsule .
 

Squonk

Well-Known Member
Abysmal Vapor wrote :
Have isolated the halogen bulb wires and slot with smth ?

Hi Abysmal Vapor,

I have not isolated the wires. I am not sure I need this and the space is limited.
I am including pictures of my unit and feel free to ask any questions or suggestions.

Here is my baby :brow: DIY Homemade Vaporizer
dsc00221pp.jpg


Bubbler details
dsc00229jv.jpg


The inside
dsc00222ju.jpg


Close-up view from top - bowl removed - There is a gap of approx 1/8" around the ceramic allowing air flow coming in from beneath
dsc00224ek.jpg


Close-up view from side - Assembly holder detached from box - There is a gap equivalent to the washers thichness in between the 2 pieces of wood (red oak) to let the air coming in toward and then around the ceramic holder
dsc00223b.jpg


Close-up view from side - Top of bowl screens details (someone posted this idea here on FC ... works a treat):lol:
dsc00226vl.jpg


Close-up view - Bottom of bowl with glass insert - This glass insert is essential for the vape to function efficiently.
dsc00228rs.jpg


Bottom of unit and wiring - Do not put on a table with water :uhoh:
dsc00225br.jpg


Fresh flowers and ABV comparison
dsc00230fv.jpg


This was a very fun project and for my purpose it is doing the job very well.

I normally put 1/8 flat teaspoon and I get from 8 to 12 good hits.

Each hit is like 2 or 3 draw of about 3 to 5 seconds each. :)
 

Abysmal Vapor

Supersniffer 2000 - robot fart detection device
Cool setup.. I just dont like the part with the screen.. There is some wire inside .What is that and where you get those cylinder screens . are they the stock one for arizer ?
 
Abysmal Vapor,
  • Like
Reactions: Madri-Gal

Squonk

Well-Known Member
@Abysmal Vapor : Yes, these are arizer stock. The screens works very nicely, the top one holds the flower and the bottom screen increase the height and picks up small debris. The wire you see is simply a brass wire which holds both screen together with a little hook on top to let me take out the screens easily with a pair of needlenose when I need to clean the bowl (ISO).

@austintexican : Here is the part list :

1 Arizer whip kit which includes : 3' tubing with attached glass adapter (with screen) and glass mouthpiece, 1 Glass Cyclone Bowl and 1 glass stirring tool.
$22.99

1 Also, Arizer included a free screen pack as a gift worth $5.
$Free

1 additional mouth piece. Not necessary
$5

1 Round Halogen Socket, ATRON ELECTRO INDUSTRIES INC. Model: HLA200 | Store SKU: 1000406895 - Home Depot
$4.15

1 LEVITON 600 Watt Rotary Dimmer Switch, Model: 6681-732 | Internet/Cat: 947944 | Store SKU: 1000107270 - Home Depot
$6.98

1 BPQ20/8.6 20-Watt T4 JCD Halogen Bulb with Bi-Pin Base, Clear
$8

1 wooden box at the Dollar store
$2

1 Test tube.
$0.50


I cut a straight portion of the test tube with a dremel disc for the insert in the bowl. The insert needs to be 1 - 1/8" long. O.D : 5/8", I.D : 9/16". I had to slightly sand the 2 bottom sides of the halogen bulb so that the insert could be slip over the bulb. It's very easy with 220 grit sand paper. Do not touch the bulb with your finger. Also I used just a tiny dab of Hi temp stove & furnace cement to make the insert adhere to the bottom lip of the cyclone bowl. Hope this helps
 

Squonk

Well-Known Member
You're welcome austintexican,

Here is what I call my "medecin bag" to carry the vape in and out of the house.
dsc00234jo.jpg


I can leave everything in for a vape session and close it out quickly if I need.
dsc00233h.jpg


Squonk ;)
 

Squonk

Well-Known Member
austintexican wrote:
I was checking out these plans for a DIY vaporizer and it looks pretty good. The only thing missing is a thermometer. I was thinking I could solder a wired probe kitchen therm onto the bowl if I want to get fancy.

Oh yes, I forgot to answer about the temperature thermometer. I tried a thermometer inserted through the bowl (had to drill a 1/8" hole). It worked but it added complexity and I finally decided to remove it. I adjust it by the thickness of the clouds and the color of the ABV's. I usually set it at the 1 o'clock position and forget about it. :ko:
 

brainiac

log wrangler
@Squonk I came across your halogen vape in 2015 and had a go at building a similar unit.
I wasn't successful - having some, but not enough, tools/parts/skills - but never entirely gave up.
Put together a small workshop at the beginning of this year to build resistor logs but recently produced a halogen unit.

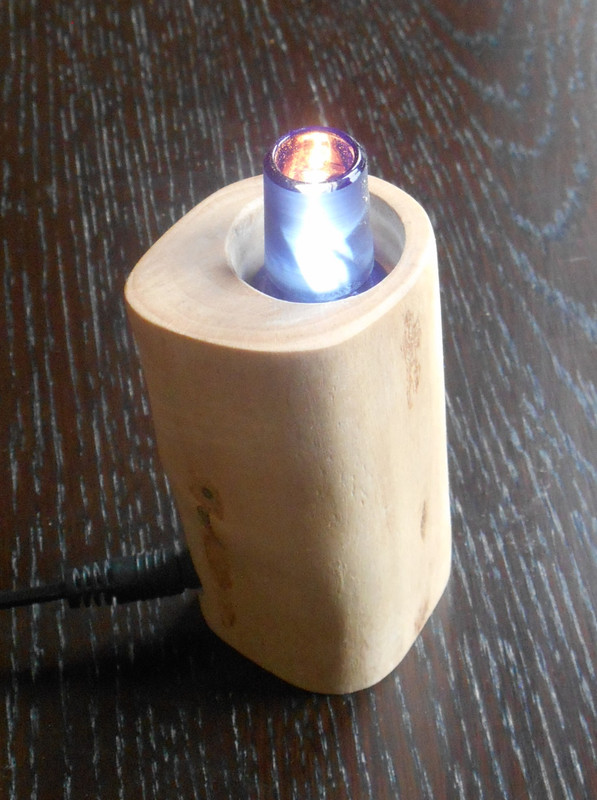
blue-halo-on-3.jpg


Anyway, just wanted to say thanks for the inspiration and, perhaps more importantly, I see that your images are no longer available. Any chance you might repost them?
 

Squonk

Well-Known Member
Hi Abysmal Vapor,

I have not isolated the wires. I am not sure I need this and the space is limited.
I am including pictures of my unit and feel free to ask any questions or suggestions.

Here is my baby :brow: DIY Homemade Vaporizer
dsc00221pp.jpg


Bubbler details
dsc00229jv.jpg


The inside
dsc00222ju.jpg


Close-up view from top - bowl removed - There is a gap of approx 1/8" around the ceramic allowing air flow coming in from beneath
dsc00224ek.jpg


Close-up view from side - Assembly holder detached from box - There is a gap equivalent to the washers thichness in between the 2 pieces of wood (red oak) to let the air coming in toward and then around the ceramic holder
dsc00223b.jpg


Close-up view from side - Top of bowl screens details (someone posted this idea here on FC ... works a treat):lol:
dsc00226vl.jpg


Close-up view - Bottom of bowl with glass insert - This glass insert is essential for the vape to function efficiently.
dsc00228rs.jpg


Bottom of unit and wiring - Do not put on a table with water :uhoh:
dsc00225br.jpg


Fresh flowers and ABV comparison
dsc00230fv.jpg


This was a very fun project and for my purpose it is doing the job very well.

I normally put 1/8 flat teaspoon and I get from 8 to 12 good hits.

Each hit is like 2 or 3 draw of about 3 to 5 seconds each. :)

@Squonk I came across your halogen vape in 2015 and had a go at building a similar unit.
I wasn't successful - having some, but not enough, tools/parts/skills - but never entirely gave up.
Put together a small workshop at the beginning of this year to build resistor logs but recently produced a halogen unit.

blue-halo-on-3.jpg


Anyway, just wanted to say thanks for the inspiration and, perhaps more importantly, I see that your images are no longer available. Any chance you might repost them?

Hello Brainiac, thanks for the kind words. As for the images I think I used IMGUR at the time and now it's not showing anymore.

Also, keep up the good work!

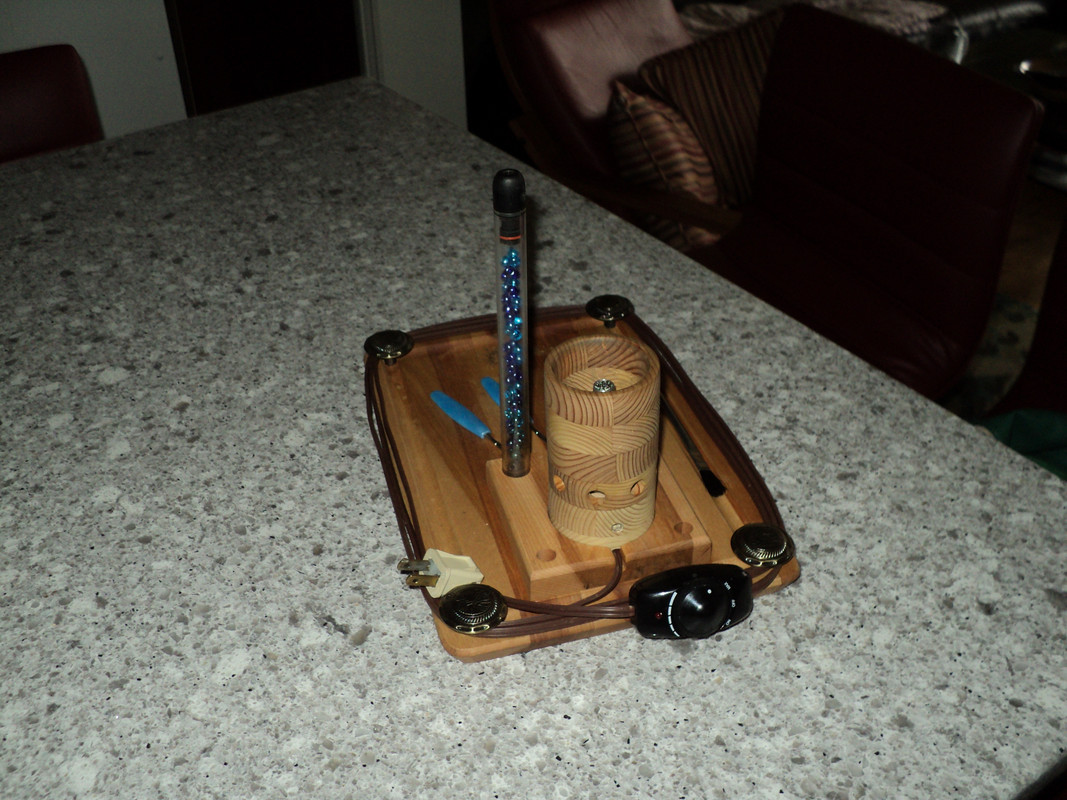
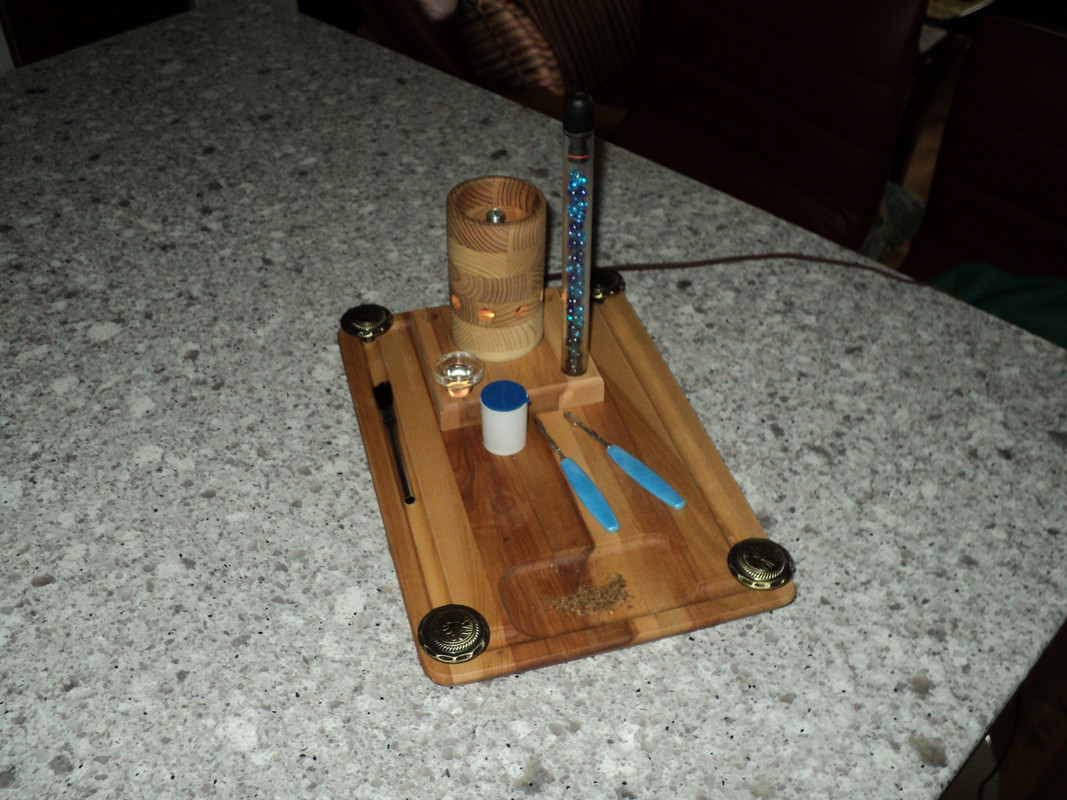
Here is a recent photo
DSC01297.jpg
 
Last edited:

brainiac

log wrangler
Absolutely amazing :nod:
Lovely board with the unit as it's crowning glory.
Visually stunning log. The combination of tones, patterns and light apertures works very well indeed.
Are you still using the 20w bulb?
 

Squonk

Well-Known Member
Absolutely amazing :nod:
Lovely board with the unit as it's crowning glory.
Visually stunning log. The combination of tones, patterns and light apertures works very well indeed.
Are you still using the 20w bulb?

Thanks for the kind words. Yes, I still use a 20 watts halogen bulb. With up to 20W it has enough power to cover all my need in term of temperature range. Also at maximum power the body is just slightly warm in hand. I started this project back in 2016 and I think that (knock on wood) this is my last rendition ... for this type of vaporizer.

I was inspired at the time by a few members here on FC and elsewhere on the web. And now I am inspired by guys like you, Blokenoname and all the others who are experimenting and trying stuff.

Keep up the good work guys, keep learning and most important ... do it! :science:


Thanks so much blokenoname.
 
Last edited:

blokenoname

DIY Log Dabbler 😁🪵💪💨💨💨
@Squonk
It really looks terrific :tup: :nod:

Well, got into the idea of building a halo powered log mainly inspired by the MUSA wooden vape http://fuckcombustion.com/threads/musa-wooden-vape.23239/ at the time, which was more meant to be a cross between a log body and a Cloud Evo, originally. It used a 50w bulb at first and later on a 35w bulb. Started out also experimenting with a 35w at first, but soon switched to building more traditional resistor- and cartridge heater based logs, which utilize quite small heaters (about 6mm x 20mm) and produce nice fat vapour with just 7w to 7,5w already.
With the 35w bulb which is about 12mm in diameter, I needed at least a 3A PSU, wider glass heater covers (used a 19/26 male cone tube here, 13mm inner diameter, 17mm outer diameter), which lead to larger and more massive bodies and thereby also more heat loss through conduction to the body, requiring even higher temps and therefor increased brightness :( :cool:

So I put the idea on the back burner and it was only through @brainiac 's attempts to do a halo Rustic log, that I revisited the idea recently. With the discovery then, that the 20w bulbs and lower are only 9mm in diameter, this opened up the possibility to set the bulb into a more common sized log body and the use of a 11mm/10mm OD/ID steel heater cover, which solved several problems at once, re brightness problems and also compatibility to off the shelf options for roasting tubes and WPAs, as the 10mm Vapcap Ti/ss tips worked for sliding into the core and the all glass stems and GonGs from the Arizer Solo/Air worked for sliding over the core :clap:
You can also get 10mm OD borosilicate glass straws in 6/8 or 10 packs for just a few quid, to also serve as slide in all glass roasting tubes.

Then I found, that I still needed to turn up the 20w bulb to maximal 1/2 power, to get very good results already (around 8w), so that I moved to a 10w bulb next. Works very satisfactory right now and I've still about 2w in reserve, if I need even more power. With the 10w bulb, I also can go with the smaller wall wart 12v/1,5A PSU units now, I use for my other log vape projects, as it'll draw a maximum of just ~0,84A now :)
The end result was the recent steel core Halo Misty then, you saw in my thread already :nod:
It's a mere 4cm x 9cm in size now and due to a bit of folded up ss fine mesh foil placed within the small basket screen, I use for a debris screen, also not much brighter than a night/mood light even at full vaping temps:

14907-A0-F-2-EF2-4-A95-B0-D8-72124-FBC8-B65.jpg

E3-B2-CF19-CA35-448-C-88-A4-F225-CF054-BFE.jpg


Care to elucidate a bit more on your specific heater setup there?
Is this a steel heater cover/tube we see there?
Do you use an off the shelf ceramic socket for the bulb?
The (very nice) cooling stem slipping over the heater port, I guess?
Are you using mains power there (judging from the plug)?
 

Squonk

Well-Known Member
@Squonk
Care to elucidate a bit more on your specific heater setup there?
Is this a steel heater cover/tube we see there?
Do you use an off the shelf ceramic socket for the bulb?
The (very nice) cooling stem slipping over the heater port, I guess?
Are you using mains power there (judging from the plug)?

First WOW ... what a stunning piece you have built. Looks comfy in hand too . Good work!:tup:

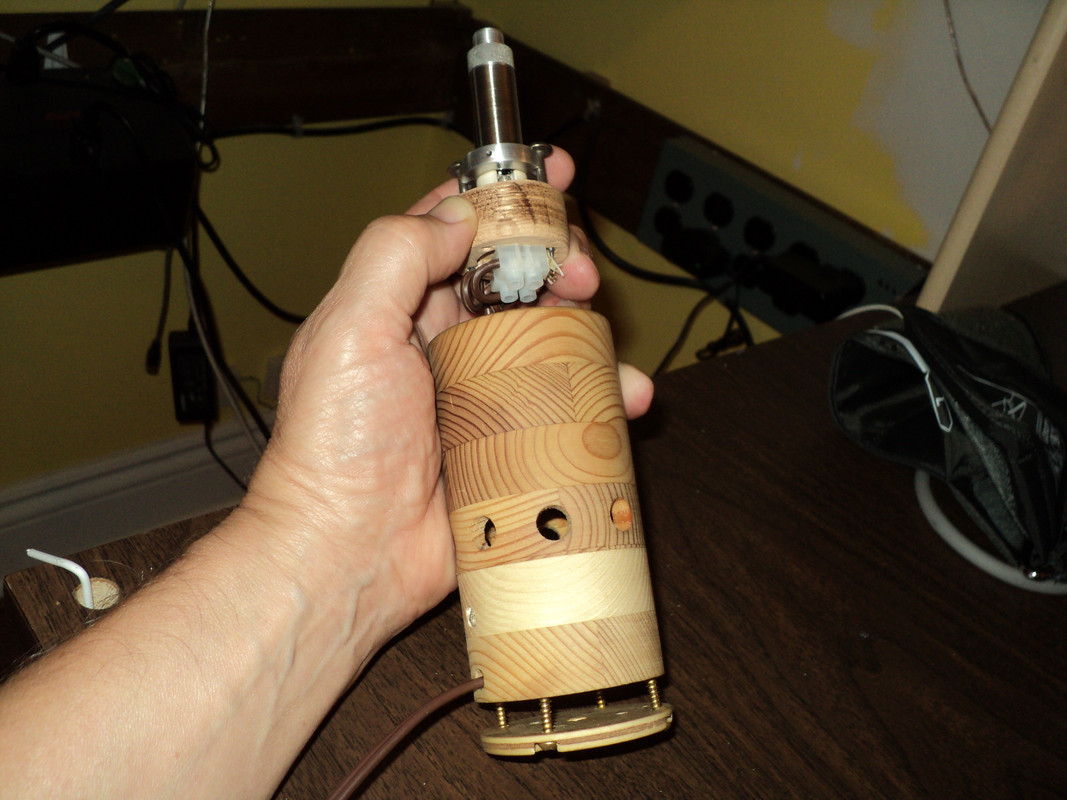
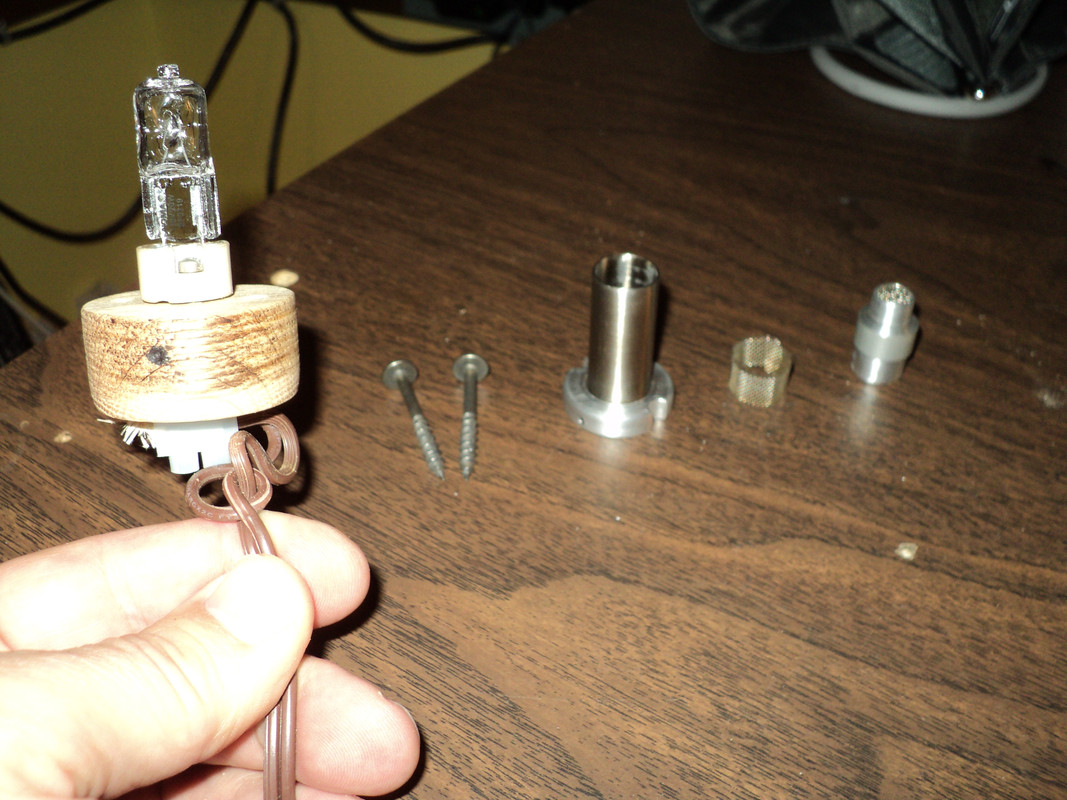
And to answer your questions here are the details of my vape:
The body of the vape is 55mm x 110mm.
The light bulb is a Noma Halogen bulb T4 JCD, 120Vac, 20 watts (Canadian Tire).
The BI-PIN base is a off the shelf ceramic socket (Homedepot).
The OD of the bulb is 13mm and the width of its base (where the pins are sealed in glass) is 13.75mm.
The stainless steel sleeve ID is 14mm and 40mm in lenght.
The mesh ss screen strip is 0.5mm x 10mm x 50 mm and is installed inside around the bottom of the sleeve (around the bulb)
The heater port is used to slip the cooling stem. Inside of it is a stainless steel drip pad.
Yes it uses the main power with the dimmer close to the plug.
That's it for now, if you need any more infos ... pls let me know!

DSC01323.jpg


DSC01324.jpg


I really like this simple concept. Did you say you are running unregulated?

It uses a dimmer to set the power at a fixed wattage. It does not have a temperature sensor for feedback, so there is no regulation as in PID control.
 
Last edited:
Top Bottom