'The Misty Log' - DIY wooden Log Vaporizer

blokenoname

DIY Log Dabbler 😁πŸͺ΅πŸ’ͺπŸ’¨πŸ’¨πŸ’¨
I just found one for about 40 euro locally.. lol looks the same as yours Model is RDP-BD04 and is 350w .
image;s=585x461;r=180
Cool... if in working order, seems you can't go wrong there. Just plowed through a piece of pine for a test run and it cuts like through butter even at the relatively low rpm, it is set at now :) :clap:

Edit: There! Masters the mahogany-sapele like a champ :D

314sccg.jpg
 
Last edited:

Copacetic

Somewhere North of The Wall
Cool... if in working order, seems you can't go wrong there. Just plowed through a piece of pine for a test run and it cuts like through butter even at the relatively low rpm, it is set at now :) :clap:

Edit: There! Masters the mahogany-sapele like a champ :D

314sccg.jpg
Speed adjustment of these drills is often by swapping drive belt positions on the pulleys under the upper metal cover.
Unplug drill first!!
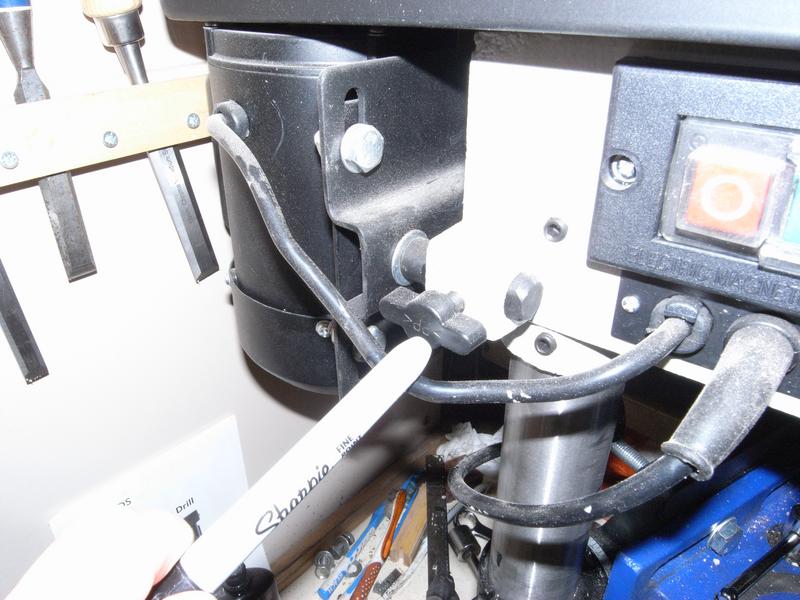
There are two plastic ' thumbscrews ', one on either side of the drill.
They hold the motor at the appropriate distance fom the drill to maintain drive belt tension.
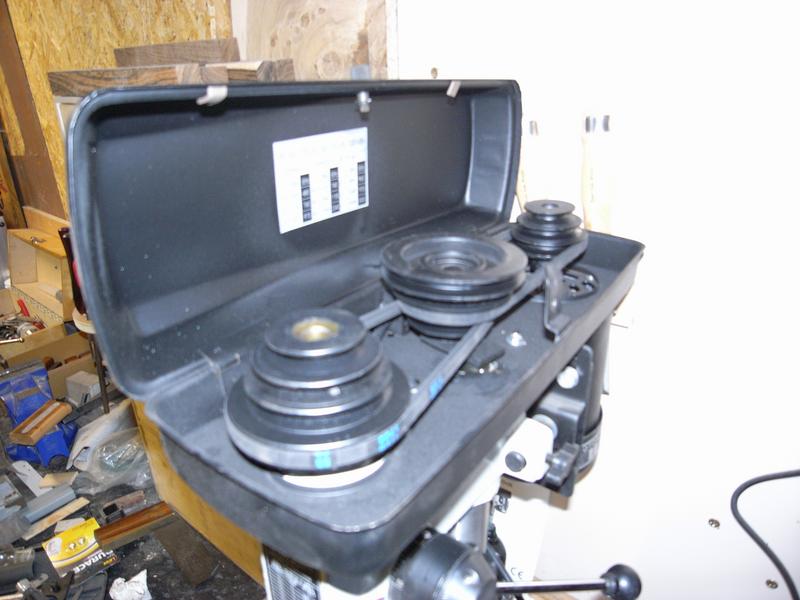
If you loosen them, and lift the metal cover on top of the drill (you have unplugged the drill, yeah?) you will see the gear pulleys.
You should be able to move the motor towards the drill to loosen the belts enough to swap them from pulley to pulley.
There's usually 3 sets of pulleys, and by selecting which ones to use, different speeds can be achieved.

this is one of the two pulley tension bolts (other is on the other side of the drill)

R0013991.jpg

R0013991.jpg


This is what the pulleys on my pillar drill look like:
R0013987.jpg


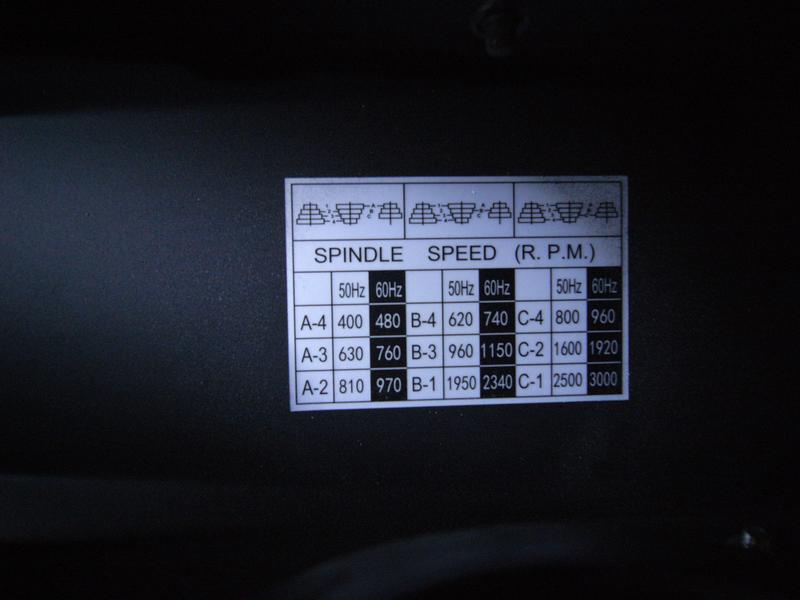
And here are the pulley/spindle speed ratios for mine:
R0013989.jpg


Sorry for the awful pic's, rushing out, new image hosting site etc.

Your drill may differ, but hopefully this will steer you in the right direction. ( and hopefully these images work, can't find the 'test your images' advice on FC so I'm winging it in a hurry!)

Oh, and when you have positioned the belts to the ratio you want, tension the belts by using something like a spanner or whatever as a lever to push the motor away from the drill and maintain pulley tension while you re-tighten the two pulley tension bolts (first pic').
The belts don't have to be SUPER tight, but they do have to be tighter than you will achieve by simply holding the motor away from the body of the drill with your hand while you tighten the bolts.
The space between the 'motor plate' and the body of the drill is where to place your lever.

Hope this helps!
 

blokenoname

DIY Log Dabbler 😁πŸͺ΅πŸ’ͺπŸ’¨πŸ’¨πŸ’¨
@Copacetic

Ahhhh... yes! :D Thank you! Just opened it up and its the same here, only that it has only two pulley gears. It's set at the 3rd largest from the top now.

Your pics show up fine. Mine are all missing from the thread now (at least for me) and tinypic.com gives no response when pinging. Down for several hours now. I will hope, not permanently, as otherwise this whole thread is crippled :uhoh:

Edit: Down for at least 15h now: http://www.isitdownrightnow.com/tinypic.com.html
 
Last edited:

blokenoname

DIY Log Dabbler 😁πŸͺ΅πŸ’ͺπŸ’¨πŸ’¨πŸ’¨
Found me a new tidy little buck, only 5 cm * 2,5 cm :nod:
Shows current and voltage. Even the small terminal block connectors for the 2,1 mm barrel plugs and the little loggie itself look huge now :p

2eukjk0.jpg


Also experimented with 11 mm ss slide over tips for the single glass core Misty, I had done. Made also a fitting wooden stem (the glass core unit's body is made from spruce, not fir BTW. Translated that wrong) and a WonG, though sadly I have no tool at hand to taper off the wood itself precisly enough to fit a tapered glass joint :( So silicone for sealing it is for now.

1zcnvpy.jpg
 
Last edited:

blokenoname

DIY Log Dabbler 😁πŸͺ΅πŸ’ͺπŸ’¨πŸ’¨πŸ’¨
Finished another MistyMahogany standard core resistor unit :clap:
This time giving it a wider centre bore (30 mm instead of the usual 25 mm). The thinner shell making it really lightweight and the wider bore keeping the body cooler to the touch, while still maintaining temps. I really like the outcome :nod: :)

353do91.jpg


Refitted the cocobolo NonaVong with one of my 8 mm ss tips temporarily (which perfectly fit the 8 mm bore of the Vapcap body, BTW), as it just pairs wonderfully with the mahogany-sapele :) No multi tip size bushing for this unit, as I recycled an older hc from one of the pinewood prototypes, that already had a bushing for Arizer Solo/Air glass, which won't come off again :p

wtsh0.jpg
 

Abysmal Vapor

Supersniffer 2000 - robot fart detection device
@blokenoname That last one looks really nice. I also prefer to have thinner walls,much less heat to the body from the cartridges/buls :)).
Btw those 12v50w do work really good,i am only concerned about the sealing at botom,seems to be some kind of cement,i guess i will have to look into what exactly it is,before i start breathing trough these .
Edited:
Just got a reply back from the manufacturer. The cement used is just edible lime and water. I asked also about the leads and he said it is not Nicrome ,but tinned aluminium or tinned copper.He explained that if the leads were from Nichrome they would get redhot. I guess i will try to cut as much off the leads as possible and also check up with the guy that make customs and ask about if it is possible to make one with SS leads.
 
Last edited:

blokenoname

DIY Log Dabbler 😁πŸͺ΅πŸ’ͺπŸ’¨πŸ’¨πŸ’¨
Well, the thinner walled bodies will be an additional option for Mistys with the standard, lightweight core (SC), powered by the classic Ohmite resistor :nod:
Functional, there is no difference to the more narrow bore, apart from the body remaining cooler.
Though the bodies with the standard 25 mm bore don't get too hot anyway. You should touch a unit with the cartridge heater powered high mass core (HMC)... those little buggers do indeed get a bit hot to the touch at their midsection, where the core is located :D

@Abysmal Vapor
Besides the ceramic/ss cartridge heaters, there is always the possibility of simply using another Ohmite resistor with the appropriate resistance. For use in a portable, a resistor between 1 ohm to 3,5 ohm should do fine and replicate the performance of the 50w cartridge. As their coating is vitreous enamel, which is essentially just a mold of powdered glass, I'd say the resistor solution might be one of the more healthier solutions. I say 'more healthy' here, as I go very much conform with the notion of the original Eterra's creator, that there is no such thing, as a 'healthy vaporizer'! Our lungs are solely made for breathing air, not smoke, nor vapor of any kind ;)
We can (and should) make our vapes as 'safe' as possible, that is correct, but please always within reason. Besides the above general statement regarding health, there is also always the need for compromise (within reason) on technical grounds alone in cases.
I avoid ss wiring nowadays for instance, b/c it's nearly impossible to form a good and lasting connection with ss, using standard soldering equipment alone. I'd have to resort either to braze-welding or crimping and terminals. So I decided on silver plated copper wire instead here for extending the leads and use tinned copper splices (both RoHS compliant of course), if need be, which should pose no relevant health risks, as long as a minimum distance to the heater itself is kept to comply to a given material's max temp specs.

The idea of custom made cartridges is an appealing one, though price will always be an issue there, when not ordering in economical relevant quantities. But we discussed that before.

Also pondering the idea of a kind of base/socket here, the heater (be it resistor or cartridge) can be set into non-permanently to connect to the log's wiring, so that it becomes user replaceable by just unscrewing the heater cover. Kind of a small ceramic disk with two holes for the leads, into which two splices go comes to mind here for instance... have to work on that idea a bit more yet.
 
Last edited:

blokenoname

DIY Log Dabbler 😁πŸͺ΅πŸ’ͺπŸ’¨πŸ’¨πŸ’¨
Well... looks like I'm pretty much on me way, making a first small batch for sale! :D

Guess, another week or a fortnight, and I'll start a new thread for my Misty Logs in the 'Upcoming&Unreleased' section and will probably also do an instagram page or s/t like that :nod:

30bd3zk.jpg


Top to bottom:

Standard Core (SC)
High Mass Core (HMC)
Glass Core (GC)

29awcns.jpg
 
Last edited:

Abysmal Vapor

Supersniffer 2000 - robot fart detection device
Well... looks like I'm pretty much on me way, making a first small batch for sale! :D

Guess, another week or a fortnight, and I'll start a new thread for my Misty Logs in the 'Upcoming&Unreleased' section and will probably also do an instagram page or s/t like that :nod:

30bd3zk.jpg


Top to bottom:

Standard Core (SC)
High Mass Core (HMC)
Glass Core (GC)

29awcns.jpg
Good luck,mate ! Those animated animals are really cute :))!
 

brainiac

log wrangler
Excellent news! :tup::tup:.
I hope you make as many logs as there are grains of rice in my larder (ancient Indian blessing).
We've waited a long time for a European log maker so I'll be keeping a keen eye out for your new thread.
All the very best to you @matenoname.
 

Megaton

Well-Known Member
So i've had few weeks with a couple of prototypes of @blokenoname's logs.

I first starting chatting with Bloke in July round these parts when I came across this thread. I was looking to build an induction heater for my Vapcaps, and was aware of being able to use logs such as the Woodscents with a Vapcap. Knowing that there weren't many log makers over here in Europe I was extremely interested to follow what he was doing.

Unfortunately I am not the most practical of people, and as simple as Bloke makes this whole log making business seem, it is just outside of my abilities to make one myself. Regardless of this though, Bloke kindly entertained my many, many questions and shared lots of his knowledge with me. Bloke is clearly passionate about logs, and he really has done his homework, if there were a museum dedicated to logs this would be the man to curate it!

So with all that said, Bloke has kindly invited me to beta test one of his prototype logs. Please bear in mind that Bloke already has some major changes in the pipeline in the form of the variety woods he is using- the prototype I have is mahogany- sapele, but future units will have a wide range of choice of hard woods and bottom caps, such as walnut, beech, cherry, ash, all the usual suspects.

Anyway, on to my test unit. Bloke has taken all of his research to make a simple yet extremely effective unit. The model I have is a sapele wood, with an open heating core. This log shares lineage with Alan's Heat Island logs, with a traditional resistor, in a 9mm stainless steel tube, with slits at the bottom to allow air through which passes over the heating element through your bowl. Bloke has also included a bushing over the heater port which allows you to use 10mm tips, and a circle clip and high temp silicone o-ring so you can use 'slide-over tips' such as the glass Arizer stems which have a roughly 11.5mm inner diameter.

If you are interested in how it is put together or what materials are used you can just go through this veritable treasure trove of an informative thread, I won't bore you with a recap of what is already written here.

I have been running this unit on a variable voltage power supply (VVPS) at 12.25V-12.5V. You could vape with it within about 10 minutes of turning it on, maybe quicker if you gave it a bit more power to start with. I tend to give it about 20 minutes at 12v so that the wood is thoroughly heat soaked. However, this has extra β€œgas in the tank” as it were, which is very useful for when using the larger tips or glass stems, as they are a touch further away from the heater itself, and so need a bit more heat to get you where you want to, go if you have a VVPS, for these I would use 12.5V.

The 10mm tips work exactly as the 8mm do, a light pack (using the straw method to hoover up your material) works best with these types of vapes. The Arizer stem packed with a very minimal touch of material works superbly and the flavour is amazing. Bloke has added a clip ring and high temp silicone o-ring around the bushing to allow the glass stem to make a good seal. I have been getting great flavour from the all glass stems, but you definitely need a bit of extra power in order to get a full extraction.

I have been using the unit exclusively through water as that is just how I like to vape these days. I have been using an 8mm tip with a 14/18mm PonG as Bloke likes to call it, as well as a Ddave custom waterwand, into my matrix sidecar china glass copy.

12.25V might be a bit hot for some peoples tastes, but as I am using it through water it is just right. These higher power settings have been working great with a dab of concentrates on top of the herb. With the 8mm tip, the first hit is an instant white walled bong, with a massive rip. The second is still a pretty large hit, and then a third more wispy hit. After that I take the adapter out of the bong and use it directly dry, and will get a few smaller hits directly from the log by letting the tip heat soak a little and taking slow draws to get the last goodness out of the bowl. The avb is very, very, very efficiently extracted, all but black on the very top, with even the herb furthest from the bowl still being very dark. As this is a pure convection vape, you are bound to have the material closest to the heater darker than the rest. You could stir if you wish, but I don't. This will also depend on your grind and how you pack the bowl.

The stem/bowl compatibility of this unit is one of its major strengths. You can either use the 8mm tips slid into the heating core (a relatively standard size of tip for a log), or a large 10mm OD tips (such as a Vapcap or SS tubing) into the bushing around the top of the core, or an Arizer or similar glass stem slid over the top bushing, if that is what you are into. So with that in mind, this is definitely one of the most versatile logs you are likely to find,with tips and stems that suit any preference.

The Misty logs will give you everything that you expect from a log vape. Extremely efficient, simpler than practically any other vape (hell, it doesn't even have any buttons!) and versatile to the extreme with the choice of tips and stems you can use with it. With this particular heating element the log would need to be used a VVPS if you wanted a bit of extra heat, but it can be used natively with a 12v power supply, and a dimmer gives you the option to turn down a little if it feels too hot. Bloke has said that there will be a choice of heating element- either a traditional resistor as found in the Heat Island logs, or a more powerful cartridge as recommended by Rasta, which may be best paired with a high mass core so I’m sure if that is your flavour, he would be happy to oblige!

At some point i will get a milk shot video in, when i get round to it!
 

brainiac

log wrangler
Excellent review @Megaton.
A person could make a well-informed decision about this vape on the basis of your review
and more than that we cannot ask.
You describe a well-made and versatile addition to our vape options and it sounds like just the job to me.

Like you, I consider water conditioning as standard for vaping and log vapes are ideal for use with glassware.
Tho I do use glass and ss dd stems for flavour testing and your review reassured me that my U/D stems could be used with this unit.

And of course you're absolutely right:
logs are efficient, very economical with the herb - and just lovely to look at.
The world needs more logs :tup:
 

Megaton

Well-Known Member
Thanks @brainiac! Iv been really enjoying doing lots of highly scientific experiments with @blokenoname's logs, and i have learnt a hell of a lot along the way! :science: so much so that i am going to have to do extensive testing tonight. Can never be too sure :rofl:

So so glad to see a new log coming to the European market, im hoping it will make waves! The final production logs look to be shaping up amazingly!
 

blokenoname

DIY Log Dabbler 😁πŸͺ΅πŸ’ͺπŸ’¨πŸ’¨πŸ’¨
Morning! :clap:

Did a new standard core unit from European beech (though probably have to reduce rpms of the drill press, as the bit charred the bore somewhat).

Also made a small improvement to the standard core, hiding the teflon washer holding the heater cover in place beneath a 30 mm ss washer now, which in turn is held in place by a retaining clip.
Looks much better that way :nod:

@Megaton & @brainiac

Thank you both for the great review and comments and your interest in me little log endeavor here :D :rockon:

Have a nice weekend, all ;pd;:cheers:


20p2crk.jpg


2dkztp2.jpg
 

Megaton

Well-Known Member
And thank you @blokenoname for involving me one your log journey and inviting me to beta test for you!

That beech looks really nice mate! Lovely pair of loggies there! The metal bottom washer looks great too.
 

blokenoname

DIY Log Dabbler 😁πŸͺ΅πŸ’ͺπŸ’¨πŸ’¨πŸ’¨
Alternate body design for the high mass core! (Used spruce here, as its the easiest & fastest to work on for a prototype unit).
This one has the wide 30 mm bore only going in for about 2 cm. Bellow that, the bore narrows down to 25 mm and holds the bulk of the core.

The bigger, 30 mm ss top washer rests on the lip created by the two step bore and pressing down on the smaller washers, stacked onto the heating tube below, and is fixated by a retaining clip, which keeps the whole core arrangement in place.
Works good so far and main advantage is in keeping the body cooler to the touch, as the larger surface area of the top washer acts as a heat sink, dissipating a good deal of the excess heat. Running for 6 hours straight yesterday night, body surface is still considerable cooler, than in the HMC units with a straight 25 mm bore, running all the way through.

Bottom of the unit is no longer plugged up, but is closed by a wooden bottom cap now, which is simply screwed on.... though this needs a bit more precision work and should work better with hard woods, as it's friggin easy to sand away more then planned, with the super soft spruce ;)

Will set the innards into a mahogany or beech body later on and we'll see, how that looks and fares :nod:

Have a nice Sunday, all :)

Edit: also got a nice 30 mm beech rod for further experiments with the portable. New DC jacks also already arrived. Still waiting for PA6/nylon rods for new stems and NonGs, which should arrive by mid of the week.

21e57c5.jpg
 
Last edited:

blokenoname

DIY Log Dabbler 😁πŸͺ΅πŸ’ͺπŸ’¨πŸ’¨πŸ’¨
Progress on the new beta units. Finished the bodies already :) ; innards go in tomorrow. Then another day for burn in and testing and they can go on their way by Saturday morning :nod:

10776ag.jpg


12 mm PA6/Nylon rods for the stems and NonGs also arrived and a first small batch of stems turned out quite well :clap:
The Nylon is a bit harder than the POM and is also more translucent, which looks quite nice.

257di55.jpg
 

KeroZen

Chronic vapaholic
Is there a steel tube all the way inside your Nylon stems or is vapor touching the plastic at some point?
 
KeroZen,

Abysmal Vapor

Supersniffer 2000 - robot fart detection device
Is there a steel tube all the way inside your Nylon stems or is vapor touching the plastic at some point?
I think it is in contact with nylon. I have a few Aromazap stems and they feature just a tip melted into a nylon tube,but have never tried them :D.
@blokenoname I like the light one in the middle,but all look nice ,GJ ! :)
 

blokenoname

DIY Log Dabbler 😁πŸͺ΅πŸ’ͺπŸ’¨πŸ’¨πŸ’¨
Evening :)

@KeroZen
Nope, no steel tube all the way in the Nylon stem. Vapor does touch the plastic, just like it does with the Nylon stems/NonGs of the Underdog or Alan's high temp polypropylene mouthpiece tubes and PonGs, he offers as a budget solution besides his gorgeous wooden stems and WonGs and glass.
Aromazap and Purple Days also used polypropylene for the tubes AFAIK, not polyamide 6/Nylon, but a thermoplastic nevertheless. PA6 melting point is 220Β°C (polypropylene is 170Β°C), but even though the air exiting the heating tube might in cases be that hot when hitting the load, once it passed the load it rapidly cools off, as otherwise it would be impossible to inhale the vapor after only another 8 cm, where your mouth already is. The backend of the ss tip itself also doesn't get hot enough to melt the plastic, where it enters into the stem. Though the plastic gets good and hot to the touch where the backend of the tip enters, you can still hold it with your fingers, showing that it's far off 220Β°C there.
My ss tips also aren't melted into the plastic on purpose, but get rather simply pushed into the fitting 8 mm bore at the business end of the stem and a tight fit is achieved by deforming the back end of the ss tip into a slight oval, so that it's snug enough to stay in place but removed easily enough for cleaning or replacing.

@Abysmal Vapor
Thx :) Light one in the middle is beech. Not my personal favorite actually, but still waiting for some nicer woodes to arrive.

Tried a new method for fastening the heater cover in the standard core units, so that I can eventually dispense with the teflon washer. Backend of the heater cover gets flared out a bit, so that an M8 washer comes to rest on the flare. Big 30 mm washer goes on top of that then the whole arrangement is fastened simply by a fitting #30 ss circlip. Holds up quite good so far (even dropped it from the table onto the floor a few times on purpose without being abke to loosen the clip). Question is, can the clip deal with long time changes in the wood due to heat degradation? The standard core units get nowhere even near to 'hot to the touch' actually, but are just cosey warm :nod:

awe4jl.jpg
 
Last edited:
Top Bottom