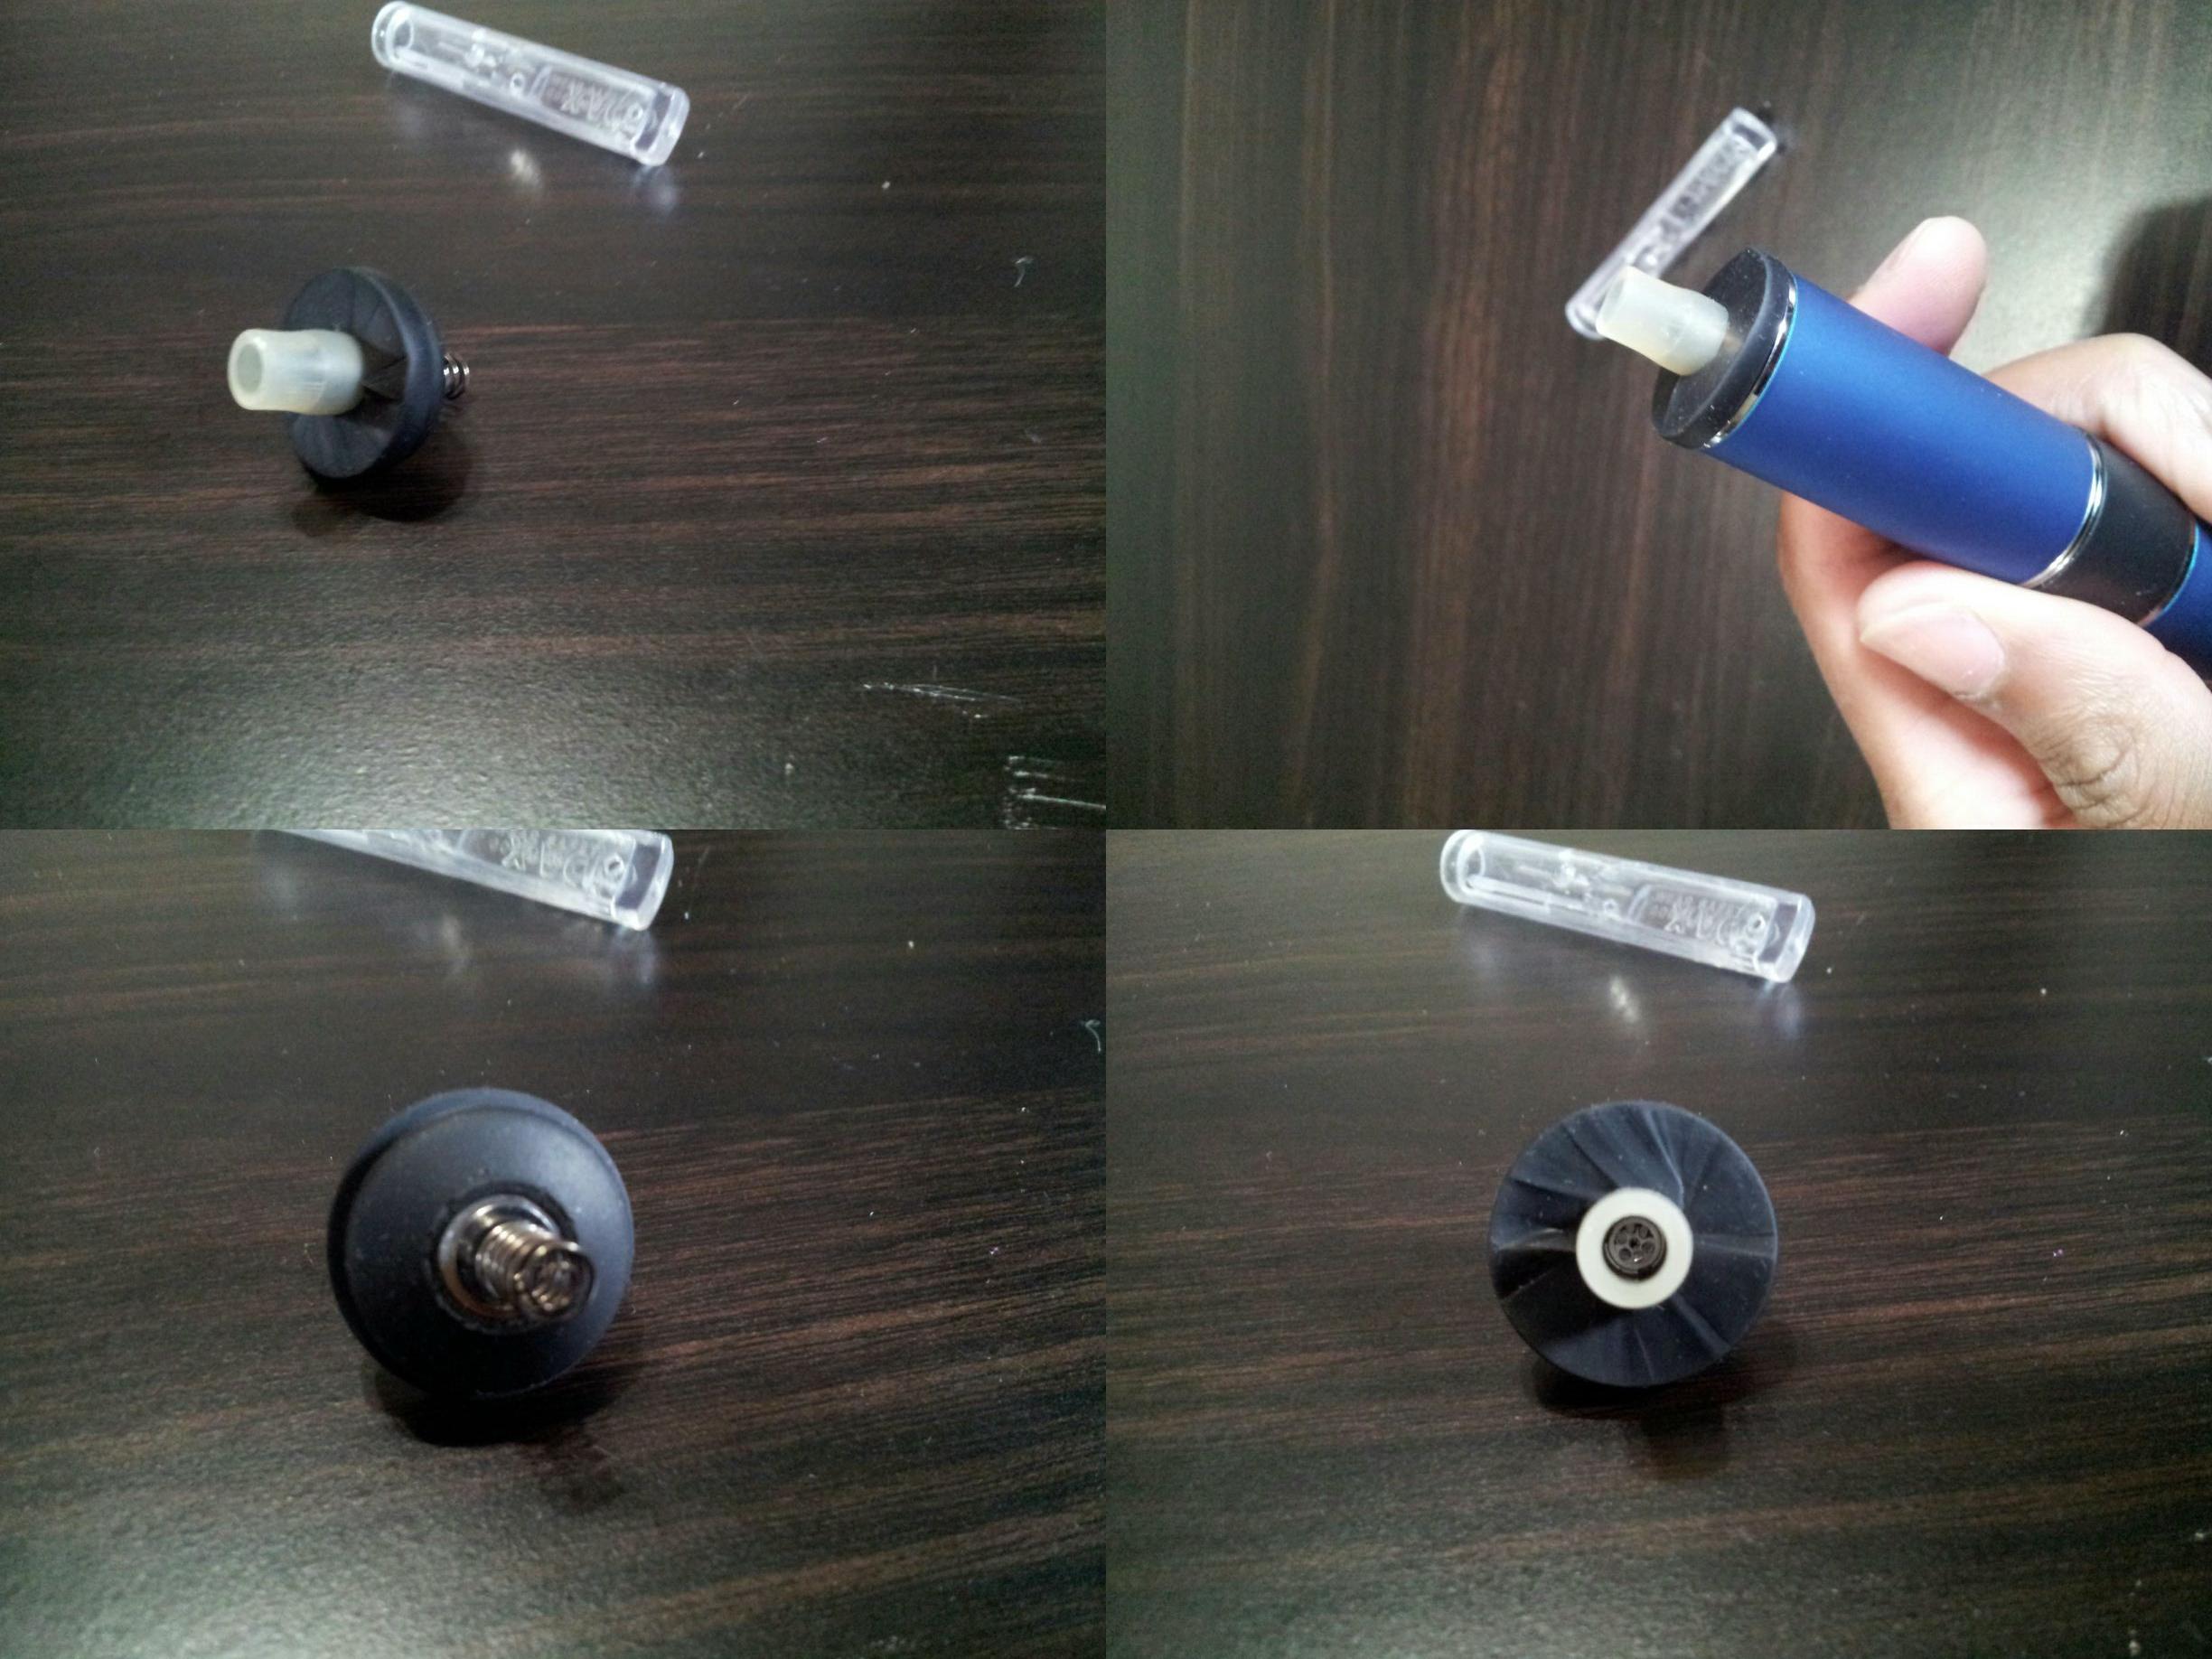
Discontinued Tvape Vaporizer

Yoosh

Well-Known Member
@paytonpenn; I'd love a comparison video between the old tvape and the 2.0. I'm personally interested in learning how long a same-sized load lasts in both the 1 & 2.0 versions, cloud production versus the two, usage, etc. I'm still very confused by the 2.0 and dont know if I should sell my short & long 1.0 or just stick with them.

For example, I love how I can fill up my tvape 1.0 and just hit it leisurely and get big hits over a course of 15+ minutes which doesn't seem to be a feasible feature of the 2.0 (I could be wrong).

I'd love to see these differences highlighted in a video and I think it'll help clarify whether the 2.0 is what someone is looking for.
 

pakalolo

Toolbag v1.1 (candidate)
Staff member
@pakalolo Have you cut the nipple and replaced that draw path with silicone for the MFLB yet? I find the oven also has an off taste but the nipple is strongest first similar to the issues in the FM thread.

If you want more info or pics of my nipple setup I can post.

Video wise, what are you guys looking for currently, I am interested in doing a series of videos to show off the pulses at different length and abv results from varied styles of pulsing lengths.

I have not. I think I know what you did, but pictures would confirm (or educate). Mostly I use mine with my Orbiter. The MP fits fairly snugly into 14 mm.
 
pakalolo,
  • Like
Reactions: RUDE BOY

owin

Well-Known Member
So I finally got to try out my tvape 2.0. I did the mini setup. Loving it so far. Been looking for a pen style flower vape and this is pretty close. A little bigger than most pens but still pocket friendly.

I still like the pax better overall, especially for taste. But this guy is definitely pretty good and I will be adding it to my rotation while on the road.

I travel all over the world for work and this will be going with me and my pax from now on. Maybe even replace the pax depending on how the tvape holds up.
 
owin,

paytonpenn

Level 30 Nature/Healer
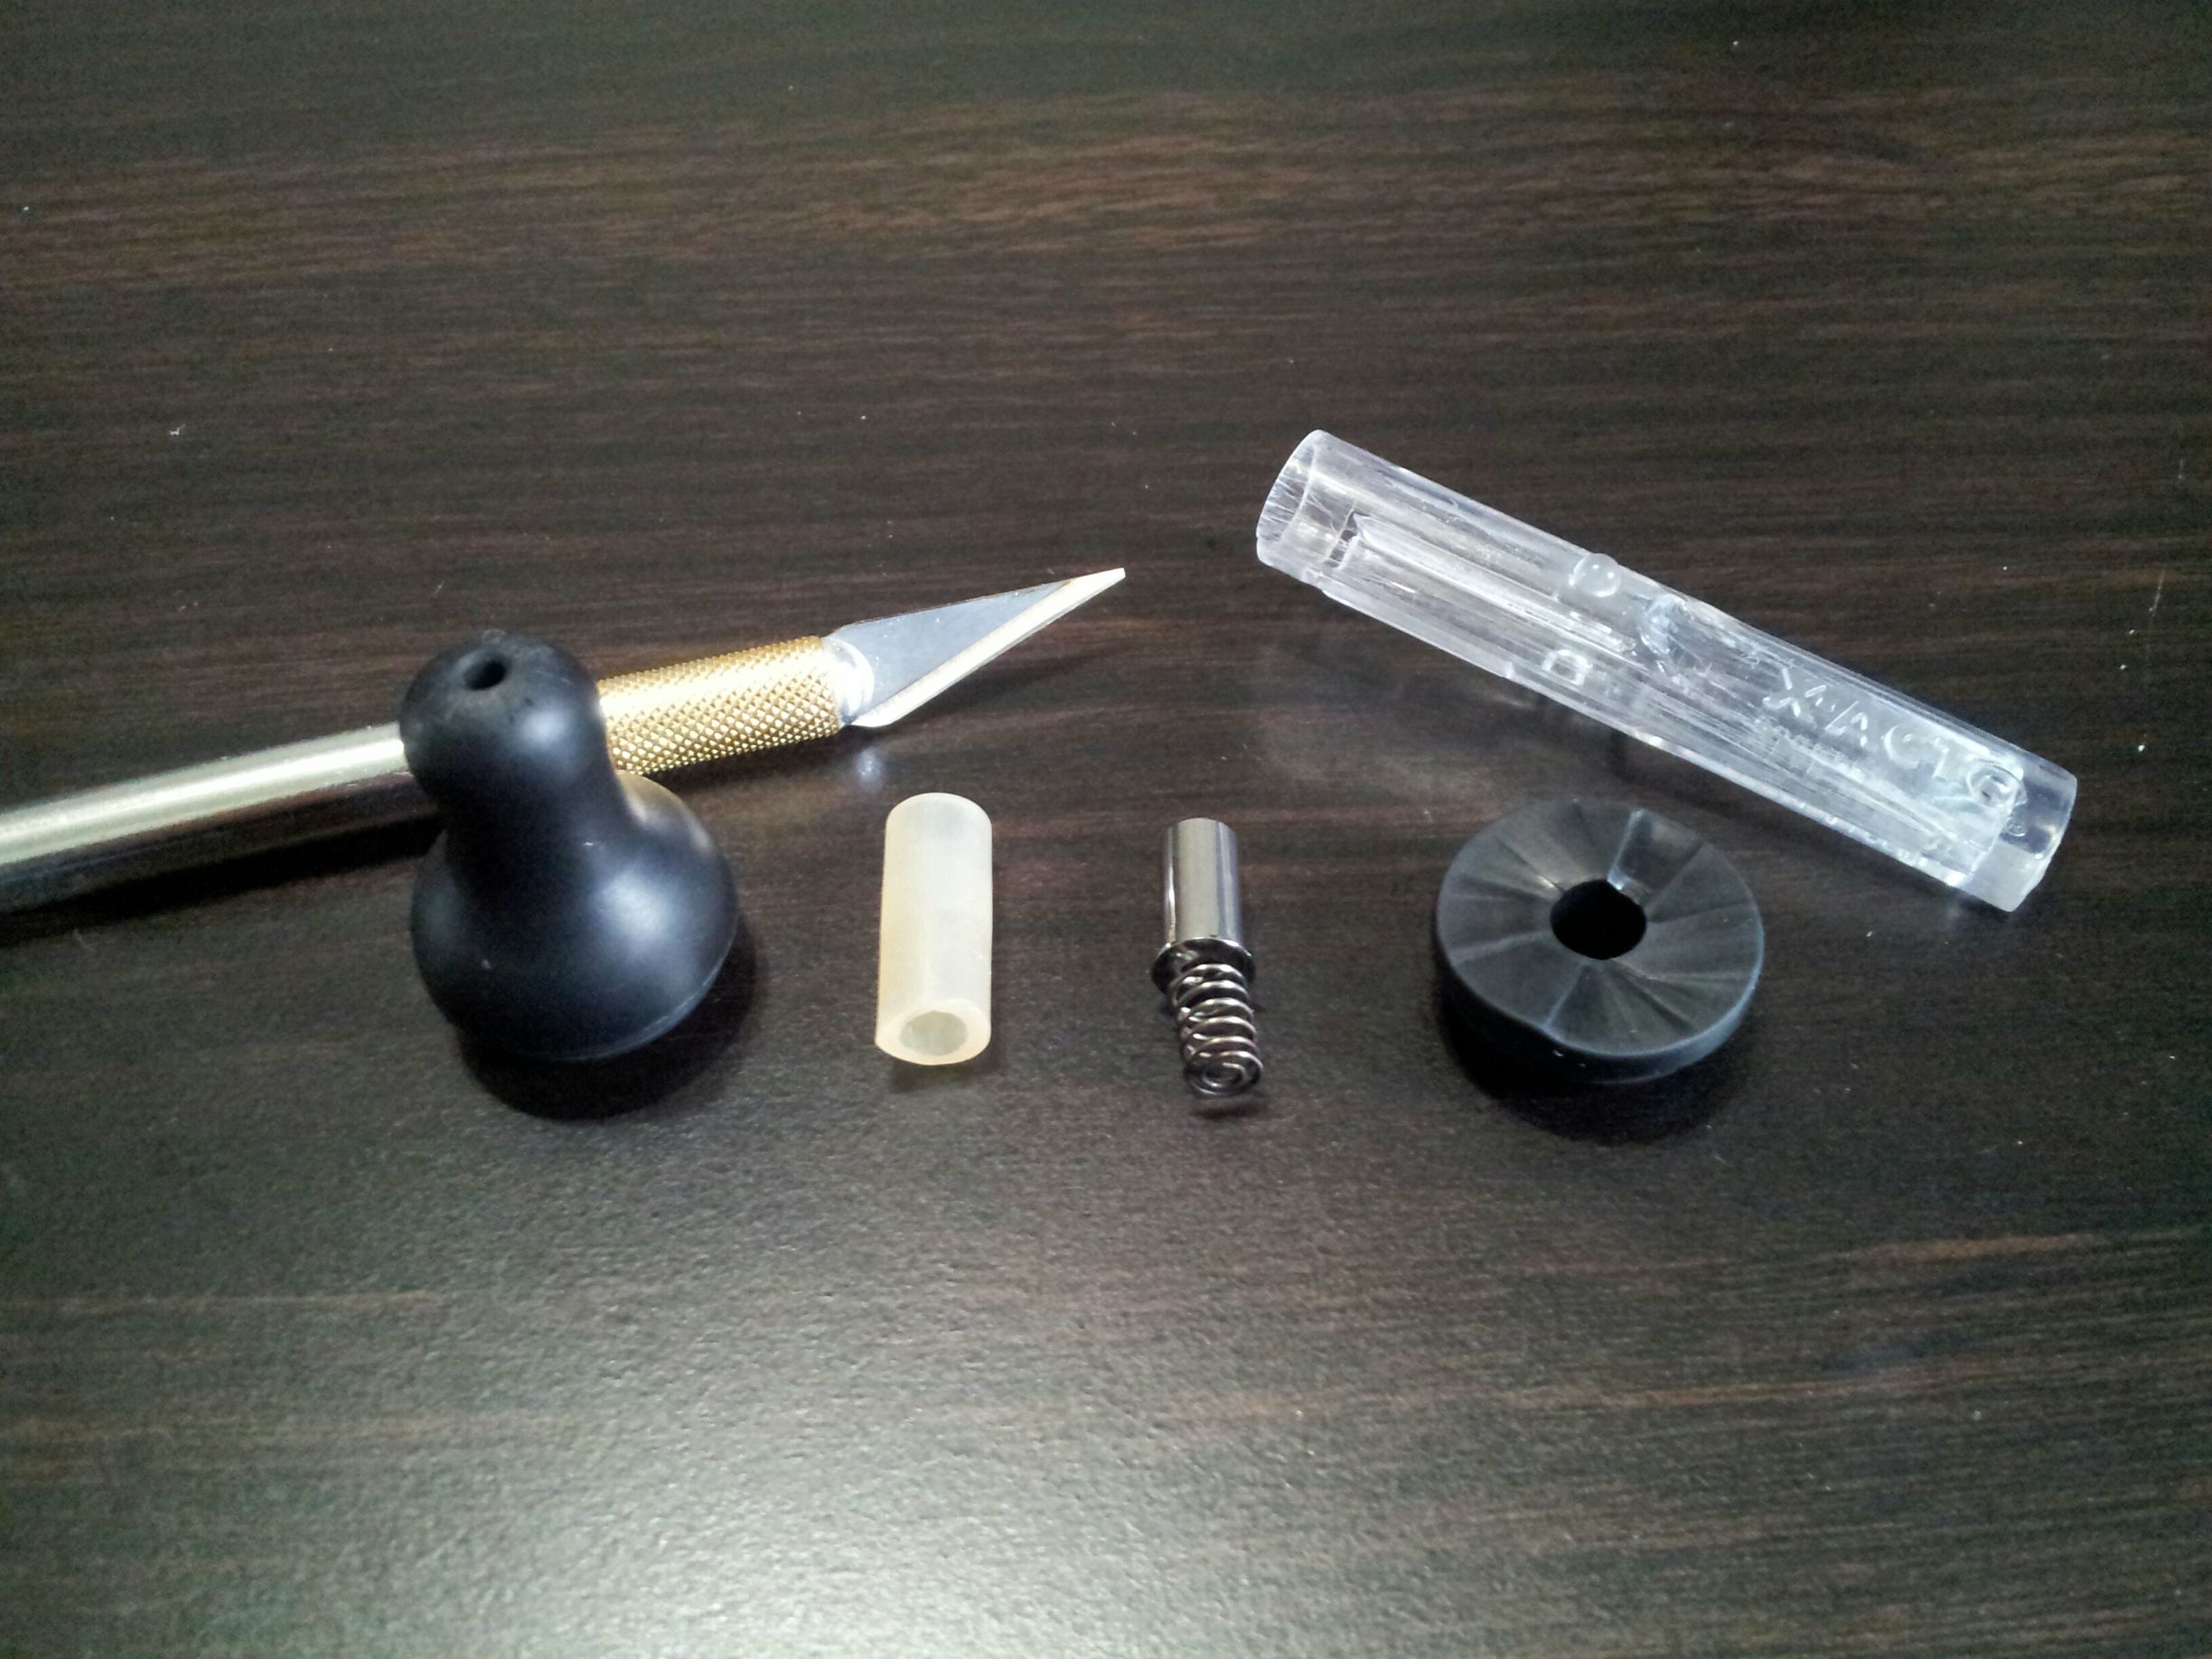
Here's how I create the mouthpieces I use for my T-Vape.

ZNEVOYX.jpg

First you'll want to ensure you have at least 3 inches of silicone tubing to play with (you'll only need an inch at the most). Hopefully someone can come in with sizing information for the tubing but I use the Magic-Flight "draw whip"; my tubing was pre-cut to about 3/4th of an inch. You'll also want an X-ACTO knife, but any knife should work. I believe I first used a steak knife for the original mouthpiece of this design. In the assumption you already have the nipple and spring you're ready to start (I also included a pre-cut nipple for example).

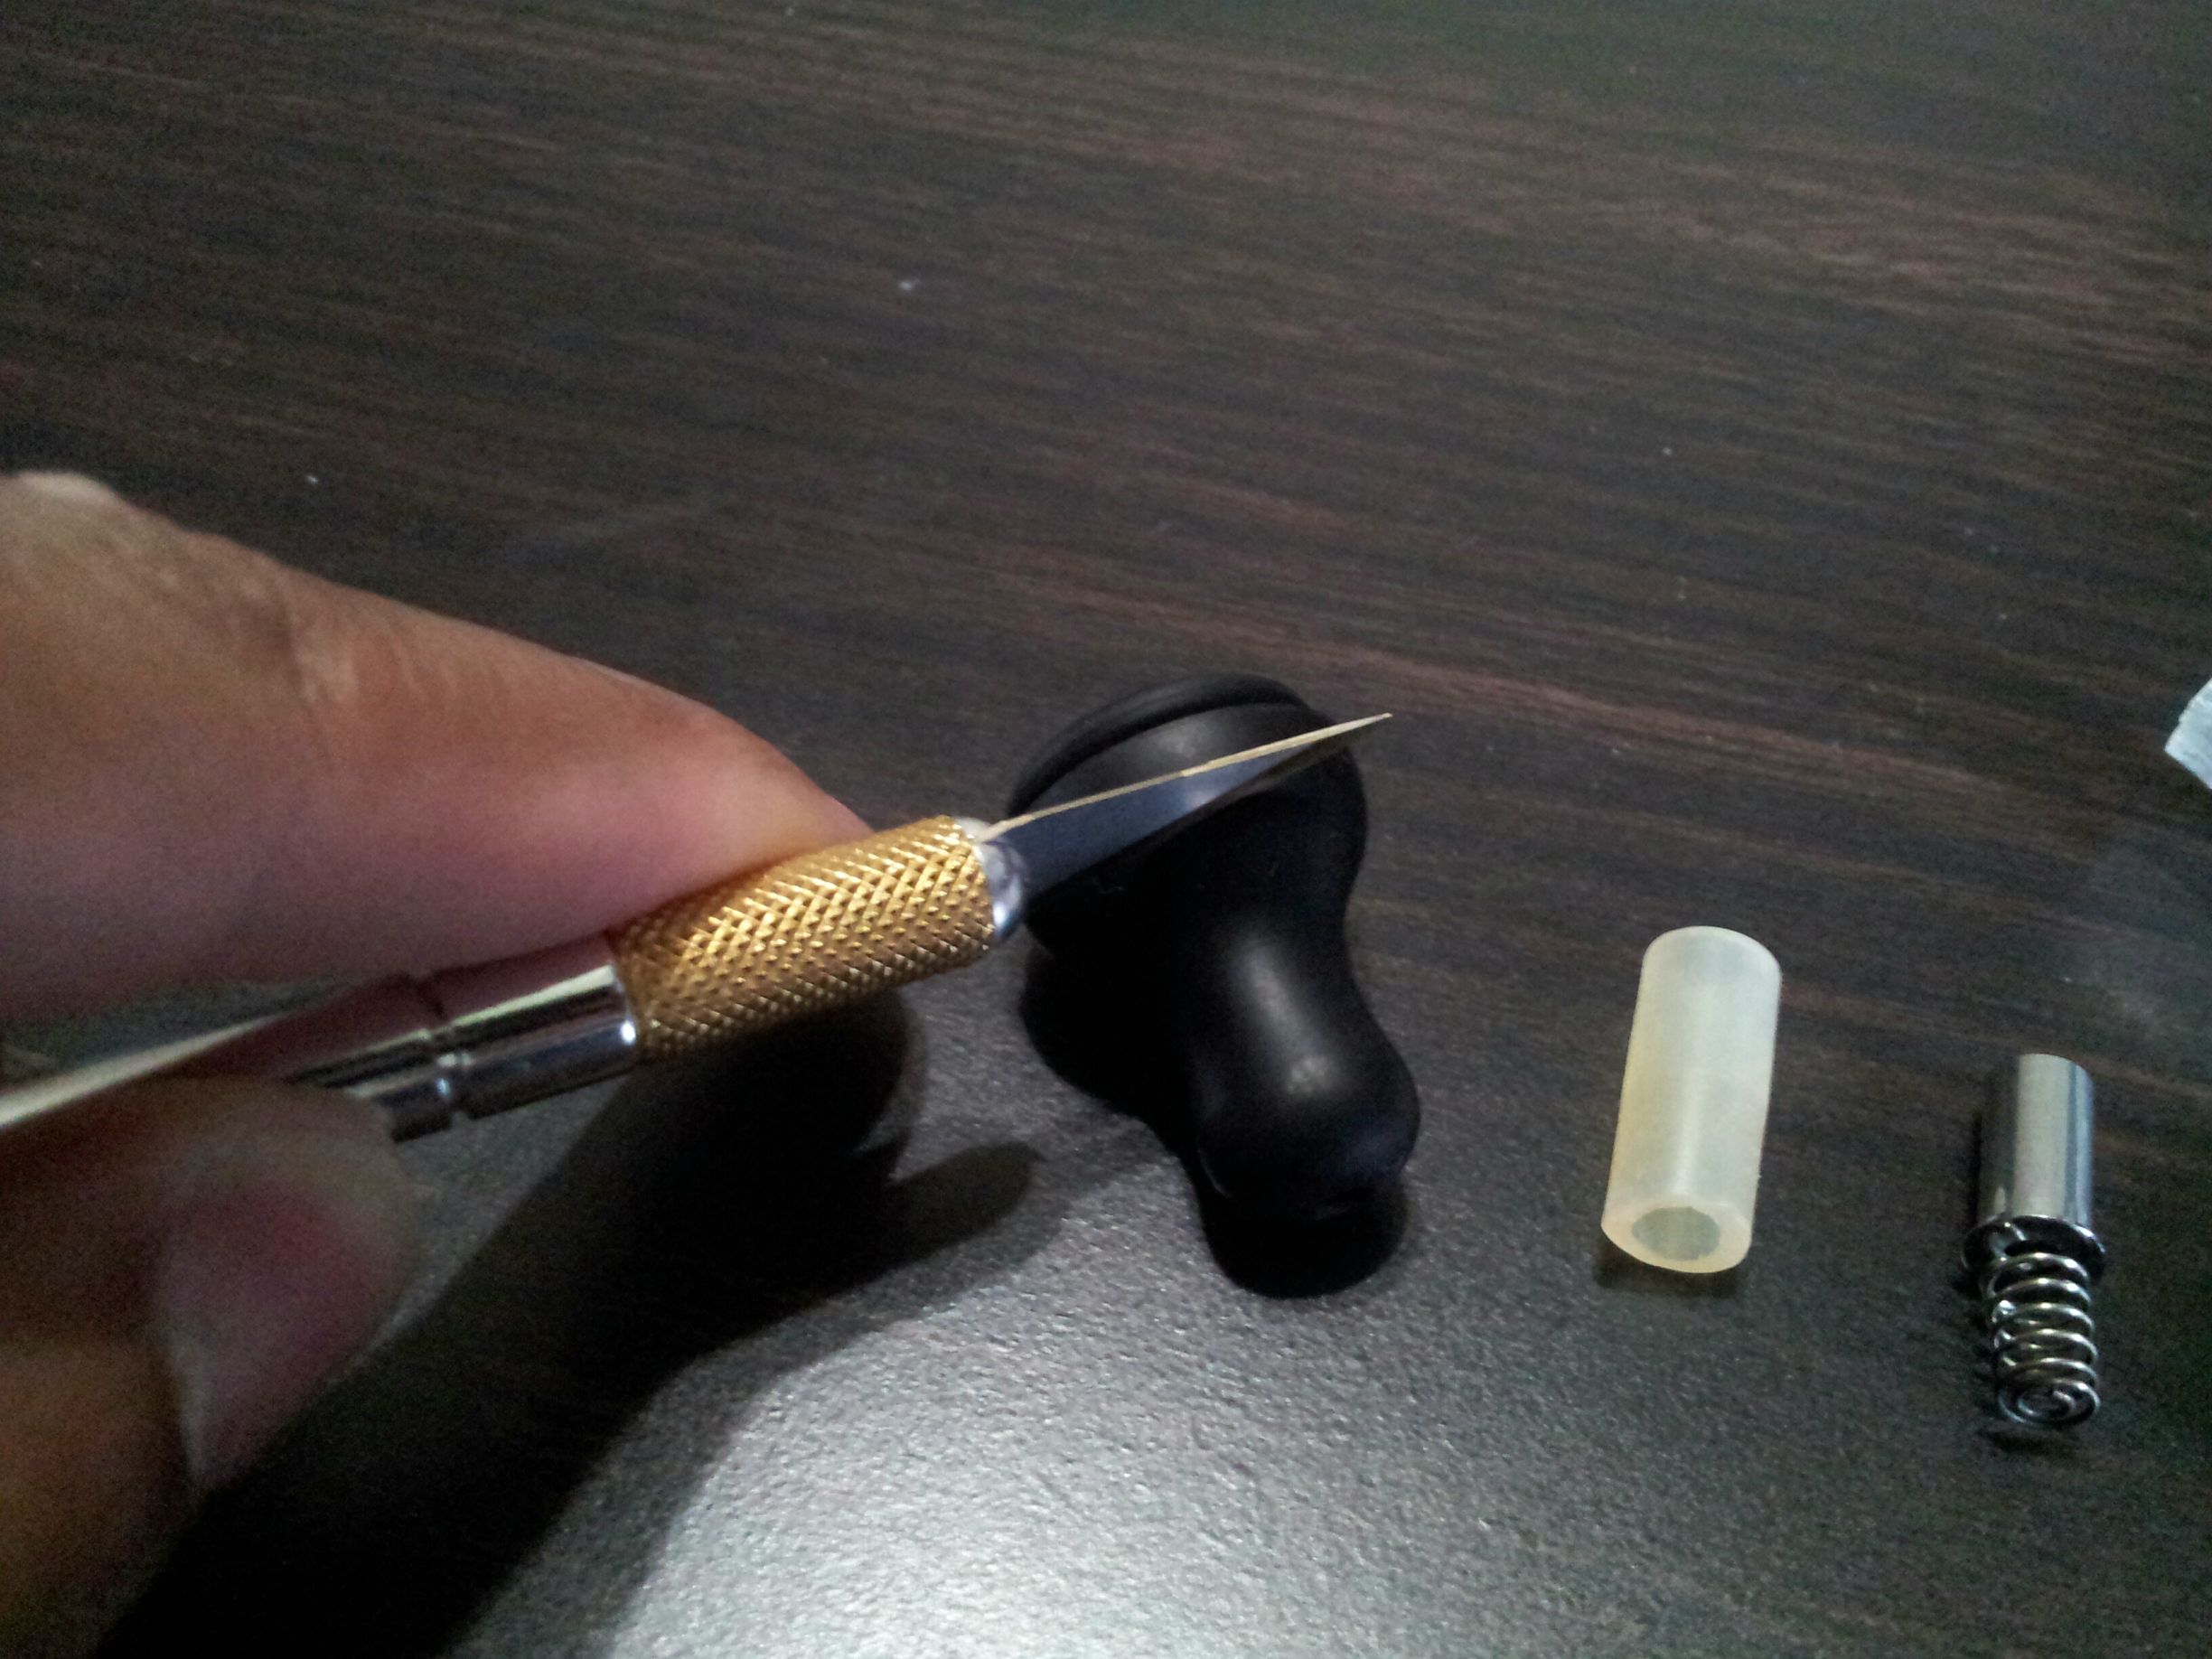
Tycijyj.jpg

I made my cut about a half inch in on the mouthpiece from the bottom, I'd just ensure to snip off the end of the nipple when it becomes narrower.

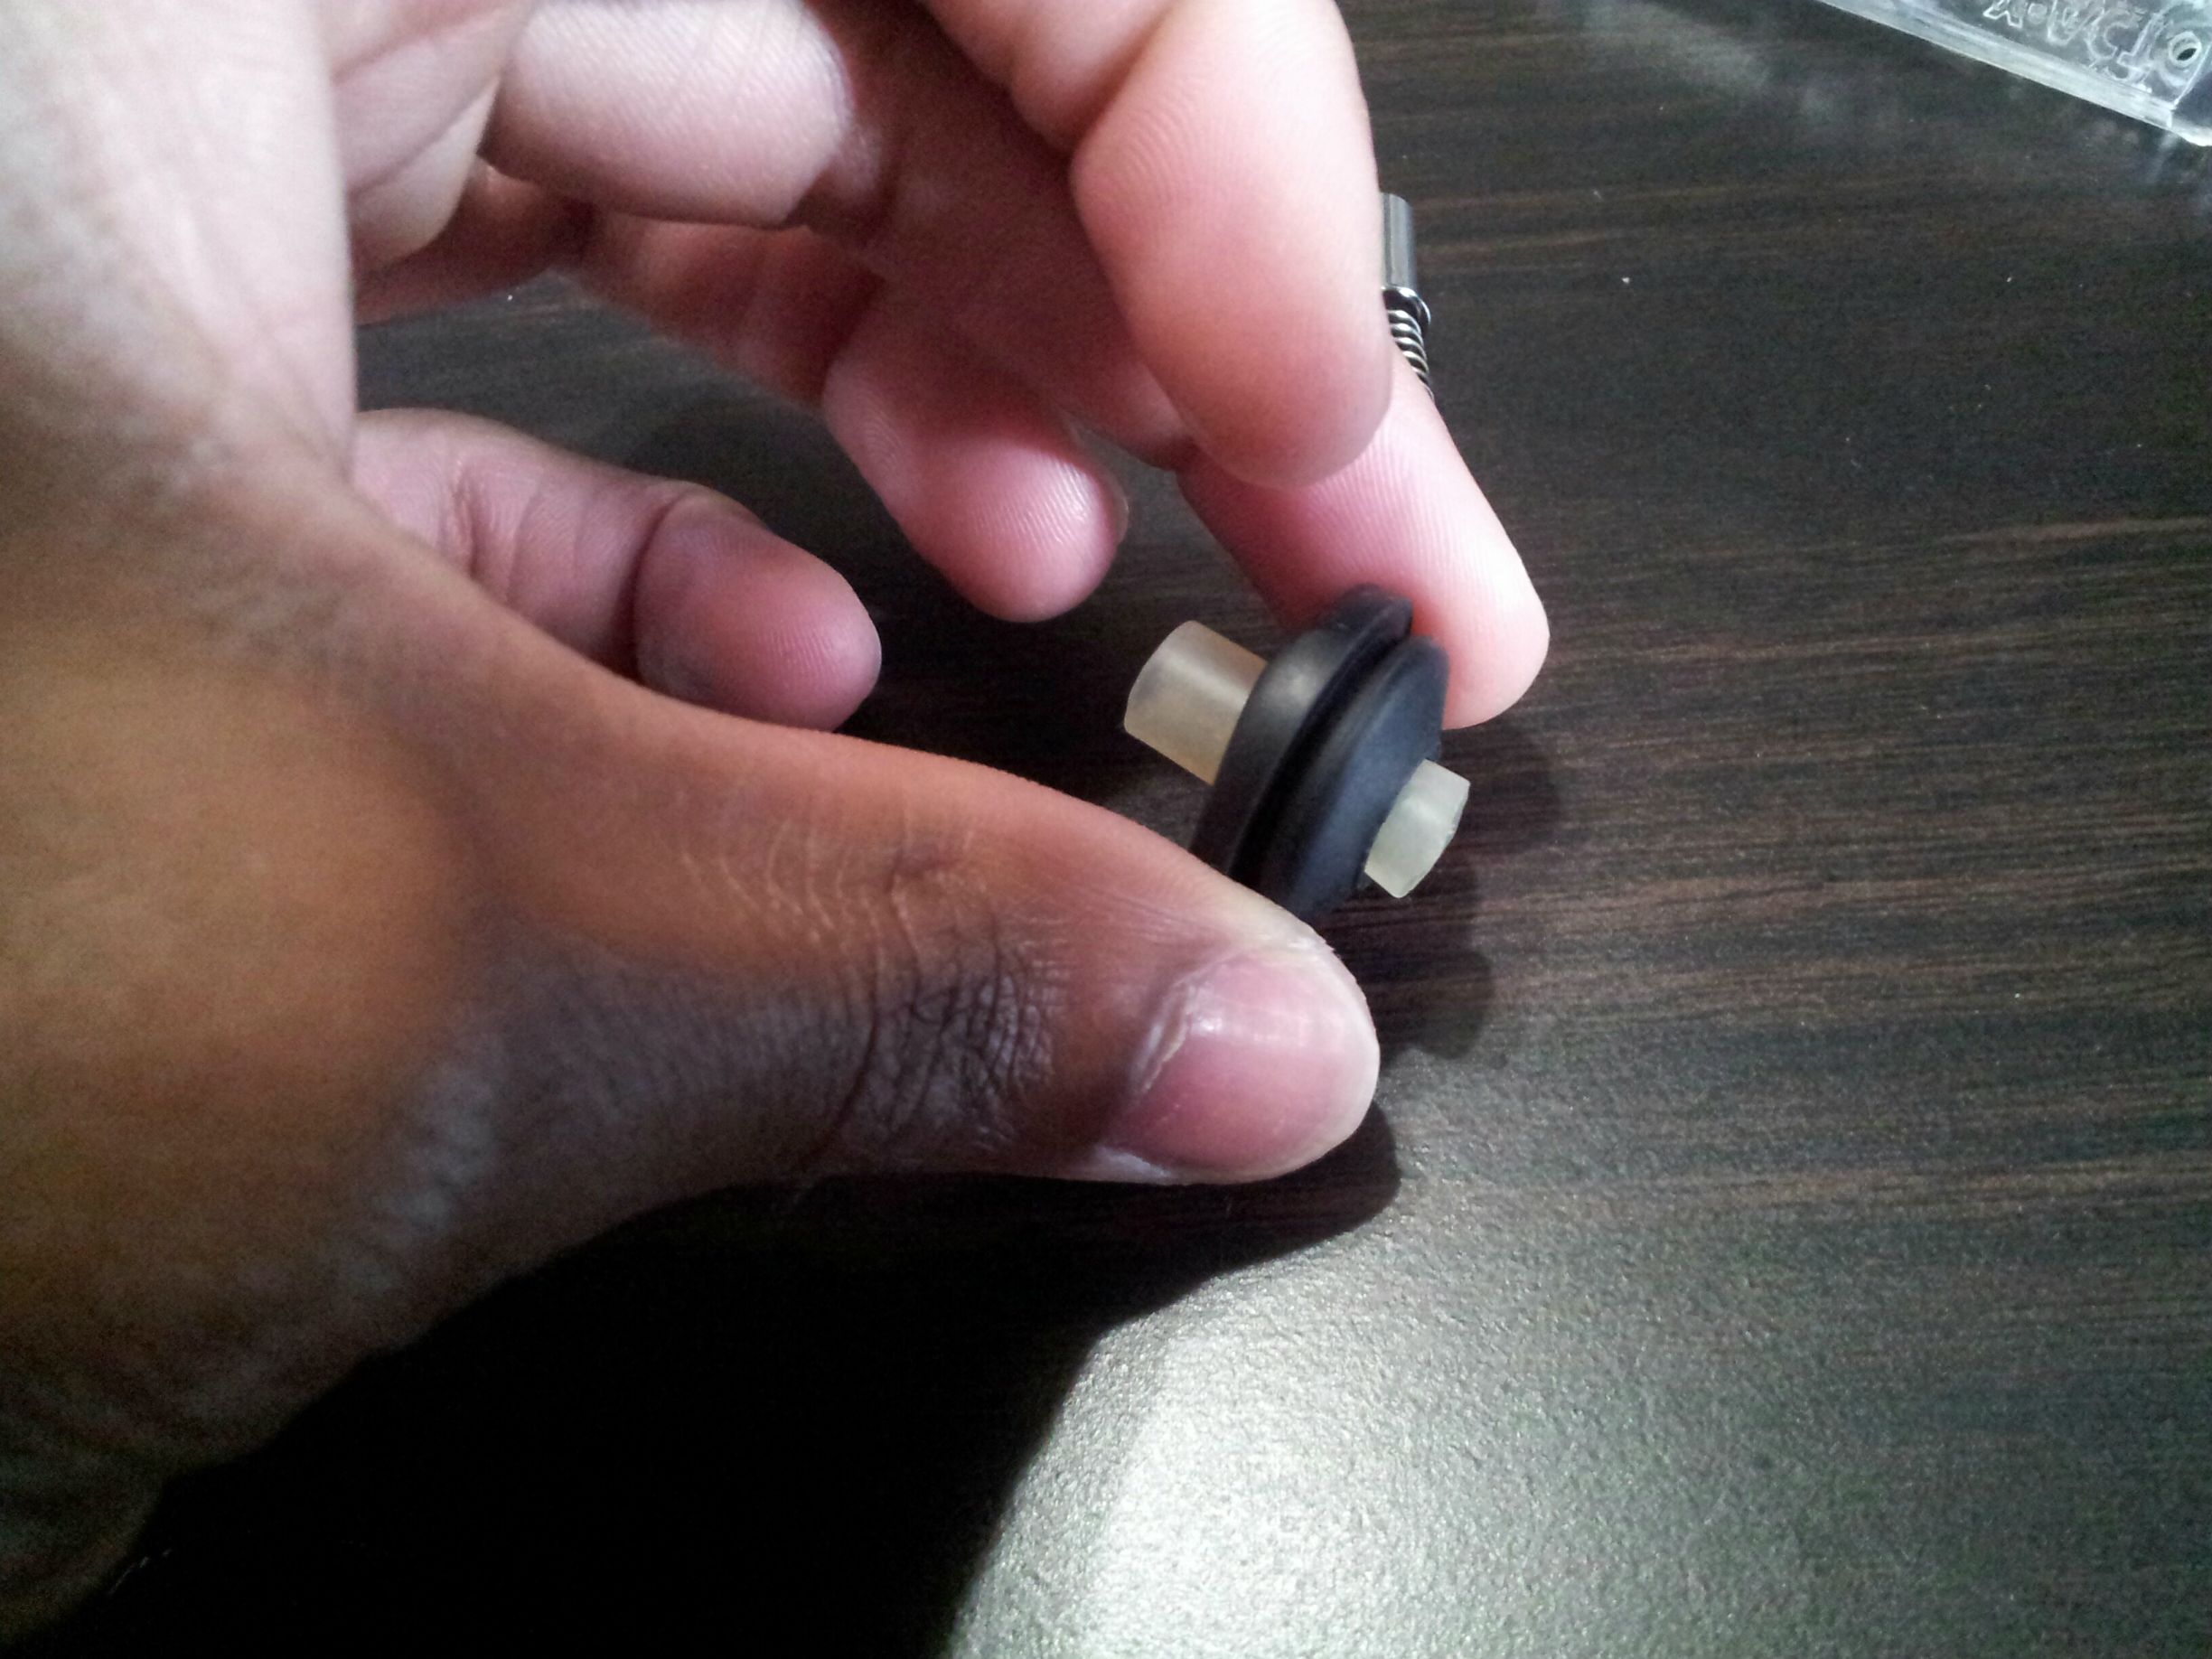
n0sr1Bs.jpg

Then shove the silicone in the hole on the nipple. You may want to have it protrude from the bottom of the nipple to make insertion of the spring easier.

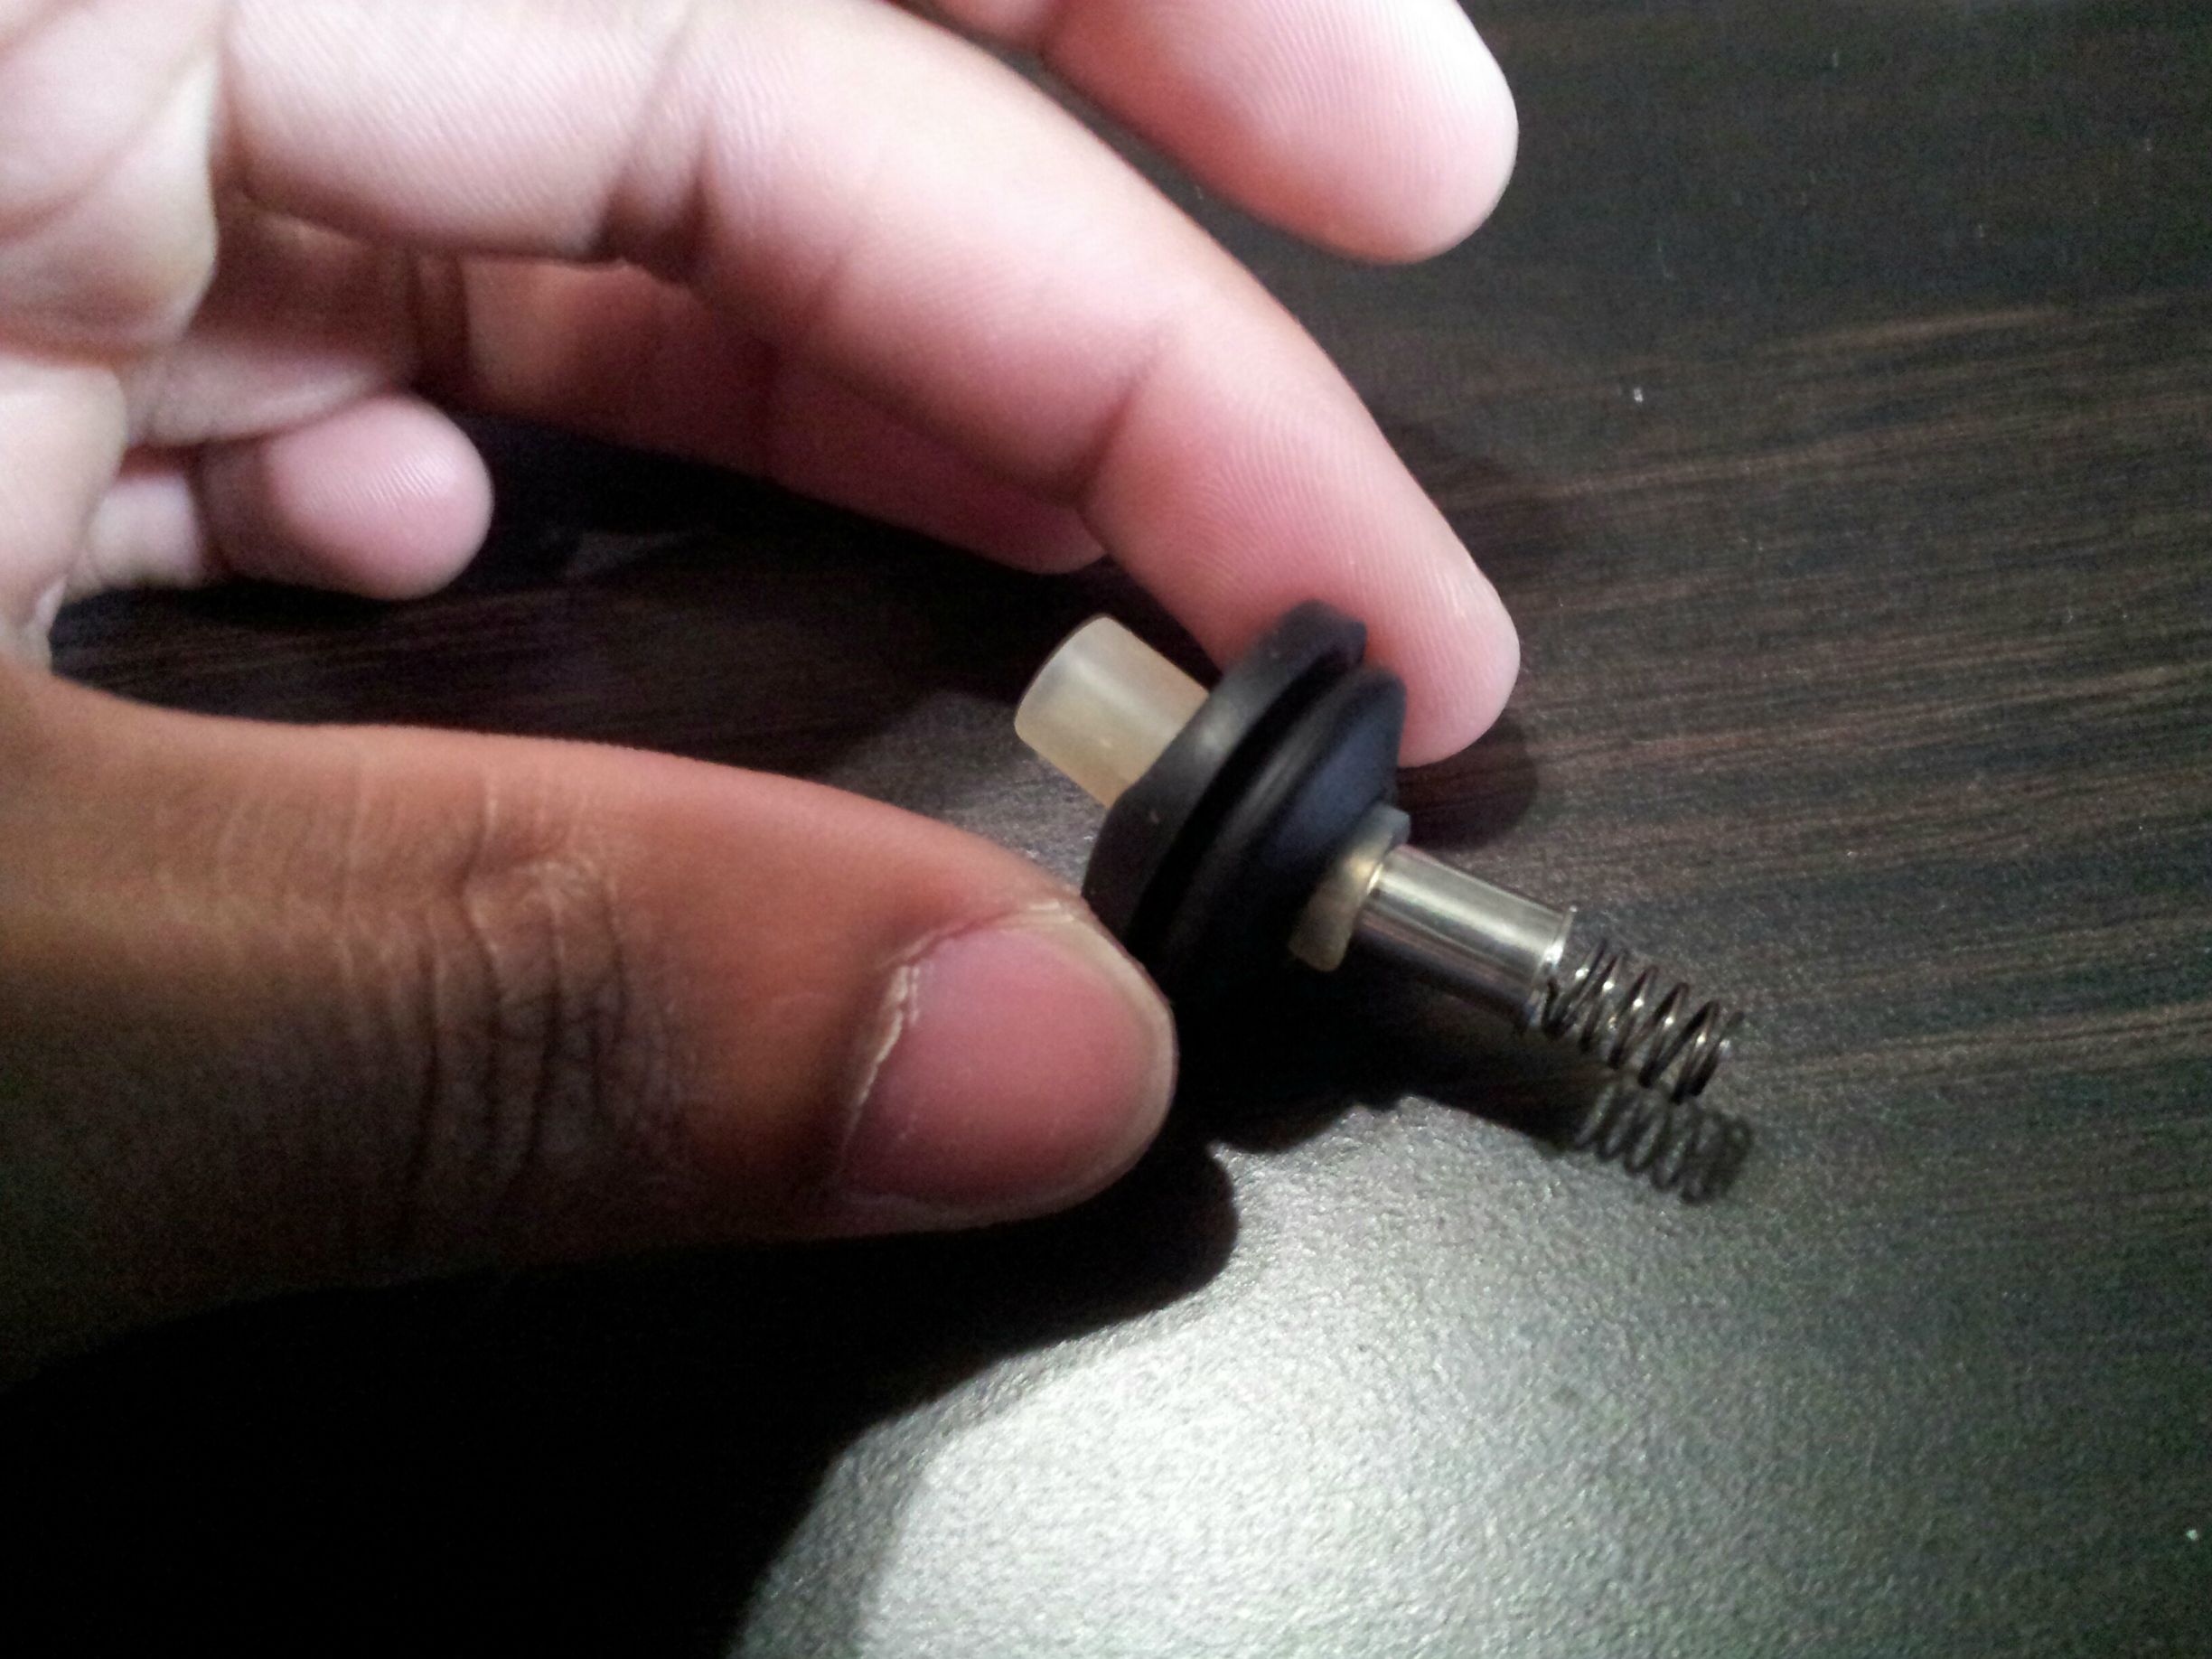
O8AkOUs.jpg

Now the spring gets forced in from the bottom. I experienced the silicone sliding upper while trying to force in the spring so you may find it easiest to slide the silicone down as you press the spring in.

TDXxfcm.jpg

Hopefully you're done and the taste has improved as well. Also, you wont have any issues with the nipple coming off randomly with your mouthpiece like this.
 

pakalolo

Toolbag v1.1 (candidate)
Staff member
Here's how I create the mouthpieces I use for my T-Vape.

ZNEVOYX.jpg

First you'll want to ensure you have at least 3 inches of silicone tubing to play with (you'll only need an inch at the most). Hopefully someone can come in with sizing information for the tubing but I use the Magic-Flight "draw whip"; my tubing was pre-cut to about 3/4th of an inch. You'll also want an X-ACTO knife, but any knife should work. I believe I first used a steak knife for the original mouthpiece of this design. In the assumption you already have the nipple and spring you're ready to start (I also included a pre-cut nipple for example).

Tycijyj.jpg

I made my cut about a half inch in on the mouthpiece from the bottom, I'd just ensure to snip off the end of the nipple when it becomes narrower.

n0sr1Bs.jpg

Then shove the silicone in the hole on the nipple. You may want to have it protrude from the bottom of the nipple to make insertion of the spring easier.

O8AkOUs.jpg

Now the spring gets forced in from the bottom. I experienced the silicone sliding upper while trying to force in the spring so you may find it easiest to slide the silicone down as you press the spring in.

TDXxfcm.jpg

Hopefully you're done and the taste has improved as well. Also, you wont have any issues with the nipple coming off randomly with your mouthpiece like this.

Thanks for the tutorial. I might do this with my unused MP since the taste has pretty much disappeared from the one I have in use, and uncut I can make a nice seal with my Orbiter (14mm). I think I'd also add a stem.
 

pakalolo

Toolbag v1.1 (candidate)
Staff member
The actual video was about 14 minutes

Nice. Talk to me about your button technique. It never occurred to me to pump it like that. How do you decide how long to hold it?

I don't know how the button works, but I think it just turns up the heat as long as its held until you get the green flash (~30 seconds). I'm assuming the heater shuts off at that point. The heating chamber gets pretty hot. I know the 30 second timer restarts if you let up on the button for even a split second.
 

paytonpenn

Level 30 Nature/Healer
Nice. Talk to me about your button technique. It never occurred to me to pump it like that. How do you decide how long to hold it?

I don't know how the button works, but I think it just turns up the heat as long as its held until you get the green flash (~30 seconds). I'm assuming the heater shuts off at that point. The heating chamber gets pretty hot. I know the 30 second timer restarts if you let up on the button for even a split second.
Its very similar to the concept of pulsing oil pens to regulate temperature, unfortunately on a longer time scale.

In the video I started with short 3-8 second pulses then around the 8 minute mark I consistently aimed for 5 second intervals and gradually increased to 10 second holds for pulses and 20 seconds, for the last couple hits I held the battery until it flashed.

I have been pulsing my hits since the T-Vape 1; what helps me decide how long to pulse is the temperature, I try to never go above 10 as its already at 390, so in the beginning of my sessions I may just pulse for 1 or 2 second intervals reaching 392 each pulse, and just gradually increase my pulse length as the bowl requires it.

Unfortunately I didn't record the time held for each pulse but I did record the length of each warmup overall if anyone has interest.

Should have a video uploaded soon that will show vapor production from a preloaded bowl and how much vapor one would get from not pressing the button.

EDIT:
 
Last edited:

pakalolo

Toolbag v1.1 (candidate)
Staff member
Its very similar to the concept of pulsing oil pens to regulate temperature, unfortunately on a longer time scale.

In the video I started with short 3-8 second pulses then around the 8 minute mark I consistently aimed for 5 second intervals and gradually increased to 10 second holds for pulses and 20 seconds, for the last couple hits I held the battery until it flashed.

I have been pulsing my hits since the T-Vape 1; what helps me decide how long to pulse is the temperature, I try to never go above 10 as its already at 390, so in the beginning of my sessions I may just pulse for 1 or 2 second intervals reaching 392 each pulse, and just gradually increase my pulse length as the bowl requires it.

Unfortunately I didn't record the time held for each pulse but I did record the length of each warmup overall if anyone has interest.

Should have a video uploaded soon that will show vapor production from a preloaded bowl and how much vapor one would get from not pressing the button.

Thanks. You might not have timed the pulses but I can do that myself, unless you sped up that part of the video. I tried your method last night but as we've already discussed, I don't get the same results you do from my T-Vape 2.0. My vapour was a lot thinner than yours at all stages. I don't know if this is because of the strain I used, or my technique, or how the chamber was loaded, or simply that the individual units vary that much. I'd be surprised if it were the latter, but who knows. More research is needed! :science:
 

paytonpenn

Level 30 Nature/Healer
I did speed it up, I do have the original video still so maybe one day I might edit that in.

Do you have in something to block the bottom deadzone?
 
paytonpenn,

pakalolo

Toolbag v1.1 (candidate)
Staff member
I did speed it up, I do have the original video still so maybe one day I might edit that in.

Do you have in something to block the bottom deadzone?

No, perhaps that's the difference. What do you recommend?
 
pakalolo,

paytonpenn

Level 30 Nature/Healer
No, perhaps that's the difference. What do you recommend?
A screen forced in with the cleaning rod would be easiest.

I am currently testing SS Wool, its been rather nice, I've put eliquid in the T-Vape and it worked fairly well for anyone interested. I can do more testing if there is anyone interesting in that area.
The wool also seems to get the herb closest to it slightly darker.

I've also tried cotton and other items I probably shouldn't have.
 
paytonpenn,

pakalolo

Toolbag v1.1 (candidate)
Staff member
A screen forced in with the cleaning rod would be easiest.

I am currently testing SS Wool, its been rather nice, I've put eliquid in the T-Vape and it worked fairly well for anyone interested. I can do more testing if there is anyone interesting in that area.
The wool also seem to get the herb closest to it slightly darker.

I've also tried cotton and other items I probably shouldn't have.

I did try a screen in it for a bit but I didn't think it was making a difference so I left it out. I'll try it again now that I understand it better.

I forgot to ask: how much do you normally load? My standard load for everything is .07g but I've also tried .05g in the T-Vape a few times. Also, do you pack it? I didn't see any tamping in your video so I'm assuming you don't.
 
pakalolo,

Joelixny

New Member
I finally got my T-Vape (The first model) and I was exited to try it out since I've been waiting about 20 days for it. First thing I did was pop in a cig and turn it on by pressing it 5 times. The button and bottom lid up red like I expected, but after about 10 seconds it turned off. I figured maybe I had to charge it, so I left it charging before I tried again with the same result, even after overnight charging. I tried tightening it as hard as I could since I read that might be the issue but same result. I tried turning it on and then quickly turning it off before the 10 seconds, After I did that the unit didn't turn off by itself anymore, it continued to "heat up" until it was green, however I was disappointed when I tried to take a slow hit that nothing came out. Nothing. The oven isn't getting warm either. It's as if the oven isn't connecting to battery, but my turning it on and off tricked it into heating up nothing. I'm not sure what to do, and any help would be really appreciated.

EDIT: Forgot to add, after doing the turning on and off trickery the battery will "heat up" and turn green even without being connected to the oven at all.
 
Joelixny,

Yoosh

Well-Known Member
Hmm, maybe try removing turning it off and charging it with the thickest usb cable you have (maybe directly into a computer?) and then after its charged reconnect the tube as smooth as can be and finger tight and then try again. Sometimes mine will do the same thing during heat up but if i remove and reattach the tube it always fixes the issue for me. Where did you purchase it?
 
Yoosh,

paytonpenn

Level 30 Nature/Healer
I'd clean the ends where you connect the battery and oven, make sure there are no particles there, I normally use a ISO'd qtip.
 
paytonpenn,

Joelixny

New Member
I'd clean the ends where you connect the battery and oven, make sure there are no particles there, I normally use a ISO'd qtip.

Thanks, I'll try this. I suspect they're not making contact or something.

Hmm, maybe try removing turning it off and charging it with the thickest usb cable you have (maybe directly into a computer?) and then after its charged reconnect the tube as smooth as can be and finger tight and then try again. Sometimes mine will do the same thing during heat up but if i remove and reattach the tube it always fixes the issue for me. Where did you purchase it?

I tried charging it with my computer, even tried turning it on while charging and nothing. I've tried disconnecting and reconnecting the tubes many times and it doesn't do anything.
I bought off ebay. Actually, I didn't buy it, I paid someone to purchase it off ebay and bring it to me, since I live in a country where almost nothing gets shipped to and where the mail service is extremely unreliable. Do to that, I received the product opened and without a box. (And the instructions, the cleaning brush, or the screens. I did get the two nipples and the poking stick.)
 
Joelixny,

Joelixny

New Member
I'd clean the ends where you connect the battery and oven, make sure there are no particles there, I normally use a ISO'd qtip.
I tried doing that with Ethanol since I didn't have any Isopropyl. The vape is still turning off after 10 seconds.

This is what it looks like when screwed, in case I'm not screwing it tight enough.
4YJo9F.jpg


And this is the problem I'm having.
 
Joelixny,

vap999

Well-Known Member
Two questions (that I hope I haven't missed being answered already):

1) Are version 1 and 2 component parts (oven tubes, batteries/controls and nipples) compatible? For example, can version 1 oven tubes be used with version 2 batteries/control units?

2) My Tvape will rechange from my computer but not from USB outputs built into my car; from USB output of a 2 amp-rated "universal" car adapter; nor from an external powered USB hub - all using the same cable. Does only the computer provide the needed amount of properly-conditioned power?
 
vap999,

momothelemur

Well-Known Member
Hey y'all

Would you recommend this as a "My-First-Dry-Herb" vape pen? Honestly, I've been a little confused by the button-pulsing I've seen in the videos. Shouldn't it work at the post-preheat, initial temperature?
I'm sure given time and practice I would get the timing down but, I also don't think I want it vaporizing at the highest temperature. That said there's a lot that I don't know yet and there appears to be a reason for pulsing.

I guess I'm wondering, will I have a decent yield out of the gate? Was it easy for you to learn to use? And, what is the reason for pulsing the button?

with humble thanks :peace:

Edit:

These questions are regarding version 2.0.

I did speed it up, I do have the original video still so maybe one day I might edit that in.

Do you have in something to block the bottom deadzone?

How far down does the screen need to be to avoid the deadzone? (And I assume "deadzone" means an area that doesn't receive as much heat?)
 
Last edited by a moderator:
momothelemur,

paytonpenn

Level 30 Nature/Healer
From my experience.
Finer grind means less button usage or a freshly charged battery if you want a short or "high temp session".

The screen should be pushed up by the silicone stub if it's down too far. I choose screen placement on what I want my bowl size to be.

Just know if you didn't exhale much vapor try holding the button for at least 10 seconds.

EDIT:
It should work after initial heat up but if you have your herb in the chamber during heat up you'll have a shorter session.

Pulsing IMO still needs to be tested more thoroughly. The T-Vape can work randomly, I feel just small change in herb or usage can result in a different experience. My new strain vapes quicker than any other, I didn't have to press the button all this morning, but now I do. Pulsing put simple is pressing the button applies heat, if you don't want too much heat don't have such long pulses.

Its a pretty simple vape to get into, just load it, turn it on, and press the button when you want more vapor. Since it keeps at a standby temp I would consider it semi-automatic, which I really wish the Firewood or Flowermate was. Actually.. Every vape.
 
Last edited:
paytonpenn,

pakalolo

Toolbag v1.1 (candidate)
Staff member
Hey y'all

Would you recommend this as a "My-First-Dry-Herb" vape pen? Honestly, I've been a little confused by the button-pulsing I've seen in the videos. Shouldn't it work at the post-preheat, initial temperature?
I'm sure given time and practice I would get the timing down but, I also don't think I want it vaporizing at the highest temperature. That said there's a lot that I don't know yet and there appears to be a reason for pulsing.

I guess I'm wondering, will I have a decent yield out of the gate? Was it easy for you to learn to use? And, what is the reason for pulsing the button?

with humble thanks :peace:

Edit:

These questions are regarding version 2.0.


How far down does the screen need to be to avoid the deadzone? (And I assume "deadzone" means an area that doesn't receive as much heat?)

I don't claim to be an expert in the use of this device, but I find that after the first couple of hits, I have to use the button to get any significant vapour. The button increases the heat, but nobody seems to know how much. All I know is that I haven't managed to make this thing reach combustion, even by pumping the button.

A few things about the button: it times out after 30-32 seconds of constant pressing. It flashes green when it times out, but the flash is so quick you can easily miss it. I don't think the TVape limits the temperature, just the time that the button has been held down. The timer restarts if you let up the button even for a split-second, so pumping in theory lets you get more heat than a 30 second press does, but the upper limit is determined by the strength of the battery and as far as I can tell, pumping doesn't increase the temperature much further else we'd be combusting. The heating chamber cools off amazingly quickly, however, so pumping will let you maintain the higher temperature longer. You also want to keep in mind that heat isn't good for the battery and that button timeout is probably there more for that purpose than to prevent combustion.

If you look into the threaded end of the heating chambers, you'll see a groove with what appears to be a silicone O-ring. It's actually not a ring since it has a cut in it, but I digress. Below that is the dead zone, I think. I lodge a screen right above it and as far as I can tell, I've avoided the dead zone; however, the silicone nub on the battery extends just about that far up the heating chamber so my herb wouldn't be much lower anyway. There are others who have investigated this much more thoroughly than I so I suppose I should just wait for them to chime in.
 

RUDE BOY

Space is the Place
Once mine's up to temp i can usually get 4-5 decent hits, push the button for 5-10 seconds and pull off another 4-5 hits and repeat until i feel the load is spent. I stopped worrying about the "dead Zone" and just stir the load once or twice during the session, works best for me.
 
Top Bottom