
-
SCAM WARNING! See how this scam works in Classifieds.
You are using an out of date browser. It may not display this or other websites correctly.
You should upgrade or use an alternative browser.
You should upgrade or use an alternative browser.
The Nomad From Morwood
- Thread starter Dan Morrison
- Start date
Thanks everyone!
Yes. Almost all of the brass parts you'll see are conductors.
And in case you're wondering, the brass bottom plate is completely covered when the outer sleeve is in place. The real bottom plate you'll see on the outside is wood.
Alternatively I could have gone with other metals for the conductors, but I chose brass because it's a good middle ground between conductivity, corrosion resistance, machinability, aesthetics, and price.
In the production model, I'd like to switch to using a thinner metal bottom plate. It doesn't need to be so thick. The only advantage to a thick base is added weight.. and I think most people will actually see this as a disadvantage..
I originally went with a thick bottom plate because I was going to incorporate a gold plated beryllium copper canted coil spring (say that 5 times fast!) to act as a wicked efficient conductor between the brass plate and the heater modules... but after testing that out, It just wasn't necessary. An over-complex solution. The "feel" of the insertion/removal wasn't as smooth as I wanted either.
It often happens.. you design the whole, then remove one part.. and suddenly the entire puzzle changes.
If I make it from 1.5mm - 2mm sheet, I can use some more exotic metals that would be way too expensive or not available in a thicker sheet form. I am thinking Japanese alloys, mokume gane.. etc.
It also allows for easier manufacturing because I can punch cut or waterjet it. So that's a plus...
Will brass be used as a conductor? (ie. part of the electrical circuit)
Yes. Almost all of the brass parts you'll see are conductors.
And in case you're wondering, the brass bottom plate is completely covered when the outer sleeve is in place. The real bottom plate you'll see on the outside is wood.
Alternatively I could have gone with other metals for the conductors, but I chose brass because it's a good middle ground between conductivity, corrosion resistance, machinability, aesthetics, and price.
In the production model, I'd like to switch to using a thinner metal bottom plate. It doesn't need to be so thick. The only advantage to a thick base is added weight.. and I think most people will actually see this as a disadvantage..
I originally went with a thick bottom plate because I was going to incorporate a gold plated beryllium copper canted coil spring (say that 5 times fast!) to act as a wicked efficient conductor between the brass plate and the heater modules... but after testing that out, It just wasn't necessary. An over-complex solution. The "feel" of the insertion/removal wasn't as smooth as I wanted either.
It often happens.. you design the whole, then remove one part.. and suddenly the entire puzzle changes.
If I make it from 1.5mm - 2mm sheet, I can use some more exotic metals that would be way too expensive or not available in a thicker sheet form. I am thinking Japanese alloys, mokume gane.. etc.
It also allows for easier manufacturing because I can punch cut or waterjet it. So that's a plus...
All about the buttons!
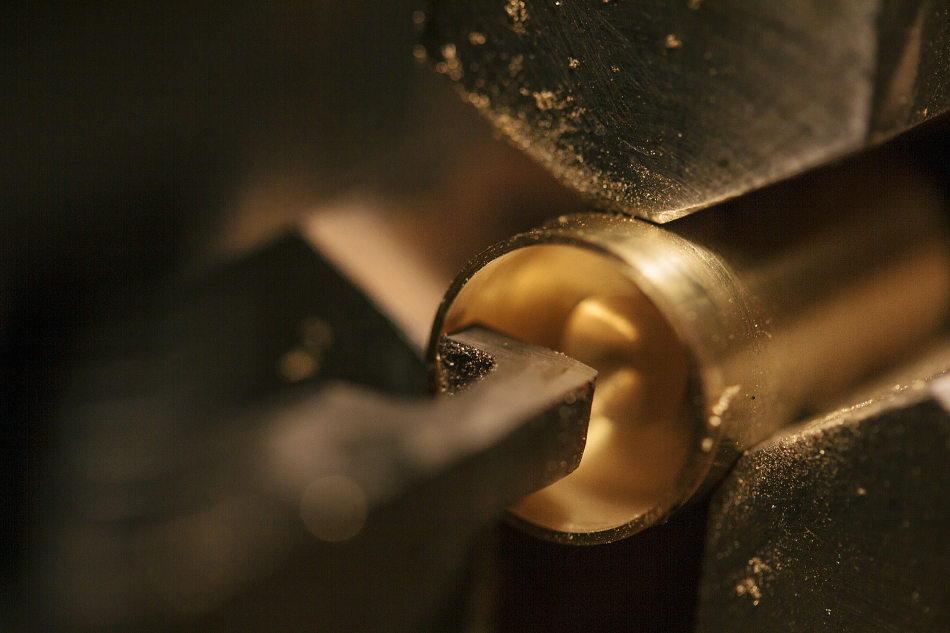
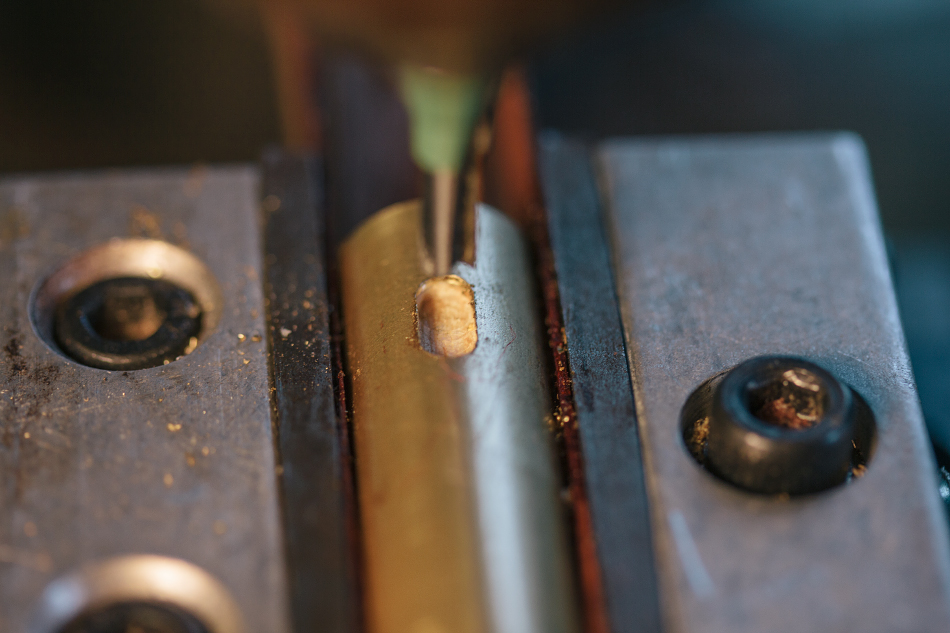
It starts with boring out the hole for the button material. This hole can be filled with just about anything to give all sorts of custom options.
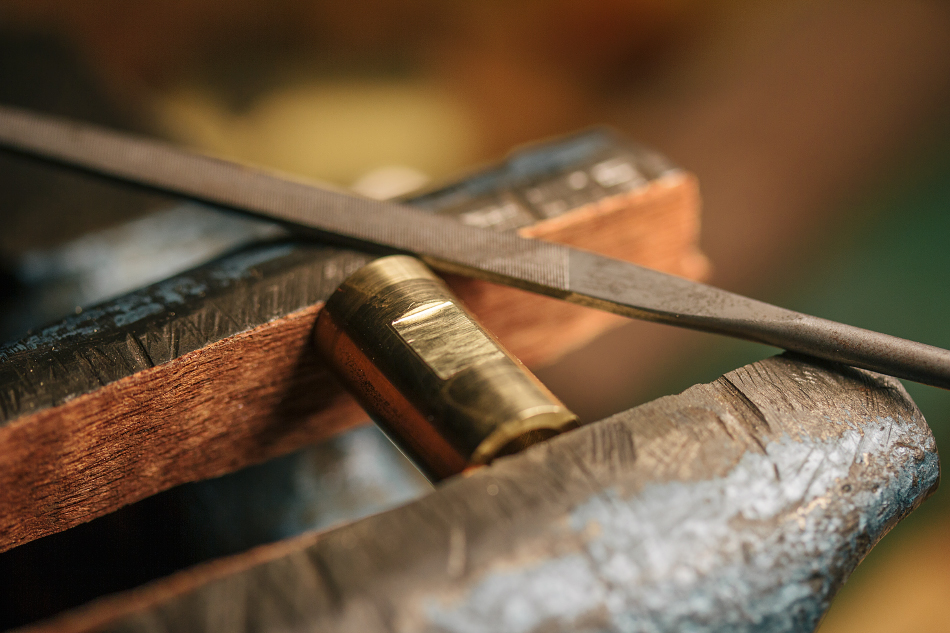
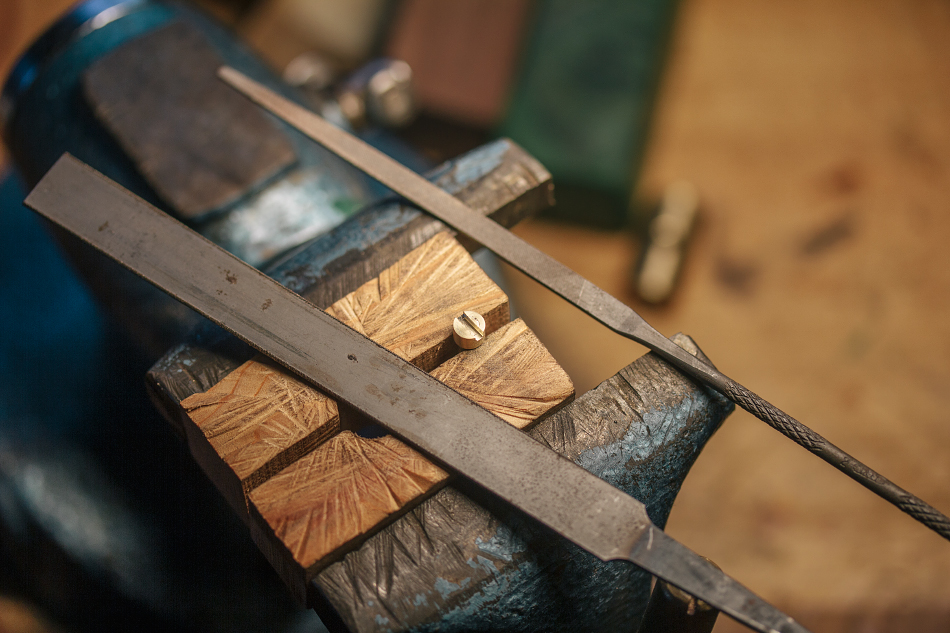
Skip ahead a bit, and we're filing down the flat for the screw.
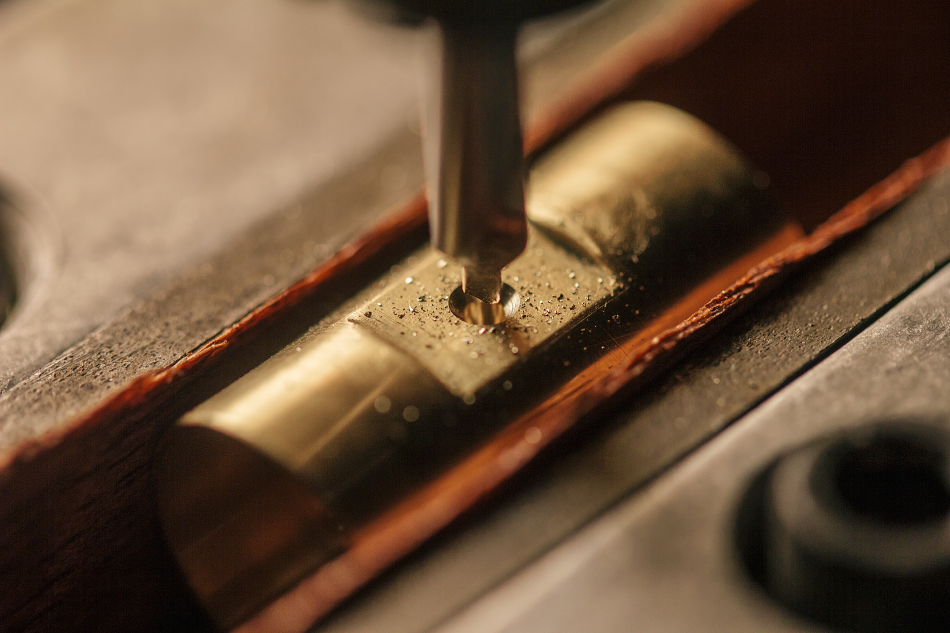
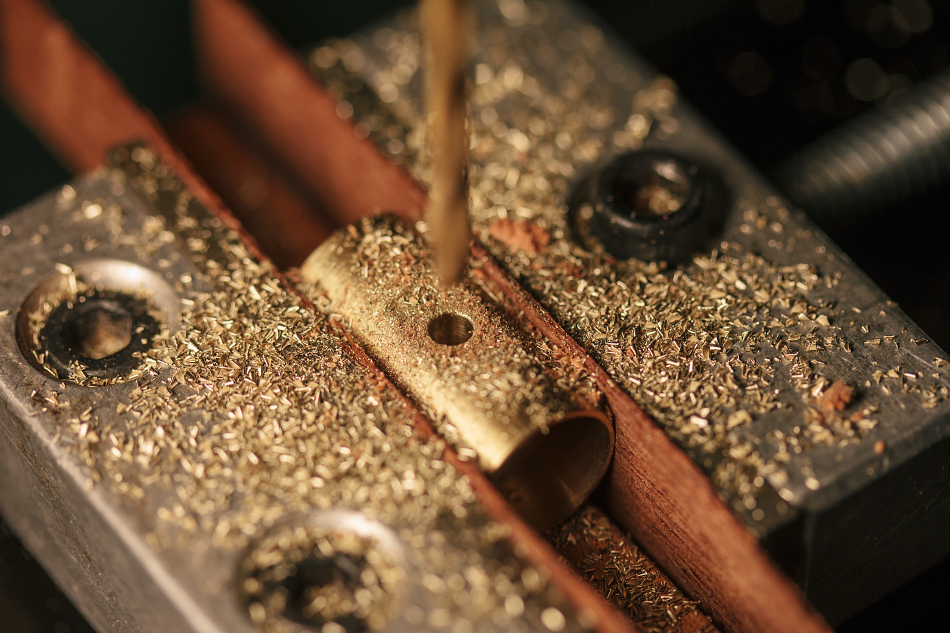
Lets drill that screw hole.
This slot will make more sense later...
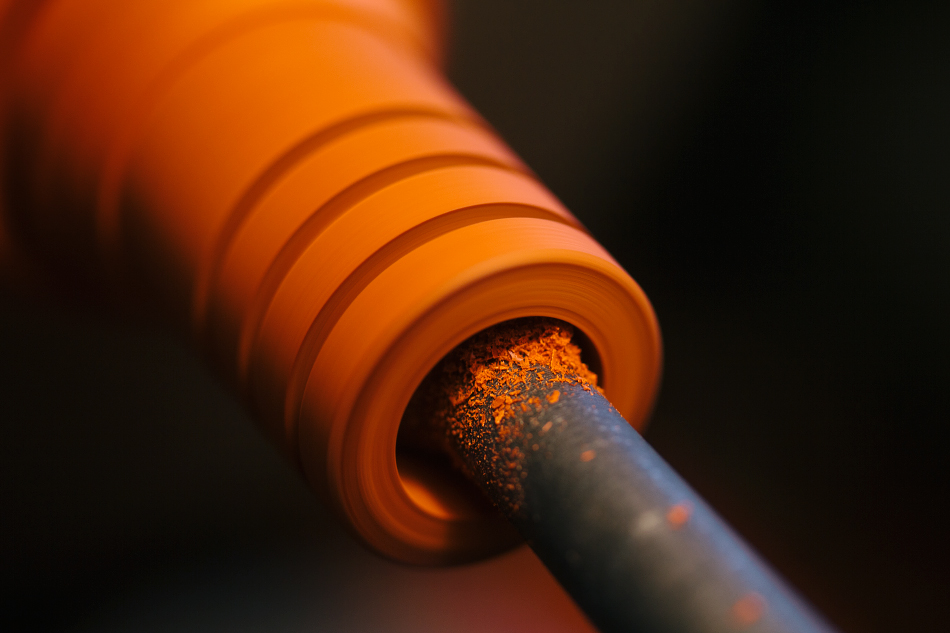
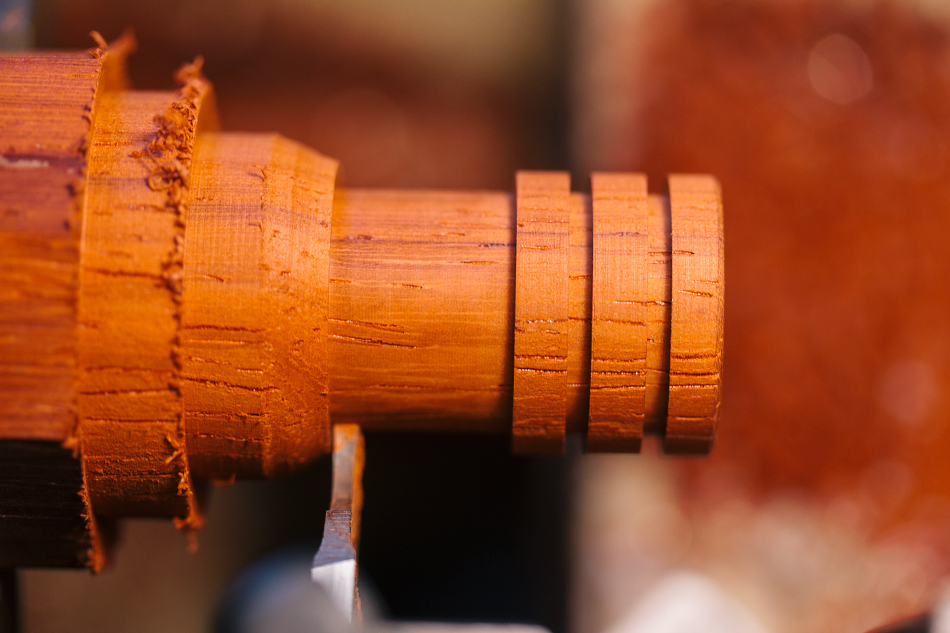
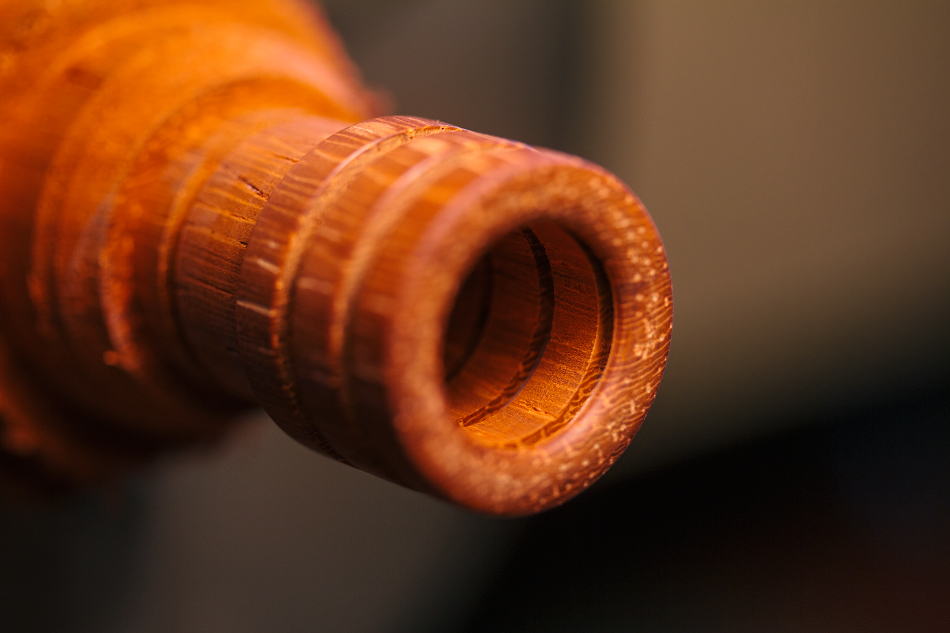
Wanna turn a thin walled tube on the lathe? Mount it on an oak mandrel. When the wood is dry, the fit will be loose. Dip the wood in water and it'll expand, locking the tube in place.
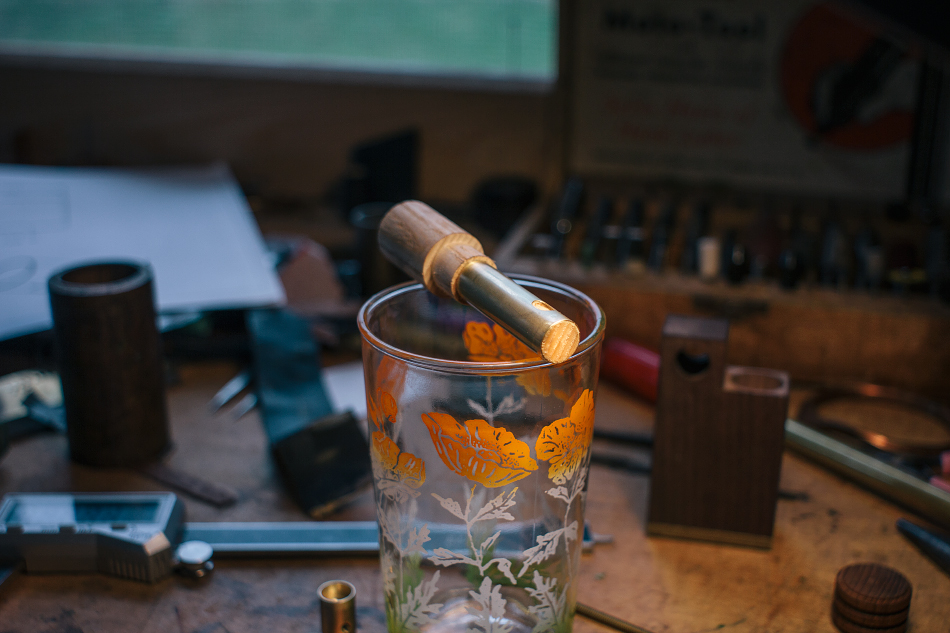
Drill chuck inception! My main lathe chuck doesn't close down small enough to hold small bits.

Now tap that hole!

After drilling, tapping, and adding a threaded rod.
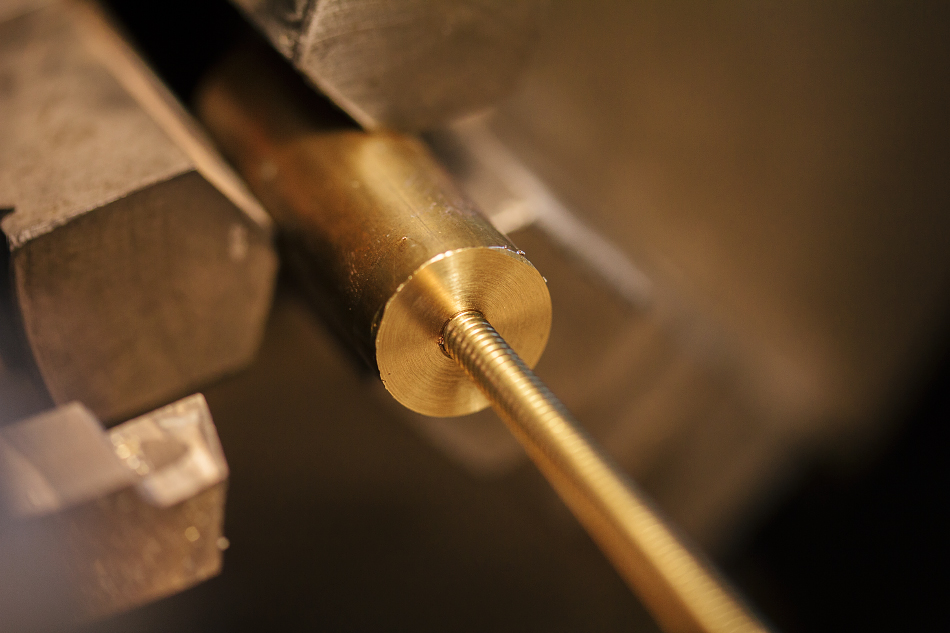
Starting to look like a screw, eh?
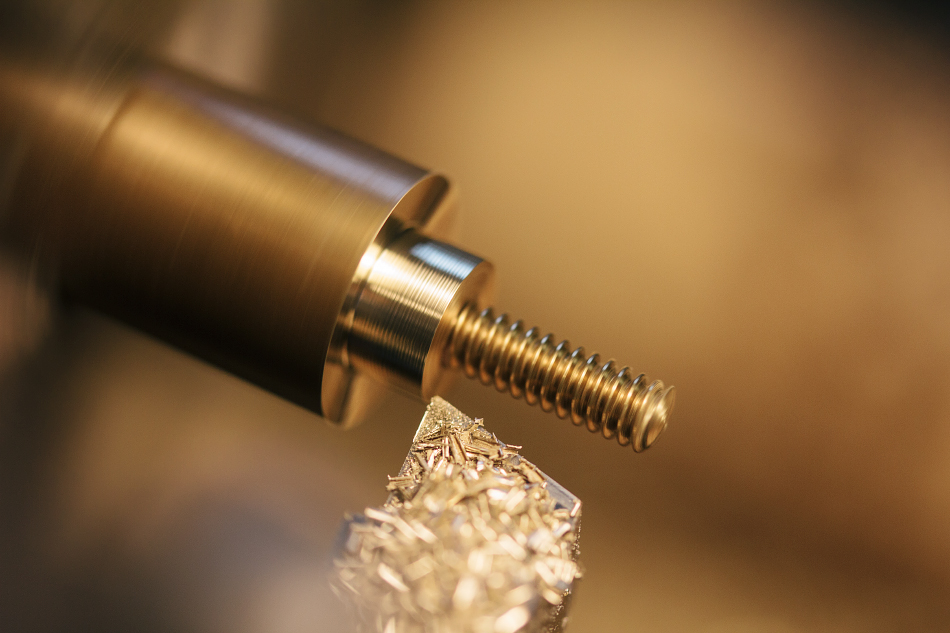
I silver soldered the threaded rod into the head.
I used the lathe tool to score a straight line across the face of the screw head. This gives me a guide to file a slot.
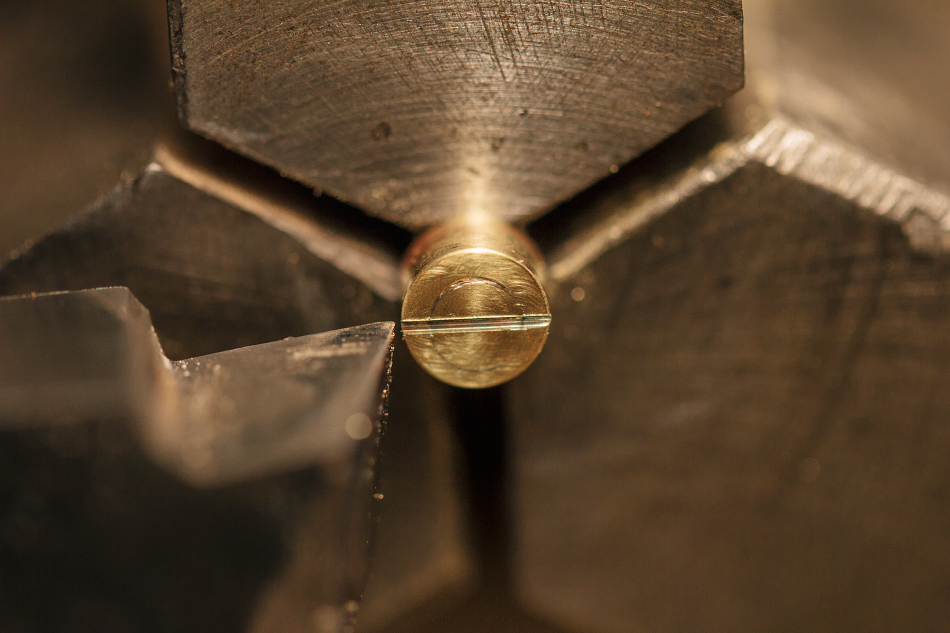
aaaand we have a slot!
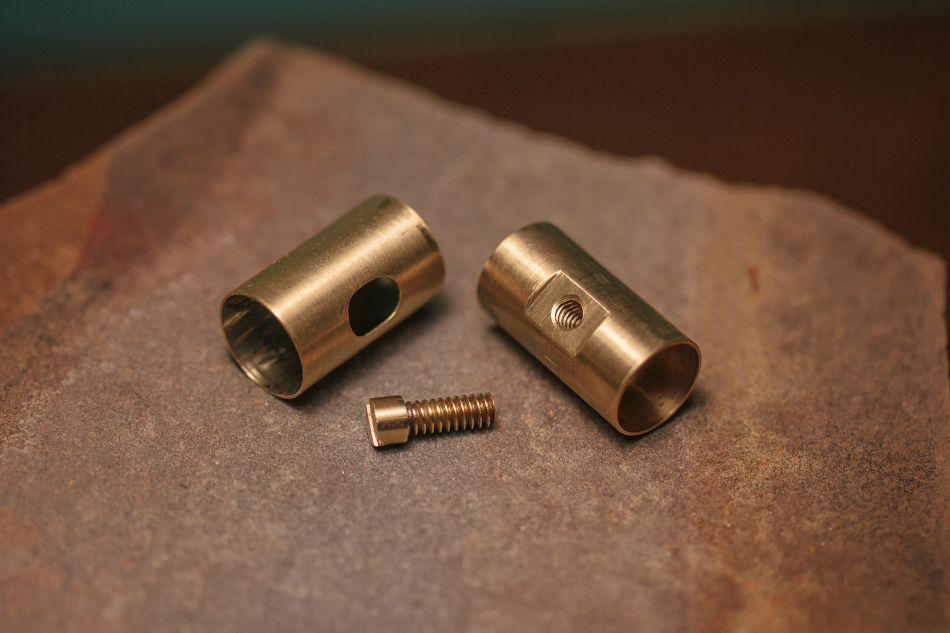
The brass components of the button are complete!
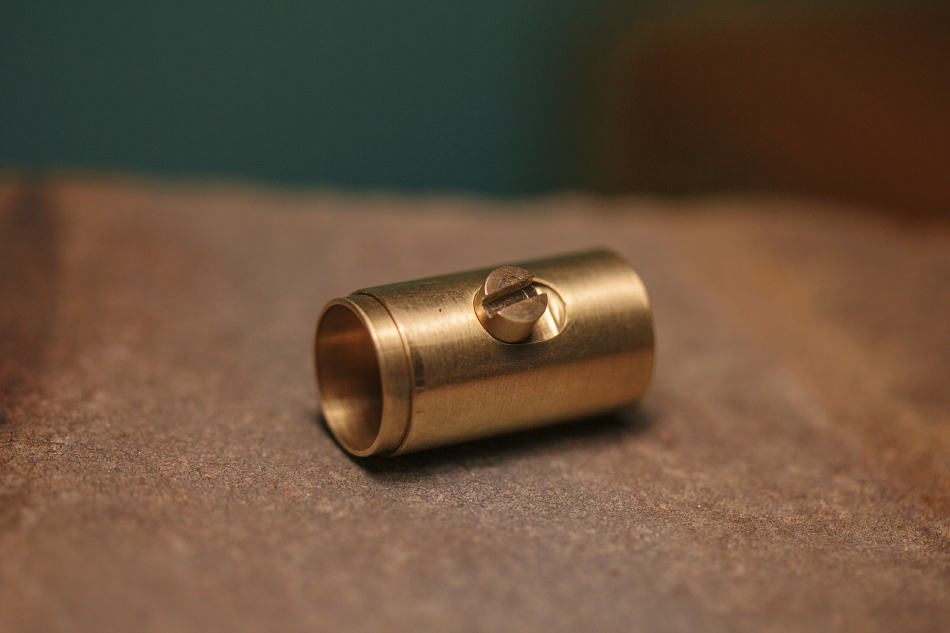
Assembled.
Currently the outer sleeve of the button is brass. But I'll most likely switch to a PTFE sleeve for better wear resistance and lower friction.
This style of button gives you the minimum number of contact points possible in a mechanical setup, as far as I can figure out. Less contact points = less resistance, better efficiency!
It starts with boring out the hole for the button material. This hole can be filled with just about anything to give all sorts of custom options.
Skip ahead a bit, and we're filing down the flat for the screw.
Lets drill that screw hole.
This slot will make more sense later...
Wanna turn a thin walled tube on the lathe? Mount it on an oak mandrel. When the wood is dry, the fit will be loose. Dip the wood in water and it'll expand, locking the tube in place.
Drill chuck inception! My main lathe chuck doesn't close down small enough to hold small bits.
Now tap that hole!
After drilling, tapping, and adding a threaded rod.
Starting to look like a screw, eh?
I silver soldered the threaded rod into the head.
I used the lathe tool to score a straight line across the face of the screw head. This gives me a guide to file a slot.
aaaand we have a slot!
The brass components of the button are complete!
Assembled.
Currently the outer sleeve of the button is brass. But I'll most likely switch to a PTFE sleeve for better wear resistance and lower friction.
This style of button gives you the minimum number of contact points possible in a mechanical setup, as far as I can figure out. Less contact points = less resistance, better efficiency!
vapen00b
Many vapes & accessories. Always happy to help
I can't find words for what I wanna say.. Am so deeply impressed by everything that I see and try to understand/figure out. You possess such a rich knowledge about so many things and your manufacturing skills... jaw-dropping, mind-blowing  Thanks for sharing your progress in such a detail.

Thanks for sharing your progress in such a detail. GreenHopper
20 going on 60
I can't find words for what I wanna say.. Am so deeply impressed by everything that I see and try to understand/figure out. You possess such a rich knowledge about so many things and your manufacturing skills... jaw-dropping, mind-blowing
Yeh I know right!
I'm completely dumbstruck at how inventive and communicative Dan is, the pics are also masterful.
I'm in no rush for this vape as I'm enjoying the process as much as I know I'll enjoy using the vape.

KeroZen
Chronic vapaholic
Yes. Almost all of the brass parts you'll see are conductors.
Alternatively I could have gone with other metals for the conductors, but I chose brass because it's a good middle ground between conductivity, corrosion resistance, machinability, aesthetics, and price.
While I understand why brass is appealing to you for various reasons, you need to keep in mind that copper and copper alloys have severe oxidation issues that affect their conductivity when not coated.
I invite you to read the 8 first pages of this article "Corrosion Protection of Electrically Conductive Surfaces" >> http://www.mdpi.com/2075-4701/2/4/450/pdf
It explains the corrosion effects on conductivity, as well as the so called fretting corrosion and fretting wear on electrical contacts.
Check also this post >> http://fuckcombustion.com/threads/t...ated-single-18650.18829/page-323#post-1103995 where Ryan measured a 10% power loss on the Milaana due to oxidation.
Several users also reported dramatic changes when using sandpaper to rub the copper plate that is used as a battery contact. There are also issues with the brass thread and nut, and those develop pretty fast (under 6 months) and require user maintenance.
You might want to investigate into various platings, and the linked article is a good introduction.
This style of button gives you the minimum number of contact points possible in a mechanical setup, as far as I can figure out. Less contact points = less resistance, better efficiency!
The resistance of a given material of fixed length, decreases with increasing cross-sectional area. This is why lower gauge (i.e. larger) wires can handle more current than higher gauge ones. I might be wrong but I think that for a contact, the conductivity increases with the contact surface (cf. constriction resistance)
Also since (I think?) you won't use a MOSFET for the switch, you need to minimize bouncing in your switch as it will create arcing that can slowly damage it over time.
Here's another small document called "Contact Resistance vs Contact Pressure", it's about electrical relays but those are just really a kind of automated switch and the parts about switching high currents apply to your trigger switch too >> http://www.willow.co.uk/html/compon...akool-Contact-Versus-Pressure-Information.pdf
Excellent post @KeroZen!
This is exactly the sort of stuff I've been reading through, I actually read through that willow.co.uk article already a few weeks ago. Interesting stuff!
I've been looking at a lot of examples of how they solves these issues in industry, especially with high current applications. And yes, it does seem like using noble metal coatings is the way to go to avoid oxidation. There are a number of interesting solutions used in relays and large connectors that are pretty neat as well.
I actually sampled a few connectors, all of them gold plated. But non of them felt quite right. I opted for a more simple approach.
Originally, I was going to go for gold plated contact surfaces all around.
But, then I got more into reading about mechanical mods. Here is another related field that has already dealt with all of the exact same problems. When you get into plated vs. non plated contact points, or even solid silver contacts.. the performance differences are pretty much nill'.
Oxidation is not the only barrier to a good electrically conductive contact. Regardless of metal, the contacts need to be kept clean of oil, dirt, dust, etc..
This is why I went with a design that enabled easy disassembly and cleaning of all contact surfaces.
Mechanical mod users seem to clean their contacts quite often, I think it's just a requirement.
And yes, brass definitely does not provide the best corrosion resistance, it's just a good compromise IMO.
That said, the only all brass connection is in the button. I would love to be able to offer gold plated contact points in the button to those who are interested. I looked into it, and proper industrial plating services usually require fairly large minimum orders. Plus, the parts will need to be "masked" off so that only the places I want to get gold plated will get the gold plating.
Alternatively I could get gold plating supplies/tools to do it here in the shop, but that will be a fairly big investment if I want to do it properly....and it needs to be done properly... I've read a lot of reports of the thin Chinese gold plating they put into mech mods wearing off in no time at all.
To mitigate some of the issues with brass corrosion, I am maximizing contact surface area, and also giving the parts a high polish. All of the parts are cut to a very tight tolerance, no slop or play, so when the contact surfaces are touched, the entire surface will make contact because the parts are not skewed or crooked.
The contact between the battery negative and the brass screw is a sliding connection. This sort of connection is used in connector/relay design to "scrape" away corrosion each time the connection is used. Essentially making it self cleaning.
The screw thread quality will also play a big role. The threaded screw is as long as possible in the solid brass button housing. And since the head of the screw is always tightened down firmly, the flat face of the head will make a better connection with the flat face of the button housing. It's not enough to rely on the threads alone, because there is always some play in even the most accurately cut threads.
This screw should only need to be removed for cleaning, so it should see minimal wear. It's also a fairly beefy thread, as beefy as I could fit.
I will be using silver contacts for positive connection between the battery and the heating module.
All of the heater module connections are silver.
Anyhow, If money was no object, I would probably go with selective thick gold plating in the button, silver screw, and silver alloy for all other metals... but for now I am just trying to do the best I can with the resources I have available.
I would be interested to hear more of your thoughts If I missed anything! I love thinking/talking about this stuff!!
Last edited:
KeroZen
Chronic vapaholic
Ha! You remind me so much of a close friend of mine, you seem to have very similar personalities. Out of curiosity, did you ever pass any MBTI or Socionics test? Would be fun if you could PM me your result to see how my intuition stands. 
I was slightly concerned a dozen pages back that you could be focused too much on the artistic / aesthetic side, but you approach that project with a very rational mind and such an attention to details, now I'm confident that you will succeed and create a real master-piece.
I could tell you "here, take my money" but I'm already on your waiting list haha!
KeroZen
Chronic vapaholic
So I read the entire thread back (or well, just the pictures that were posted and the design evolution), and I enjoyed seeing the older ideas again. But I clearly like the latest design the best. It's more bulky than the taller sketches but I prefer it this way.
I realized that I forgot to comment on two points: the stems and the proposed capsule/cartridge system.
For the latter, it's simple, I vote against! I understand the argument that it allows to pre-load many of them when going outside, it's stealthy alright... but it's also tedious, you have to fill them, then store them when they are scorching hot...
I have many friends who enjoy the "ritual" of rolling their spliff almost as much as smoking. They need to have all their tools, their material, a flat surface like a DVD case, sitting comfortably etc... Their very own "rolling workshop".
For me it's a part that I absolutely don't miss, not a single bit! I tear/grind my buds with my fingers (I don't like how powdery it ends with grinders, it clogs everything, plus you lose the contact with the plant, the ability to feel how much moisture there is left etc), I put the material in my palm, load it all at once in the device, tamp lightly and I'm good to go.
So for me the bowl preparation part is super fast and not an issue, even when outside. I don't feel the need to prepare in advance. In the worst case I can go to the bathrooms...
But my main argument against cartridges is that it's nearly impossible to make the system air tight, unless you start using silicone gaskets everywhere, and that's a no no! Please no silicone in the vapor path, or if really needed, as little as possible. And there's nothing worse than having a powerful vape and getting the vapor diluted *after* the bowl, be it due to telescopic stems or poor mating around the cartridge (Elo vaporizer anyone?)
I would much prefer a stem system like in the Mi/Zi/MVT with GonG joints, preferably 18mm. It's super easy and fast to load and unload (just suck the material from your palm, tamp lightly with your pinky, when done blow everything out) It's also a breeze to maintain on the long run: the stem is the only thing you have to clean while the vape itself stays pristine clean. At worse you get a speck or two falling on the heater screen, but you just blow them away and voila!
I prefer 18mm as a matter of taste but also because you can easily use adapters to reduce to 14mm, while the inverse is more difficult.
Finally there's a single thing that worries me in the last design: it's the length of the stem. The stock Milaana one is barely adequate to cool the vapor, and the stock Firewood 2.1 was just simply unusable for me. I'm under the impression just by judging from the pictures that yours is somewhere in between.
Again not a big deal if it's a standard taper GonG joint, you'd have the ability to use longer ones if you prefer.
Fat Freddy
FUCK CANCER TOO !
I would much prefer a stem system like in the Mi/Zi/MVT with GonG joints, preferably 18mm. It's super easy and fast to load and unload (just suck the material from your palm, tamp lightly with your pinky, when done blow everything out) It's also a breeze to maintain on the long run: the stem is the only thing you have to clean while the vape itself stays pristine clean. At worse you get a speck or two falling on the heater screen, but you just blow them away and voila!
I'm kinda new to these unregulated "stem/bowl" vaporizers but I REALLY enjoy my MVT...soon to be plural!
So I couldn't agree more with KeroZen, for what it's worth!

.
@KeroZen,
Yeah man, I think I agree with you. I've been thinking more on this topic.. and you're totally right on those key points you mentioned, ease of cleaning, using, and air tightness. And yes, no silicone in the airway!
I'm the same as you in the sense that I just like to load as fast as possible and get on with it, I am completely non-obsessive about that aspect of it.
Pre-loaded chambers, unless kept in an airtight container, tend to dry out too much for my taste. So that's yet another thing to carry.
And when it comes down to it, the stems themselves are capsules.
Stem length is deceiving if you're just looking at the outside, because the stem goes right down into the body, and the heater is near the bottom. Currently the stem length is 3 inches long. 14mm OD, 11mm ID. Straight tube, no taper joints. Stem protrudes about 3/4" out of the top. With the remaining length being hidden inside the body. There is a stop that stops the stem from being inserted too far down and coming into contact with the heater, so inserting the stem is dead simple.
The seal is made with O-rings held in the wood stem collar. This allows for expansion/contraction of materials without ever binding or becoming loose. You can slide the stem in and out as you please.
The O-Rings hold the stem secure, not all floppy wobbly n' loose like I've experienced with the Air stem.
With that design, you can go to any length stem you want, without worrying about joint compatibility/quality. You can also use different materials like wood and steel stems, or half glass/half wood..whatever.. All that is required is a smooth straight 14mm OD.
I am going with 14mm OD stems because it's the largest that will fit my design.
My production prototype will have the stem load system.
GreenHopper
20 going on 60
So I read the entire thread back (or well, just the pictures that were posted and the design evolution), and I enjoyed seeing the older ideas again. But I clearly like the latest design the best. It's more bulky than the taller sketches but I prefer it this way.
I realized that I forgot to comment on two points: the stems and the proposed capsule/cartridge system.
For the latter, it's simple, I vote against! I understand the argument that it allows to pre-load many of them when going outside, it's stealthy alright... but it's also tedious, you have to fill them, then store them when they are scorching hot...
I have many friends who enjoy the "ritual" of rolling their spliff almost as much as smoking. They need to have all their tools, their material, a flat surface like a DVD case, sitting comfortably etc... Their very own "rolling workshop".
For me it's a part that I absolutely don't miss, not a single bit! I tear/grind my buds with my fingers (I don't like how powdery it ends with grinders, it clogs everything, plus you lose the contact with the plant, the ability to feel how much moisture there is left etc), I put the material in my palm, load it all at once in the device, tamp lightly and I'm good to go.
So for me the bowl preparation part is super fast and not an issue, even when outside. I don't feel the need to prepare in advance. In the worst case I can go to the bathrooms...
But my main argument against cartridges is that it's nearly impossible to make the system air tight, unless you start using silicone gaskets everywhere, and that's a no no! Please no silicone in the vapor path, or if really needed, as little as possible. And there's nothing worse than having a powerful vape and getting the vapor diluted *after* the bowl, be it due to telescopic stems or poor mating around the cartridge (Elo vaporizer anyone?)
I would much prefer a stem system like in the Mi/Zi/MVT with GonG joints, preferably 18mm. It's super easy and fast to load and unload (just suck the material from your palm, tamp lightly with your pinky, when done blow everything out) It's also a breeze to maintain on the long run: the stem is the only thing you have to clean while the vape itself stays pristine clean. At worse you get a speck or two falling on the heater screen, but you just blow them away and voila!
I prefer 18mm as a matter of taste but also because you can easily use adapters to reduce to 14mm, while the inverse is more difficult.
Finally there's a single thing that worries me in the last design: it's the length of the stem. The stock Milaana one is barely adequate to cool the vapor, and the stock Firewood 2.1 was just simply unusable for me. I'm under the impression just by judging from the pictures that yours is somewhere in between.
Again not a big deal if it's a standard taper GonG joint, you'd have the ability to use longer ones if you prefer.
I just don't have the experience that @KeroZen has in regards to these unregulated device like the Milanna or Firewood so I'm really glad to see this level of thought and feedback from far more knowledgeable users.
I have read through a number of Vape threads I've seen the 14mm/18mm discussion before and I agree that it's easier to use a downsize adapter to bring 18mm down to 14mm than to go the other way. I also know the Milanna users very much appreciate the 18mm sized stems.
Regarding the loading of stems, I really do like the idea of preloading. My hands are covered in open wounds due to severe eczema so breaking up material with my fingers results in hours of pain. However I hear what @KeroZen is saying about leaks in the air path and definitely feel it would be better not to introduce complexity that reduces performance.
Therefore I see the following as options for my requirements:
- Pre grind material, place in doob-tube and just fill the stem on the go as needed
- Carry multiple stems
- Use some sort of stainless steel tube with screens at each end that can be pre filled and dropped into the stems
Multiple stems also works quite well but the material can dry out a bit unless the stem is contained within a sealed tube.
The stainless steel capsule approach interests me but I have no idea if there are repercussions or downsides having never used a similar system. It could turn out to be more trouble than it's worth.
As for all the discussions on electro conductivity and material selection, has @Dan Morrison considered unobtainium? I hear it's great stuff
 So clearly I have nothing useful to offer here...
@GreenHopper , Pre-Grind and stem load seems to be the way!
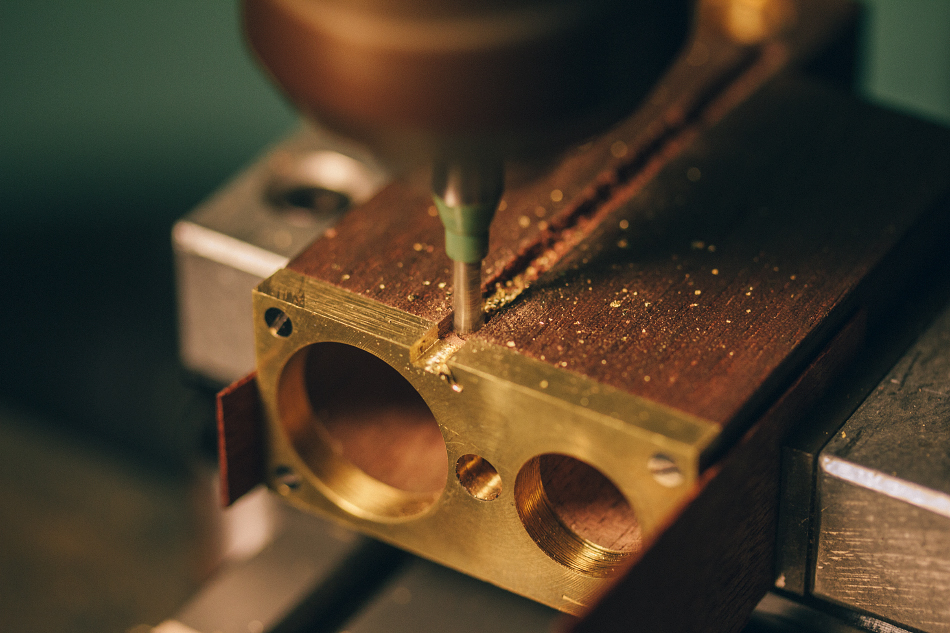
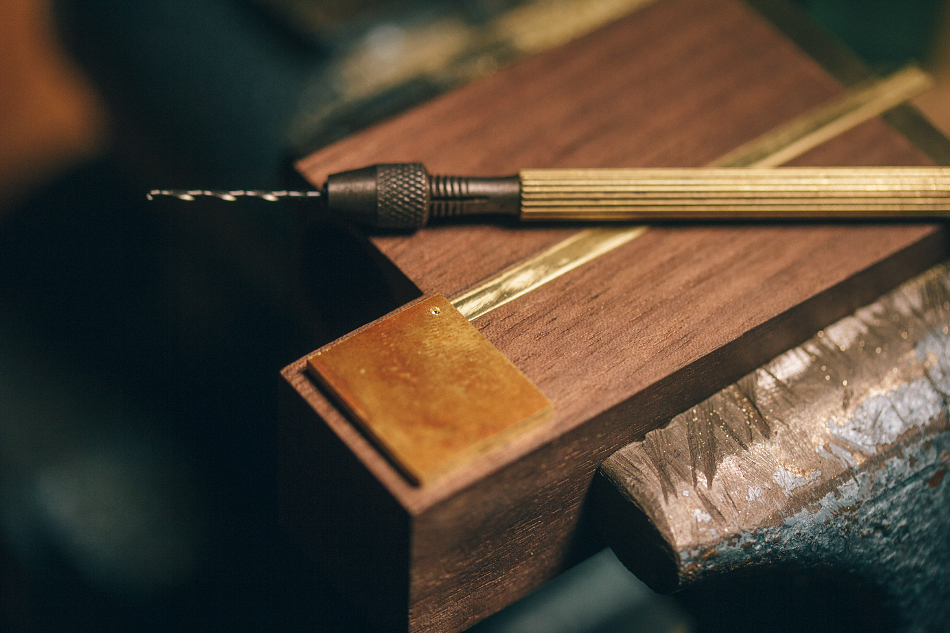
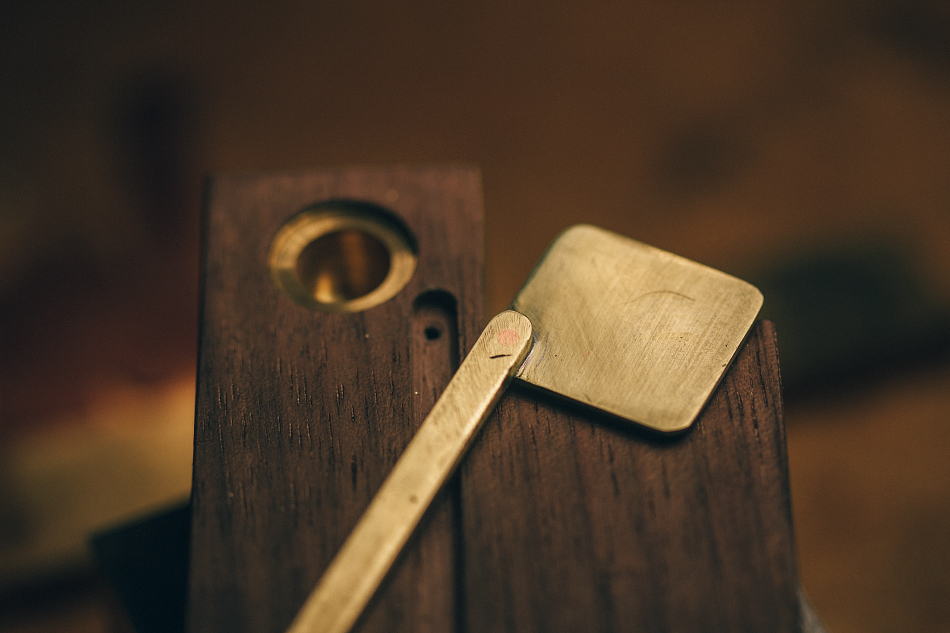
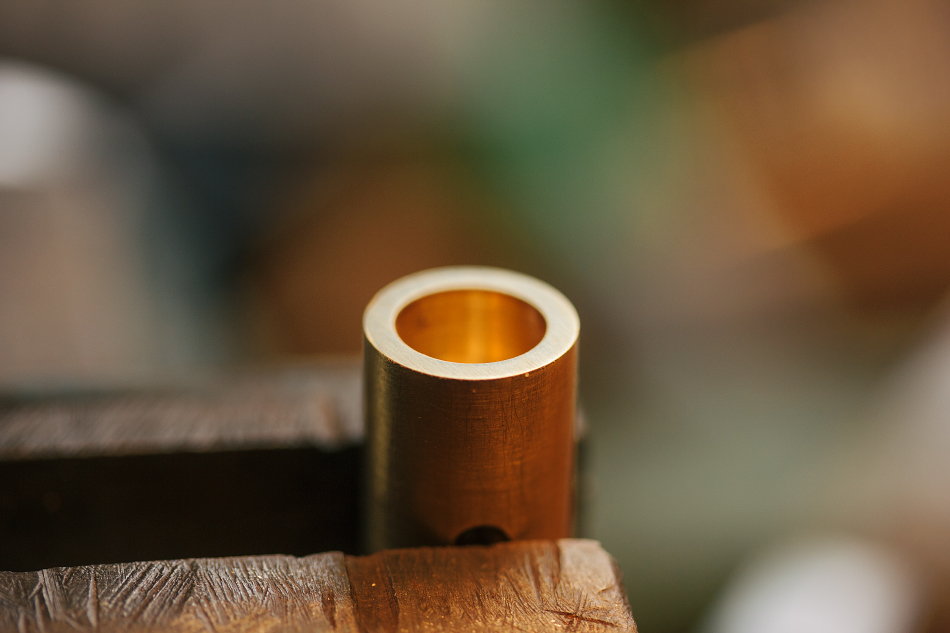
Here's some more shots from the shop. This is the brass conductor track on the back. This brings the pixies from the heater module to the button.
First a slot is milled in the wood body and brass bottom plate.
The piece of brass to be inlaid.
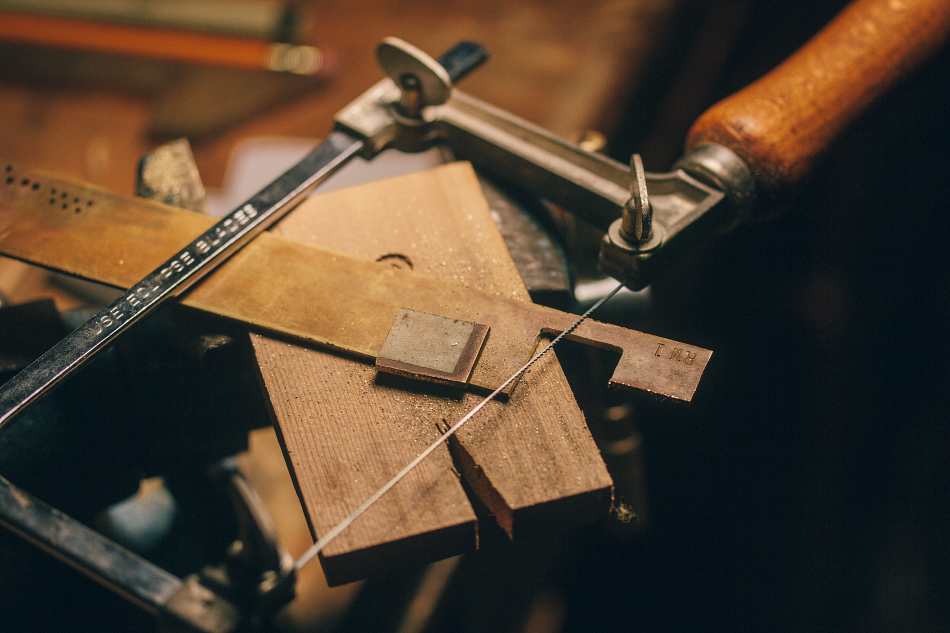
Cutting out the brass contact plate for the button.
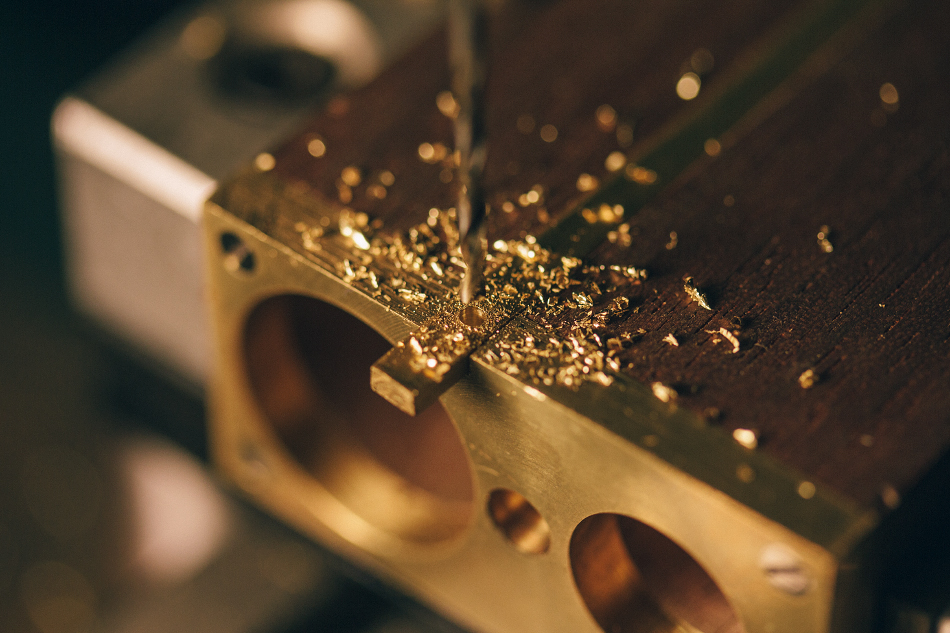
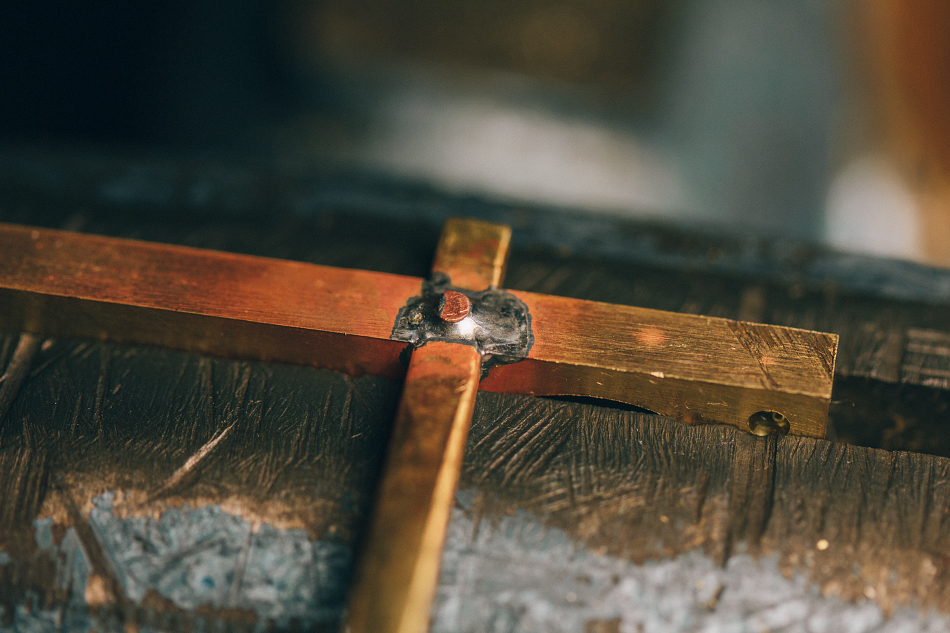
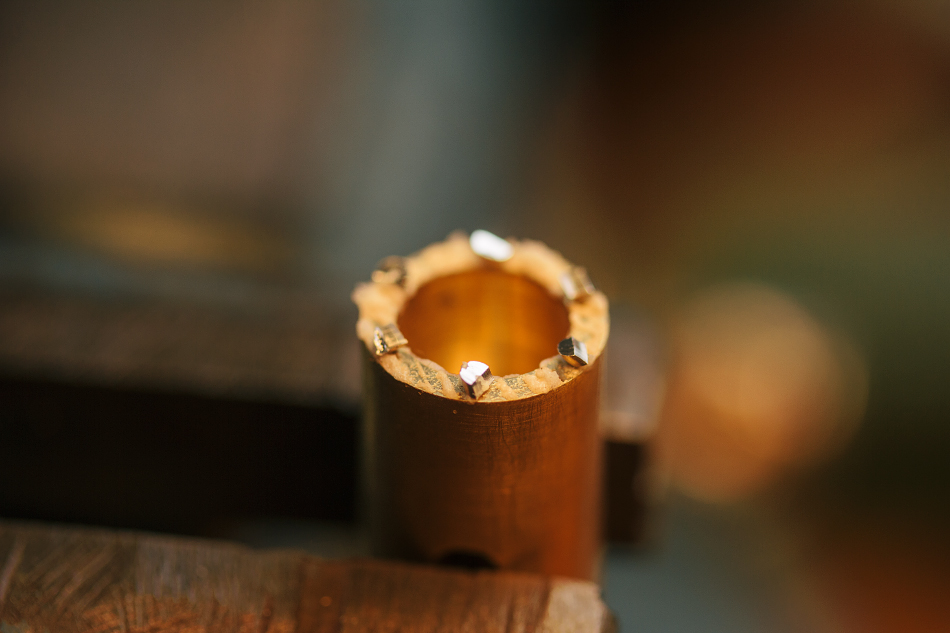
After lining the two parts, the contact plate and inlaid track. A hole is drilled through both parts and they are riveted to each other with a copper pin. This keeps the parts aligned for soldering and makes for a stronger joint vs. solder alone.
Another hole, another copper rivet.
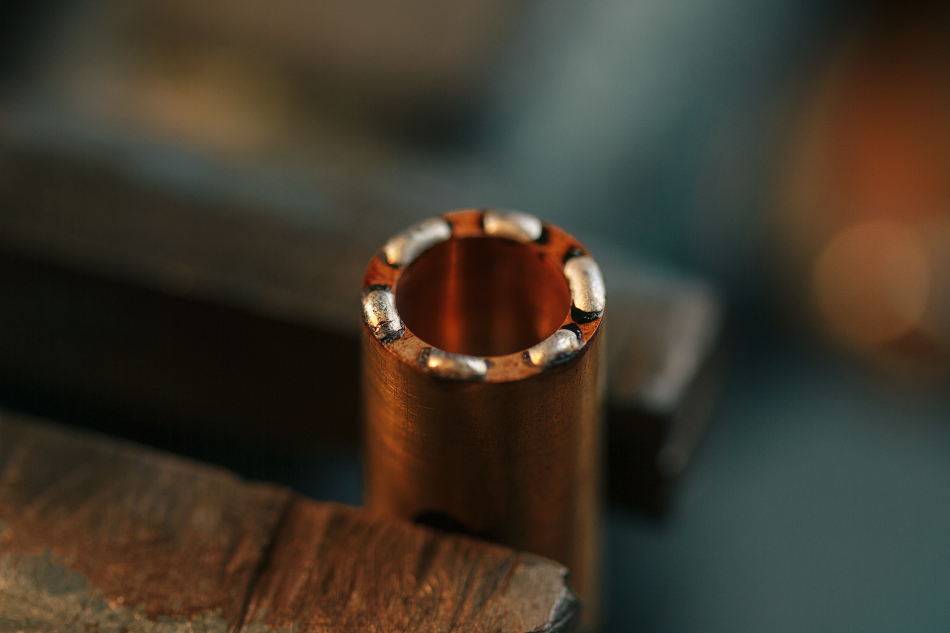
After silver soldering. Lead free solder is used all around.
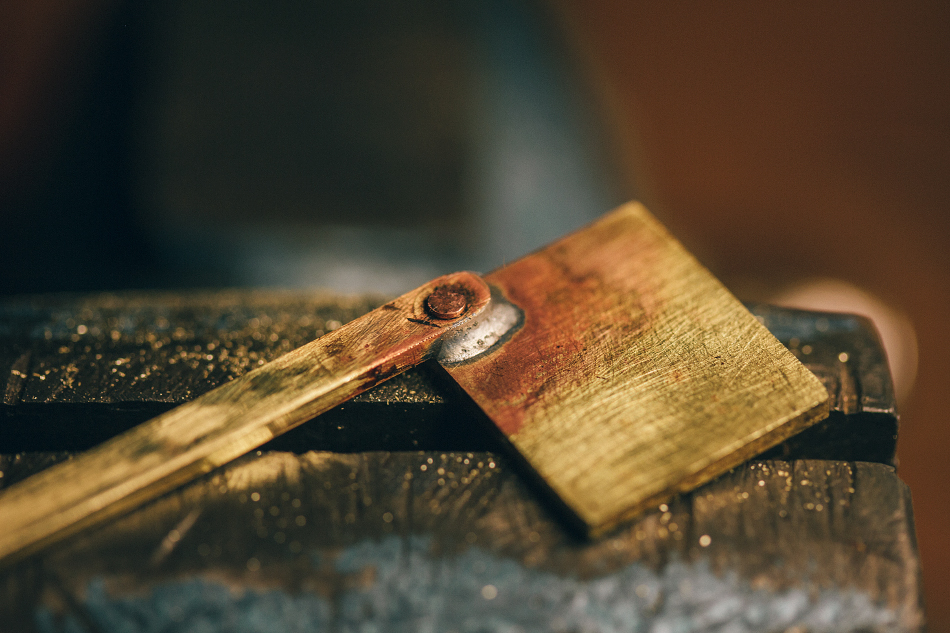
After some rough sanding/polishing you can see how nice the copper blends in with the brass.
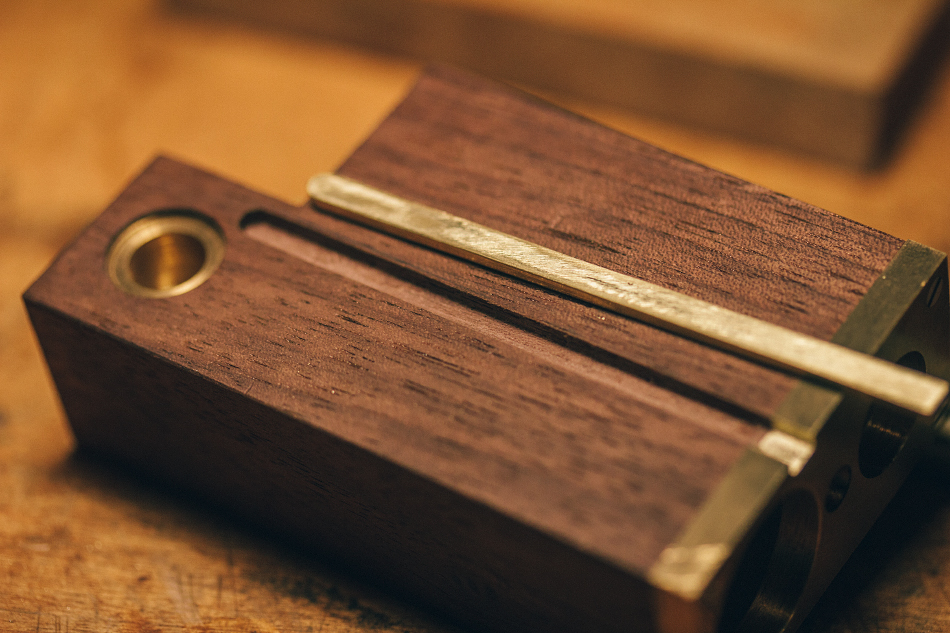
Here is the joint where the track connects to the bottom plate.
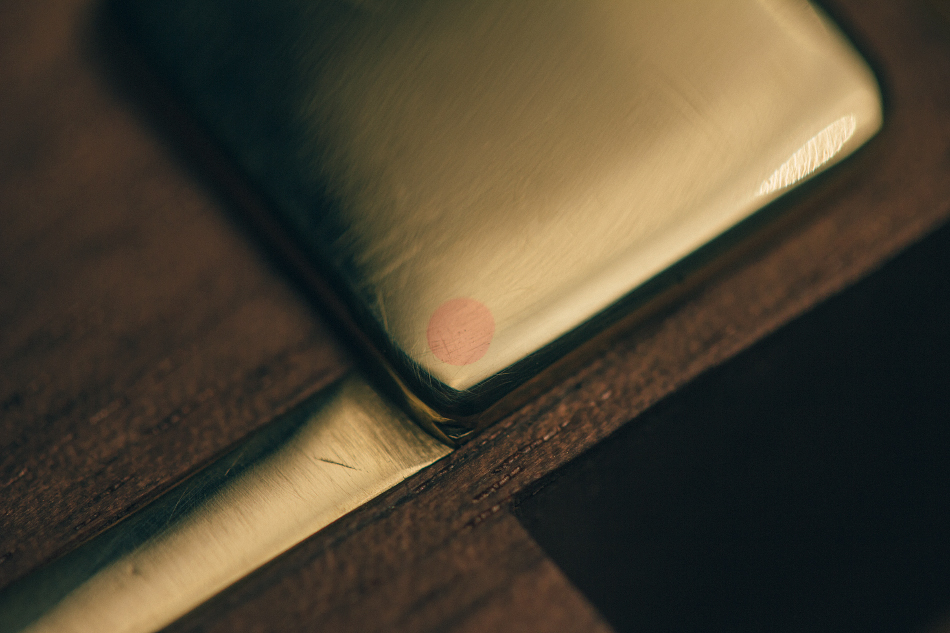
The entire assembly. This is the main electrical pathway. All one piece, large cross sectional area, less resistance in the circuit.
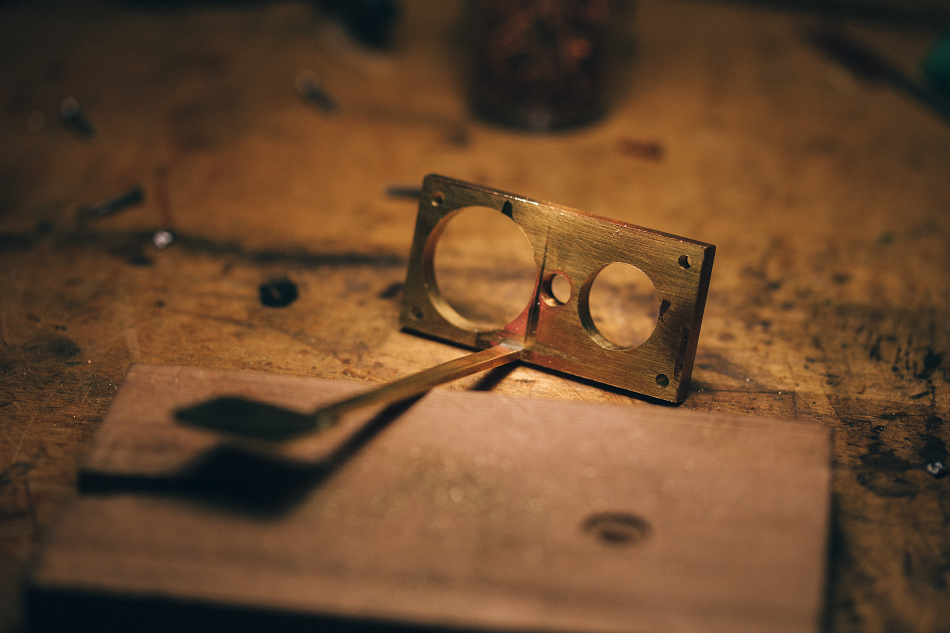
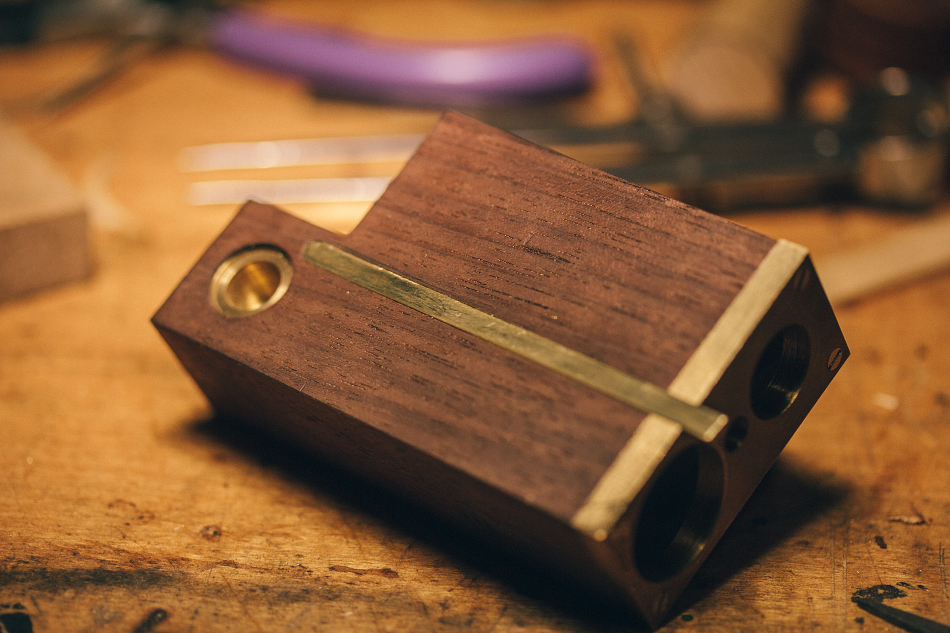
Coming together now!
The square brass plate behind the button turned out a bit 'bubbly', heh.. I will be rounding the edges less, and probably using a thinner gauge plate. The entire plate will be attached with taper pins into the wood body.

Here's some more shots from the shop. This is the brass conductor track on the back. This brings the pixies from the heater module to the button.
First a slot is milled in the wood body and brass bottom plate.
The piece of brass to be inlaid.
Cutting out the brass contact plate for the button.
After lining the two parts, the contact plate and inlaid track. A hole is drilled through both parts and they are riveted to each other with a copper pin. This keeps the parts aligned for soldering and makes for a stronger joint vs. solder alone.
Another hole, another copper rivet.
After silver soldering. Lead free solder is used all around.
After some rough sanding/polishing you can see how nice the copper blends in with the brass.
Here is the joint where the track connects to the bottom plate.
The entire assembly. This is the main electrical pathway. All one piece, large cross sectional area, less resistance in the circuit.
Coming together now!
The square brass plate behind the button turned out a bit 'bubbly', heh.. I will be rounding the edges less, and probably using a thinner gauge plate. The entire plate will be attached with taper pins into the wood body.
D
Deleted member 22423
Guest
WOW! @Dan Morrison, your attention to detail is amazing. If it's function matches its appearance, and I'm thinking you won't stop until it does, this thing is clearly going to be a keepsake.
Fat Freddy
FUCK CANCER TOO !

GreenHopper
20 going on 60
@GreenHopper , Pre-Grind and stem load seems to be the way!
Yep, I think that's the ticket. Keep it nice and simple.
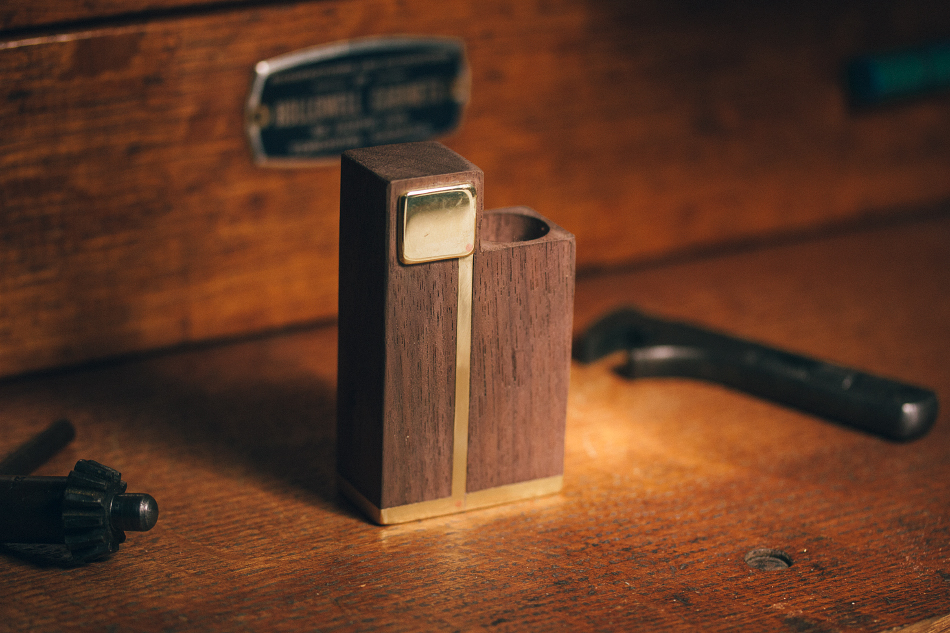
Liking the brass contrasting with the wood.
needalift
Well-Known Member
When I look at these pictures , it makes me wish I lived in your workshop !! So beautiful . Although if that was my place it would go to waste ") . Very impressed with the work , the work area , and the worker . Looking at threads like this make me feel like I need to get off my ass and learn a new skill !!!
. Very impressed with the work , the work area , and the worker . Looking at threads like this make me feel like I need to get off my ass and learn a new skill !!!
. Very impressed with the work , the work area , and the worker . Looking at threads like this make me feel like I need to get off my ass and learn a new skill !!!grokit
well-worn member
I can't get past this part,Originally, I was going to go for gold plated contact surfaces all around.
I could get gold plating supplies/tools to do it here in the shop, but that will be a fairly big investment if I want to do it properly....and it needs to be done properly...
besides all the incredible craftsmanship it would also be the 1st gold-plated vape
I know not really but still

And now on to the stem collar and button!
It starts with turning the padauk stem collar. This is one of my favourite woods... the grain is so neat.
O-Ring grooved cut into the inside diameter. I will probably change this to be only two O-rings in the production models, three is a bit overkill. I'll be using brown Viton or red silicone O-rings.

Two initial button styles.. the one in the back is Verawood, came out way too dark for my liking. The second one is painted with lacquer...
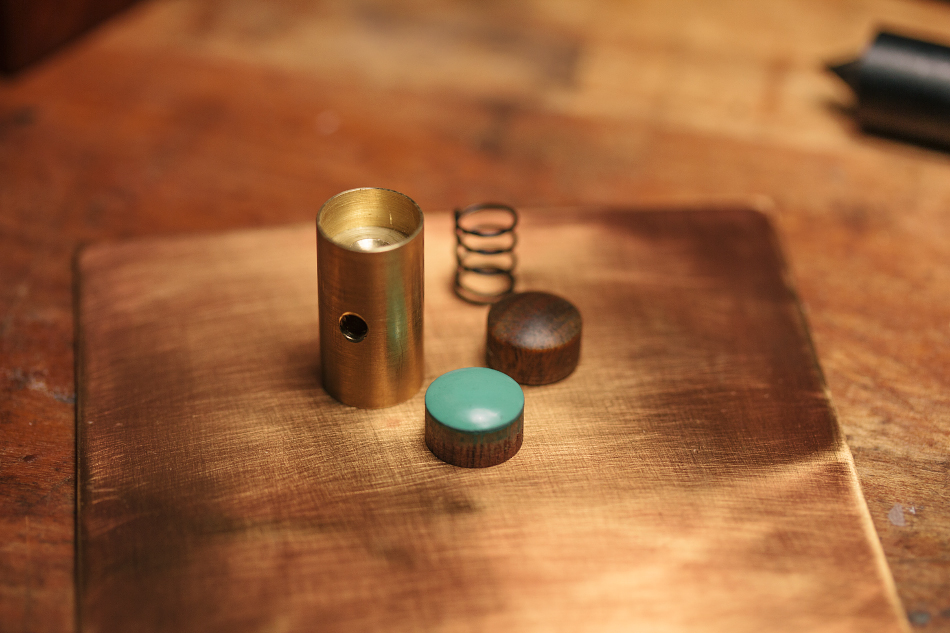
...and once I fitted it, realized it looked a bit odd. Some people might like this totally opaque look, but it's not for me. The "illuminated from within" vibe that I got with the lens button in an earlier prototype looked so much cooler. More on this later.
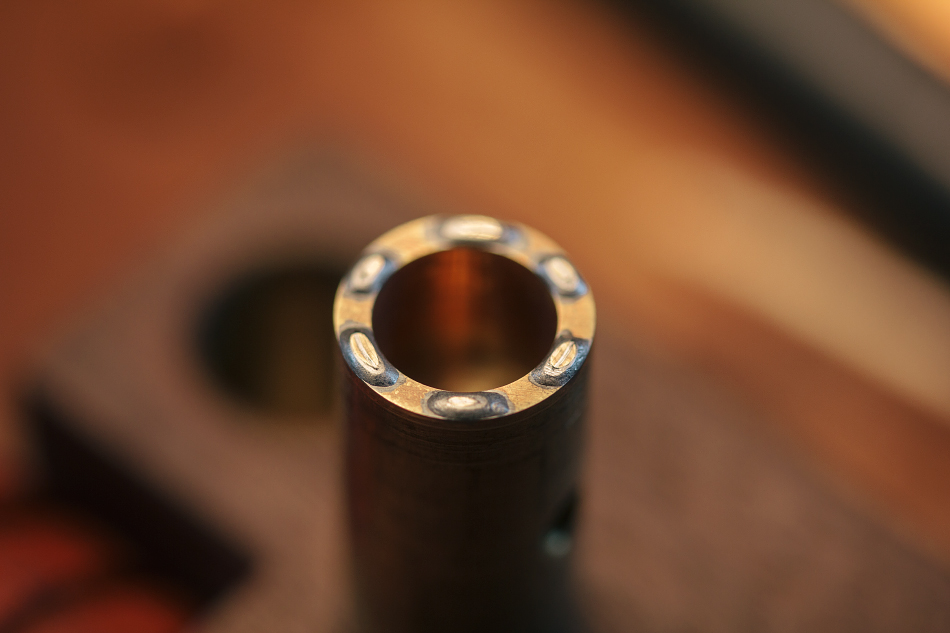
I wanted to add silver contacts to the button, as suggested by @KeroZen.
After soldering, the silver contacts were polished against the button housing, matching the two components perfectly. You can see the bright polished contact points.
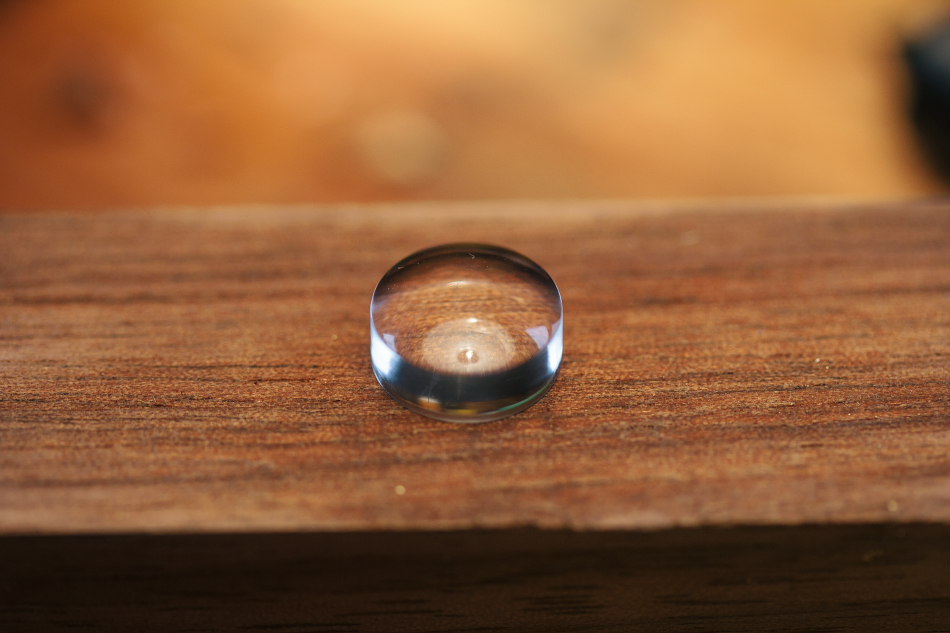
Okay, back to that button! I chucked up a piece of optical acrylic I salvaged from a camera flash.
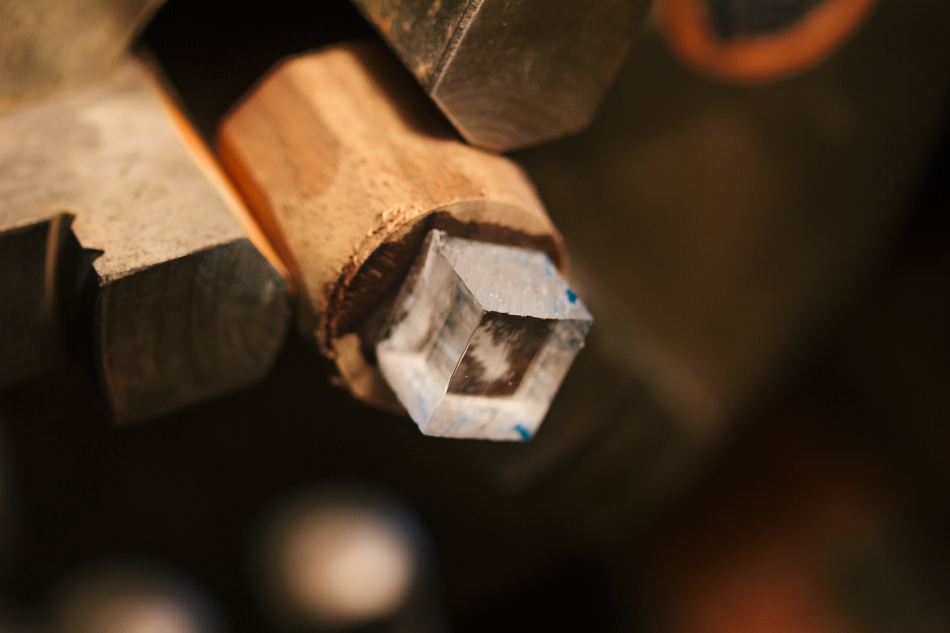
Roughly turned, this stuff is a breeze to turn!
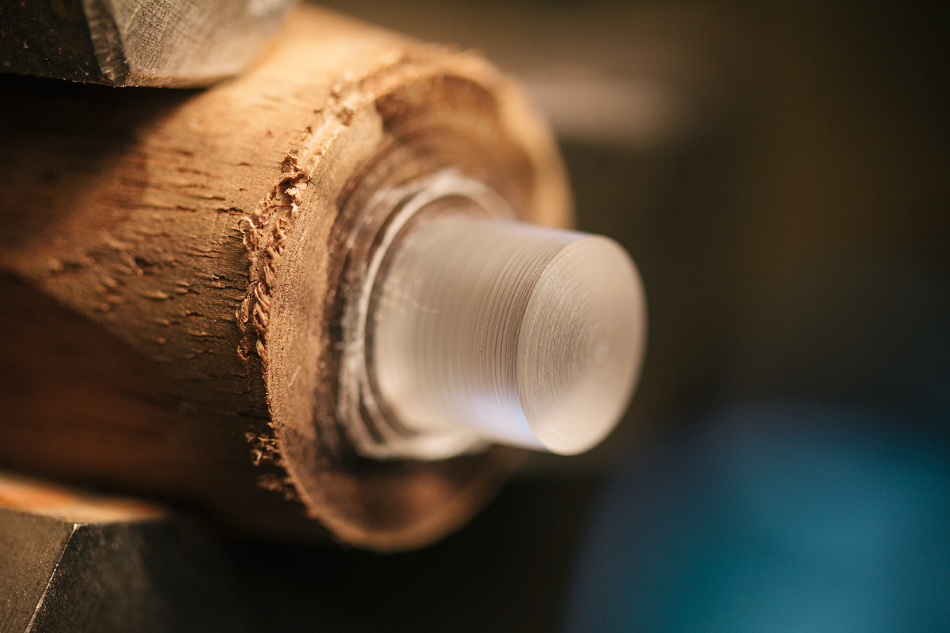
Polished with wet sandpaper from 800x - 2000x, then a couple very fine polishing pastes.
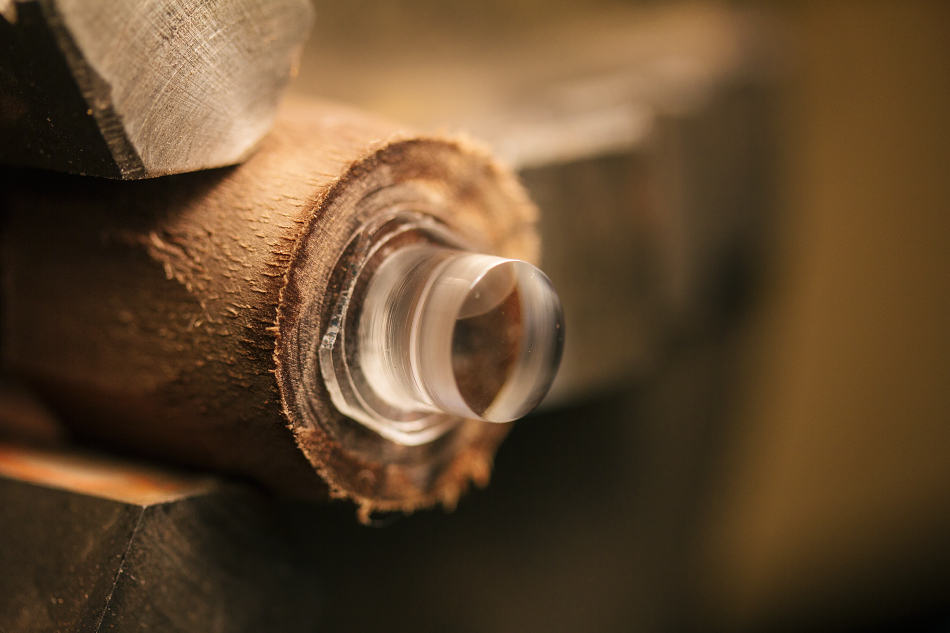
Nice little custom lens! For the production units, I will be making these in bulk from acrylic rod.
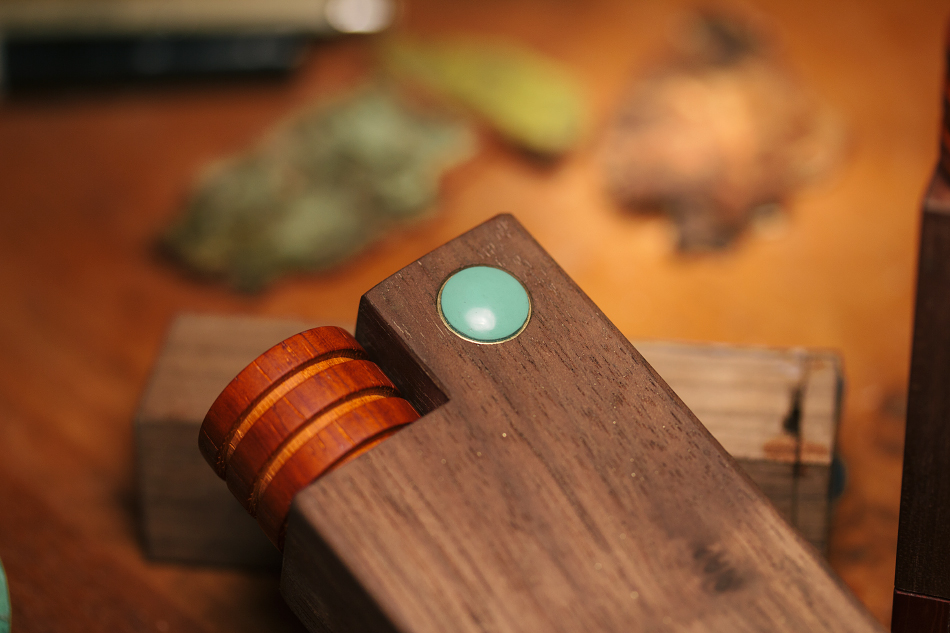
I went out to the woods and found a sweet little lichen growing on some bark. I used a circle punch to punch out a nice tight fitting circle.
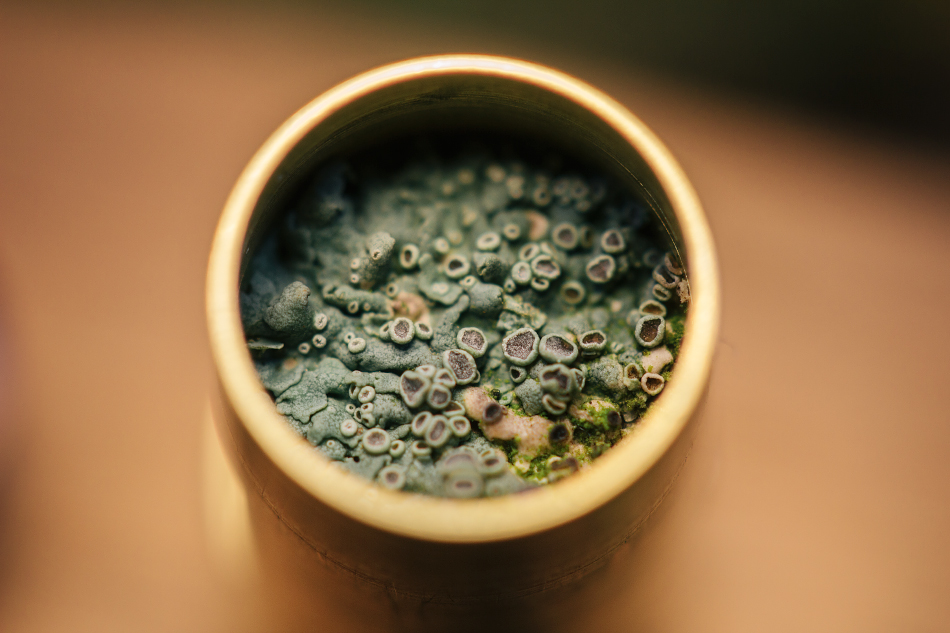
Then sealed it permanently in place with the lens, using clear glue.
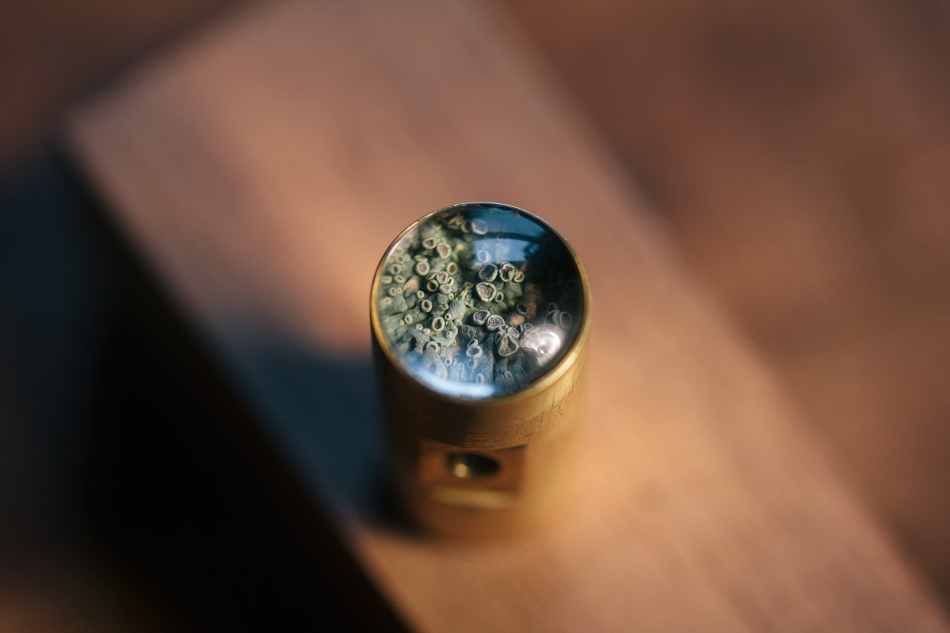
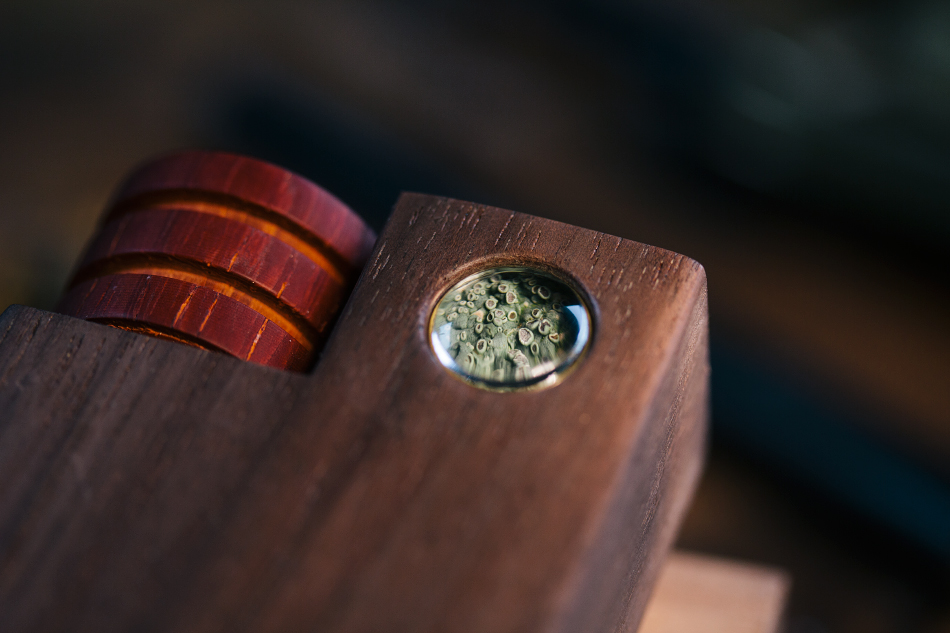
The lens gives a very cool magnifying effect, while allowing light and shadow to give a real sense of depth. Light coming in from the side will make the button appear illuminated.
It starts with turning the padauk stem collar. This is one of my favourite woods... the grain is so neat.
O-Ring grooved cut into the inside diameter. I will probably change this to be only two O-rings in the production models, three is a bit overkill. I'll be using brown Viton or red silicone O-rings.
Two initial button styles.. the one in the back is Verawood, came out way too dark for my liking. The second one is painted with lacquer...
...and once I fitted it, realized it looked a bit odd. Some people might like this totally opaque look, but it's not for me. The "illuminated from within" vibe that I got with the lens button in an earlier prototype looked so much cooler. More on this later.
I wanted to add silver contacts to the button, as suggested by @KeroZen.
After soldering, the silver contacts were polished against the button housing, matching the two components perfectly. You can see the bright polished contact points.
Okay, back to that button! I chucked up a piece of optical acrylic I salvaged from a camera flash.
Roughly turned, this stuff is a breeze to turn!
Polished with wet sandpaper from 800x - 2000x, then a couple very fine polishing pastes.
Nice little custom lens! For the production units, I will be making these in bulk from acrylic rod.
I went out to the woods and found a sweet little lichen growing on some bark. I used a circle punch to punch out a nice tight fitting circle.
Then sealed it permanently in place with the lens, using clear glue.
The lens gives a very cool magnifying effect, while allowing light and shadow to give a real sense of depth. Light coming in from the side will make the button appear illuminated.
GreenHopper
20 going on 60
And now on to the stem collar and button!
It starts with turning the padauk stem collar. This is one of my favourite woods... the grain is so neat.
O-Ring grooved cut into the inside diameter. I will probably change this to be only two O-rings in the production models, three is a bit overkill. I'll be using brown Viton or red silicone O-rings.
Two initial button styles.. the one in the back is Verawood, came out way too dark for my liking. The second one is painted with lacquer...
...and once I fitted it, realized it looked a bit odd. Some people might like this totally opaque look, but it's not for me. The "illuminated from within" vibe that I got with the lens button in an earlier prototype looked so much cooler. More on this later.
I wanted to add silver contacts to the button, as suggested by @KeroZen.
After soldering, the silver contacts were polished against the button housing, matching the two components perfectly. You can see the bright polished contact points.
Okay, back to that button! I chucked up a piece of optical acrylic I salvaged from a camera flash.
Roughly turned, this stuff is a breeze to turn!
Polished with wet sandpaper from 800x - 2000x, then a couple very fine polishing pastes.
Nice little custom lens! For the production units, I will be making these in bulk from acrylic rod.
I went out to the woods and found a sweet little lichen growing on some bark. I used a circle punch to punch out a nice tight fitting circle.
Then sealed it permanently in place with the lens, using clear glue.
The lens gives a very cool magnifying effect, while allowing light and shadow to give a real sense of depth. Light coming in from the side will make the button appear illuminated.
I love that lichen button idea you got going there, that's a nice touch!
This vape is going to feel like it's alive, does it come with its own soul?

Very organic

GreenHopper
20 going on 60
This is stunning... like a marble!
Dare I say that when I saw the lichen... I immediately imagined that you could trap a bud full of thrichs in there too!
That would be quite unique!
I was totally on the same wave length but figured that might make the device difficult to ship to non 420 friendly locations.
But a nice purple strain with orange pistils would look soooo good under that lens button.
Having said that I really do like the lichens texture.
Fat Freddy
FUCK CANCER TOO !
Jesus freakin' H. Christ! Where do you come up with these combinations of ideas, @Dan Morrison !?
Totally stunning!
Although, I have to wonder how long it will take for you to build just one unit, start to finish? I mean, given the "hands on" demands of this artwork, how much of the build will actually lend itself to mass production?
I'm imagining seeing one day some DMVapes of exotic woods with silver and turquoise inlay!