Homemade Vaporizers

Egzoset

Banned
Salutations Tweek,

Might get to tinkering over the winter.

If that is so then i'd certainly be very excited to see anything done using induction heating since it's wireless and hence generates heat right where it's most wanted while there are no power electric contacts to fail, etc., etc. Plus instead you'd practically get the power of fire to work with in record time and more (virtually infinite heat @ the selected Curie temperature over the operating range), etc.

:peace:
 
Egzoset,
  • Like
Reactions: Tweek

nopartofme

Over the falls, in a barrel
well, clearly, trying to do a table really, really sucks in this editor. just check that link if you are interested.
Next time use the (code) (/code) tags, it'll force a fixed-width font for you:

Code:
AWG           Dia."   400F  600   800   1000
(Gauge)               204C  316   427   538
16            0.05    6.13  8.31  10.5  13.11
17            0.05    5.31  7.18  9.13  11.3
18            0.04    4.66  6.26  7.9   9.75
19            0.04    4.09  5.46  6.84  8.41
20            0.03    3.58  4.77  5.92  7.25
21            0.03    3.14  4.16  5.13  6.26
22            0.03    2.76  3.63  4.44  5.4
24            0.02    2.12  2.76  3.32  4.01
 

lazylathe

Almost there...
I tried one more idea yesterday with the silicone heater vape.
The thermocouple from the thermometer was threaded into the tube and i stopped at the top of the herb level.
Load a stem and placed it in the heater and watched the temps go up to 375 and start to inhale slowly.
I managed to get it to stay right around 375 for the whole bowl and all i can say is WOW!!!
I was so medicated, the clouds were very good and the taste was getting better with the vinyl taste now only a hint.

This is the first time i needed to sit down and try and collect myself!
About an hour later i seriously needed an afternoon nap and when i awoke, i felt really good!

So my further experimentation will involve trying to stabilize the temp at 375+ for the entire load.
I am hoping the PID helps with regards to this otherwise i will look into a more accurate Arduino control option.
 

lazylathe

Almost there...
@Hippie Dickie , I cannot agree with you more!
The amount of vapor i can get from a tiny amount of herb is amazing to me.

For anyone that knows the size of the Vapolution stems, i have only been filling it to a 1/3 full.
I can get a good 6 hits from that amount!

Need to invest in a scale that reads well below 0,1 grams.
 
lazylathe,
  • Like
Reactions: Egzoset

Egzoset

Banned
Salutations LazyLathe,

Since you've mentioned the Vapolution i'd appreciate having opinions on the presence or absence of radiated heat in such systems and how it balances with conduction and convective heating. My HerbalAire may have been a great extractor, yet it's got plenty of conductive + radiative components that will bake the herb if left unattended - hence the need to finish the bowl which some of us tagged as the "locomotive" feature, kind of:

Spaceballs_288x288.jpg

« We Brake for Nobody! » (...a SpaceBalls reference)

Well, with an HerbalAire there are no breaks at all:

While in Arizer's Cyclone Bowl the situation reverses:

This juxtaposition inspires me the following thought: the HA can't be caused to emulate a V-Tower because the conductive/radiative heat components are already present and integrated into this design. On another hand, it seems to me that the V-Tower could be made to emulate an HA at will with the addition of transient radiative heat, hence in such way vaporists would effectively benefit from a "Boost" button, IMO.

The amount of vapor i can get from a tiny amount of herb is amazing to me.

As i've illustrated above, there's the amount but time is another important variable, etc.

So, i wonder. Do you think the Vapolution could benefit from a "boost" button in similar fashion as suggested here?

:peace:
 

SquidgyB

Well-Known Member
Just to run in and add another different design to the list;

I'm in the process of testing and refining a Vriptech VHW inspired DIY project.

The end result should be cheap (well under £50 in parts, minus tooling) and robust, with the heated section of the air path being all glass - only high temp silicone where the heat is acceptable, possibly with an aluminium outer cover.

Here's what I have up to now:

sbt6t.jpg


And here's a rough diagram of the air path - very much out of scale:

ol5h6.jpg


Blue = Heater

Red = silicone

Green = airpath

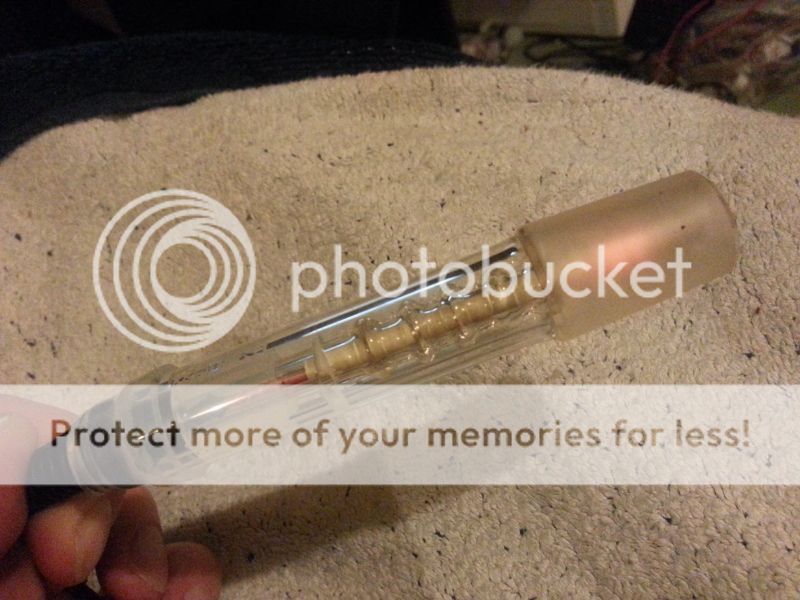
It's made out of a borosilicate glass syringe, cut and ground with a dremel, and the inner heater cover is a DIY glassworking of what is supposedly quartz glass tubing - from the inside of an aquarium heater. Two holes are ground in at an angle to create a vortex down the tube as air is pulled through, and the heater cover is "wibbled" for extra surface area/turbulence in the flow.

It's a hakko style heater, controlled by a ~£24 controller from ebay which needs a laptop power supply. An analogue version of the heater would be an Aoyue/Yihua 936, available very cheap online.

Lots of experimenting has got me this far, I'll try to get some better pics of the inner workings to explain it a bit more.
 
Last edited:

lazylathe

Almost there...
http://www.jacobs-online.biz/nichrome/NichromeCalc.html

For anyone looking for nice Nichrome wire info when designing a heater!
You can customize everything and it will supply you with Amps, Watts and Ohms required to achieve your previously plotted info.

Salutations LazyLathe,

Since you've mentioned the Vapolution i'd appreciate having opinions on the presence or absence of radiated heat in such systems and how it balances with conduction and convective heating. My HerbalAire may have been a great extractor, yet it's got plenty of conductive + radiative components that will bake the herb if left unattended - hence the need to finish the bowl which some of us tagged as the "locomotive" feature, kind of:

Spaceballs_288x288.jpg

« We Brake for Nobody! » (...a SpaceBalls reference)

Well, with an HerbalAire there are no breaks at all:

While in Arizer's Cyclone Bowl the situation reverses:

This juxtaposition inspires me the following thought: the HA can't be caused to emulate a V-Tower because the conductive/radiative heat components are already present and integrated into this design. On another hand, it seems to me that the V-Tower could be made to emulate an HA at will with the addition of transient radiative heat, hence in such way vaporists would effectively benefit from a "Boost" button, IMO.


As i've illustrated above, there's the amount but time is another important variable, etc.

So, i wonder. Do you think the Vapolution could benefit from a "boost" button in similar fashion as suggested here?

:peace:

Hi Egzoset,

To be perfectly honest, i am a complete noob to all of this but will try my best to answer your questions, they may not make sense though!

I have just bought a HA so i know what you are talking about, same issues with my Vapolution.
If you leave the herb in the crucible or the stem and are not drawing, vapor is being formed and lost.
For me it was a lot worse in the Vapolution, sometimes you leave the stem in for a bit too long and it chars the herb and smells really bad!
The HA is a pain to empty after a session because as soon as you open the top there is a lot of vapor escaping from the crucible and a lot of heat is still being generated! The garbage about it just releasing vapor when you inhale is a fairy tale, IMO.
In order for it to be most effective, hot air would need to be drawn from further away down a path that does not heat up and then int the herb. All this would require isolation in a thermal compound that does not heat up or hold heat. That way you would only be getting vapor on a draw and when done the herb would ideally cool down again quickly.

Not sure if this happens with any vape out there? Maybe the Herbalizer?
It would have to have excellent heat retention in the heater core and minimum heat retention in the crucible area.

I have never used an EQ before so cannot comment on that.

A boost button on a vapolution? I see you have asked the same question on a few other vapes as well.
Since these types of vapes are interactive, IMO, since you turn them on and adjust the contact time of hot air to herb by adjusting length of time exposed to hot air, i do not see the need for a boost button on them. Also because of heat retention the boost function in this type would most likely case the load very quickly and possibly burn the herb.

More testing needs to be done in the name of SCIENCE!!! LOL!
mod note: 2 posts merged. Please don't make back to back posts within the edit window. It's a rule.
 
Last edited by a moderator:

Egzoset

Banned
Salutations LazyLathe,

...as soon as you open the top there is a lot of vapor escaping from the crucible...

This was my solution:


As you can see i had strict confinement while teflon tape sealed the path...

zl5jeb.jpg


It was somewhat fun but i'd have much prefered this to come with HA's parcel instead.

A boost button on a vapolution? I see you have asked the same question on a few other vapes as well.

Yes, but perhaps i perceive something that ain't real, because of some considerations which would be escaping me. What you see may not be what you get these days...

...i do not see the need for a boost button...

With my Arizer V-Tower i was constantly trying to keep air in motion, in preparation of a hit i was hoping would come next... I finally got tired of it, especially using a long path.

...in the name of SCIENCE!!!

So the future generations some day won't even remember what combustion was!! With a good cause as that i see no way to go wrong!

:peace:
 

Hippie Dickie

The Herbal Cube
Manufacturer
@lazylathe - nice find! most useful for fixed voltage vapes.

once you have temperature control, there is a lot more freedom in designing the heater coil. a current flow (12 amps) that would normally create 1000°F can allow faster heater recovery and yet maintain 380°F to 440°F very easily.

a boost button might be useful for fixed voltage vapes, where the temp can drop 50°F with a hit.
 
Hippie Dickie,
  • Like
Reactions: lazylathe

Egzoset

Banned
Salutations Hippie Dickie,

A boost button might be useful...

This was in reference to the air cushion in a "pure convection" setup as the Cyclone Bowl where air temperature would be lower in the section below (#1) while momentary radiative power can be injected at bowl level (#2) for instant use, etc.

:peace:
 
Egzoset,

SquidgyB

Well-Known Member
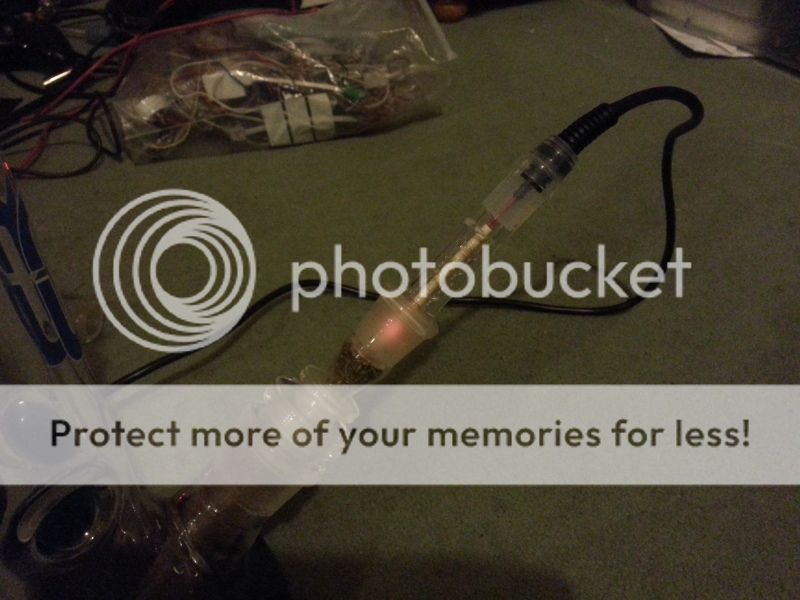
So, following my earlier post, I've come along a fair way. MkII is fully operational, and looking damn good if I do say so myself.

Changes are that I've dumped the slightly fiddly glass syringe as a starting item and gone for a proper ~2.5mm borosilicate glass 18mm ground joint. Combined with the use of readily available glass carbon filters as bowls. I have a small one which holds ~0.5g of herb (pictured), and a much larger "party bowl" which will hold at least 7-10g in my estimation. I'm not rich enough to try that quite yet though...

This version still uses high temp silicone tubing in the design, and I'm not entirely sure how hot it gets up at the top of the unit. I want a cheap k-type thermocouple I can sandwich between the inner heater cover and silicone just to see how hot it gets in there when the unit is left on for a while, but the outer glass doesn't usually get very hot, certainly touchable for a second or so.

I've invested in a proper blowtorch, and I've played around a little and I'm confident I can make an all glass version - but not in the flat I'm in right now. I'll need a friend's garage/workshop to get MkIII done. And a small kiln for annealing...

Anyhow, using the small bowl, 10-15 minutes warm up time and close to the lowest heat setting gives a lovely vape, having to turn it up a little as the herb browns.

One thing I've found I have to do, which is not pictured in the version shown, is that I put 1200C fire cement inside the inner heater cover. It's non toxic according to the gumpf, and besides - it's behind 1.5mm of glass so isn't anywhere near the air path. I've had problems with the glass inner heater cover bonding with the heater at tiny points where the ceramic touches the glass, resulting in stress/heat fractures in the cover. Filling the cover with cement and forcing a 4mm shaft down the hole to leave a smooth-ish cylindrical space inside the cover for the heater seems to work wonders - it evens out the heat coming from the heater so that no glass gets hot enough to melt/bind to the heater, and as a side effect also gets rid of the air gap between the heater and heater cover leading to decreased warm-up times and increased efficiency - I can turn the heater down much lower than when the heater was "naked" inside the cover. The first time at very high temp the cement appears to ooze out some sort of crystalline silica - if the heater cover is completely airtight this can cause issues by bursting out of the glass - but with the 1.5mm boro glass I've purchased (no more aquarium heaters) I've had nothing like that happen, and there should be just enough gap for pressure relief around the outside of the heater. This stuff glues the heater in there, but I think it's one of the main reasons the heat transfer is now so efficient. The heater covers and heaters are cheap enough to produce that I'm not too bothered about the heater being permanently stuck in there.

Finally. Pics uploaded:


And yes, there's a fairly hefty power brick out of shot. All that will change soon. Stay tuned :)
 
Last edited:

SquidgyB

Well-Known Member
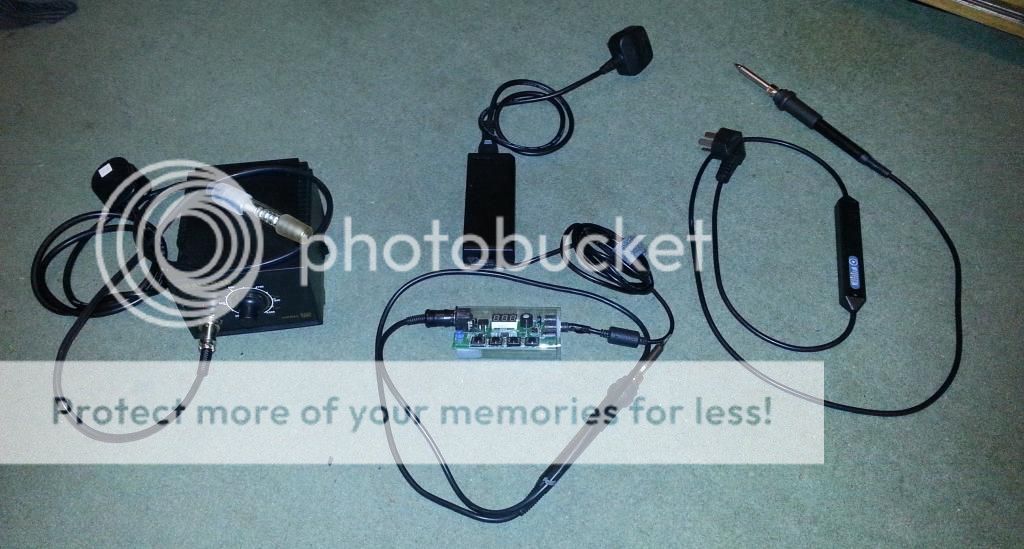
Here's a little show and tell about the various options I've explored for the heater power supply.

They're all soldering irons, based on the Hakko style irons that are everywhere nowadays. There are obvious (and not so obvious) pro's and con's for each, which I'll try to explain.

IMG_20131124_153452.jpg


Right to left:

Yihua 936 - bog standard soldering iron with a 24v heater. Big, bulky with a plain switch and analogue control over the heater. Best in terms of available spare parts, and the spare ceramic heaters are *perfect* for the job, as all the wires come straight out of the back of the tube, rather than having been brazed onto the side of the heater.

Korean digital controller (ebay) with a laptop PSU. Very nice accurate control of heat, nicely portable compared to the Yihua, but relies on proper Hakko heaters - wires are brazed to the side of the heater making assembly of the glass vape parts more difficult. Has a temperature memory as well, can hold one memory setting as well as remembering what it was set to before selecting the memory. Comse as a plain shrink wrapped PCB, needs a case to look decent.

And the newcomer - I don't even know what the product name is (the one on the packaging brings up nothing on google). aliexpress.com has one or two available as an "adjustable soldering iron). This thing is tiny, almost unbelievably so. 7 heat settings, from 200c - 480c, and can be calibtrated with a pot inside the plastic case. Temp control won't be as accurate as either of the others, but I expect with practice it'll be a case of using one setting for the initial vapes, then jumping up a setting to finish off the bowl. unfortunately comes with brazed connections for the heater - and the heater and circuitry is 240v - not to be trifled with. Heaters are more difficult to locate, but once I have a source for 240v ceramic heaters with inline wiring this should be the final version - unless some bright spark in the land of cheap consumer goods comes up with a design for something similar in size to this one, but with a numeric digital temp control like the Korean no-namer above.

Here's a pic showing the problem I have with the heater supply wiring:

IMG_20131124_160057.jpg


Right to left, same as above. You can see that the Yihua spare heaters (search 1322 on ebay) slip right in there, no problem. The other two won't go in without modification of the glass tube, or a larger tube (which in turn buggers up the rest of the design).

So I'm waiting on some heaters to turn up from China which will hopefully be compatible with the new iron and have wiring similar to the Yihua heaters. Here's hoping!
 

CentiZen

Evil Genius in Training
Accessory Maker
Do you have a temperature sensor anywhere in the heating core, or are you just freeballing it? This design looks great, I'm really interested to see more.
 
CentiZen,

SquidgyB

Well-Known Member
Both the Yihua and Hakko heaters (left and middle) incorporate temperature sensors (k-type I think) into the heater design (and is why they both have 4 wires). However, what I've found is that in general a good vaping air temp requires a slightly higher reported heater temp. With a finalised design (when I've settled on a heater/controller combo) I'll think about calibrating the controller to the air temp rather than the temp of the heater inside the glass. The problem is that the end air temp depends a bit on other factors - to a more or less degrees; ambient temp, glass thickness/size of bowl, warm up time etc.

I've only had the last controller/heater since friday, but it appears to give out a stable heat. It's very high tech stuff, for a soldering iron imho. I've never seen a proper, cheap (~$18) digital iron with a controller quite that small before. But like I said, a suitable heater might be hard to find.
 
SquidgyB,

CentiZen

Evil Genius in Training
Accessory Maker
Measuring the temperature of the output air-stream is near impossible to do, really. Most temperature display vapes just give an optimistic estimate at the very best. Have you ever played around with microcontrollers? I'm in the process of trying to set up an Arduino as a vaporizer controller to take advantage of the easy USB programming and debugging; they might work well for your situation as well.

Also, I just picked up a lot of ten of those Yihua's; so thank you for bringing those to my attention.
 
CentiZen,

SquidgyB

Well-Known Member
Yeah, I don't intend to try making a control system taking into account the end air temp, that's going to be complicated, and inevitably end up with some kind of "foreign object" in the air path :)

My idea would be to do a one time calibration, just to set the controller to display a temp which is more in line with the actual air temp, rather than being ~50c or so higher. Not that it bothers me in use - I'm well aware of the thermal dynamics going on inside that heater and I'm happy to set the controller to 250c or 300c if it means I'm getting a good cloud going without combustion!

I'm shying away from complicating matters with a microcontroller, too - though it's right up my alley in terms of my other hobbies/interests. This project is meant to be cheap, simple, and (relatively) easy to produce. Up to now I can get all the parts required for the entire vape (minus bowl/pipe/bong) for about $30 (admittedly I've spent a lot more in experimentation and design, though I'm sure you guys know where I'm coming from here). Making one takes a few hours, the most difficult thing being creating the glass inner heater cover out of a plain 7mm boro tube. It's easy enough now that I have a "jig" set up, but it's still 30 minutes or so with a blowtorch and takes a fair bit of nous to get right. Then its a bit of glass grinding/cutting, soldering, fitting and calibration.

Once I have a few "units" up and running, I'll hand them out to my friends to see how they fare in the "real world" hehe.

e: Yeah, the Yihua's are available dirt cheap - I think hobbyking.com sell them for ~$10-15, but if you're looking for a straight heater like I've shown on the left in that second pic, you'll need to desolder the one that comes with the Yihua and replace with those 1322 heaters that are all over ebay/aliexpress (or if you're in the UK, give me a PM. I have a few of them. When I say a few...)
 
SquidgyB,

Hippie Dickie

The Herbal Cube
Manufacturer
... I'm shying away from complicating matters with a microcontroller, too - though it's right up my alley in terms of my other hobbies/interests. ...

really, it's not that hard -- a microprocessor, a temperature conversion chip (reads the thermocouple), a k-type thermocouple and a MOSFET. Toss in a voltage regulator chip for a wider input voltage range if running off batteries. okay, buttons for user input and LEDs for user output. And getting surface mount boards fabricated is drop-dead simple, and cheap-ish when ordering 20 or so.

Not trivial, but not all that complicated.
 
Hippie Dickie,
  • Like
Reactions: Buildozer

SquidgyB

Well-Known Member
Hehe, you're really got me thinking now... I've made prototype PCBs in the past, so I already have all the kit for etching etc.

So the Yihua style heater is already basically a nichrome wire heater and a k-type thermocouple in one unit. Am I right to think that what you have displayed in your signature is an example of the basic circuit you're talking about? If so... That looks good - very simple and easy to make (if you know what you're doing, ofc :)). I'm guessing it would require some sort of laptop PSU to give a nice amperage and stable voltage.

I think I need to go read up on some stuff...

What time is it Jake?

It's research time!
 
SquidgyB,

Hippie Dickie

The Herbal Cube
Manufacturer
i have a 12v6a power supply that i use sometimes, but i prefer using two LiFePO4 (A123Systems) batteries. They can deliver 80 amps at 6 volts. the voltage regulator allows any DC input from 5.5v up to 20v.

i use 24" of 16ga Nichrome80 as the heater, wrapped around a 1.5" length of 15mm dia borosilicate test tube. The 0.010" k-type thermocouple is in physical contact with the hottest point of the heater coil.

that's the Bud Toater in my signature. click the title to see the construction thread. this iteration of the cube has been running 5 times per day, every day, for over 2.5 years (for testing purposes, of course) - came online on 4/20/2011. (page 39 in the thread).

i etched the first several iterations of the pcb, but doing smd traces was impossible for me to do. i did find a great etchant: 2 parts of H2O2 plus 1 part of Muriatic Acid. super cheap and very fast etch.

once i had the layout proven, i farmed it out to a pcb fab -- just a button click in the free layout software.
 
Hippie Dickie,

SquidgyB

Well-Known Member
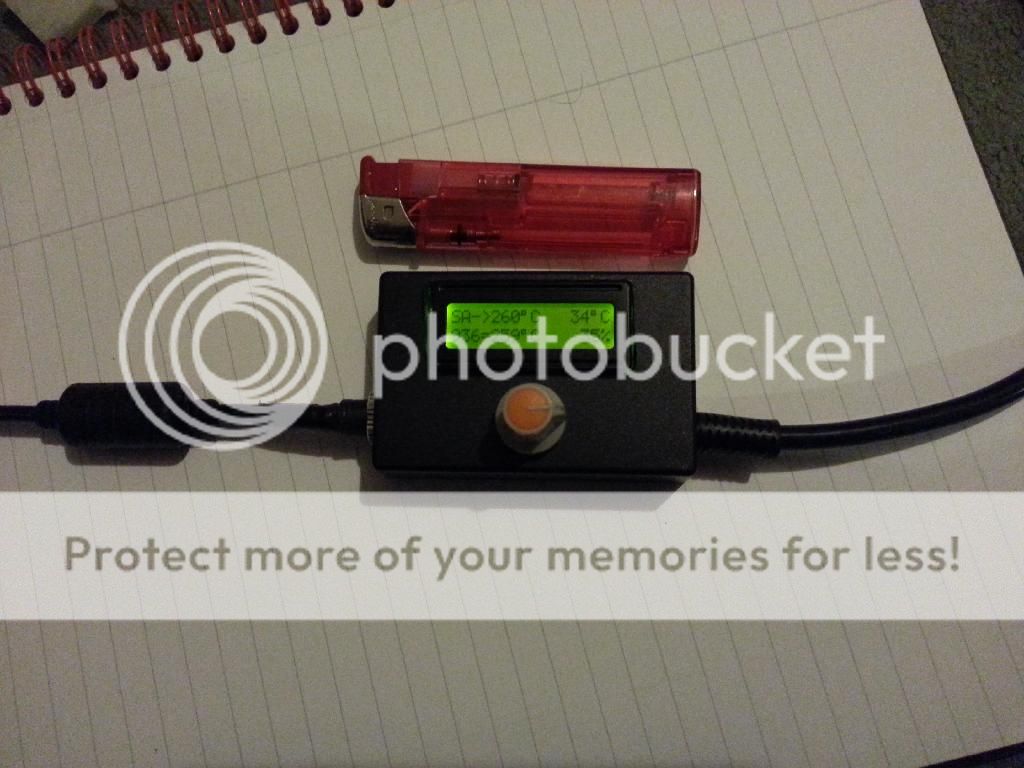
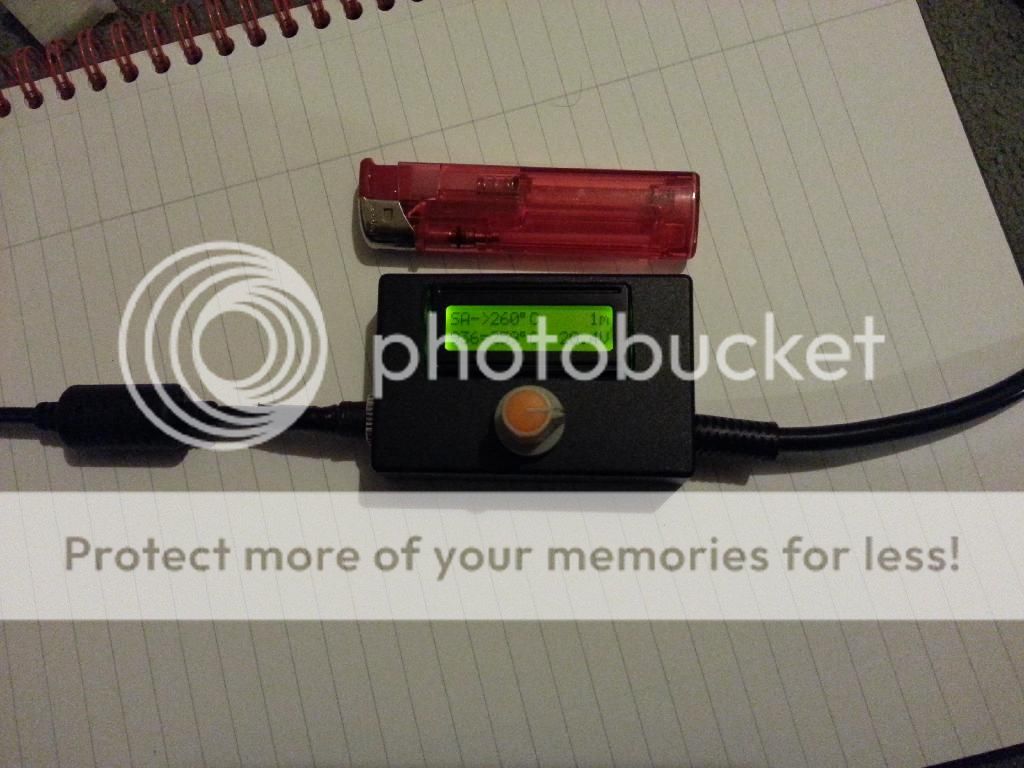
I've settled on a controller now - I found a really small low cost Chinese units. They work perfectly with the 1322 heaters that I have so many of. For less than $15 each, I can't fault them.

I'm running them with a laptop PSU, but as they take 16-24v DC I could use a battery at some point. There's four memory settings, a rotary encoder and an auto off 10 minute sleep function with vibration switch wake.

The display shows target temp, heater temp, what I assume is ambient (controller board) temp, running time, percentage PWM power and supply voltage.

A couple of pics showing the display in a prototype housing:

IMG_20131220_004036.jpg

IMG_20131220_004035.jpg


Lighter shown for scale.

The housing could be smaller, as the board itself is barely bigger than the display itself, but wiring, connectors and the encoder all need to go somewhere. It'd be nice to have something nicely designed and compact, but it's very small and light as it is. It just needs... refinement.
 

CentiZen

Evil Genius in Training
Accessory Maker
Hello there everyone!

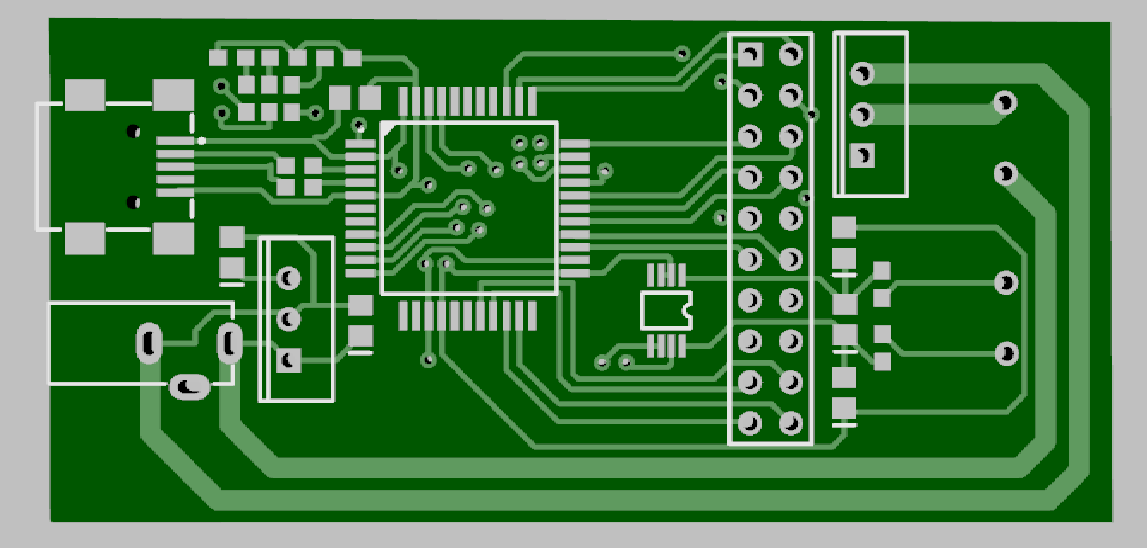
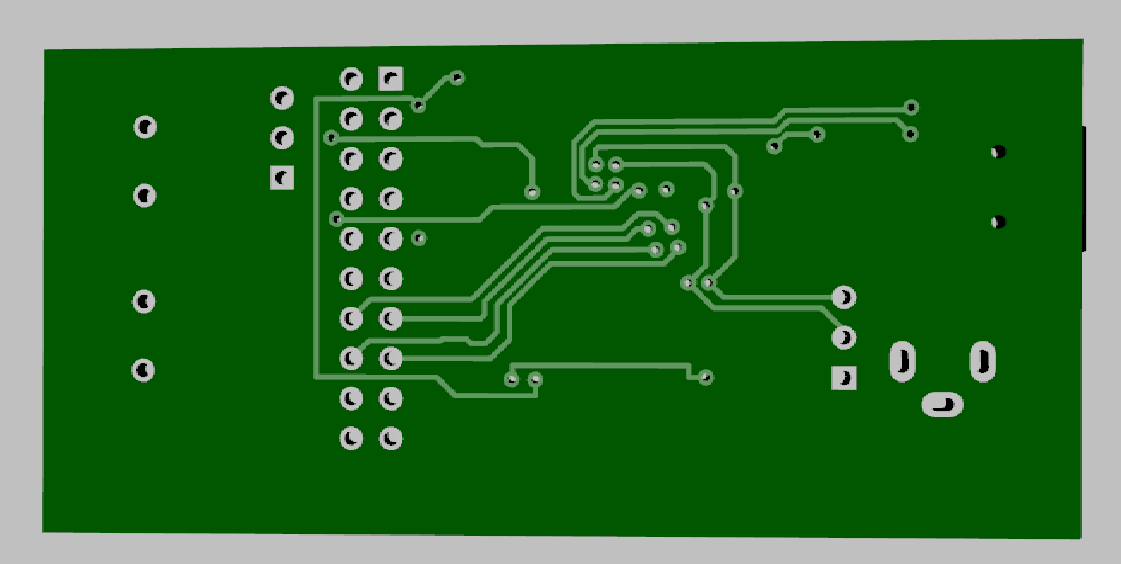
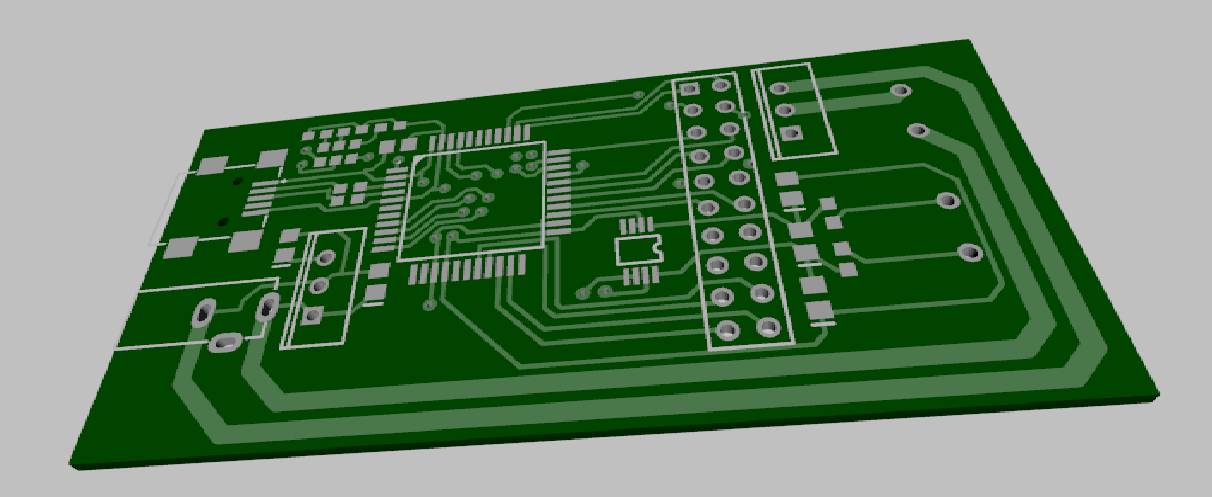
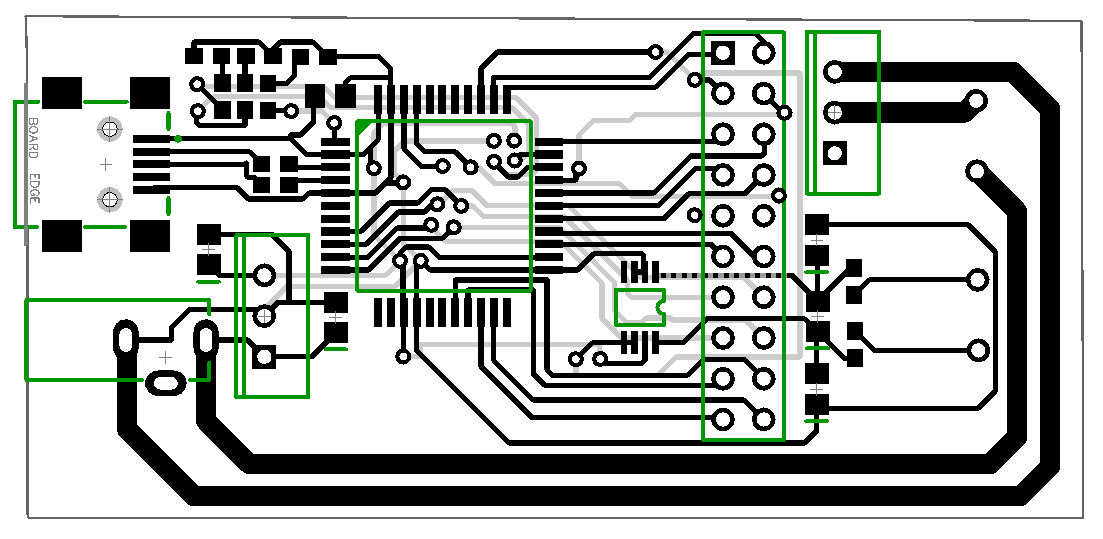
I wanted to drop in and show off the first version of my recent creation. I've been trying to design an arduino compatible development board that would make it easy on myself (and anyone else) to experiment with custom heating algorithms, various power sources and advanced electronics like screens or special sensors. Basically, this is a complete development board for a vaporizer, a blank slate of electronics waiting to be programmed with your control algorithm. You just need to add the power supply and the heater/thermocouple.

My intentions with this are to make the development process of making a vaporizer a lot easier. I have so many idea's I want to experiment with, and just using a straight PID controller means your locked into one type of control algorithm. This will make that a lot easier, especially the programming portion, since the chip can be reprogrammed in circuit hundreds of thousands of times.

Arduino is awesome, because it removes so much of the hassle of working with microcontrollers out of the development process. You can write your programs in the easy to learn, C based programming language, and upload it at the touch of a button via a programmer, or in this case, just plugging the board itself in to a computer via USB. There is already an Arduino implementation of PID control that can be drawn on, and lots of other cool stuff.

Here's some pictures, I've only got 3D renderings at this point since I still need to get my prototypes produced. But some of you might be able to make use of the CAD files to make your own, so I've added them to the end of the post. I'll make a dedicated thread for this once I've made more headway.
F6R9avZ.png

wxpNMg2.png

c7ajiPr.png

1qS3Ag5.png

This board supports any DC voltage from 12 - 30V, keeping the high voltage power isolated from the low voltage circuitry. A beefy power regulator keeps the microcontroller powered, and provides up to 500mAh of extra power for additional lights, screen backlights and things of the sort. There's a 20 pin expansion header through which you can get 5V power, TX/RX serial, SPI protocol for external devices, and 6 GPIO with 4 ADC. You can also read the thermocouple state, and interact with the transistor gate. You can also read the thermocouple from USB.

The heater is modulated by a large MOSFET-style transistor, which is connected to a PWM output, allowing for either normal on/off style control or sophisticated modulation. The thermocouple input has a low-pass filter on it to prevent the thermocouple leads from acting as an antenna on longer cords, making temperature detection extremely accurate. There's also three lights for status/temperature indication.

At the moment I've got it controlling a cartridge style heating element (the yihua ones @SquidgyB posted) at 250 degrees C. The rudimentary control program I have made keeps it accurate to about +- 3 degrees Celcius, and I'm working on one that is based off of @Hippie Dickie 's bud toaster algorithm.

Here's a pack with the CAD files, Bill of Materials, and a labelled diagram of the parts in it. I'm hoping to get some of these boards produced soon. I used DipTrace to make these files, it's free and great. I'm hoping to have this powering a vape as soon as possible.
 

lazylathe

Almost there...
Now that is so cool @CentiZen !!!!

This will be so much easier to use to power and control a homemade vape!!
Sign me up!!
 
lazylathe,

xRUFUSx

special like everyone else
Lurking with anticipation... the electronics stuff is a bit over my head, but with a tested elegant design and a parts list with a total between $40 and $80, I'd loose whatever sleep necessary to build it. I'm handy and not worried about the mechanical stuff.

Finding old Hakko irons is a challenge, and the new FX series irons are a little cost prohibitive, or I'd go the Hakko+SSV HC route. Also my R&D budget is zero so rolling the dice on untested cheap irons sets me back from getting the right stuff.

On some dead threads detailing alternative solder iron /HC builds, the crucial tutorial pics links are broken :bang:

This thread is basically the holy grail for me right now. Thanks for sharing your experience guys and gals.
 
xRUFUSx,
  • Like
Reactions: Egzoset

Egzoset

Banned
Salutations xRUFUSx,

I'm handy and not worried about the mechanical stuff.

Then perhaps you may like alternative solutions with less electronic hardware in them:


This one is a favourite in terms of concept, as i've never found suitable to try one myself:


It's for the Vaponic (formerly VapBong) which has a safe enough air/vapour path. This wasn't a DIY project but i find it quite inspiring...

:peace:
 
Top Bottom