DIY Induction Heater Builds and References

RedEyeFlightControl

Inventor,Maker, Pro Nerd, Entgineer, GladScientist
Manufacturer
RedEye, I would love to know, in general, what you learn about temp sensing. It's understood that implementation details might be "IP" you don't want to share.

From all the theory without details above I'm assuming that no one has seen truly functional temp sensing with a VC. I'm strong on the software side so the PID part is straightforward (there are plenty of sample libraries that can be used). The trick is the sensing, without good data you can't do anything useful...

You're right on point - the trick is getting fast, accurate reads on a vapcap. I haven't even begun to start testing the IR module yet. I'm still working on tooling and some additional setup to do anything useful with it. It will be some time before I have any results worth a damn. I fully expect to get down and dirty with it, but I don't wanna start with my eye(s) closed :) I am intrigued by the idea of the use of silicone for heat control in the heater's oven cavity. This could be suitable material for testing in conjunction with the sensor and is one of the things I'll be taking a further look into. I need to (a) bake the sensor programming and libs into my code, (b) get a suitable testing rig designed to start collecting data, (c) do a lot of math to "right-size" the implementation.

Of course, this is all on top of being able to accurately control the heater itself, too. Even if you can read the cap in 100ths or 10ths and PID tune the heater, you still need a way for the controller to accurately gauge how much power it's really putting out and where it's coasting to, to hit the desired temp and then stabilize. It's rather challenging because historically, the vapcap click relies on thermal overshoot (torch, and fast IH) to get to the proper running temp. Since we're not exceeding those temps in a controlled IH (observed), we need to be far more precise with how much power is applied for how long. And when to regulate it. And how to present that control and setting to a user in a meaningful, easy way. THEN "user harden" it.

It's not just a "read the temp and call it good" thing, there are a ton of invisible moving parts from a thermal perspective that must be accounted for and balanced on split second timing, and I think that's the real challenge. Lots of interesting projects on this floating around!
 
RedEyeFlightControl,
  • Like
Reactions: TommyDee

TommyDee

Vaporitor
I'm still struggling with just charging the batteries. The A'20 helped kick start that effort. I burned out another MT3608 boost driver. It was a fluke of sorts but it sure raan hot putting out only 1 watt. I wonder if that is a cross-talk problem that Piggy ran into. I adjusted the voltage on the driver and went poof.

This is weird as the Micro-USB is working very well in the 3-watt range. Barely warm and a current rate of between 2/3-1 amp is more than enough. I am finding that USB chargers don't do well on the 5V regulation department either. They just push out raw power and call it good. Very limited outputs.

And I fried a wall-wart that was charging my 3S pack. So we're going to get serious now. I have the 4A Boost/Buck meter/converter that uses digital control for controlling the driver. CV/CC and lots of read-back. data. I can power this with damn near anything including 2S and 3S packs of larger capacity. This will top off my A'20 and charge the FlatPack with the USB charger.

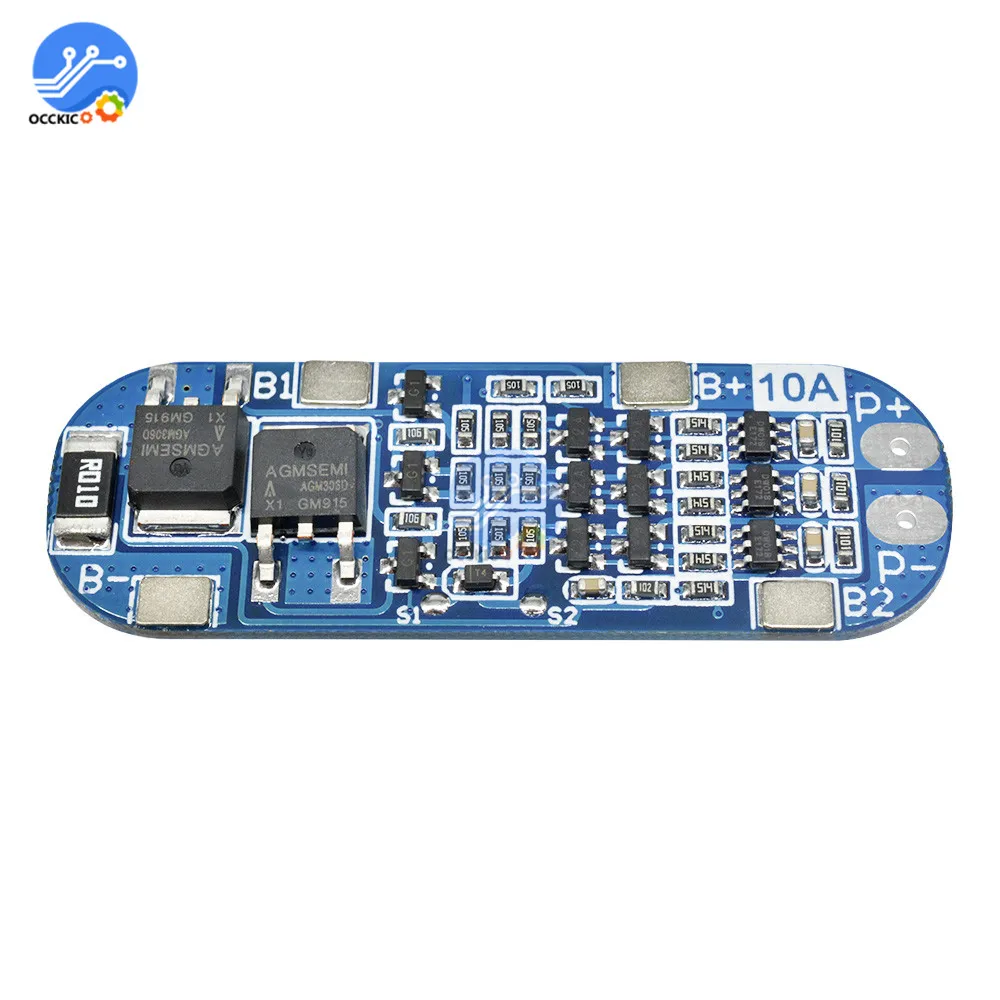
The 10A BMS appears to be working. I tripped it somehow last night and locked me out solid until I put the charger on it. I'm liking it. One more trick for the battery pack and I think that part of the design is done. I will live with the 100uA discharge across the boost driver. Definitely keep an eye out for LVD on the BMS.

I printed the newest iteration of the FlatPack. Got some tweaks to make. Still a very hot oven outperforming the A'20 significantly. If only I could tweak the coil in the A'20.
 
TommyDee,

badbee

Well-Known Member
I am intrigued by the idea of the use of silicone for heat control in the heater's oven cavity. This could be suitable material for testing in conjunction with the sensor and is one of the things I'll be taking a further look into.

What sort of heat control do you have in mind? I'm not sure I follow.

I picked up some 0.5 inch ID silicon tubing at a local home brewing store and it fits tightly into a standard ZVS coil. It works well for feeding a sensor through the side of the coil and holding it firmly. A hot cap, intentionally heated to combustion range, does not discolor or affect the silicon in any way. The cap just fits inside and the perfect centering slows down the heating just a little bit, 1 or 2 seconds (less flux linkage?). The maker of the Fluxer documents a similar behavior if you request his thicker glass insert.
 
badbee,

TommyDee

Vaporitor
20200716_120731.jpg


Today I did a little BMS work. Turns out the one I chose has a very loose familiarity with low voltage cutoff. I ran a few weak cells down to what I thought would be a good level - 8 volts and nothing. Then I caught one reading at 7.99V when it popped. Funny enough, given time, even at this low voltage, you can click the VC.

Good news is that it does pop. I was starting to think it didn't have a functioning low voltage cutoff. They are using a drop-dead of 2.5V/cell apparently. Regardless, I now knew the protection circuit should work so I tested it with the MT3608 boost converter. The lowest reading I caught on the output was 7.75V while the cell meter didn't drop below 8V. Dubious but functional. With an onboard low current drain on li-ion cells, that is not the best idea but it is the means of last resort. They only protect you from your own stupidity. Which is likely a lot of protection if you think about it. We are stoned after all!

Alright, I feel better now about the circuit. In 30 years I've only got careless once and got lucky. I plan to add a 12.6V direct charge connector as the final iteration. I'll say this for the Alpine 2020 circuit; it pops right at 9V as it should!

I also learned that you will pop this circuit if you put your fingers across the middle of the board. Annoying!

This is the BMS we're talking about -
bms-3s-Li-ion-Lithium-Battery-protectiong-board-18650-Charger-Protection-balancer-PCB-BMS-10A-Module.jpg
 
Last edited:

scy123

Trusted Member Don't Worry
If you want to just read the temps of the cap for testing and not in use purpose, thermal imagining is the way to go. Some have focusable lens that you can get pretty good macro shots if you wanted to focus on a particular part. To get something that can accurately read temps that high would require a lot of money though, also calibration and putting a high emissivity target to read the cap temp reasonably accurately (anything shiny will reflect ir)

And yea you need to use a special material for the lens which is also big bucks.

China is starting to catch onto the thermal imaging bandwagon, and I see a lot of interesting stuff they are putting out for cheapish. Might be worth looking into if you think it's a good enough investment. One funny story I just wanted to share, Flir software limits $4000 imagers to degrade the image and sells them for $1000 lol. A popular thing to do is to buy the $1000 ones and hack it to be better than (the hack adds more features) the $4000
 
Last edited:
scy123,

RustyOldNail

SEARCH for the treasure...
If you want to just read the temps of the cap for testing and not in use purpose, thermal imagining is the way to go. Some have focusable lens that you can get pretty good macro shots if you wanted to focus on a particular part. To get something that can accurately read temps that high would require a lot of money though, also calibration and putting a high emissivity target to read the cap temp reasonably accurately.

And yea you need to use a special material for the lens which is also big bucks.

China is starting to catch onto the thermal imaging bandwagon, and I see a lot of interesting stuff they are putting out for cheapish. Might be worth looking into if you think it's a good enough investment. One funny story I just wanted to share, Flir software limits $4000 imagers to degrade the image and sells them for $1000 lol. A popular thing to do is to buy the $1000 ones and hack it to be better than (the hack adds more features) the $4000

Indeed, a FLIR type thermal imager is the better choice over handheld IR guns, especially for close readings of small objects. I never mention those since I don’t own one yet, they are costly. HKJ uses a “thermal imager”, for his charger reviews, photo of it down the page here:

 
RustyOldNail,

scy123

Trusted Member Don't Worry
Yea, it's a large investment, I was planning on doing diy electrical stuff and it seems like a good idea. To get a reasonably accurate temp reading would require some tricks, but doable.

I almost had a deal on a $2000 imager for $500 brand new, the mark ups on these are insanely high, so you can find deals here and there.
 

scy123

Trusted Member Don't Worry
Yea, it's really nice to see what people can come up with sometimes. A lot of manufacturing/sales process can be underwhelming now a days.

I see a few (2 that I know of) concentrate rigs are using IH now. Don't know if it's temp sensing (probably not) but the tech seems promising if not just plain cool.

BTW was looking up on one of these IH type rigs, the Dr Dabber switch has advertising that says "The SWITCH can control power to an accuracy of .1%. It modulates the power to precisely control the temperature of the induction cups throughout the heating cycle" Might just be blowing smoke but would be interesting to know what it's really doing.

Also BTW: they also state “The patent-pending induction heating technology inside allows the device to heat to target temperature in an incredibly short amount of time.” They probably got the idea indirectly from Pipes to power vapes with induction and trying to patent it. Makes you have to think if you should share your ideas or patent it first.
 
Last edited:
scy123,
  • Like
Reactions: TommyDee

TommyDee

Vaporitor
Waiting for some more meters to come in but I thought I'd try to add a 5.5x2.1 connector to the battery pack for a quicker charge. This will also make for a nice remote battery pack for Caldron and Flix or even Apollo.

20200717_135335_1.jpg

20200717_135347.jpg


I'll work on 2 cases, one to house the pack and one to add the adjustable converter. This should be fun!
And yes, I choose 18 gauge on the connector output.
With the short runs, I'd say losses will remain minimal as compared to the connections themselves.
BMS is the fuse. Low voltage tested and definitely not sufficient. It is what it is.
And yes, for those that are wondering, there is 12V on the output of the USB.
All limitations noted, time to make use of the new pack.

----------------------------

I love it when a 3D print just works right out of the shoot.
The pack on the right, the little black one, is a 3S 18350 10A pocket pack no bigger than 1" x 2" x 3".
Once the meters get here I'll put a bezel on the front. Pretty simple case though.

Batts charging Batts!

20200717_201539.jpg


I finally found a use for the little digital boost/buck supply. This will make a perfect peak charger for the IH packs.
I can use any 2S or 3S pack or any wall wart and reliably hold the upper voltage to 12.6 volts. Full charge every time!
 
Last edited:

Edgedamage

Well-Known Member
Xbox power supply 12v output and enable. Remove connector, you will find three yellow and three black wires and one red and one blue wire. Solder the yellow wires together and do the same to the black wires. I soldered mine up to a XT60 connector. Now for the power supply enable, just connect the red and blue wires together and the power supply will start outputting voltage. This only works with the older non-slim power supplies. And they output 14.2 amps plenty of power for your induction heater builds.
odqtpizeywb51.jpg
 

badbee

Well-Known Member
While I was looking at temp sensing options I stumbled across the site for Excelitas Technologies, a sensor manufacturer, and submitted a request for more information. They took me seriously and consulted with one of their tech's to recommend a sensor for IH applications. Their suggestion looks perfect: the tpis-1t-1086-l55 is only $15 at Digikey and has a 5 degree field of view, 50 uW low power internal signal processing, I2C interface and micro controller interrupt functionality. Just thought I would share since they were so helpful.
 

scy123

Trusted Member Don't Worry
Keep in mind it will take a lot of calibration for ir for in use purpose. Shiny metals will get a lot of reflections (ie it might pick up the temps of an object nearby) and have a very low emissivity. Usually for testing purpose on shiny metals you add on a high emissivity target with a known emissivity. Also, discoloration will change the emissivity.
 
Last edited:
scy123,

RedEyeFlightControl

Inventor,Maker, Pro Nerd, Entgineer, GladScientist
Manufacturer
While I was looking at temp sensing options I stumbled across the site for Excelitas Technologies, a sensor manufacturer, and submitted a request for more information. They took me seriously and consulted with one of their tech's to recommend a sensor for IH applications. Their suggestion looks perfect: the tpis-1t-1086-l55 is only $15 at Digikey and has a 5 degree field of view, 50 uW low power internal signal processing, I2C interface and micro controller interrupt functionality. Just thought I would share since they were so helpful.

Good to see another I2C option. Very promising.
 
RedEyeFlightControl,

RustyOldNail

SEARCH for the treasure...
RustyOldNail,
  • Like
Reactions: TommyDee

TommyDee

Vaporitor
It has sparked in the past but we took care of that. I'll get the insides when we have some light.

That art was inspired to say the least, finally! That is just so hard for me to do! I am happy with how the 3D print just nailed it.
 
TommyDee,

TommyDee

Vaporitor
And for the insides of the HalfPint FlatPack arrangement;

Simplicity was the watchword. So that is an abject failure. When you look at this in the end, there is nothing simple about it... or is it?

20200726_091826.jpg

3 beads of hot glue is what holds this little experiment together. The battery case allows 3 ways of cell management;
Micro-USB, 12.6V charger, and replacement. A full 10 amp BMS solution is the protection circuit. This one has been tested on several levels and found to be lacking on several front. For my purposes, being aware enough of these things that I am okay with that. Another weird aspect to this particular BMS is that is acts like a GFI outlet in that it opens up just from touching the circuit and needs to be reset with a charger. Makes swapping cells 'interesting' and more work than should be required. But like I said, it is a protection device and it should keep things safe enough.

20200726_091923.jpg

I find this battery solution to be very welcome in this small package.

If you're looking at this and consider this too complicated, I hear you. There is an alternative in LiPo cells. These can be plugged into this type of device and can be charged remotely on a hobby charger. Absolutely worth looking at. You can also add the BMS to LiPo to make it directly chargeable. I am sure there is plenty of room for some of the higher capacity LiPo packs within this size housing.

Of course I did give up the push-switch within the coil. I never liked that much but one handed operation is a bit tougher. I'll certainly concede that notion. If I wanted to leave the VC standing in the cup, well sure. But my wooden cups scorch so no dice. The low profile in this case is my more important.

Two other important aspects to my 'personal IH' is battery status and fire enabled status. With the flaky action of the BMS, I definitely needed an 'active' or 'fire' light to be visible. I have never liked 'light-load' devices unless they are flashlights, and even then I want light in one direction. I want a subdued yet relevant signal that the unit is indeed firing. Again, based on minimalism, I utilized the on-board LED for the fire signal. It took a lot more effort to get it to show though. Now the case has enough diffusion to show the unit is firing, without letting the whole household know about it.

20200726_092013.jpg

And the final tough is a little more than one might expect. When I first stated using the IH, I was always worried about what level my cells were at. Running mostly 18650's in a remote pack, I knew the click time depended on charge level. The pack was protected for extreme low voltage, it went lower than I liked.

The various meters available are interesting. I picked up the little black meter, similar to the PSM meter, because it fit my bill. I knew I wanted it off in general so the activation switch on the meter was not only handy but it became the only on-switch in the system. Looking at the Alpine 2020, the only reason for the switch is the damn battery lights. Knowing now how important this feature is, I incorporated the switch and the lights into the case for easy access.

20200726_092020.jpg

Overall, this project has kept my VAS at bay and my claustrophobic tendencies in these days of C'19 from affecting me as much as it would have otherwise.

I look forward to finalizing the other IH modules I' ve been working on. I can tell you now though that this little FlatPack is a winner on my coffee table. The A'20 is just hanging out.
 

RedEyeFlightControl

Inventor,Maker, Pro Nerd, Entgineer, GladScientist
Manufacturer
And for the insides of the HalfPint FlatPack arrangement;

Simplicity was the watchword. So that is an abject failure. When you look at this in the end, there is nothing simple about it... or is it?

View attachment 1631

3 beads of hot glue is what holds this little experiment together. The battery case allows 3 ways of cell management;
Micro-USB, 12.6V charger, and replacement. A full 10 amp BMS solution is the protection circuit. This one has been tested on several levels and found to be lacking on several front. For my purposes, being aware enough of these things that I am okay with that. Another weird aspect to this particular BMS is that is acts like a GFI outlet in that it opens up just from touching the circuit and needs to be reset with a charger. Makes swapping cells 'interesting' and more work than should be required. But like I said, it is a protection device and it should keep things safe enough.

View attachment 1632

I find this battery solution to be very welcome in this small package.

If you're looking at this and consider this too complicated, I hear you. There is an alternative in LiPo cells. These can be plugged into this type of device and can be charged remotely on a hobby charger. Absolutely worth looking at. You can also add the BMS to LiPo to make it directly chargeable. I am sure there is plenty of room for some of the higher capacity LiPo packs within this size housing.

Of course I did give up the push-switch within the coil. I never liked that much but one handed operation is a bit tougher. I'll certainly concede that notion. If I wanted to leave the VC standing in the cup, well sure. But my wooden cups scorch so no dice. The low profile in this case is my more important.

Two other important aspects to my 'personal IH' is battery status and fire enabled status. With the flaky action of the BMS, I definitely needed an 'active' or 'fire' light to be visible. I have never liked 'light-load' devices unless they are flashlights, and even then I want light in one direction. I want a subdued yet relevant signal that the unit is indeed firing. Again, based on minimalism, I utilized the on-board LED for the fire signal. It took a lot more effort to get it to show though. Now the case has enough diffusion to show the unit is firing, without letting the whole household know about it.

View attachment 1633

And the final tough is a little more than one might expect. When I first stated using the IH, I was always worried about what level my cells were at. Running mostly 18650's in a remote pack, I knew the click time depended on charge level. The pack was protected for extreme low voltage, it went lower than I liked.

The various meters available are interesting. I picked up the little black meter, similar to the PSM meter, because it fit my bill. I knew I wanted it off in general so the activation switch on the meter was not only handy but it became the only on-switch in the system. Looking at the Alpine 2020, the only reason for the switch is the damn battery lights. Knowing now how important this feature is, I incorporated the switch and the lights into the case for easy access.

View attachment 1634

Overall, this project has kept my VAS at bay and my claustrophobic tendencies in these days of C'19 from affecting me as much as it would have otherwise.

I look forward to finalizing the other IH modules I' ve been working on. I can tell you now though that this little FlatPack is a winner on my coffee table. The A'20 is just hanging out.

Well freakin' done, my man. I love the "poor man's inlay" hahahahaha! Poor nothing, that's smart as shit! Nice trick to have for a single hotend printer and it looks wicked jazzed up!
 

RustyOldNail

SEARCH for the treasure...
Most of us know TD “talks the talk”....... :)

But .......

He “WALKS the WALK”!

While I don’t digest everything he shares, he has been the most PROLIFIC IH heater maker on the planet recently!

HATS OFF !!!
 

vapormachina

Well-Known Member
And for the insides of the HalfPint FlatPack arrangement;

Simplicity was the watchword. So that is an abject failure. When you look at this in the end, there is nothing simple about it... or is it?

View attachment 1631

3 beads of hot glue is what holds this little experiment together. The battery case allows 3 ways of cell management;
Micro-USB, 12.6V charger, and replacement. A full 10 amp BMS solution is the protection circuit. This one has been tested on several levels and found to be lacking on several front. For my purposes, being aware enough of these things that I am okay with that. Another weird aspect to this particular BMS is that is acts like a GFI outlet in that it opens up just from touching the circuit and needs to be reset with a charger. Makes swapping cells 'interesting' and more work than should be required. But like I said, it is a protection device and it should keep things safe enough.

View attachment 1632

I find this battery solution to be very welcome in this small package.

If you're looking at this and consider this too complicated, I hear you. There is an alternative in LiPo cells. These can be plugged into this type of device and can be charged remotely on a hobby charger. Absolutely worth looking at. You can also add the BMS to LiPo to make it directly chargeable. I am sure there is plenty of room for some of the higher capacity LiPo packs within this size housing.

Of course I did give up the push-switch within the coil. I never liked that much but one handed operation is a bit tougher. I'll certainly concede that notion. If I wanted to leave the VC standing in the cup, well sure. But my wooden cups scorch so no dice. The low profile in this case is my more important.

Two other important aspects to my 'personal IH' is battery status and fire enabled status. With the flaky action of the BMS, I definitely needed an 'active' or 'fire' light to be visible. I have never liked 'light-load' devices unless they are flashlights, and even then I want light in one direction. I want a subdued yet relevant signal that the unit is indeed firing. Again, based on minimalism, I utilized the on-board LED for the fire signal. It took a lot more effort to get it to show though. Now the case has enough diffusion to show the unit is firing, without letting the whole household know about it.

View attachment 1633

And the final tough is a little more than one might expect. When I first stated using the IH, I was always worried about what level my cells were at. Running mostly 18650's in a remote pack, I knew the click time depended on charge level. The pack was protected for extreme low voltage, it went lower than I liked.

The various meters available are interesting. I picked up the little black meter, similar to the PSM meter, because it fit my bill. I knew I wanted it off in general so the activation switch on the meter was not only handy but it became the only on-switch in the system. Looking at the Alpine 2020, the only reason for the switch is the damn battery lights. Knowing now how important this feature is, I incorporated the switch and the lights into the case for easy access.

View attachment 1634

Overall, this project has kept my VAS at bay and my claustrophobic tendencies in these days of C'19 from affecting me as much as it would have otherwise.

I look forward to finalizing the other IH modules I' ve been working on. I can tell you now though that this little FlatPack is a winner on my coffee table. The A'20 is just hanging out.


OMG, you are the man!

I've been waiting a long time for something like this, an IH that I can wear in my tight pants.

That device looks amazing, I honestly think you are not aware of how revolutionary this is. Almost anyone you ask about the vapcap will all say the same thing; which is probably the best vaporizer you can have but using it in public sucks. This however completely changes the rules of the game; yes, devices like The Beast certainly already exist, but we already know that conduction heating is not the most efficient thing here. This however, changes everything, I can finally have an IH that I can take with me everywhere, now I can finally turn the vapcap into an electronic device when it suits me if I am in public or in a meeting while I use it with CBD isolated by example. The Fluxer Deluxe is on the right track but you have managed to take it one step further; That 0.5cm less thickness certainly make a big difference.

I mention some ideas in case you find them interesting for future designs:

- take advantage of the empty space you have left on top of the batteries, to the left of the heater to put a place where you can deposit the ABV

- try with Lipo batteries to make it even slimmer

- shape it into a hip flask to better fit it when carrying it in your pocket (this would decrease the stability of the device when you use it on non-smooth surfaces but given the two-module manufacturing it would be easy to implement and it would give it a more elegant image plus you can even tilt the heater a little bit and make it more ergonomic)

- make the heater area hermetic so that the gases emanating from the coil do not permeate around the vapcap

I hope you don't mind me sticking my nose into your design but I've been thinking about such a device for a long time and I have a lot of crazy suggestions in my head😜
 
vapormachina,
Top Bottom