blokenoname
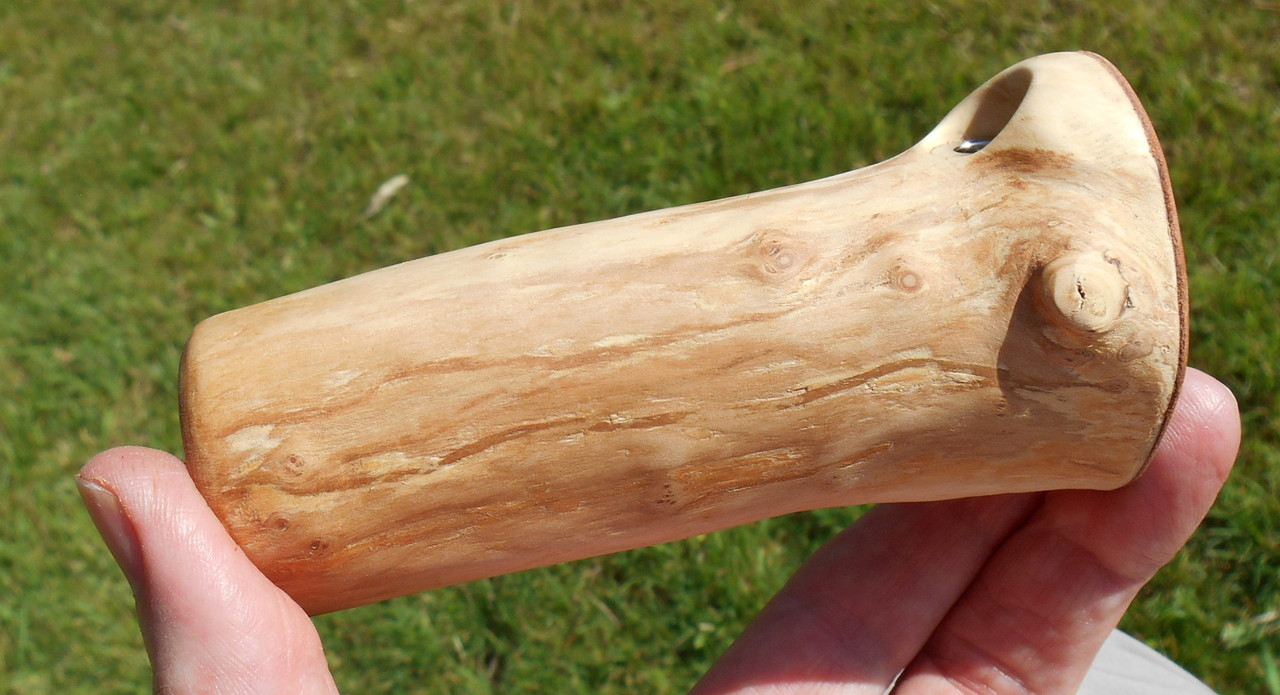
DIY Log Dabbler 😁🪵💪💨💨💨
@Abysmal Vapor
Yes. That weird thing is indeed a carbon filter But more on that below
 ")
Well, the angled glass cover concept of the 'Blowtorch Misty' has become more or less obsolete now, as the use of a 20W bulb with G4 pins allows me now to build a real Halo Misty along the lines of a typical resistor or cartridge driven log. Means, all and everything there can be done a whole order of magnitude smaller in size, than was possible with the 35W or 50W bulbs
And with that reduction in size (the air path is reduced to an inner diameter of 10mm now, which means, a much smaller air volume flowing through, needs to be heated ), comes a reduction in power necessary, to produce vapour and make this baby sing
The v3 of the Halo Misty now needs a mere 7 - 8W to produce sufficient vapor, running at 6,7V/1,2A right now. With that vastly reduced power output... 'the glow' is no longer an issue anyway. Here's what the Halo Misty (right) looks like at full vaping temps in me dimly lit cave, in comparison to 2 LED ambient light candles (left)

You can safely put the back into the drawer
And there's merely a sliver of fine mesh around the bulb and a pipe screen on top, which are more for protection of the bulb and serving to hold it in place, than dimming anything down.
@all
Ok... refined and streamlined that a bit 
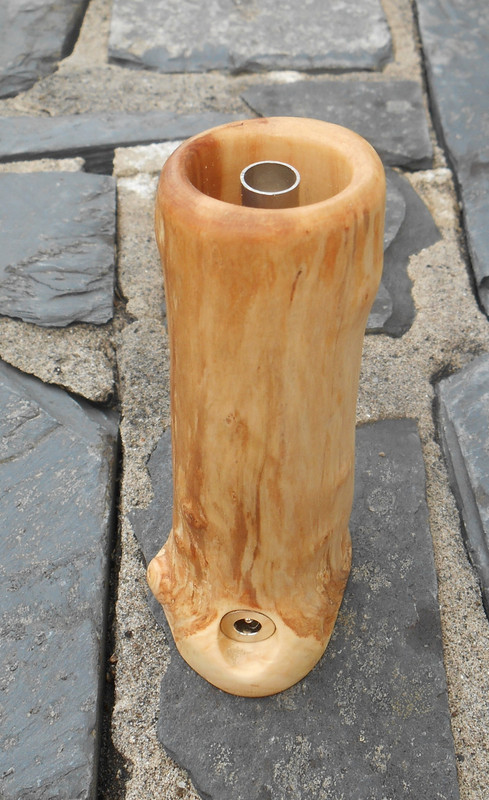
DD stem is now 10mm/7mm OD/ID (was 9mm/6mm before) and so has better airflow, comparable to the standard 8mm (~5/16") steel tips, which also feature a 7mm inner diameter. Had to machine the front end down a bit though, to fit into the 14/23 male joint
That off the shelf 14mm GonG in the pic above (actually a carbon filter) was also a bit on the clunky side. The removable bowl insert with the screen is a nice hack, to fasten a proper screen in there, but makes it a rattling affair and is also prone to breaking, as it's cut from very thin glass tubing with only 1,0mm wall thickness.
New GonG is just one of my standard 14mm GonGs, with a 10mm ID bowl and adjustable basket screen. Just gave it a fitting wider glass collar, that allows it to slip over the 14/23 joint of the Halo Misty's heater cover.
As the collar touches the heater cover's joint only at its widest point, it also reduces conduction/heat loss from the heater cover to the GonG itself, presenting a lot less surface/contact area, than the 14/23 female joint of the off the shelf adapter above, which encloses the whole cone from all sides.

For the upcoming v4 iteration of the Halo Misty, I'll also discard the 14/23 male joint for the glass heater cover, as it is more of a nuisance, than really practical.
As with the fatter 19/26 joint stems, the inner diameter of the joint itself varies widely, even with tubing coming from the same batch. Only two of the seven 14/23 stems allowed for a 9mm OD tube to enter. The rest was too narrow (8mm) or in one case, even wider
To make that work, I would constantly have to grind down stems or joints, to make them fit.
So I think it's better to just go with a straight end 13mm/10mm OD/ID glass tube for the heater cover instead, the 10mm ID of which have been strict so far in my experience.
This also allows for a much more convenient stem and GonG/WonG line up then. The straight 10mm ID glass heater cover will accept for slide in:
a) Vapcap 10mm steel and titanium tips
b) My own custom made 10mm steel tips
c) 10mm glass roasting tubes and glass tips
... and for sliding over the core and bigger loads, it'll also accept the GonG with the glass collar, I rigged up above.

ETA:
There are also various ways to go about the arrangement of the heater/bulb now:
a) You can crimp two longer pieces of appropriate stiff, blank wiring to the two G4 pins of the bulb with uninsulated butt splices and simply lead them down through the glass heater cover into the base section and directly solder them to the contacts of the DC jack there. That’s the purist ‘nothing but wood, glass, stainless steel and a bit of cork’ approach, I guess
b) You can extend the leads as above, but then set them into a fitting ceramic G4 socket, that can sit in a second cork base, situated right above the DC jack (the first cork base sitting further up in the body, holds the heater cover). 0,8mm uninsulated wiring fit perfectly into the G4 socket.
The ceramic socket itself already comes with insulated wiring, which then gets soldered to the DC jack.
This also allows for a relatively easy change of the bulb, as you just need to pull out the heater cover and then pull the bulb with its extended leads out of the G4 socket and set a new one in. Pop the glass cover back in... voila
That’s the elegant solution.
c) And then there’s the lazy man’s approach… just set the bulb directly into the ceramic G4 socket and simply stuff the whole affair, ceramic socket, insulated wiring and all, up that heater cover and be done with it. As long, as you make sure that the insulation of the wiring can cope with the heat, this works fine too. And yes… there’s also folks out there, who’d rather prefer having insulated wiring, to minimise risk of shorts and such.
So.. to each his own
Yes. That weird thing is indeed a carbon filter
But more on that below Well, the angled glass cover concept of the 'Blowtorch Misty' has become more or less obsolete now, as the use of a 20W bulb with G4 pins allows me now to build a real Halo Misty along the lines of a typical resistor or cartridge driven log. Means, all and everything there can be done a whole order of magnitude smaller in size, than was possible with the 35W or 50W bulbs
And with that reduction in size (the air path is reduced to an inner diameter of 10mm now, which means, a much smaller air volume flowing through, needs to be heated ), comes a reduction in power necessary, to produce vapour and make this baby sing
The v3 of the Halo Misty now needs a mere 7 - 8W to produce sufficient vapor, running at 6,7V/1,2A right now. With that vastly reduced power output... 'the glow' is no longer an issue anyway. Here's what the Halo Misty (right) looks like at full vaping temps in me dimly lit cave, in comparison to 2 LED ambient light candles (left)
You can safely put the
back into the drawer And there's merely a sliver of fine mesh around the bulb and a pipe screen on top, which are more for protection of the bulb and serving to hold it in place, than dimming anything down.
@all
Ok... refined and streamlined that a bit
DD stem is now 10mm/7mm OD/ID (was 9mm/6mm before) and so has better airflow, comparable to the standard 8mm (~5/16") steel tips, which also feature a 7mm inner diameter. Had to machine the front end down a bit though, to fit into the 14/23 male joint
That off the shelf 14mm GonG in the pic above (actually a carbon filter) was also a bit on the clunky side. The removable bowl insert with the screen is a nice hack, to fasten a proper screen in there, but makes it a rattling affair and is also prone to breaking, as it's cut from very thin glass tubing with only 1,0mm wall thickness.
New GonG is just one of my standard 14mm GonGs, with a 10mm ID bowl and adjustable basket screen. Just gave it a fitting wider glass collar, that allows it to slip over the 14/23 joint of the Halo Misty's heater cover.
As the collar touches the heater cover's joint only at its widest point, it also reduces conduction/heat loss from the heater cover to the GonG itself, presenting a lot less surface/contact area, than the 14/23 female joint of the off the shelf adapter above, which encloses the whole cone from all sides.
For the upcoming v4 iteration of the Halo Misty, I'll also discard the 14/23 male joint for the glass heater cover, as it is more of a nuisance, than really practical.
As with the fatter 19/26 joint stems, the inner diameter of the joint itself varies widely, even with tubing coming from the same batch. Only two of the seven 14/23 stems allowed for a 9mm OD tube to enter. The rest was too narrow (8mm) or in one case, even wider
To make that work, I would constantly have to grind down stems or joints, to make them fit.
So I think it's better to just go with a straight end 13mm/10mm OD/ID glass tube for the heater cover instead, the 10mm ID of which have been strict so far in my experience.
This also allows for a much more convenient stem and GonG/WonG line up then. The straight 10mm ID glass heater cover will accept for slide in:
a) Vapcap 10mm steel and titanium tips
b) My own custom made 10mm steel tips
c) 10mm glass roasting tubes and glass tips
... and for sliding over the core and bigger loads, it'll also accept the GonG with the glass collar, I rigged up above.
ETA:
There are also various ways to go about the arrangement of the heater/bulb now:
a) You can crimp two longer pieces of appropriate stiff, blank wiring to the two G4 pins of the bulb with uninsulated butt splices and simply lead them down through the glass heater cover into the base section and directly solder them to the contacts of the DC jack there. That’s the purist ‘nothing but wood, glass, stainless steel and a bit of cork’ approach, I guess
b) You can extend the leads as above, but then set them into a fitting ceramic G4 socket, that can sit in a second cork base, situated right above the DC jack (the first cork base sitting further up in the body, holds the heater cover). 0,8mm uninsulated wiring fit perfectly into the G4 socket.
The ceramic socket itself already comes with insulated wiring, which then gets soldered to the DC jack.
This also allows for a relatively easy change of the bulb, as you just need to pull out the heater cover and then pull the bulb with its extended leads out of the G4 socket and set a new one in. Pop the glass cover back in... voila
That’s the elegant solution.
c) And then there’s the lazy man’s approach… just set the bulb directly into the ceramic G4 socket and simply stuff the whole affair, ceramic socket, insulated wiring and all, up that heater cover and be done with it. As long, as you make sure that the insulation of the wiring can cope with the heat, this works fine too. And yes… there’s also folks out there, who’d rather prefer having insulated wiring, to minimise risk of shorts and such.
So.. to each his own
Last edited:
 Truly groundbreaking stuff
 ") .
.