
You are using an out of date browser. It may not display this or other websites correctly.
You should upgrade or use an alternative browser.
You should upgrade or use an alternative browser.
'The Misty Log' - DIY wooden Log Vaporizer
- Thread starter blokenoname
- Start date
blokenoname
DIY Log Dabbler 😁🪵💪💨💨💨
You're welcome! ") Thing is, the centering pin of the Forstner bit is dull. Doesn't cut into the wood all by itself. So the only way getting it into the wood without drilling a small enough hole beforehand, is by sheer pressure. And that's when the bit slips off center already, once you start drilling. Doesn't matter so much with the smaller sized Forstner bits, as their centering pin is smaller too and presses into the wood more easily then, but from 20mm upwards or so, drill a small enough hole beforehand.
Thing is, the centering pin of the Forstner bit is dull. Doesn't cut into the wood all by itself. So the only way getting it into the wood without drilling a small enough hole beforehand, is by sheer pressure. And that's when the bit slips off center already, once you start drilling. Doesn't matter so much with the smaller sized Forstner bits, as their centering pin is smaller too and presses into the wood more easily then, but from 20mm upwards or so, drill a small enough hole beforehand.
When I got my first set of Forstner bits from a mate, he mentioned never to drill a smaller guiding hole beforehand, as the centering pin had nothing to center on then and would go all over the place. Made sense, so I never bothered to fact check this statement. Turns out, he was only partialy right there, as far as holes with a wider diameter than the centering pin were concerned.
For centering a bore accurately with a larger size Forstner bit, a fitting guiding hole is indeed mandatory!
I just circumvented this problem by hamnering the forstner bit into the blank, before drilling, which is a rather brute force version of drilling a fitting guiding hole")
Thing is, the centering pin of the Forstner bit is dull. Doesn't cut into the wood all by itself. So the only way getting it into the wood without drilling a small enough hole beforehand, is by sheer pressure. And that's when the bit slips off center already, once you start drilling. Doesn't matter so much with the smaller sized Forstner bits, as their centering pin is smaller too and presses into the wood more easily then, but from 20mm upwards or so, drill a small enough hole beforehand.When I got my first set of Forstner bits from a mate, he mentioned never to drill a smaller guiding hole beforehand, as the centering pin had nothing to center on then and would go all over the place. Made sense, so I never bothered to fact check this statement. Turns out, he was only partialy right there, as far as holes with a wider diameter than the centering pin were concerned.
For centering a bore accurately with a larger size Forstner bit, a fitting guiding hole is indeed mandatory!
I just circumvented this problem by hamnering the forstner bit into the blank, before drilling, which is a rather brute force version of drilling a fitting guiding hole
Last edited:
blokenoname
DIY Log Dabbler 😁🪵💪💨💨💨

A rather spontaneous upgrade of me drill press, as ALDI just offered one for about € 70,- today, and as drilling went off center again with the old one, I decided, that I've had it with the old warhorse!
Clearly not exactly a quality tool, but my old one was 30 years old already and not exactly shining in the precision department to begin with

Comes with 500w; old one had only 300w. Drill chuck can take bits from 1,5mm to 13mm. Laser cross hairs make it easy to predict where the bit is going and the depths adjustment (0-55mm) is easily adjustable and more precise, than with the old one (though you have to add +5mm to the desired depth, to get it right on spot -bit of up/down play there).
Also comes with 3 pulley gears instead of just 2, which makes for 9 different speed settings (300-2410rpm), instead of only 5 (520-2610rpm).
Settled on 600rpm for now, which seems perfect for the 25mm Forstner bit so far (used 900rpm with the old one).
Did a cherry- and a maple body with it tonight, and both came out nicely centered now
Vid is in German, but it's quite self explanatory anyway.
Last edited:
Abysmal Vapor
Supersniffer 2000 - robot fart detection device
@blokenonameCongrats! I may have mentioned earlier that i am eyeing on one and I ended up ordering with laser crosshairs,was bloody 110 euro but did come with a 3 year warranty and a vise ).Brand of mine is FERM,made in NL  . I am curious about what kind of lathe did you get ?
).Brand of mine is FERM,made in NL . I am curious about what kind of lathe did you get ?
Last edited:
blokenoname
DIY Log Dabbler 😁🪵💪💨💨💨
@blokenonameCongrats! I may have mentioned earlier that i am eyeing on one and I ended up ordering with laser crosshairs,was bloody 110 euro but did come with a 3 year warranty and a vise
Great. Your new drill press is nearly identical to my old one then, apart from the laser cross hairs

This is the lathe I'll probably get. Dave/ @underdog said, it's a quilte solid mini lathe, similar to the one he started out with, though the EVS (electronic variable speed) version would probably be the better choice, but that breaks the bank, as it doubles the price tag. And as I'll also need a couple of accessories and tools to go with it, to put it to real good use, I'll settle for the non-EVS version.
Just have to wait till the beginning of next month.
https://www.recordpower.co.uk/product/dml250-cast-iron-10-mini-lathe#.XEzQXYq1Kf2
Last edited:
Abysmal Vapor
Supersniffer 2000 - robot fart detection device
The lathe looks really good . I was really suprised by the quality of the FERM,i suppose they are a really decent brand,i managed to drill with a 50mm forstner all the way in on lowest speed and it cut trough the oak without an issue. I cannot really imagine many scenarios with woodworking when one would have to use the higher speed settings.I really hope it last me a long time,cause it drained my DIY budget.. Did some market research in various countries.It really bugs me how the same instruments are much cheaper in germany and uk then here.. like 40% difference,no wonder we are the poorest in the EU,lol.. I got 60 day return period,so i am going to put it trough some heavy testing once i get my hands on more cheap material to work with..
It is really inspiration for me to see how you managed to get things going for such a short time ,i wish you great luck with the lathe work and cant way to see the shapes and styles you gonna come up with) !
Cheers !
It is really inspiration for me to see how you managed to get things going for such a short time ,i wish you great luck with the lathe work and cant way to see the shapes and styles you gonna come up with
) !Cheers !
Last edited:
blokenoname
DIY Log Dabbler 😁🪵💪💨💨💨
Don't know, if you already tried this, but usually you can save a good deal of money there by making the EU thingie work for you in cases like this! No problem for me for instance, to log in to Amazon UK with my German Amazon credentials and order directly from there. Only requirement is payment by credit card.Did some market research in various countries.It really bugs me how the same instruments are much cheaper in germany and uk then here.. like 40% difference,no wonder we are the poorest in the EU,lol
I did this often enough in the past, when ordering DVDs, as these are much cheaper in the UK, than in Germany. There was a small fee for the €/£ exchange and I payed a bit more postage, than when ordering from German Amazon, but that was rather negligible.
Some items won't ship into other countries, but those will be marked in red with a notice to that accord then.
Abysmal Vapor
Supersniffer 2000 - robot fart detection device
@blokenoname Tried first ordering from outside,but items either wont ship here or the shipping cost would add so much to the price that it would be like 90% of what is here with the kinks of having to deal with international warranty service,return shippings ,etc..
There is actually going to be an EU commission on the Double Standarts in the EU.. I saw an investigation report which clearly states that the same products in the same shops (LIDL for example) sell at a higher price here,or with smaller net weight or lower quality ingredients(for example the same babyfood contains 80% fruit in DE and here it is 55% )Many consider this pretty unfair having in mind the minimum wage here is 260.76 EUR per month,while in Germany is EUR 1,599.06 . The Mob has always been ruling the country but there was an overthrow from one power to another and in the last decade things only got worse,because they drained the country so they can secure they long reign,those are known criminals and evil overlords investigated multiple times by Interpol and such,but even the EU plays with them most of the time.For quite some time I am trying to hold my nerves and not to leave for a better place..
Anyway sorry for this mini rant ,guess i still havent had my morning vapors ...
...
Edited:
Btw just learned that one can save up to 50% of shipping costs from e-bay and amazon trough a local 3rd party companies that handle the delivery all the way to your door,but still it remains the pains of dealing with abroad warranty service.
There is actually going to be an EU commission on the Double Standarts in the EU.. I saw an investigation report which clearly states that the same products in the same shops (LIDL for example) sell at a higher price here,or with smaller net weight or lower quality ingredients(for example the same babyfood contains 80% fruit in DE and here it is 55% )Many consider this pretty unfair having in mind the minimum wage here is 260.76 EUR per month,while in Germany is EUR 1,599.06 . The Mob has always been ruling the country but there was an overthrow from one power to another and in the last decade things only got worse,because they drained the country so they can secure they long reign,those are known criminals and evil overlords investigated multiple times by Interpol and such,but even the EU plays with them most of the time.For quite some time I am trying to hold my nerves and not to leave for a better place..
Anyway sorry for this mini rant ,guess i still havent had my morning vapors
...Edited:
Btw just learned that one can save up to 50% of shipping costs from e-bay and amazon trough a local 3rd party companies that handle the delivery all the way to your door,but still it remains the pains of dealing with abroad warranty service.
Last edited:
brainiac
log wrangler
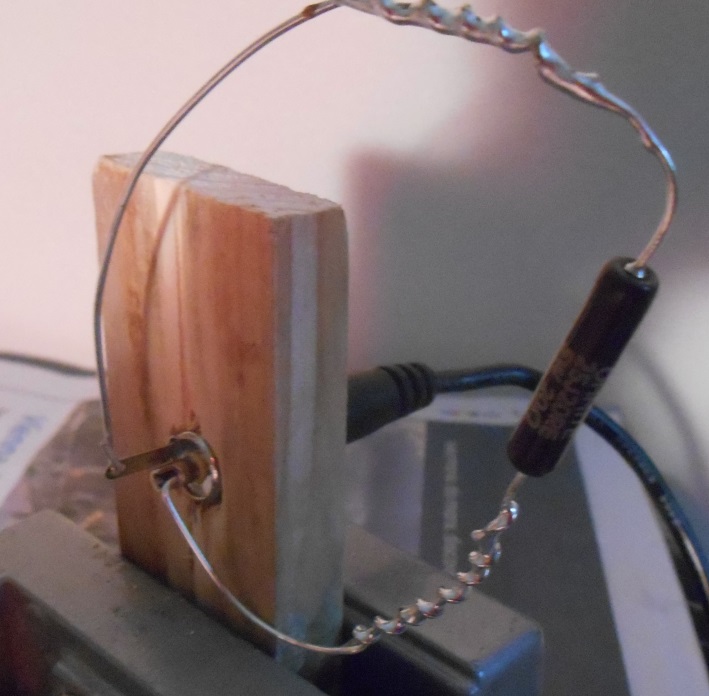
The new solder arrived so watched Tom PD's vid and a couple of others. Practiced on some spare wire
first then soldered the extension wire to the resistor.
Yet another new skill this project has taught me

It's not shown in the photo but there's now 7cm of wire on one side and 11cm on the other which
is more than enough. It's not quite the solder bloke recommended but it's the closest I could find.
Jack plug connector apperture still needs a little work.
Even when counterbored the connector's thread is still barely visible on the inside and due to the
curvature of the inner wall I can't get a nut onto it.
Options from here include chiseling a small area flat on the inner wall, finding a connector with a longer thread or going for the mousehole arrangement as per the new oak Misty. So, plenty to keep me out of mischief there, eh?
first then soldered the extension wire to the resistor.
Yet another new skill this project has taught me
It's not shown in the photo but there's now 7cm of wire on one side and 11cm on the other which
is more than enough. It's not quite the solder bloke recommended but it's the closest I could find.
Jack plug connector apperture still needs a little work.
Even when counterbored the connector's thread is still barely visible on the inside and due to the
curvature of the inner wall I can't get a nut onto it.
Options from here include chiseling a small area flat on the inner wall, finding a connector with a longer thread or going for the mousehole arrangement as per the new oak Misty. So, plenty to keep me out of mischief there, eh?
blokenoname
DIY Log Dabbler 😁🪵💪💨💨💨
@brainiac
Technically, that looks great already
Also, try to leave the longer leg as long as possible, before winding the extension around, as you've to wind the longer leg once around the resistor core, before bending it down finally. Tom just bent it straight down, for his old PD log. Winding it around the core once, helps centering the resistor within the heater cover and also creates turbulences in the air flow, which gives you much better heat dustribution, bit more draw resistance and much better vapor production
Not sure about that solder again, though. Sorry
But not your fault. Description in the ebay link doesn't make sense! What you want is high temp solder with less tin (Sn) and more copper (Cu). Sn97Cu3 means 97% tin (Sn) and 3% copper (Cu).
Link above says, it's type C99, which usually means 99,3% tin and only 0,7% copper. That's the same mid range temp solder, you had before, just thicker wire. Description reads '99C - 97% Sn (Tin)99.3% & Cu (Copper) 0.3%, which is nonsensical. Is it 97% tin or 99,3% tin? And copper content is only 0,3% here? However you add that up, never makes for a full 100%. So the seller probably got confused himsef about that, when he created the offer.
Here's the solder you need:
https://www.amazon.co.uk/Sn97Cu3-DIY-Tools/s?ie=UTF8&page=1&rh=n:79903031,k:Sn97Cu3
As for the DC jack... flattening the inside wall a bit with a file or 40/80 grit sandpaper is one optiin. Getting an M11 X 1,0 thread cutter bit and cutting threads into the wood itself is another. Then you won't need the nut. Cutting threads across the grain is no problem.
Technically, that looks great already
Also, try to leave the longer leg as long as possible, before winding the extension around, as you've to wind the longer leg once around the resistor core, before bending it down finally. Tom just bent it straight down, for his old PD log. Winding it around the core once, helps centering the resistor within the heater cover and also creates turbulences in the air flow, which gives you much better heat dustribution, bit more draw resistance and much better vapor production
Not sure about that solder again, though. Sorry
But not your fault. Description in the ebay link doesn't make sense! What you want is high temp solder with less tin (Sn) and more copper (Cu). Sn97Cu3 means 97% tin (Sn) and 3% copper (Cu).
Link above says, it's type C99, which usually means 99,3% tin and only 0,7% copper. That's the same mid range temp solder, you had before, just thicker wire. Description reads '99C - 97% Sn (Tin)99.3% & Cu (Copper) 0.3%, which is nonsensical. Is it 97% tin or 99,3% tin? And copper content is only 0,3% here? However you add that up, never makes for a full 100%. So the seller probably got confused himsef about that, when he created the offer.
Here's the solder you need:
https://www.amazon.co.uk/Sn97Cu3-DIY-Tools/s?ie=UTF8&page=1&rh=n:79903031,k:Sn97Cu3
As for the DC jack... flattening the inside wall a bit with a file or 40/80 grit sandpaper is one optiin. Getting an M11 X 1,0 thread cutter bit and cutting threads into the wood itself is another
. Then you won't need the nut. Cutting threads across the grain is no problem.
Last edited:
brainiac
log wrangler
Thanks for the info, bloke
A longer leg on one side for coiling around the resistor makes good sense. It does look bit short.
Possibly more spacing between the coils too, to make it a bit thinner?
Lucky I only bought 50cm of that solder and not a whole spool.
Thanks for the link. I'll put in an order today.
I like the idea of using a thread cutter for the connector. So would that be a 10mm drilled hole and then the M11 thread cutter? I had been hoping to simplify the job by soldering up the connector prior to its insertion into the log to avoid that last bit of tricky soldering - a PITA I think you called it, but this may just be making more work for myself in the long run.
A longer leg on one side for coiling around the resistor makes good sense. It does look bit short.
Possibly more spacing between the coils too, to make it a bit thinner?
Lucky I only bought 50cm of that solder and not a whole spool.
Thanks for the link. I'll put in an order today.
I like the idea of using a thread cutter for the connector. So would that be a 10mm drilled hole and then the M11 thread cutter? I had been hoping to simplify the job by soldering up the connector prior to its insertion into the log to avoid that last bit of tricky soldering - a PITA I think you called it
, but this may just be making more work for myself in the long run.blokenoname
DIY Log Dabbler 😁🪵💪💨💨💨
It's not so hard, soldering the heater in, once the jack is installed. Bit fiddly, yes.
And yes, 10mm hole and M11 thread cutter will do, though a 9,5mm hole is even better there, as this is even closer to the suggested core hole size for an M11 internal threading.
Re extending the leads: Tom's method up there is classy! Good, being able to do that and it probably already tought you all you need to know, about the 'how to' of soldering, as far as soldering is needed, when building a log
But make life easier for you, and simply get some butt splices, to connect the extensions. 14-16 awg should be good. Just stick the leads and extension wire in and crimp it at the mark. Then optionally add a drop of solder top and bottom, to make the connection even more stable:
https://www.amazon.co.uk/Solder-Sea...31601&sr=1-3&keywords=Butt+splice+uninsulated
Last edited:
Abysmal Vapor
Supersniffer 2000 - robot fart detection device
@blokenoname What i do when solder resistors and cartridges is to tie the two wires together like you do and wrap them in tiny gauge no flux silver solder (AG80) a ss crimp over all this and then do the crimping and apply heat with a tiny torch.I imagine the same can be done with the solder you are using too. I like this method cause silver is a bit runny and the crimp contains it it very well until it hardens.
I am using SS leads so i need a much higher gauge then you would need due to the difference in electrical conductivity,and this makes the task even harder to do if i am not using a crimp,so it is really must in such scenarios.
I am using SS leads so i need a much higher gauge then you would need due to the difference in electrical conductivity,and this makes the task even harder to do if i am not using a crimp,so it is really must in such scenarios.
Last edited:
blokenoname
DIY Log Dabbler 😁🪵💪💨💨💨
@Abysmal Vapor
That's sound advice, when using ss splices and silver solder With splices like the ones I linked to above though, you'll probably will melt the splice itself, long before the silver solder liquifies, as those splices are also just made from a tin/copper alloy, which has a lower melting point than silver
That's sound advice, when using ss splices and silver solder
With splices like the ones I linked to above though, you'll probably will melt the splice itself, long before the silver solder liquifies, as those splices are also just made from a tin/copper alloy, which has a lower melting point than silverblokenoname
DIY Log Dabbler 😁🪵💪💨💨💨
Evening
Fine tuned the DIY Mini MUSA a bit( @MUSA Vaporizer ), by centering its heater cover properly and also adding a reflector/heat shield made from 0,3mm ss sheating, to better reflect radiation heat back to the glass heater cover.
Also created a fitting dd stem with an 11 mm ss tip, for direct draw action. The tip fits quite well, although with a bit of leeway, which doesn't matter much, considering the heat output of this little 35w monster
Getting really good clouds from the dd stem with only 6v/~11w applied now , which also isn't too bright, to look into, even though I'm inly using a single, cut up ELB screen here for fine mesh, covering the bulb. Think, we can drive this mini monster sufficiently with a 20w or 15w bulb already, instead of the 35w one

Fine tuned the DIY Mini MUSA a bit( @MUSA Vaporizer ), by centering its heater cover properly and also adding a reflector/heat shield made from 0,3mm ss sheating, to better reflect radiation heat back to the glass heater cover.
Also created a fitting dd stem with an 11 mm ss tip, for direct draw action. The tip fits quite well, although with a bit of leeway, which doesn't matter much, considering the heat output of this little 35w monster
Getting really good clouds from the dd stem with only 6v/~11w applied now
, which also isn't too bright, to look into, even though I'm inly using a single, cut up ELB screen here for fine mesh, covering the bulb. Think, we can drive this mini monster sufficiently with a 20w or 15w bulb already, instead of the 35w one
Abysmal Vapor
Supersniffer 2000 - robot fart detection device
@blokenoname Looks cool ! Let me know if you get over the glowing leads issue with the smaller bulbs. Their leads are as thin as hairs. Btw i noticed that running a 35w and 50w at the same wattage gives me the same heat  +- 2 C.
+- 2 C.blokenoname
DIY Log Dabbler 😁🪵💪💨💨💨
Well, as the wattage defines the power output and the bulbs have near identical shape, size and mass, that is what I would expect, re the heat/light output, when you run them at the same wattage. That's why I'm looking for a lower wattage one, so that I can use a smaller wall wart
Re the glowing leads issue with lower wattage bulbs... you sure, you got bulbs with the correct type of socket there? The (original) MUSA uses a bulb with a bipin GY6,35 socket. The pins are uniformly 1,2-1,3mm thick with those, across the board. There are a shitload of other bipin type 12v halogen sockets however, besides this one. Maybe you just got bubs with a GX6,35 or G6,35 socket (both 0,95-1,05mm pins) or some other type? Many of those have thinner pins.
Re the glowing leads issue with lower wattage bulbs... you sure, you got bulbs with the correct type of socket there? The (original) MUSA uses a bulb with a bipin GY6,35 socket. The pins are uniformly 1,2-1,3mm thick with those, across the board. There are a shitload of other bipin type 12v halogen sockets however, besides this one. Maybe you just got bubs with a GX6,35 or G6,35 socket (both 0,95-1,05mm pins) or some other type? Many of those have thinner pins.
Last edited:
Abysmal Vapor
Supersniffer 2000 - robot fart detection device
35w and 50w have identical shape. At least osrams. They dont have 20w bulbs with this socket they got only g4 . Which brand are you using ? Btw 20mm are 10mm diameter while above 35w they are 12mm and the only think different is the wattage/coil size. Also i noticed that the thin pins are of some duller metal,not a shiny one like the >35W. Another potential issue with the tinyones is that hte pins are too close to each other..
Re; the wall wart . There is aboslutely no problem using the 50w bulb even with a 35w wall wart. My comment was pointing that there is really now difference except the max output..
BTw found some decemt chinese brand that is sold locally called Cyberlife lol, they got the 35w for 7 euro.
-------------------------------
Dimensions & weight 20w
Diameter 10.0 mm
Overall length 33.0 mm
Light center length (LCL) 22.0 mm
Length 33.0 mm
Outer bulb T10
Maximum diameter 10.0 mm
------------------------------------------------------
Dimensions & weight Above 35w
Diameter 12.0 mm
Overall length 44.0 mm
Light center length (LCL) 30.0 mm
Length 44.0 mm
Outer bulb T12
Maximum diameter 12.0 mm
Re; the wall wart . There is aboslutely no problem using the 50w bulb even with a 35w wall wart
. My comment was pointing that there is really now difference except the max output.. BTw found some decemt chinese brand that is sold locally called Cyberlife lol, they got the 35w for 7 euro
.-------------------------------
Dimensions & weight 20w
Diameter 10.0 mm
Overall length 33.0 mm
Light center length (LCL) 22.0 mm
Length 33.0 mm
Outer bulb T10
Maximum diameter 10.0 mm
------------------------------------------------------
Dimensions & weight Above 35w
Diameter 12.0 mm
Overall length 44.0 mm
Light center length (LCL) 30.0 mm
Length 44.0 mm
Outer bulb T12
Maximum diameter 12.0 mm
Last edited:
blokenoname
DIY Log Dabbler 😁🪵💪💨💨💨
Nah, then you got the wrong ones there. Down to the 20w ones, they are availiable with the GY6,35 socket and also have the same size (44/12mm) as the 35w and higher. Below 20w, you get smaller sockets.
Here is an Osram 20w GY6,35 44/12mm
https://www.amazon.de/Osram-Halogenleuchtmittel-GY6-35-STARLITE-4000h/dp/B008MTPPMY
Using the same Osram in 35w now in the DIY mini MUSA above.
Here is an Osram 20w GY6,35 44/12mm
https://www.amazon.de/Osram-Halogenleuchtmittel-GY6-35-STARLITE-4000h/dp/B008MTPPMY
Using the same Osram in 35w now in the DIY mini MUSA above.
Abysmal Vapor
Supersniffer 2000 - robot fart detection device
Thanks for clearing that thing ,i will definetly try those ! It seems that the local hardwarestore have just the Halostar series and not the Starlite which as you say 20w have the same size as the higher wattage ones. I have a whole bucket of router PSU 12v 2A, I think those will be good enough for the 20w.

blokenoname
DIY Log Dabbler 😁🪵💪💨💨💨
Yeah, that should be good with the 20w bulbs
Wanted a smaller wattage bulb, as the 35w bulb already sends my 3A wall wart into panic mode (blnking LED), drawing close to its 3A max at 12v, when directly attached without a dimmer. With a max current of only ~1,666A, the 20w one should do better there.
Wanted a smaller wattage bulb, as the 35w bulb already sends my 3A wall wart into panic mode (blnking LED), drawing close to its 3A max at 12v, when directly attached without a dimmer. With a max current of only ~1,666A, the 20w one should do better there.

blokenoname
DIY Log Dabbler 😁🪵💪💨💨💨
brainiac
log wrangler
How about...
Manfred Mann - Blinded by the Light. 1977.
"I'll turn you on son, to something strong..."
Or anything by ELO ??
A previous attempt to build a desktop vape about four years ago, sadly, did not end in success.
The heat source on that project was a halogen bulb. However, it's an idea that I'm still very keen
on and building a halogen vape is very much 'unfinished business' for me.
Bench tested a resistor today - let it run for an hour.
Seems OK but will redo the soldering when the Sn97 Cu3 arrives.
Couple of questions, bloke, if I may - how far below the debris screen should the resistor sit ideally?
And would you recommend adding an inner (8mm OD) tube to the heater cover or is the 9mm tubing enough on it's own ?
Manfred Mann - Blinded by the Light. 1977.
"I'll turn you on son, to something strong..."
Or anything by ELO ??
A previous attempt to build a desktop vape about four years ago, sadly, did not end in success.
The heat source on that project was a halogen bulb. However, it's an idea that I'm still very keen
on and building a halogen vape is very much 'unfinished business' for me.
Bench tested a resistor today - let it run for an hour.
Seems OK but will redo the soldering when the Sn97 Cu3 arrives.
Couple of questions, bloke, if I may
- how far below the debris screen should the resistor sit ideally? And would you recommend adding an inner (8mm OD) tube to the heater cover or is the 9mm tubing enough on it's own ?
blokenoname
DIY Log Dabbler 😁🪵💪💨💨💨
Well, once you've set the resistor into the ss tube, its heat intensifies, while completley uninsulated, the heat rapidly dissipates into the environment and won't get hot enough to melt the solder. Within the tube, that might change. That's why I use the high temp solder there.
About three millimeters (give/take) should be enough distance to the heater, to locate the debris screen. For the resistor I find it usually sufficient, to let the screen rest on-top of the bent over leg of the resistor, as the bend itself then defines the distance from the actual heater.
The 9mm tube is enough on it's own. I add the shorter 10mm outer tube mostly for the looks and to serve as a stop for glass dd stems/Gongs. That can also easily be accomplished by using a clipring. There seems to be a tid bit of more heat loss via conduction going on with the added outer tube, but that is negligible. Narrowing down the ID of the heater cover even more by adding an 8mm inner tube will probably add nothing to the mix and may even hinder air flow. It's also friggin narrow in there as it is and as you have to make sure, that at least one of the legs/leads does neither touch the inner wall of the heater cover, nor the other lead, to prevent short out, you don't want to reduce the ID of the 9mm tube even further.
Halo logs will be easier later on, when already having worked on a ss heater cover, as you have a much wider glass tube to work in then and do not have to worry about the leads touching the walls of the glass
Last edited: