
You are using an out of date browser. It may not display this or other websites correctly.
You should upgrade or use an alternative browser.
You should upgrade or use an alternative browser.
BaKx (heating principle) inspired desktop vape
- Thread starter CaleidosCope
- Start date
CaleidosCope
Well-Known Member
What 510 "socket" do you use?Slow start to work so with the 4mm nichrome sitting there next to the mod i decided to retry my little mod experiment.
It is so crazy to find a "processable" 510 MALE connector. The RDA options are way to big. I found one that works for me so far - not really solid. 510-soldering.
CaleidosCope
Well-Known Member
Thank you.How many watts are you pushing through ?
Also what are the ohms on it?
Gotta say the support metal work and fittings look really cool - nice work
OHMS is one of those things. The part is just a prototype. I tried to implement it beforehand with cables and crocodile clips. Unfortunately that doesn't work, I had to learn. At the moment, my heating element has something around 0.3 ohms. So first finish building, then the ohms. Like its big role model, I let 100 W loose on the heating element. After a short time and reaching the temperature, the mod regulates down. With the wrong material file and a bit of luck ... also turned another stainless steel heating element a nice blue color.
Last edited:
If i did it that way round i think i would blow my power supply! - rough calc your pushing about 20 amps so not surprised your getting it to colouring temps must be 300C? I havent pushed the dial past about 260C on mine as i can feel the heat coming off it at past 200.
The 510 connector i used was the same one a few pages back i used for the try with the stainless steel ribbon - the was an ex-coil king coil which had died so i took out the innards and used it as the connector.
With the stainless steel ribbon it was quite simple to do but with the nichrome i used some desoldering copper mesh/wire stuff covered in some shrink insulation - the bottom pin of the 510 connector comes out and with enough messing about you kind of sandwich the copper and pin so they are in electrical contact and with the insulation stopping it all touching the outer wall of the inner part of the connector - its quite a fiddle and delicate todo.
If the stainless steel is thin enough maybe you can spot weld it?
Also look at dissolving some zinc in hydrochloric acid and with a cotton bud wipe that where you want to solder on the stainless steel and it should help the solder adhere to it as it removes the oxide protective layer. tbh im avoiding using any kind of soldering near the element and sticking to mechanical connections like those screw things or crimps - if i have to i will go for some as pure silver solder i can get but that will be a nightmare to work with.
Last edited:
CaleidosCope
Well-Known Member
Spot welding...cool idea. I wanted to avoid soldering about the temps like you, thanks for the hcl reminder. The screw things clamps are a good heat insulation at least for short time... if this oven is hot for a longer time EVERITHING is hot. ")
I have now bought an M7 0.5 tap and cut the threads myself to save some space. Try to buy a M7 0.5 flat nut screw...
I have now bought an M7 0.5 tap and cut the threads myself to save some space. Try to buy a M7 0.5 flat nut screw...
If your handy with a soldering iron and the mod box doesnt play well with your coil and tube im pretty sure a pico will be able to tame that big boy.
Im going to be playing with batteries when i get back and hopefully by then the 20mm diameter tubes will have arrived so may be joining you in the high amp world.
Also one idea if the steel causing issues re un wrapping maybe blast it with a butane torch when in shape as that will help it hold it better.
CaleidosCope
Well-Known Member
That sounds really nice. Soldering is OK, my coding is bad. Assistance... please.If your handy with a soldering iron and the mod box doesnt play well with your coil and tube im pretty sure a pico will be able to tame that big boy.

My tube is still a 16mm tube, maybe that went under the radar.
Really no coding required - its all pretty much done - maybe a bit of fine tuning for your specific setup but i can tell you what line to edit or just paste here.
Will be good to see if someone else can get it all setup and running so more than happy to walk you through it - other than hardware you need a windows pc with thonny running (you dont even need to install it and can run a standalone version from a zip file)
If you have a breadboard (the white thing im currently using to proto type with and plug stuff in without it being permanent) they are cheap and you can get a little kit with a pico with headers and other things like leds, resistors etc (headers are the pin things already soldered on so you just push it into the breadboard) or if you want to wire stuff up without the bread board you get a pico without the headers.
I have got a few of each pico type so when i have a proper housing for it i will solder wires to a non header version as it will be neater.
there really are only a few components to get and wire up for the controller side
List of stuff:
Pico (with or without headers - the Pico W should be fine as well just i had no need for the vape to be online accessible via bluetooth but maybe someone does? - i suppose you could do someting re data capture and send metrics to a server if you really wanted to)
SSD1306 OLED 128x32 screen - 3 wires + 1 power + 1 ground
MAX6675 thermocouple controller (they usually come with a thermocouple as well if not then a k-type thermocouple) - 3 wires + 1 power + 1 ground
KY-040 Rotary Encoder Module (has built in switch) - 3 wires + 1 power + 1 ground
LR784/LR7843 MOS Module MOSFET Control Module (optically isolated) for heater control - 1 wire + 1 ground (get a few in case you short them - tbh most things are only a few $ each so worth getting 3-5 of them)
Active buzzer - 1 wire + 1 ground
need to also get a data usb cable for the pico not just a power one - some leds are useful to check on stuff plus multimeter etc but tbh as long as you have the above stuff and some wire to solder them all together with and a pc you should be all good.
At the moment i am powering the pico via the usb cable but when i move away from proto typing on the bread board i will use whatever power source the heater is using so will need to get some kind of dc buck/boost in place again only a few $ - not decided on a particular board but will look at what can handle 12v to >3.3v (ie 3, 2 or 1 lipo) and output the 3,3 the pico wants. i think will need to be 2 min as the mosfet needs 6v to work.
Power for the element - im currently using a mains to 12v 10 amp adaptor but will do some testing with probably 2 or 3 lipos in series - need to look at Battery Management Boards for 1, 2 or 3 batteries - they are only a few $ each so will get a few of each to mess with - until i sort the pico powering from the battery this is essentually a separate circuit being switched on/off (pwm controlled) by the mosfet module.
Last edited:
CaleidosCope
Well-Known Member
ordering process... ... come to me little picos....
I can imagine a pretty pico desktop/portable with a hardwired heater (or the 5 pin PID plug).
RotaryKnobDisplay (Aliexpress)
MosFetModule (Aliexpress). To keep the volt range. I have them in stock.
... come to me little picos....I can imagine a pretty pico desktop/portable with a hardwired heater (or the 5 pin PID plug).
RotaryKnobDisplay (Aliexpress)
MosFetModule (Aliexpress). To keep the volt range. I have them in stock.
Last edited:
ordering process...
I can imagine a pretty pico desktop/portable with a hardwired heater (or the 5 pin PID plug).
RotaryKnobDisplay (Aliexpress)
MosFetModule (Aliexpress). To keep the volt range. I have them in stock.
I would be careful with that mosfet module - it was ok with the induction heater but with the element one i had issues and killed a couple of picos because of it so switched to the optically isolated ones:
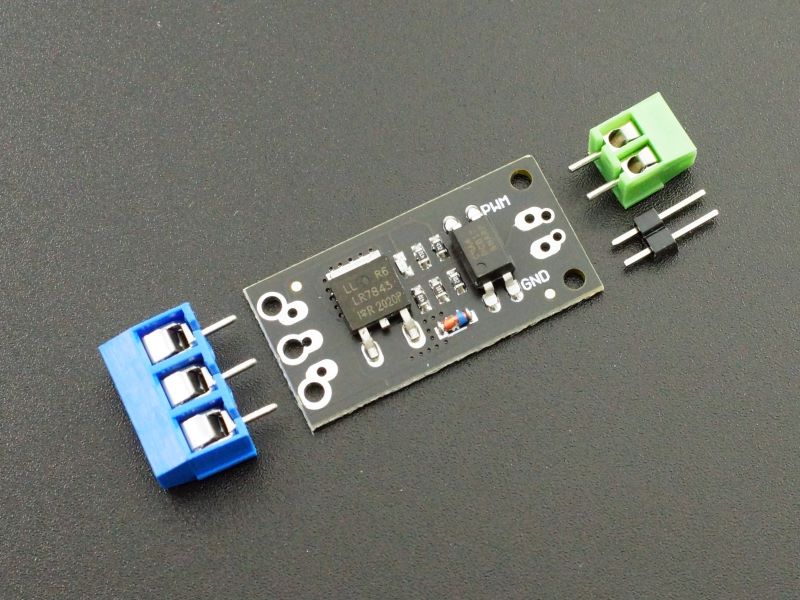
LR7843 MOSFET Control Module - ProtoSupplies
MOSFET module uses the LR7843 N-Channel logic compatible MOSFET with ultra low 3.3mΩ Rds(on) for high current low-side switching applications.
 protosupplies.com
The link to the rotary thing is maybe wrong? this is the one i am using:
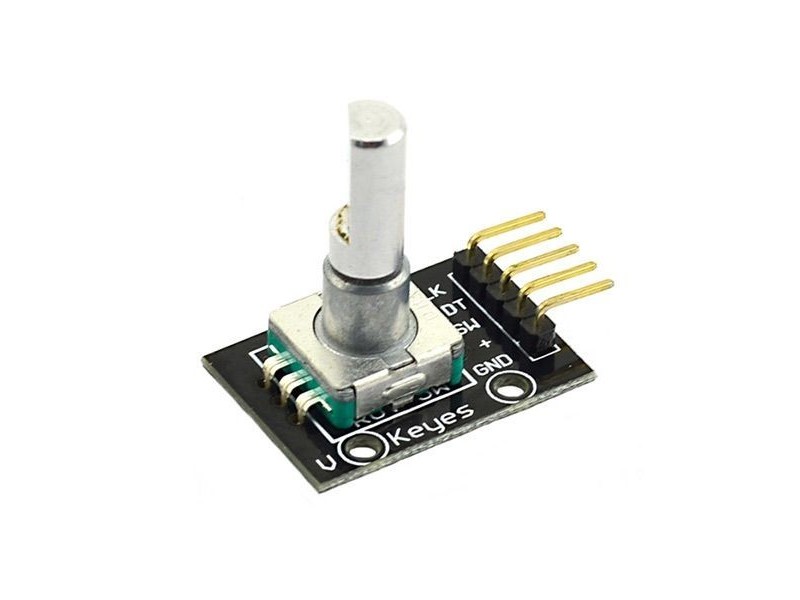
KY-040 Rotary Encoder Module
Working voltage: 5VCircle of Pulses: 20Product Code: HCMODU0063 Diagrams, Pinout and example Sketch available on our support forum.
 hobbycomponents.com
this is the screen:
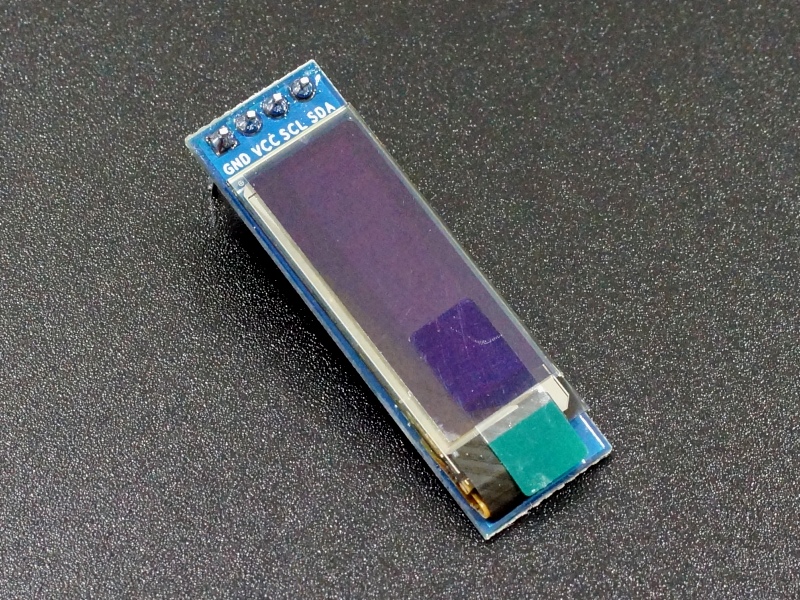
OLED 0.91" 128x32 I2C White Display - ProtoSupplies
This 0.91" OLED display has a resolution of 128 x 32 white pixels on a black background with an I2C interface for easy control by an MCU.
protosupplies.com
the thermocouple:
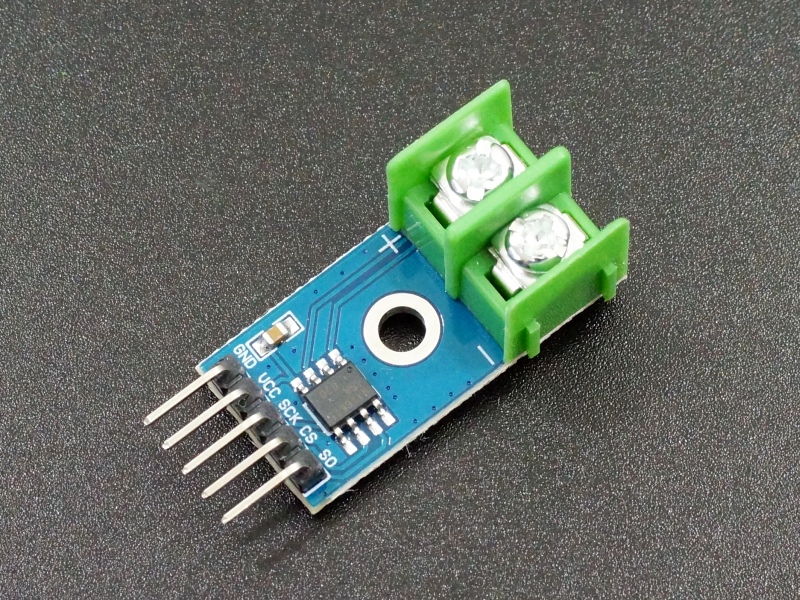
MAX6675 Thermocouple Temperature Module - ProtoSupplies
The MAX6675 Thermocouple Temperature Module is a K-Type thermocouple digital converter that has a range of 0°C up to 1024°C.
protosupplies.com
I would get a few of the actual leads as you end up messing with them to get it to stay attached - im planning on perhaps having one unit which plugs into different elements so its just simpler to leave the sensor in place and perhaps even the module but the sensor only needs the 2 contacts made as opposed to the module which needs 5.
I have been messing about with a small metal ex chewing gum box - maybe 1.5" x 3" x 0.5" - with some easy to use connectors which you connect up to what ever element you want to use. Maybe leave the mostfet module attached to the element rather than rewriting it when moving between different element/tubes setups as the pwm + ground is all you need to connect to it and is only 3.3v so can be done with some nice flexible wires compared to the power for the element.
When wiring it all up maybe add bits one at a time - the start up works through each components in this order:
LED Initialising ...
LED initialised ...
Display Initialising ...
Display initialised.
DisplayManager Initialising ...
DisplayManager initialised.
Thermocouple Initialising ...
Thermocouple initialised.
InputHandler Initialising ... <-- rotary dial
InputHandler initialised.
MenuSystem Initialising ...
MenuSystem initialised.
ElementHeater Initialising ...
ElementHeater initialised.
So if you wire stuff up in the same order and test once you have connected each bit you should be able to debug any issue as you put it together rather than try to figure out whats wrong if it doesnt work.
Cheebsy
Microbe minion
Thanks very much for this, and even more so for all the posts you're sharing. I was using the GitHub list yesterday to start to put together an Amazon shopping basket, I think I got it close but I'll check the specifics later.List of stuff:
Pico (with or without headers - the Pico W should be fine as well just i had no need for the vape to be online accessible via bluetooth but maybe someone does? - i suppose you could do someting re data capture and send metrics to a server if you really wanted to)
SSD1306 OLED 128x32 screen - 3 wires + 1 power + 1 ground
MAX6675 thermocouple controller (they usually come with a thermocouple as well if not then a k-type thermocouple) - 3 wires + 1 power + 1 ground
KY-040 Rotary Encoder Module (has built in switch) - 3 wires + 1 power + 1 ground
LR784/LR7843 MOS Module MOSFET Control Module (optically isolated) for heater control - 1 wire + 1 ground (get a few in case you short them - tbh most things are only a few $ each so worth getting 3-5 of them)
Active buzzer - 1 wire + 1 ground
I couldn't find 2mm x 0.2mm nichrome ribbon, but found some 3mm. I assume it should be ok to use seeing as @CaleidosCope has gone for 10mm.
I do plan to use the w version of the Pico, I have a smart home and triggering an automation when the device is powered or not could be useful? Something to play with in the future probably but I'm also useless with coding lol, so it could be a small waste of time and money!
@Cheebsy so glad to see other people giving it a go - the cost difference between the pico and pico w is minimal and maybe i will look at connecting it up to a network so you can get figures for graphs off it more easily than dumping to a text file and then over usb. With home automation as you press your garage door it can start the warm up! Tbh its under 30 secs from cold now with about 100w so with wider nichrome and more power sub ten secs should be easy to hit.
I think @CaleidosCope is using stainless steel and looks like its about 15mm wide for each loop and im guessing must be around 0.1 - 0.05 mm thick - going to be quite a heating unit that!
The 3mm nichrome will be fine just measure the ohms of it if you can or plug your numbers into:

 www.steam-engine.org
I have set the link up with 3mm x 0.2mm nichrome on 16mm diameter with 1 ohm resistance - you get 10 wraps with about 500mm length aound the 16mm tube.
If you look at the bottom right of the calculator there is a heat flux box - mess about with the value so the volts are at 12v and see what the wattage is - also worth seeing what you get at 6v as well - that will give you a rough idea of the power your going to be pulling
So for the 500mm length at 12v its roughly 140w and at 6v about 35w - so at that length 12v should be fine but 6v i would think will struggle to get to temps and suspect would need to be closer to the 300mm length @ 6v.
If your numbers are getting past 70w i would set the limit on the heater to about 60% to start with before scaling up.
Also if you are going to be pushing more than 10a amp (ie > 120w @ 12v) i would look at wiring up a couple of LR7843 MOSFET Control Modules in parallel rather than just use one of them - maybe one for every 100w would be sensible.
what sort of power source were you thinking for the heater part?
btw more than happy to go over a shopping list to make sure you have everything you'll need.
Just done a quick label photo of what everything is - i have some extra wires on the bread board from when messing about with other bits so its less complicated than it looks wiring wise.
While im away i will try and move the hardware pins into a hardware conf file or at least variables so its simpler to move stuff about connection wise on the pico and not have to dig through code to update the pin settings
I think @CaleidosCope is using stainless steel and looks like its about 15mm wide for each loop and im guessing must be around 0.1 - 0.05 mm thick - going to be quite a heating unit that!
The 3mm nichrome will be fine just measure the ohms of it if you can or plug your numbers into:
Coil wrapping | Steam Engine | free vaping calculators
Specialized calculator for atomizer coils. Parallel, twisted, ribbon. Returns the required length, number of wraps, performance specs, leg power loss, etc.
I have set the link up with 3mm x 0.2mm nichrome on 16mm diameter with 1 ohm resistance - you get 10 wraps with about 500mm length aound the 16mm tube.
If you look at the bottom right of the calculator there is a heat flux box - mess about with the value so the volts are at 12v and see what the wattage is - also worth seeing what you get at 6v as well - that will give you a rough idea of the power your going to be pulling
So for the 500mm length at 12v its roughly 140w and at 6v about 35w - so at that length 12v should be fine but 6v i would think will struggle to get to temps and suspect would need to be closer to the 300mm length @ 6v.
If your numbers are getting past 70w i would set the limit on the heater to about 60% to start with before scaling up.
Also if you are going to be pushing more than 10a amp (ie > 120w @ 12v) i would look at wiring up a couple of LR7843 MOSFET Control Modules in parallel rather than just use one of them - maybe one for every 100w would be sensible.
what sort of power source were you thinking for the heater part?
btw more than happy to go over a shopping list to make sure you have everything you'll need.
Just done a quick label photo of what everything is - i have some extra wires on the bread board from when messing about with other bits so its less complicated than it looks wiring wise.
While im away i will try and move the hardware pins into a hardware conf file or at least variables so its simpler to move stuff about connection wise on the pico and not have to dig through code to update the pin settings
Last edited:
CaleidosCope
Well-Known Member
It is no real secret... but took me a lot of trial and errors with material.Thanks very much for this, and even more so for all the posts you're sharing. I was using the GitHub list yesterday to start to put together an Amazon shopping basket, I think I got it close but I'll check the specifics later.
I couldn't find 2mm x 0.2mm nichrome ribbon, but found some 3mm. I assume it should be ok to use seeing as @CaleidosCope has gone for 10mm.
I do plan to use the w version of the Pico, I have a smart home and triggering an automation when the device is powered or not could be useful? Something to play with in the future probably but I'm also useless with coding lol, so it could be a small waste of time and money!
0.03X100X1000mm SSL 304 here - It is like a foil, tried to cut 10mm wide stripes got 11mm. 0,295ohms. I would post my material file, but I am still fiddling...more material test to come.
@highvaper: You can wrap it around your glas and spot weld it for the induction receiver.
Last edited:
the nichrome80 ribbon i use is: 1/8 width (approx 3mm) x 0.0113 thick (29AWG) x 12.375" long. 0.3841 ohms/ft. @ Pelican Wire Co.
Im bak and made a new version with the 4mm nichrome ribbon around a 14mm tube at about 0.4 ohms.
Also the ptfe arrived and works well under the nichrome.
Its rather rapid even when max_duty_cycle_percent is limited to 50% it pulls over 110W with the 12v adaptor and hits 200C in under 10 secs with a bit of overshoot:
The mosfet module gets a bit hot as well but im planning on using batteries with this and will just use 2 so limit to 6v.
now you're cooking!hits 200C in under 10 secs
my mosfet does not get hot - do you have control of the voltage to the gate? get it above 5v and it should run at lower Rds and lower case temp.The mosfet module gets a bit hot
do you have control of the voltage to the gate?
Nope at the moment its just getting 12v from the power supply but i have limited the pwm to a max duty cycle of 50% to keep it at about 100w - at 30% the mosfet is not getting too hot and heats up in under 20 secs.
Im not too surprised its getting hot as its only rated to 15A continuous current and is getting a bit more than that for the 10 secs when getting to the setpoint - once it hits setpoint temps it does cool down quickly - i realise im on the limit/pushing it past what its designed to handle without a heatsink.
ok, my bad - 12v gate should be plenty - i think you're right it must be the current draw. my MOSFET (FDB8832) is rated for 30V, 80A and i think the 16agw cable limits the current below that.
Yes its a smaller mosfet than yours and is ok with the 1.3 Ohm 2mm element, it uses just over 100W at a bit under 10 amps with the 12v supply. The mosfet doesnt get hot maybe a bit warm (40C or so) for the first 30 secs while it gets to the setpoint. I suppose any build needing more than 10 amps for longer than a few secs needs to add more mosfet modules in parallel or find a chunkier mosfet.
More than a few straws later - testing the smaller tube with the 4mm nichrome and i have decided i prefer the larger tube with the 2mm nichrome.
I think its due to length of tube being heated and a larger surface area being in contact with the incoming air rather than the width of the nichrome - i suspect i am getting more convection from it than i realised - the longer the heated part of the tube the more terpy it is.
With the smaller tube and element covering about 35mm length it has about 1600 mm2 surface area being heated. The larger tube and element covering about 70mm length has around 3500 mm2 surface area - ok there is a bit more of a gap between the windings but its still double the length & surface area being heated.
Also with the bigger tube there is more glass mass so more residual heat for the air passing between the outside of the straw and tube. There seems less temp fluctuation when i put a cold straw in and also inhale with the larger tube which is expected. The slower heat up time for the bigger tube isnt really an issue as its about 30 secs and retains the heat longer. If pre-heating the straw it only takes a little bit more time and heats more of the straw so you get a thicker vape as you can pack in more.
Will rebuild the smaller tube with longer 4mm nichrome ribbon so it covers 7-8cm of the tube length and see how that effects things. Also I may give a larger tube a go with the 4mm nichrome and see if there is much difference between that and the 2mm.
Very curious to see how things go with the 20mm tube + tiny mighty stem as an inner liner and then the straw inside that so the tiny mighty stem acts as a heat sink - air can flow around both sides of the tiny mighty stem + the tube + straw so there nearly double the current larger tube surface area (>5000mm2) to heat the incoming air.
Another idea is to put the material on the outside of the straw so it is in contact with the test tube wall - so expect more conduction - will allow for much larger loads but harder to clean - i have had some ideas re some kind of basket arrangement with gauze or some kind of glass disk at the bottom of the straw with holes/slits in it for airflow.
Some sketches of the ideas:
Not done much code wise or made a start at a smaller, less wires everywhere, build as unfortunately work has picked up and keeping me a bit busy at the moment.
Have made a fully wrapped version of the small tube - can only run it at 80% and its pushing just under 125w at that limit so would be over 150w if i let it rip.
Its much better having more of the tube wrapped - i think more conduction happening with the thinner tube and more of the stem touching it so when a cold straw goes in it gets hotter faster.
Only had a few tests runs with it so need more testing hrs to see how it performs - the 4mm is a bit more of a pain to get to stay wrapped - im thinking of perhaps annealing it and blasting it with a butane torch to get it to hold its shape better.
You can pack a lot in a straw when 3/4 of its heated!
After a bit more testing:
I have reduce the length of the element so about an inch of the tube worth isnt getting heated - the full length was a bit much and the straw was getting too hot higher up - it does a good job at cooling but if there is only an inch not heated it doesnt work well. Have had to dial the power back to 50% and its pulling over 100w.
Im thinking the larger tube may still be better as the smaller reacts very quickly to inhales and looses temps fast - i thought the smaller tube would allow for better airflow control but thats mostly down to how hard you pack the straw more than anything else - also if you pack more than about 50% it gets pretty tight unless you do a double screen thing with 2 small loads separated by a screen.
Also im beginning to think under 1.2 ohm element may just be too aggressive (at least with 12v) and anything pulling more than 100w is just too much with the smaller diameter tubes.
Last edited:
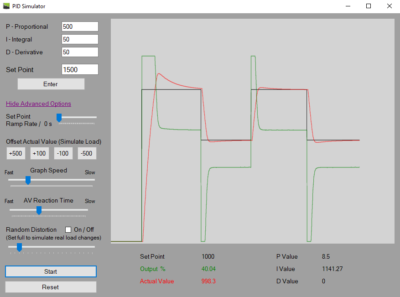
Well i have spent most of the day tuning the PID - i was a bit confused as to why the temps were fluctuating so much like +-5 from the setpoint and was sure it should be better - initially i had just used the defaults for the PID so basically just the P part was actually being used.
So after a dive into a rabbit hole of trying to auto tune it based on the setpoint i finally gave up just started from scratch and followed:
 pidexplained.com
It took a while to get a decent set of values for the 2mm nichrome and large tube as you have to wait for things to cool before trying each change. A lot of the time taken was trying to chase down an oddity which was caused by a bug when the session ended and a new one started - the pid was still producing a > 0 power even when the setpoint had been reached so the temps just kept rising with the power backing off really slowly - eventually i figured out that it was to do with the pid stats needing to be reset at the start of each session as the "off" time was still being taking into account when doing the calculations but only became apparent when the Integral was > 0.
For my notes this seems to work pretty well
tunings = 0.48, 0.006, 0.0001
Not too much of an overshoot from initial cold startup and holds around 1-2C from the setpoint once it has settled.
I dont think it will be too much of a pain to tune new setups now and suspect i may need to adjust the tunings for the same setup if i use a 6v supply instead of the 12v.
Repo updated with the bug fix.
So after a dive into a rabbit hole of trying to auto tune it based on the setpoint i finally gave up just started from scratch and followed:
How to Tune a PID Controller • PID Explained
The complete guide for PID controller tuning. Setting up a PID controller from scratch or tuning in the field. Proportional Integral Derivative control.
It took a while to get a decent set of values for the 2mm nichrome and large tube as you have to wait for things to cool before trying each change. A lot of the time taken was trying to chase down an oddity which was caused by a bug when the session ended and a new one started - the pid was still producing a > 0 power even when the setpoint had been reached so the temps just kept rising with the power backing off really slowly - eventually i figured out that it was to do with the pid stats needing to be reset at the start of each session as the "off" time was still being taking into account when doing the calculations but only became apparent when the Integral was > 0.
For my notes this seems to work pretty well
tunings = 0.48, 0.006, 0.0001
Not too much of an overshoot from initial cold startup and holds around 1-2C from the setpoint once it has settled.
I dont think it will be too much of a pain to tune new setups now and suspect i may need to adjust the tunings for the same setup if i use a 6v supply instead of the 12v.
Repo updated with the bug fix.
Last edited:
i had trouble tuning the PID also. i found that it was very sensitive to being over controlled with too much swing over/under setpoint. i tried to use an algorithm to calculate the duty cycle for the PWM but the PIC 12F683 has very primitive add/sub with no carry or borrow. so i resorted to a table lookup to get the PID parameter adjustment to the duty cycle. and smaller values work best. i have two sets of tables - one set for temp > setpoint and one set for temp < setpoint. the heater adds 25°F per second and loses 2°F per second when heater is off.
a problem i have is that after 2 minutes of run time, the temp drops to a new stable setpoint. i think the MAX6675 is getting too hot - it is very close to the heater coil (opposite side of the pcb), and i think that would cause the reading to the PIC to be too high, so the actual temp drops. i am going to try to heat sink the MAX to see if that helps the cold junction compensation - next time i get into the shop.
a problem i have is that after 2 minutes of run time, the temp drops to a new stable setpoint. i think the MAX6675 is getting too hot - it is very close to the heater coil (opposite side of the pcb), and i think that would cause the reading to the PIC to be too high, so the actual temp drops. i am going to try to heat sink the MAX to see if that helps the cold junction compensation - next time i get into the shop.
Yes im finding it hard to get spot on - its very sensitive - if i put a cold glass straw in it reacts slightly differently to a hot one
I have decided to tune it without any straw in and is ok when i then add the straw but seems to settle a degree under the setpoint until the straw gets hot
Im actually not too fussed about the exact temperature more the fact it holds a temperature constantly - the temp is at the probe so not exactly the same temp as the stuff in the straw but being able to slowly dial up the temp and taste / feel the vapour as it happens is what im after.
It reacts pretty quickly and holds the temps pretty well when inhaling - obviously it depends on how packed/hot the straw is and how hard you pull - at 200C with a fairly decent pull i cant knock it down to about 193C before it starts to fight back - if the straw is hot i cant really overpower it by more than a few C. A lot better than the mighty+ which just a normal inhale cools it down way too much and with a hot straw i think would keep up with beast mode on the tm2
that is my approach also. the temp in the vial is about 50°F below setpoint until the draw starts, then it is at setpoint within a few seconds.Im actually not too fussed about the exact temperature more the fact it holds a temperature constantly
spouse got a mighty recently and it goes +5/-2 as how it maintains the setpoint. not very well tuned, and pretty slow to reach setpoint from startup.