
You are using an out of date browser. It may not display this or other websites correctly.
You should upgrade or use an alternative browser.
You should upgrade or use an alternative browser.
PanicFreak
Theo
the zapbubbler can be used with any log vape, just requires a 14 mm sized stem which is pretty much standard on all the log vapes...i am 98 percent sure it would work some way or another....
max
Out to lunch
I did the weighing and averaging years ago (a .01g scale is a must, and you still have to weigh out at least 5-10 bowls and take an average), with the original PD bowl, and found that the range was between .02g and about .06g, depending on whether it was packed loose or tight, and whether the grind was fine or coarse. After that the PD bowl became a little longer, and the CRZ bowl is equally long and a little wider. So I'd say the range now is probably .04g to .07 or .08g, again depending on the pack and the grind consistency. Since the orginal PD bowl could be crammed with as much as .07g, I'd say it's likely you could load as much as .1g in the CRZ, with powdery herb and a tight pack. The air flow would be poor though, so that's not really a realistic bowl load.In my experience it was .03-.04. i used to have a scale that did hundredths(.01), so i would weigh up one tenth of a gram(.1) and see how many bowls it was, usually 2.5 - 3 stem loads. i found this worked better then trying to weigh an individual stem load, as the scale doesnt work very well with only a couple hundredths. but of course it will vary with different buds.
edit: forgot to add this is with an older brass zap, may be different with the new zaps, i dont know ive never seen one. hope this helps.
I agree that the Spartan is worth the extra $. You'll get a finer tune and better stability on the set voltage.SD_haze said:Now to decide between the stealth or the spartan
Phizix
Well-Known Member
Just ordered a silver spartan... Can't wait to get back up in the higher temps...
I swear the first day it was really hot here this year I could tell there was a drop in the temp of my vapes due to the power grid. I usually have one on the 12vdc and one on the 13.5vdc and when my second 13.5v adapter suddenly died I was left wanting more/fuller heat.
I've had terrible luck with the jameco power supplies.
4 out of the 6 jameco adapters I have no longer function. 2 were 12v and 2 were 13.5v.
3 were basically D.O.A (either only partial heat or none at all) and my last 13.5v just crapped out on me after less than a year. I know the wiring loosens/breaks but that is just ridiculous. Quality control must be non-existent.
The only regular adapters I have left are a 12vac and a 12vdc that I got from Rick, all the ones ordered from actual jameco were duds.
GOOOOOOOO SPARTANS!
SD_haze
Well-Known Member
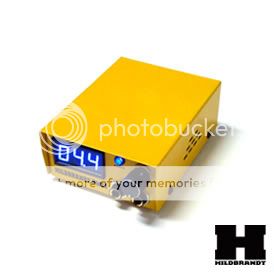
I was looking more closely at the two colors of the spartan and noticed a semi-functional difference.
The camero yellow has vents on the side, while the stainless steel doesn't appear to have any on the sides or the back (the extra pictures on the tattoo machine website has a back-view of the SS spartan)
It looks like it's more than just for aesthetics, but its possible that's all it could be. Vents seem like a good thing, but I guess dust might accumulate more over time if there were open holes for it to fly in.
Rick
Zapman
SD_haze, good spot on the vents. I think they all need some vents to keep the heat down.
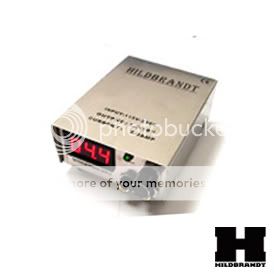
The new batch of brushed Stainless Spartans I received looks exactly the same on the outside as the yellow version. It has the same slits in the sides as the yellow and has no writing of any kind on the top. They are for sure nice to look at, more so than the pic above with all the writing on top. The blue voltage readout has a diffused like cover so the numbers are not too sharp to look at.
They are beginning to move now that I have a factory looking cord to go with them.
Been slow here getting back to the photo shop lately. I'll get some shots of the new cord and the different look of the SS Spartans we have in stock in the next day or two.
The Spartans also have to ship at 3 pounds. The Stealths make a 2 pound shipment. The main difference between the two is aesthetics and the ten turn dial on the Spartan plus the Spartan is heavier. We have seen excellent performance results with with both models.
I think fixed voltage unregulated wall transformers will gradually be replaced with some good variable voltage DC power supplies for all log vapes over time. The difference in performance is very real. One lousy volt difference in input makes a big vapor difference.
u bwade wunner
Well-Known Member
Can the zapbubbler be used on an underdog?
My first post here.This is a special thread to post on.If i can say it.i feel special privelidge posting here for the first time.
I would love to use ZapBub with my toasty top when it arrives.I haven t as yet seen real close up video of the diffuser of the zapbub.would someone post one maybe?
the supplied zapbubbler 5/16 adapter should drop straight into the heat port of the Hi and Toasty top.
all credit it too you Rick for having the guts to make such a curvy glass piece.Has love written all over it.
Rick
Zapman
u bwade, thanks for your first post on the Zap thread. You will have to contact Alan of TT/HI to be sure the Zapubler will fit the TT heatport with our included 14 mm GonG short stem. We use 5/16" OD stainless steel tubing for the vapor stem tips. The 14 mm GonG fitting at the bottom of our Zapubler does make it functional for many different vapes, not just log vapes.
Or maybe someone around here knows for sure how it will fit the TT?
Or maybe someone around here knows for sure how it will fit the TT?
TheDudeNextDoor
Abiding
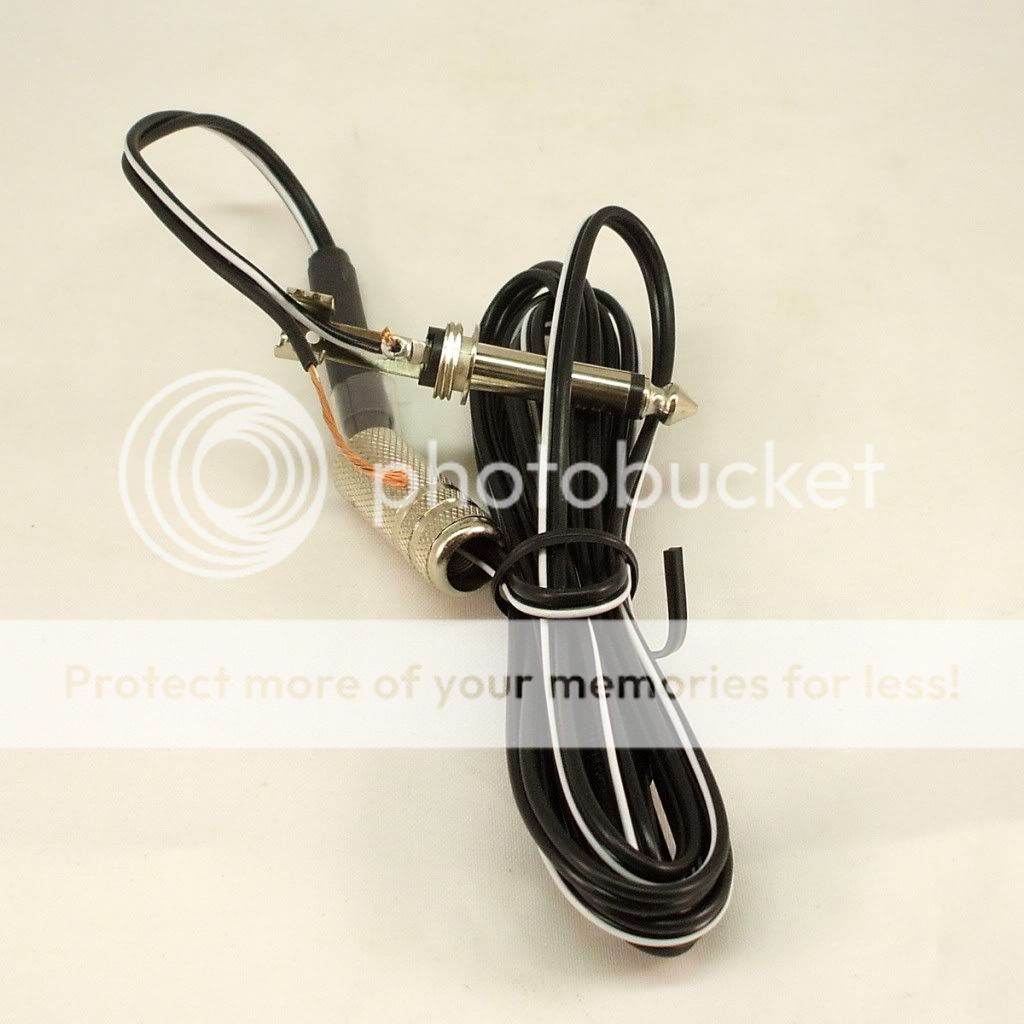
I am having a problem keeping the heavier wires into the vvps plug. This started with happen after a couple days use. Rick should I just try and screw down as hard as humanly possible to get the wires top stay? I remember having this issue with the original wires, but because they weren't so heavy the issue wasn't as bad. Picture of my problem:

Also if those wires touch is there a spark worry?
A full review will come when I can.

Hey, I can field this one also since I have had the same issues. First, no worries about being shocked. I had the same concern and decided to just find out and got my fingers all over those wires with no jolts.
As for the fraying, this will be constant problem with the first run of wires. The issue is that by picking up and setting down the zap, especially if you are using glass where you are turning it upside down and rightside up again, the cord is getting twisted and turned and pulled and pushed, and those wires will start to fray.
Easy fix. Get you a small screwdriver like the one you use for eyeglasses. Remove the wires from the plug. Cut and strip about .5" of wire if it has weakened at the connection (looks like you will need to) to expose new, strong wire. Roll each end to wrap around wires around themselves. Now bend the exposed wire back on itself in a V shape and push into the correct port. While holding V'd wire snugly into port, tighten screw well.
This will still fray over time, so you will need to repeat the process, but this will strengthen the wire quite a bit and keep you from having to do it all the time.
It's really pretty easy. Good luck!
collegerower
Well-Known Member
Thanks for the tip Dude!


Rick
Zapman
Thanks for the vid Stu. Those Redwoods do crank out the vapor.
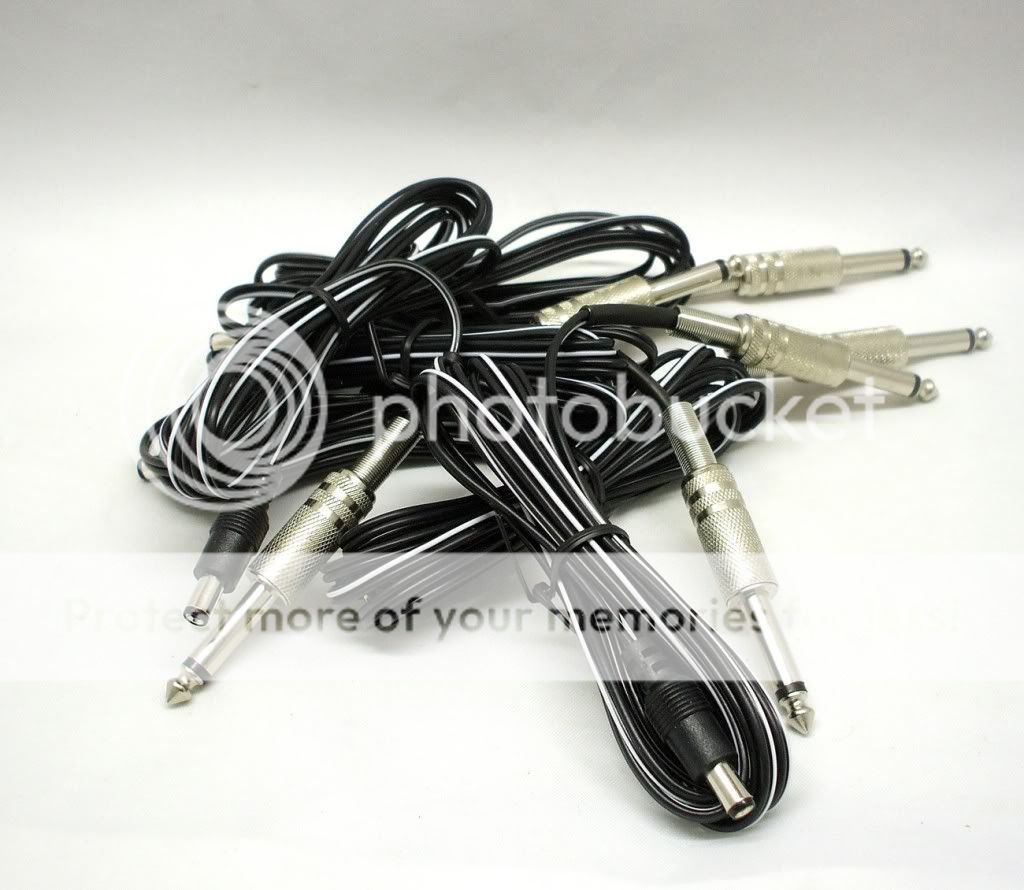
Finally a few pics of the new VV Power cord.
Step 1, solder hot wire to positive terminal of plug.
Step 2, install heat shrink over power wire, clamp ground wire in end clamp(ground).
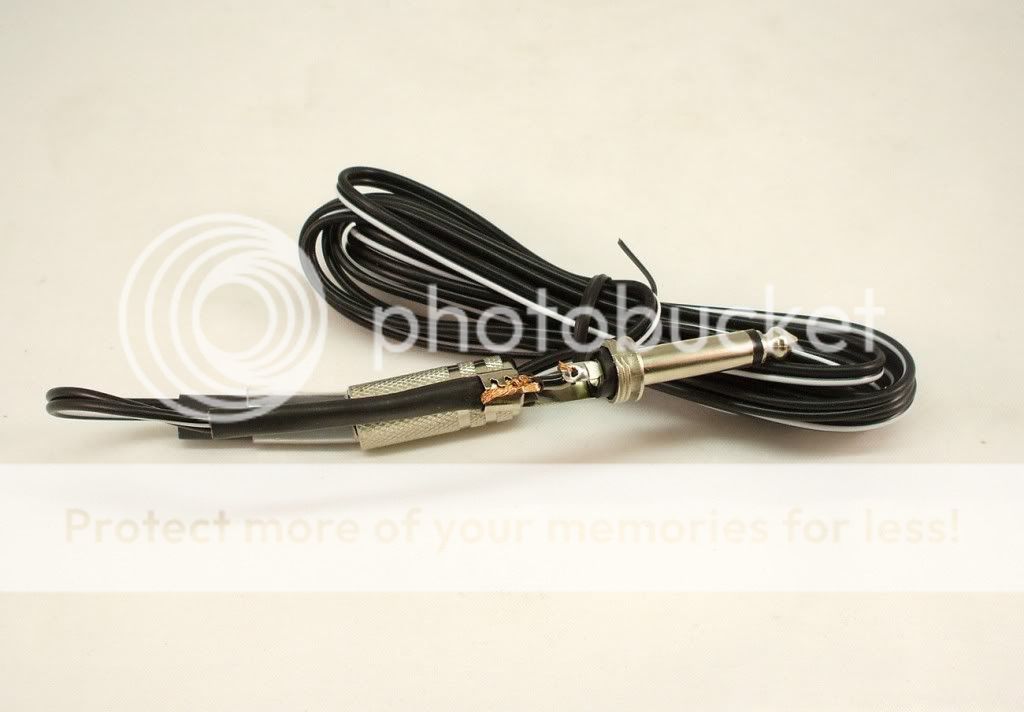
Step 3, install second heat shrink tubing over entire plug internal assembly.
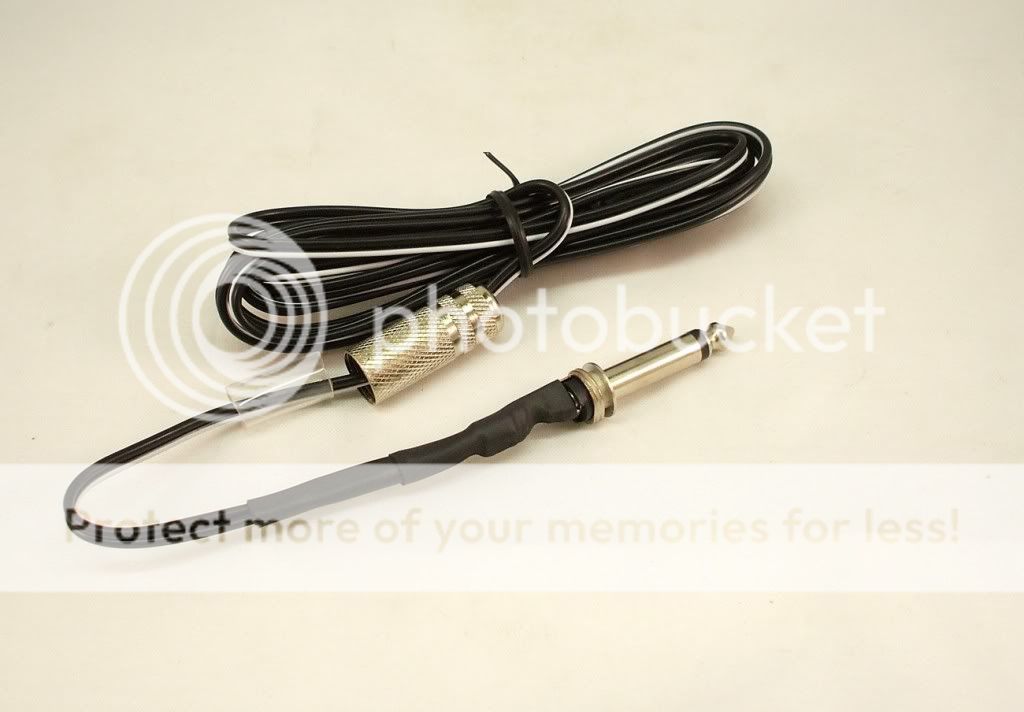
Step 4, install factory insulating tubing and screw cover on plug. Done.
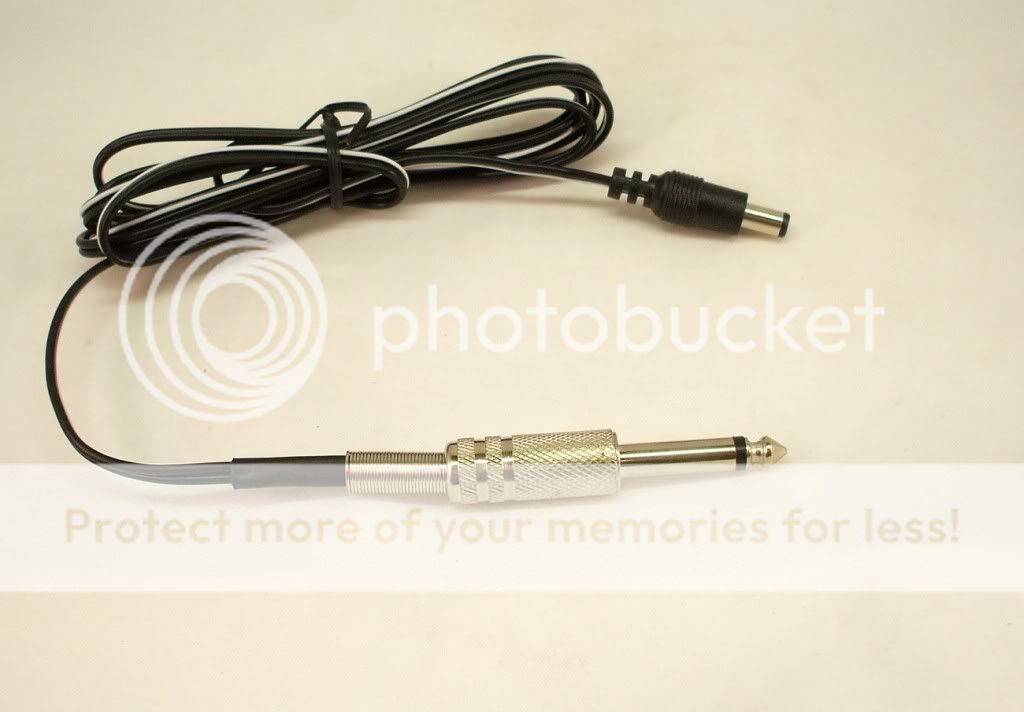
A bunch completed. Note the factory installed Zap plug for both trouble free ends on this power cord.
Finally a few pics of the new VV Power cord.
Step 1, solder hot wire to positive terminal of plug.
Step 2, install heat shrink over power wire, clamp ground wire in end clamp(ground).
Step 3, install second heat shrink tubing over entire plug internal assembly.
Step 4, install factory insulating tubing and screw cover on plug. Done.
A bunch completed. Note the factory installed Zap plug for both trouble free ends on this power cord.
TheDudeNextDoor
Abiding
Very nice! I definitely like the factory zap plug. That should hold up nicely.
collegerower
Well-Known Member
I was just going to show off how sweet this new style plug was, and Rick beat me to it! It is not nearly as thick and heavy as the original white wire was. Muuuuuuuuuuuuch better. I am now loving this VV PS much more than before!
Thanks again Rick.
Thanks again Rick.
SD_haze
Well-Known Member
Thanks for the vid Stu. Those Redwoods do crank out the vapor.
Finally a few pics of the new VV Power cord.
Step 1, solder hot wire to positive terminal of plug.
Step 2, install heat shrink over power wire, clamp ground wire in end clamp(ground).
Step 3, install second heat shrink tubing over entire plug internal assembly.
Step 4, install factory insulating tubing and screw cover on plug. Done.
A bunch completed. Note the factory installed Zap plug for both trouble free ends on this power cord.
To clarify, since there's two input holes on the tattoo VVPS, and the power cord only has one end, is there an additional insert that is just plugged into the 2nd hole during use?
Rick
Zapman
SD_haze, yes there is an additional "insert" we provide. The second port needs a switch to turn the power port on. We provide a small metal tube with a back plastic tube cap for that purpose. Plug it in to the second port and the power port is turned on. We leave it in place all the time as the power supplies have an on/off switch on the back of the unit.
Glad you are happy with your new power cord, collegerower.
Glad you are happy with your new power cord, collegerower.
johnny_jungle
Well-Known Member
Hi.
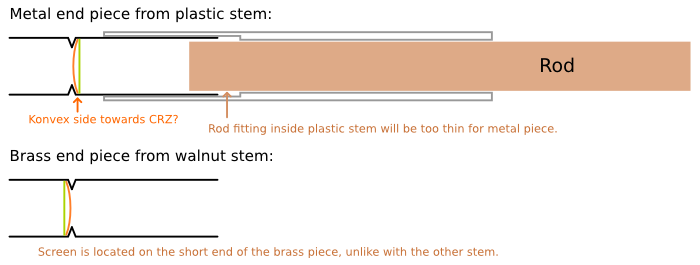
So I got a Rockzap from Blisssville a few months ago and I'm loving it. I got two stems, one is the standard white plastic stem with a steel end piece, the other one is a walnut stem with a brass end piece. I tried the walnut stem only once and didn't like it because it adds a lot of taste/smell to the vapor, probably from the wood glazing. So I kept using the regular stem, but it got clogged more and more, even though I cleaned it out using a brush after every use.
To clean it, I dipped the tip it into cleaning alcohol for a while, which cleaned out a good deal of gunk. Then I tried scraping some more stuff out at which point I accidentally dislodged the screen. So I removed it and cleaned it in alcohol as well. Everything's nice and shiny now. Problem is, I can't seem to get the screen retaining clip to hold in place. I'm using a metal rod which is perfectly flat at the end and which fits snuggly into the plastic stem to push the retaining spring towards the screen. But no matter what I try, the screen sits somewhat loose, i.e. I can shake the stem and hear the screen move about. The problem here is really that the plastic stem is more narrow than the metal end piece, i.e. the rod I use fits snuggly into the plastic stem but the metal piece is clearly a little bit wider.
Then I had a look at the brass stem. Clearly, the mesh is thinner on the brass stem (which is nice) but unfortunaltely, the brass stem end piece (which is detachable) doesn't fit on the plastic stem metal end piece. In any case, I have a few questions:
1) Which way should the screen be facing? Should the convex face point towards the mouth end or the CRZ end? I forgot to take note of this when I dislodged the screen.
2) Is there some way to get the retaining clip to hold in place? I've seen the 'official screen replacement tool' but that's just a rod as well. It wouldn't fit any better through the narrow plastic stem and then widen once it's through to fit better inside the metal end piece.
3) Regaring the detachable brass end piece, which way should it be pointing? I was somewhat confused to find that the screen and retaining spring on the brass end piece seem to point toward the bud/CRZ, unlike with the metal end piece from the plastic stem, where the screen and retaining spring point towards the mouth. Is this correct? Of course I can turn the brass end piece around 180° but then the 'bud chamber' becomes quite large.
Okay so it might not be clear what I'm talking about, so I made a little drawing...
Please advise") Thanks!
Thanks!
So I got a Rockzap from Blisssville a few months ago and I'm loving it. I got two stems, one is the standard white plastic stem with a steel end piece, the other one is a walnut stem with a brass end piece. I tried the walnut stem only once and didn't like it because it adds a lot of taste/smell to the vapor, probably from the wood glazing. So I kept using the regular stem, but it got clogged more and more, even though I cleaned it out using a brush after every use.
To clean it, I dipped the tip it into cleaning alcohol for a while, which cleaned out a good deal of gunk. Then I tried scraping some more stuff out at which point I accidentally dislodged the screen. So I removed it and cleaned it in alcohol as well. Everything's nice and shiny now. Problem is, I can't seem to get the screen retaining clip to hold in place. I'm using a metal rod which is perfectly flat at the end and which fits snuggly into the plastic stem to push the retaining spring towards the screen. But no matter what I try, the screen sits somewhat loose, i.e. I can shake the stem and hear the screen move about. The problem here is really that the plastic stem is more narrow than the metal end piece, i.e. the rod I use fits snuggly into the plastic stem but the metal piece is clearly a little bit wider.
Then I had a look at the brass stem. Clearly, the mesh is thinner on the brass stem (which is nice) but unfortunaltely, the brass stem end piece (which is detachable) doesn't fit on the plastic stem metal end piece. In any case, I have a few questions:
1) Which way should the screen be facing? Should the convex face point towards the mouth end or the CRZ end? I forgot to take note of this when I dislodged the screen.
2) Is there some way to get the retaining clip to hold in place? I've seen the 'official screen replacement tool' but that's just a rod as well. It wouldn't fit any better through the narrow plastic stem and then widen once it's through to fit better inside the metal end piece.
3) Regaring the detachable brass end piece, which way should it be pointing? I was somewhat confused to find that the screen and retaining spring on the brass end piece seem to point toward the bud/CRZ, unlike with the metal end piece from the plastic stem, where the screen and retaining spring point towards the mouth. Is this correct? Of course I can turn the brass end piece around 180° but then the 'bud chamber' becomes quite large.
Okay so it might not be clear what I'm talking about, so I made a little drawing...
Please advise
Thanks!momofthegoons
vapor accessory addict
You were right johnny, the longer end of the brass insert goes into the stem. The smaller end is your bowl.
It sounds as if you have one of the original size screens if it's a little loose. Rick has started making them a bit bigger in diameter. Shoot him an email and I'm sure he'll get you squared away.
I have found it isn't necessary to use the retaining clip with the new size screens. They fit in nice and snug. And, I don't think it really matters which way the screen is facing, although it seems to me that the convex face would go towards the mouth end.
Rick
Zapman
johnny, thank you for your thorough explanation of problems you are having replacing the screen in your stock nylon stem. Nice drawing of the screen/stem thing too.
We do not make the Walnut stem. That comes from Ed of Eds TNT. I cannot help on that one which you do not like anyway.
Our screens have been the same mesh for 11 years. Finer mesh screens, if found in Zap stems, come from someone else.
I can say we do install the screens on the back side of the stem tip but that is only possible because we install the screen in the tip BEFORE installing the tip in the nylon handle. When replacing a screen, it must be installed from the front end for the reason you stated, that being the inside diameter of the nylon is slightly SMALLER than the inside diameter of the stem tip. So install the replacement screen from the tip(bud) end. Spread the ends of the clip apart slightly so it will stay secure in the stem tip. Screen goes against the crimp, then retaining ring goes in to hold the screen against the crimp. Your "ramrod" technique is the correct way to install a screen and clip.
Having said all that, send me an Email(zapman@aromazap.com) and I will send you more screens, clips and another stock stem. When we started the gig with Blisssville, we included two stock stems with each Zap we sold. Blisssville apparently started substituting a wood stem for one of the stock stems. We think folks should have at least two stock stems with a Zap kit so there will always be an extra if needed as in your case.
Good time to mention we are ending any wholesale Zaps. The plan did not work for many reasons, mainly our older age and me not wanting give "the big time" the proper effort due to all of the other gigs we have going around here.
Life is the book of changes.
johnny_jungle
Well-Known Member
Ah, I wasn't aware of that.johnny, thank you for your thorough explanation of problems you are having replacing the screen in your stock nylon stem. Nice drawing of the screen/stem thing too.
We do not make the Walnut stem. That comes from Ed of Eds TNT. I cannot help on that one which you do not like anyway.
Allright, I'll do that. It didn't occur to me to try this, but of course it makes sense.When replacing a screen, it must be installed from the front end for the reason you stated
Well thank you for the kind offer. I had ordered from Blisssville only because you don't ship to Europe, where I live. Does your offer for another stem still stand? If yes, I'll send you an Email.Having said all that, send me an Email(zapman@aromazap.com) and I will send you more screens, clips and another stock stem. When we started the gig with Blisssville, we included two stock stems with each Zap we sold. Blisssville apparently started substituting a wood stem for one of the stock stems. We think folks should have at least two stock stems with a Zap kit so there will always be an extra if needed as in your case.
Thanks for the quick advice!
johnny_jungle
Well-Known Member
Thanks Rick, I really appreciate it. I love my CRZ, glad I got it before you're ending the wholesale Finding a good log vape in Europe is hard...
Well I've sent you an email, looking forward to hear from you!
Finding a good log vape in Europe is hard...Well I've sent you an email, looking forward to hear from you!
StealthGrower
Member
I thought my MZ was a hard hitter before, but wow add the VV PS and i am pulling about 10 thick clouds per stem from mids  .
.
.JackHerer0803
Member
Purchased a Chestnut M22 CRZ today along with a Spartan VV PS and can't wait to receive it! This is my first vaporizer.