Titan vaporizer

Pipes

Addicted DIY Enthusiast
Accessory Maker
Reporting back after a couple days use.

Guess I'll start with the negatives.
The push buttons are cheap feeling which is the typical tack pressure switch used in many devices and not un-expected. However, the main button is elongated and is not perfectly centered with the tach switch. This off center pressure point makes toggling the button not that confident of feel, causing some miss counting. The off center also has caused the button plate to stick down from pressing on end.
That robot fart smell had gotten much worse before getting better. Still can smell it at end of good session. (after unit very hot) As @jambandphan03 stated above, it is irritating, at least with mine and apparently hers too. Good news it is fading but is taking longer than had hoped. I did a full battery worth of hot running which helped a lot. It did make me cough more than usual but the big thing it did was make my sneeze a lot..?
Also, checked for air path intake for Jam. I used my ecig to reverse blow into it and the majority came out the sides. Yes, some did make it out the USB port but IMO, no problem. Breathing air that has crossed over electronics is something we all do every day anyway.
The mouthpiece cap seems like it will have a hard time maintaining it's grip over time but that's speculation.
Using with the provided tip, the distance for the air path from herb to mouth is short thus very hot.
Single non-removable battery good for 2+ "complete" sessions. (guesstimate 10 timeouts?)

OK, on with the good:
Very nice consistent medium sized clouds.
Taste is getting better and better.
Battery life is acceptable with the unit size as trade off. 2 full bowls. 1 bar battery left.
Really light weight and size looks like an ecig.
Price is a no brainer.
Can charge on any common USB changer.
Good for sipping instead of ripping.
ABV comes out consistent with no stirring.
ABV dumps easily and cleaning looks like it will be a rare task.

Overall, if you can handle the break in, excellent vape. Maybe not for a main driver but for backup or pace change it's a great deal.

Fun stuff:
As usual, didn't take me long to make it fit my needs better.
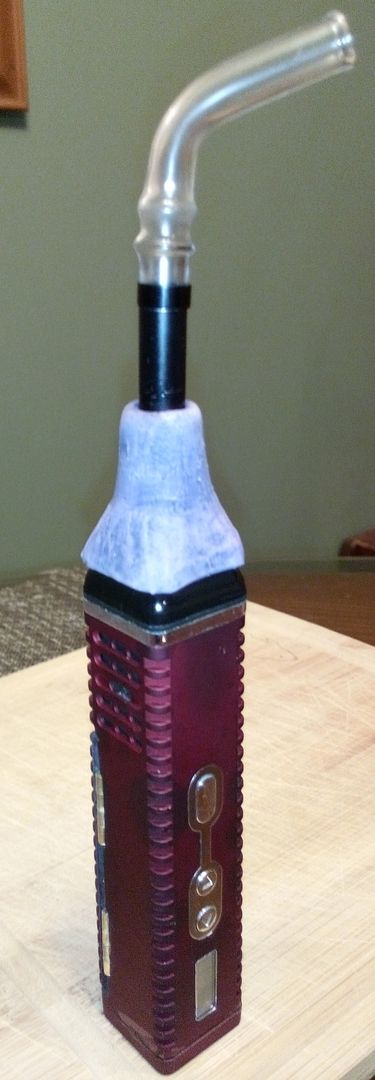
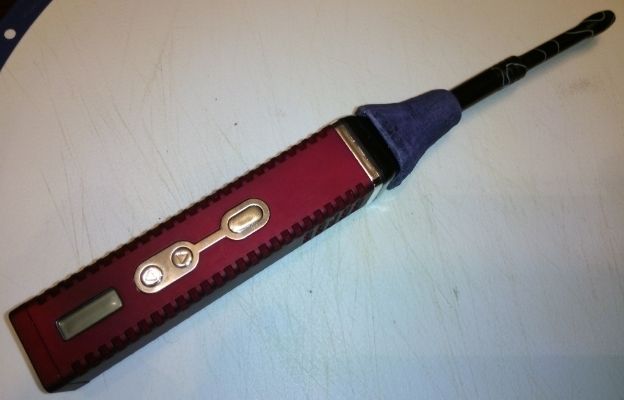
Wanted to convert to a 510 mouthpiece as well as a way to use water tools. So I got some of my food grade silicon mold making mix as well as an empty 510 tube and came up with this.
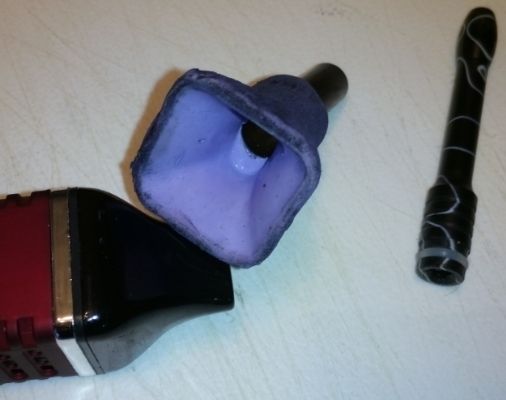
e1e1b328-23d9-4f22-a681-8625f4b5b161_zpscryda753.jpg
1585ec83-04d5-4047-91df-3d337d56a714_zpsjebmzziz.jpg


Fits over the OEM tip like the condoms that come with it. The 510 tube can hold any standard drip tip. I'm using a long one which has cooled the vapor a lot. Have also used with the D20 with no too bad results. (more testing needed here...but the seal is good)

At this point I'm VERY happy with this purchase.

:nod::tup:
 
Last edited:

jambandphan03

in flavor country
thanks for the review @Pipes :) Maybe I need to burn in the v1 that I have more, though I have used it enough now that I'd expect it to be properly burned in. I have also noticed sneezing with various vapes, esp if my herbs are fresh. Not sure what causes that, terps??
 

Justpassedu

Well-Known Member
Reporting back after a couple days use.

Guess I'll start with the negatives.
The push buttons are cheap feeling which is the typical tack pressure switch used in many devices and not un-expected. However, the main button is elongated and is not perfectly centered with the tach switch. This off center pressure point makes toggling the button not that confident of feel, causing some miss counting. The off center also has caused the button plate to stick down from pressing on end.
That robot fart smell had gotten much worse before getting better. Still can smell it at end of good session. (after unit very hot) As @jambandphan03 stated above, it is irritating, at least with mine and apparently hers too. Good news it is fading but is taking longer than had hoped. I did a full battery worth of hot running which helped a lot. It did make me cough more than usual but the big thing it did was make my sneeze a lot..?
Also, checked for air path intake for Jam. I used my ecig to reverse blow into it and the majority came out the sides. Yes, some did make it out the USB port but IMO, no problem. Breathing air that has crossed over electronics is something we all do every day anyway.
The mouthpiece cap seems like it will have a hard time maintaining it's grip over time but that's speculation.
Using with the provided tip, the distance for the air path from herb to mouth is short thus very hot.
Single non-removable battery good for 2+ "complete" sessions. (guesstimate 10 timeouts?)

OK, on with the good:
Very nice consistent medium sized clouds.
Taste is getting better and better.
Battery life is acceptable with the unit size as trade off. 2 full bowls. 1 bar battery left.
Really light weight and size looks like an ecig.
Price is a no brainer.
Can charge on any common USB changer.
Good for sipping instead of ripping.
ABV comes out consistent with no stirring.
ABV dumps easily and cleaning looks like it will be a rare task.

Overall, if you can handle the break in, excellent vape. Maybe not for a main driver but for backup or pace change it's a great deal.

Fun stuff:
As usual, didn't take me long to make it fit my needs better.
Wanted to convert to a 510 mouthpiece as well as a way to use water tools. So I got some of my food grade silicon mold making mix as well as an empty 510 tube and came up with this.

e1e1b328-23d9-4f22-a681-8625f4b5b161_zpscryda753.jpg
1585ec83-04d5-4047-91df-3d337d56a714_zpsjebmzziz.jpg


Fits over the OEM tip like the condoms that come with it. The 510 tube can hold any standard drip tip. I'm using a long one which has cooled the vapor a lot. Have also used with the D20 with no too bad results. (more testing needed here...but the seal is good)

At this point I'm VERY happy with this purchase.

:nod::tup:
I got the same vape as a back up and I happen to like it also. I'm having same results as you with my battery only going about 3 sessions. I had a replacement sent to me for other reasons and took apart the broken 1 . There is a 18650 in there that could prob be replaced with something of a higher mah for more runtime. Also I had some smell but after a burn off and a few sessions I don't have the smell anymore. Glad you like it though and for the price it's a good back up . It also has a nice taste the first few hits if your herb is quality .
 
Justpassedu,
  • Like
Reactions: Pipes

Pipes

Addicted DIY Enthusiast
Accessory Maker
First off, really liking this vape. Very light and easy to use. Was a little put off on having to charge and worry about having it in ready mode.
Had been thinking about doing this mod since the start and found it easier than expected.
Please do not attempt unless your completely confident in your soldering skills and battery knowledge. Don't want any house fires over this.

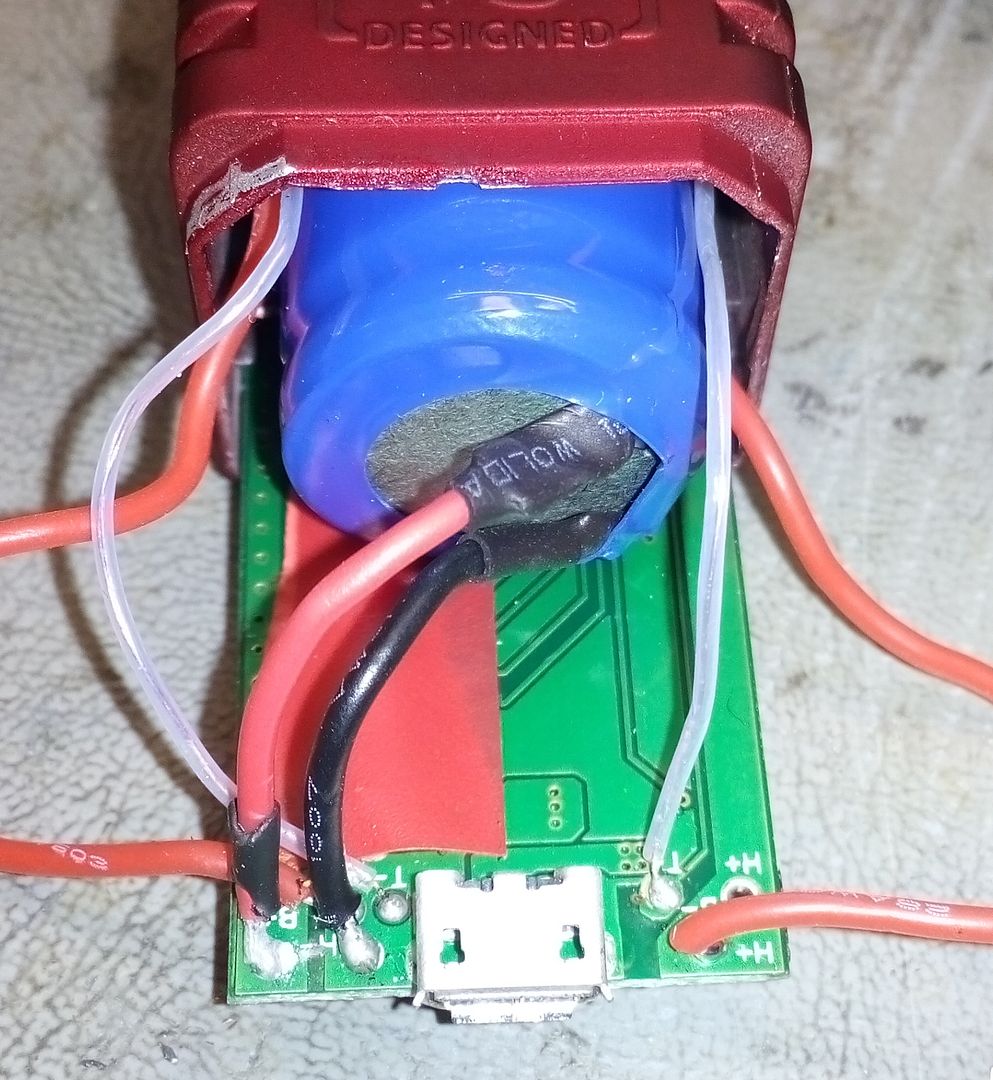
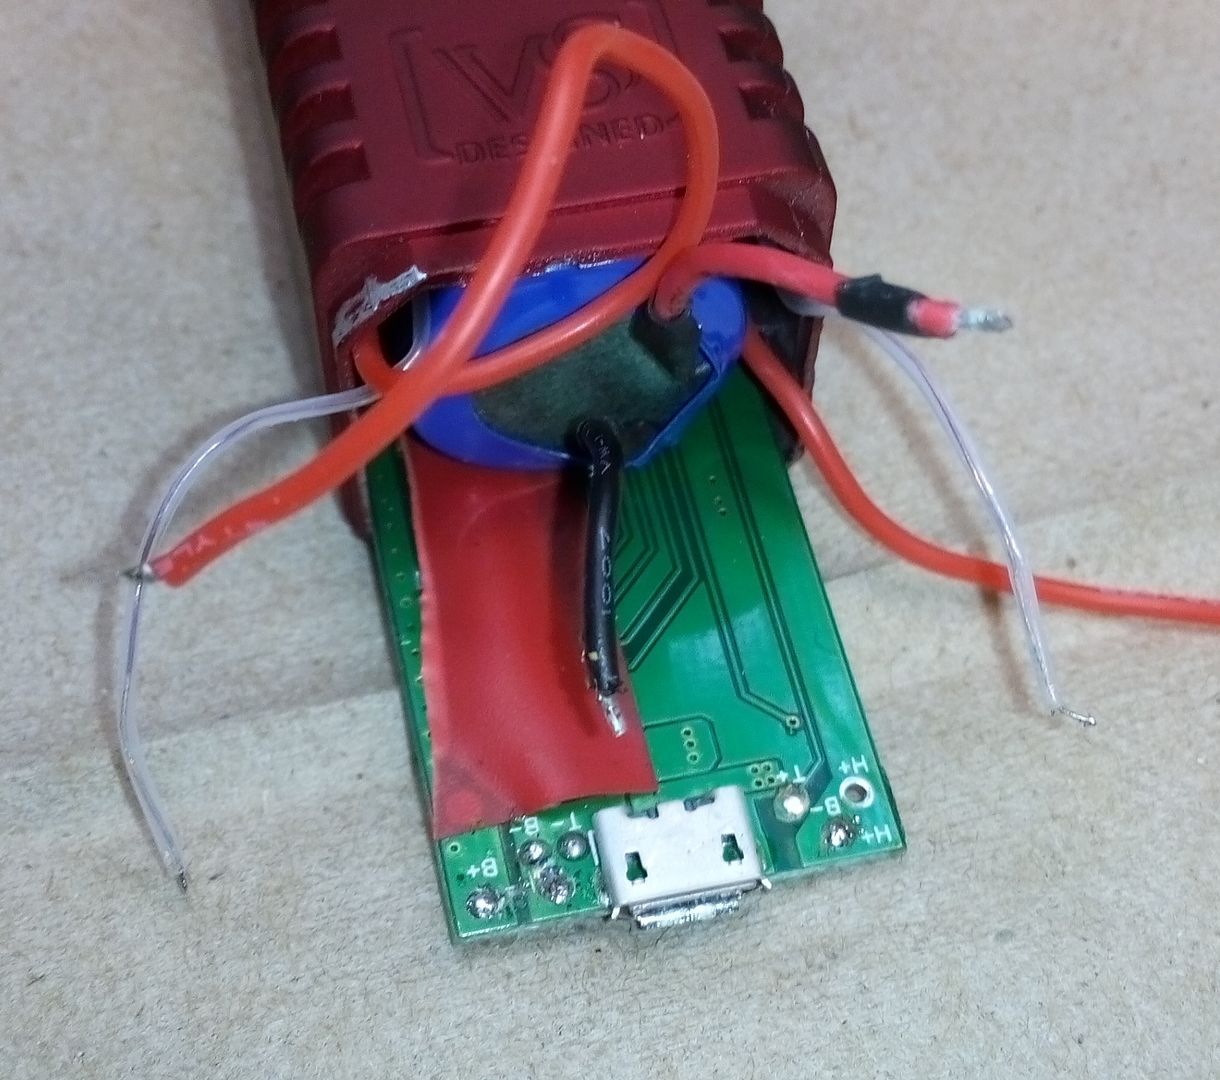
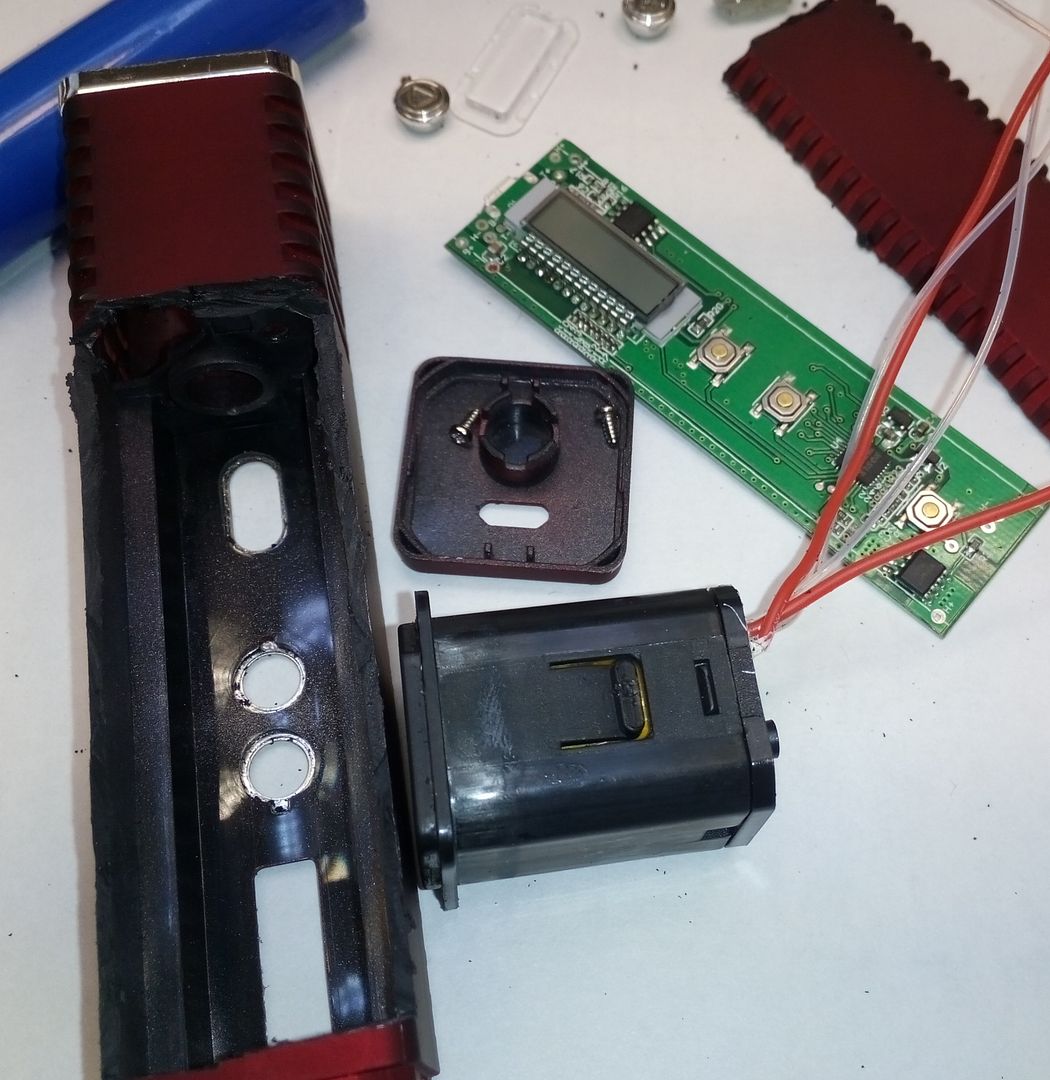
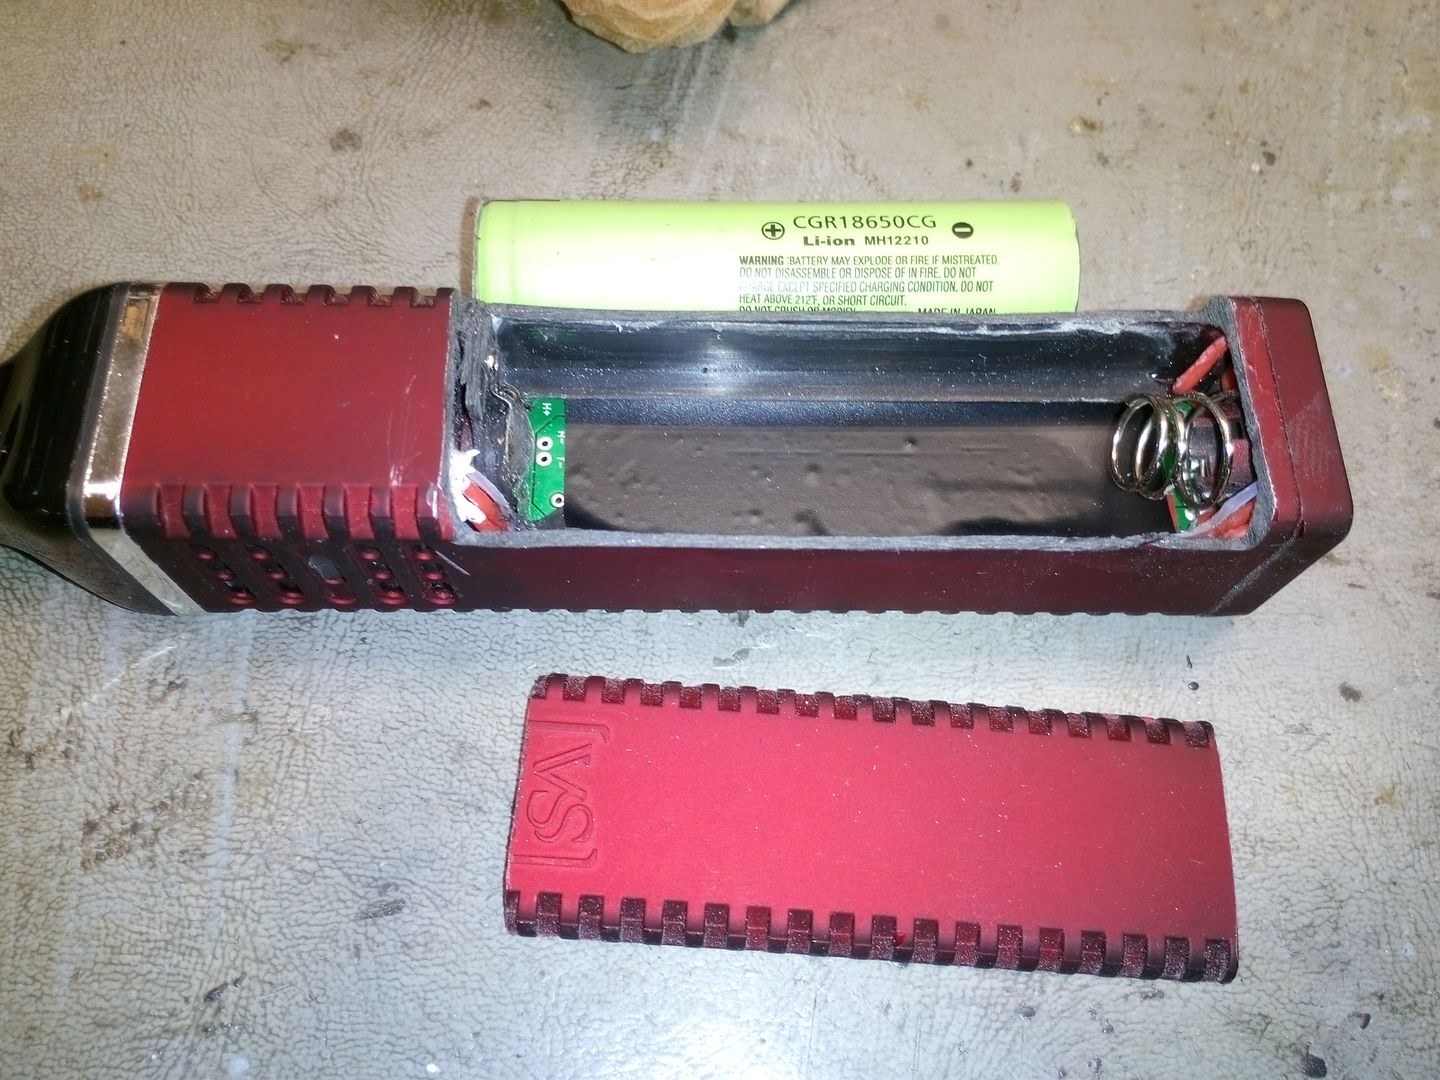
The starting point is through the bottom. There are pressure points on the sides and there was a very small amount of glue on mine as well. Once the bottom comes off, you will see all the wires. This is the only place the wires are soldered to. There are 6 wires, 2 for the battery, 2 for the thermo couple and 2 for the heater. Polarity only matters for the battery.
3 of the wires all go to the same pad. 1 from the heater, one from the thermo couple, and the ground.
Note that the heater, thermo, and ground pads are also available for use at the other end of the PC board. I did not use but is an option for shorter wires.

IMG_20150217_172042_zpsgvpbwscm.jpg

IMG_20150217_172311_zpsukoufdtt.jpg


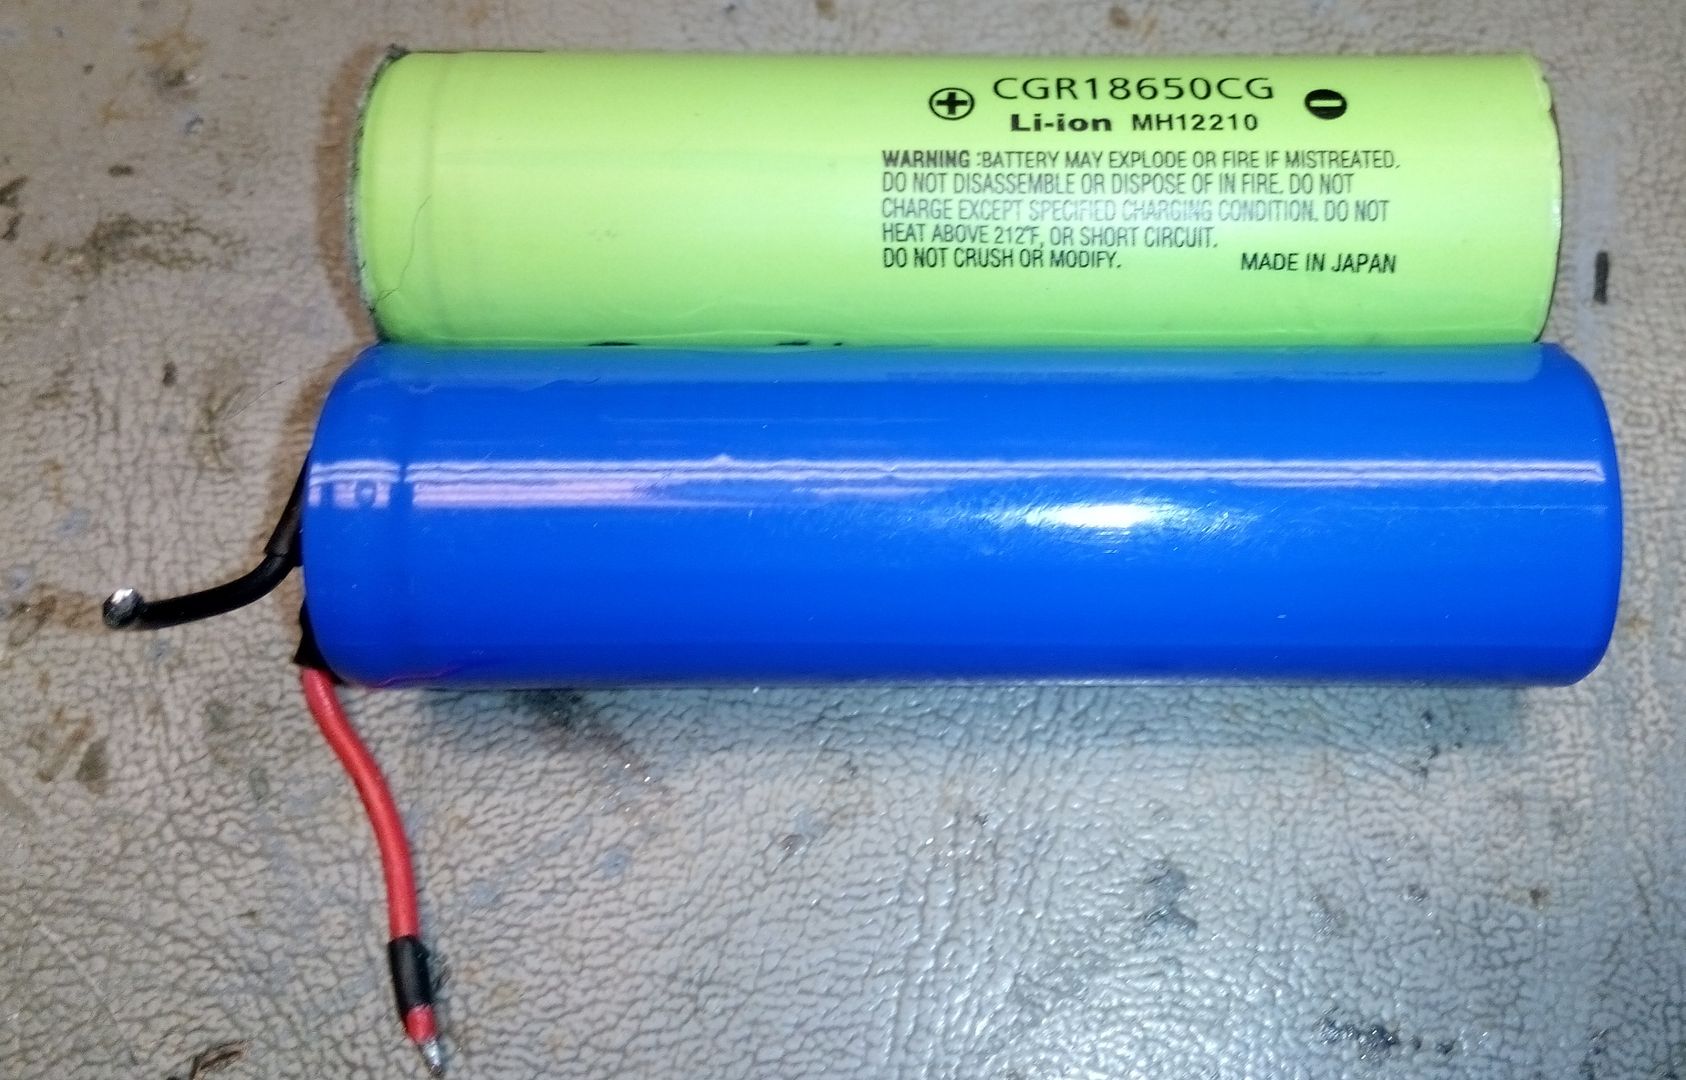
The battery has no markings but the important thing is that it has no protection board so using standard "decent" 18650s should be OK. The unit only draws about 2.5 amps while heating. I've tried all my ecig batteries with no problems.

IMG_20150218_224142_zpsifpvlev5.jpg


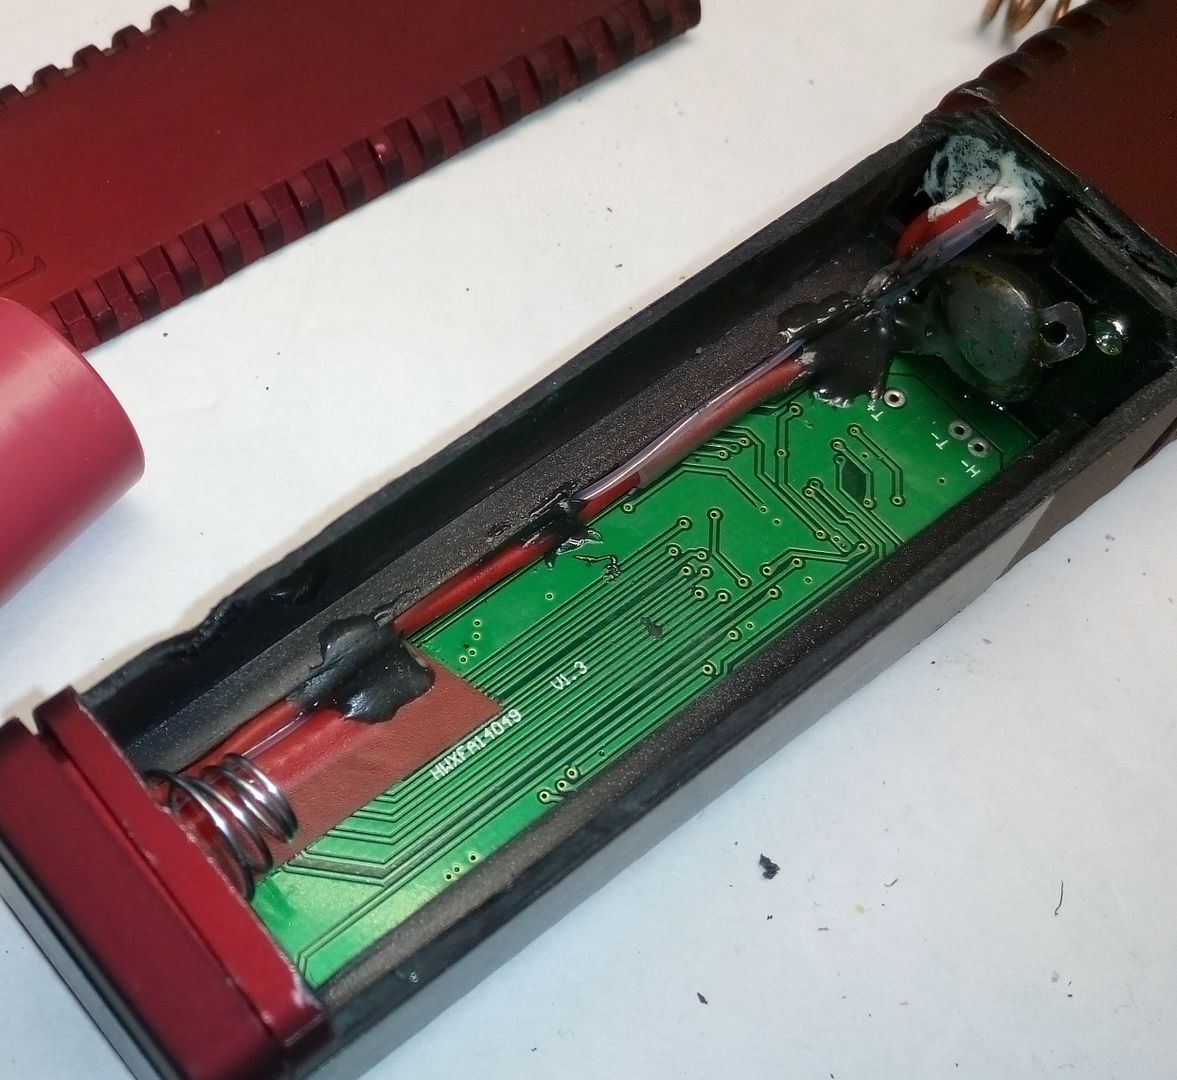
For the bottom (negative) battery contact, I used a spring from a broken 18650 flashlight. Important to use a spring designed for batteries as will compress if overheated. (safety feature) Soldered the spring directly to the USB shield. Once re-assembled, the spring is supported by the end cap which has an inner support conveniently already there.

IMG_20150217_194636_zpsrrvxftut.jpg

IMG_20150217_194838_zpsdbfu1hxk.jpg


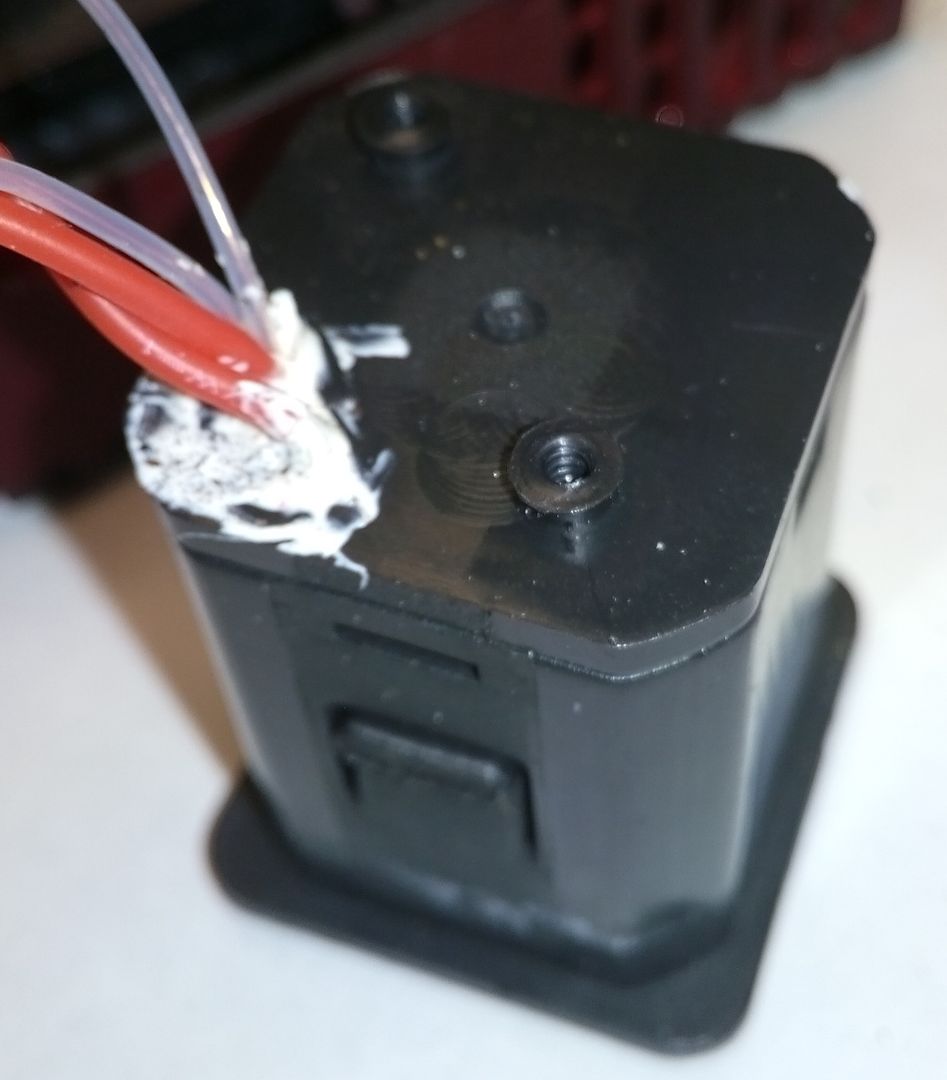
To answer any questions regarding air path, there is very little flow coming down to the bottom. The heating oven is isolated by a molded barrier inside the enclosure and is actually screwed to it with two screws. (These are the screws which keep it from coming out of the top when pressing the two tabs visible on the outside of unit.) The only airflow would be coming around the seal where the wires disappear into the oven.

IMG_20150217_200300_zps46y10fya.jpg


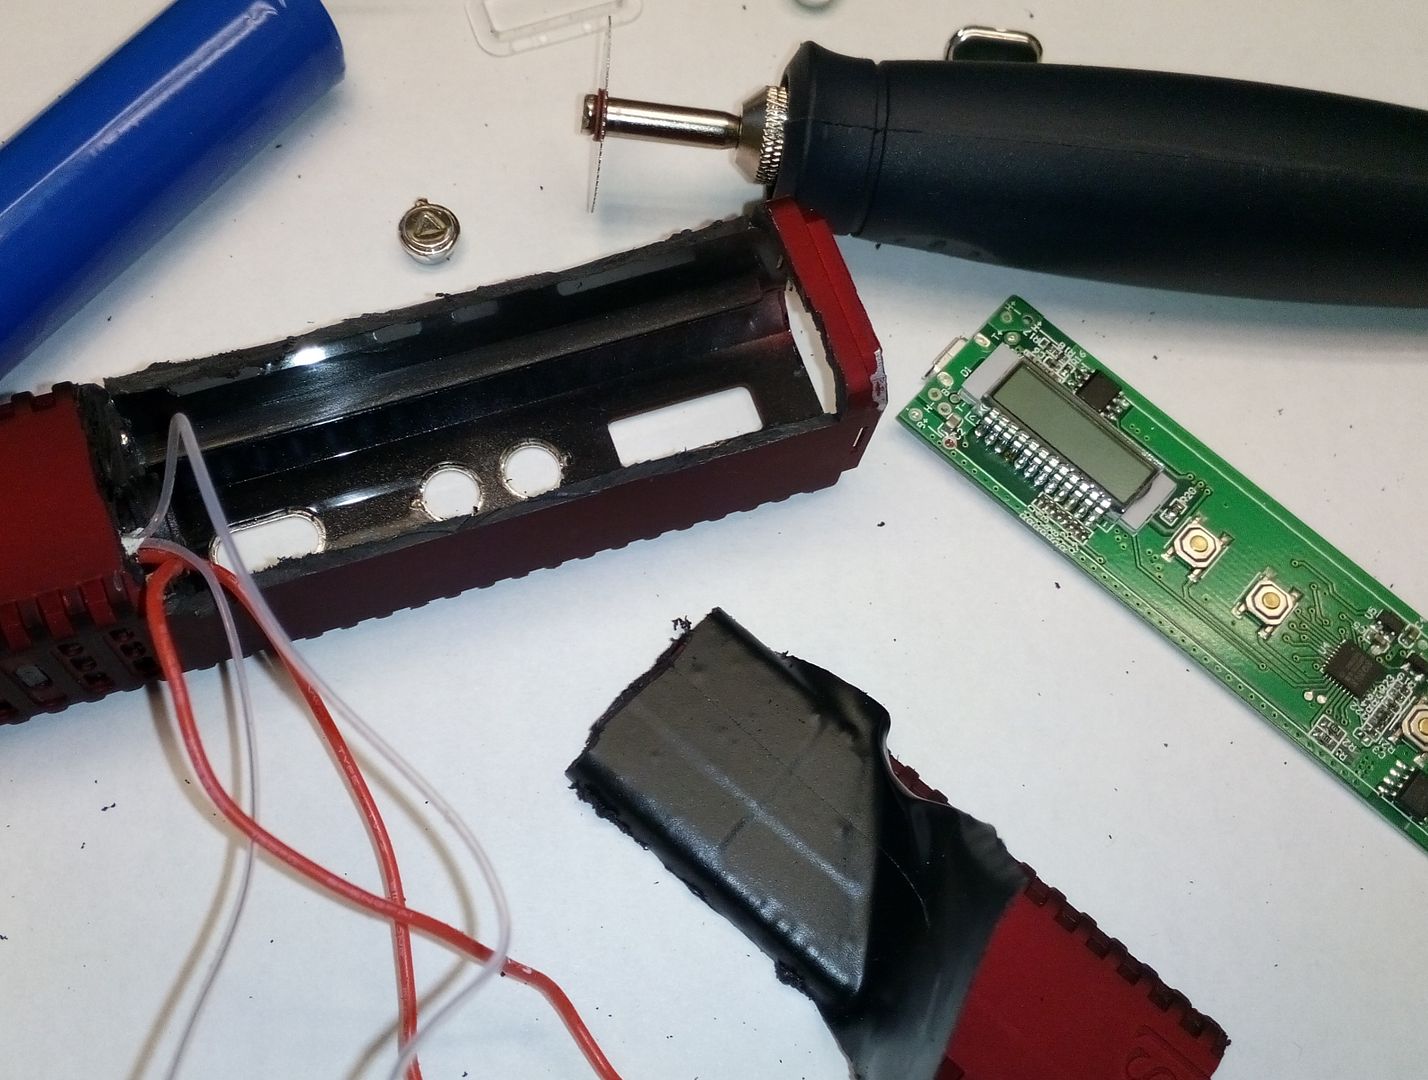
Used a Dremel tool with thin cutting blade to cut out where I estimated the battery door to go. Note, I went about 1-2 mm too high as started to cut into the separating plate which keeps the oven insulated. No biggy.
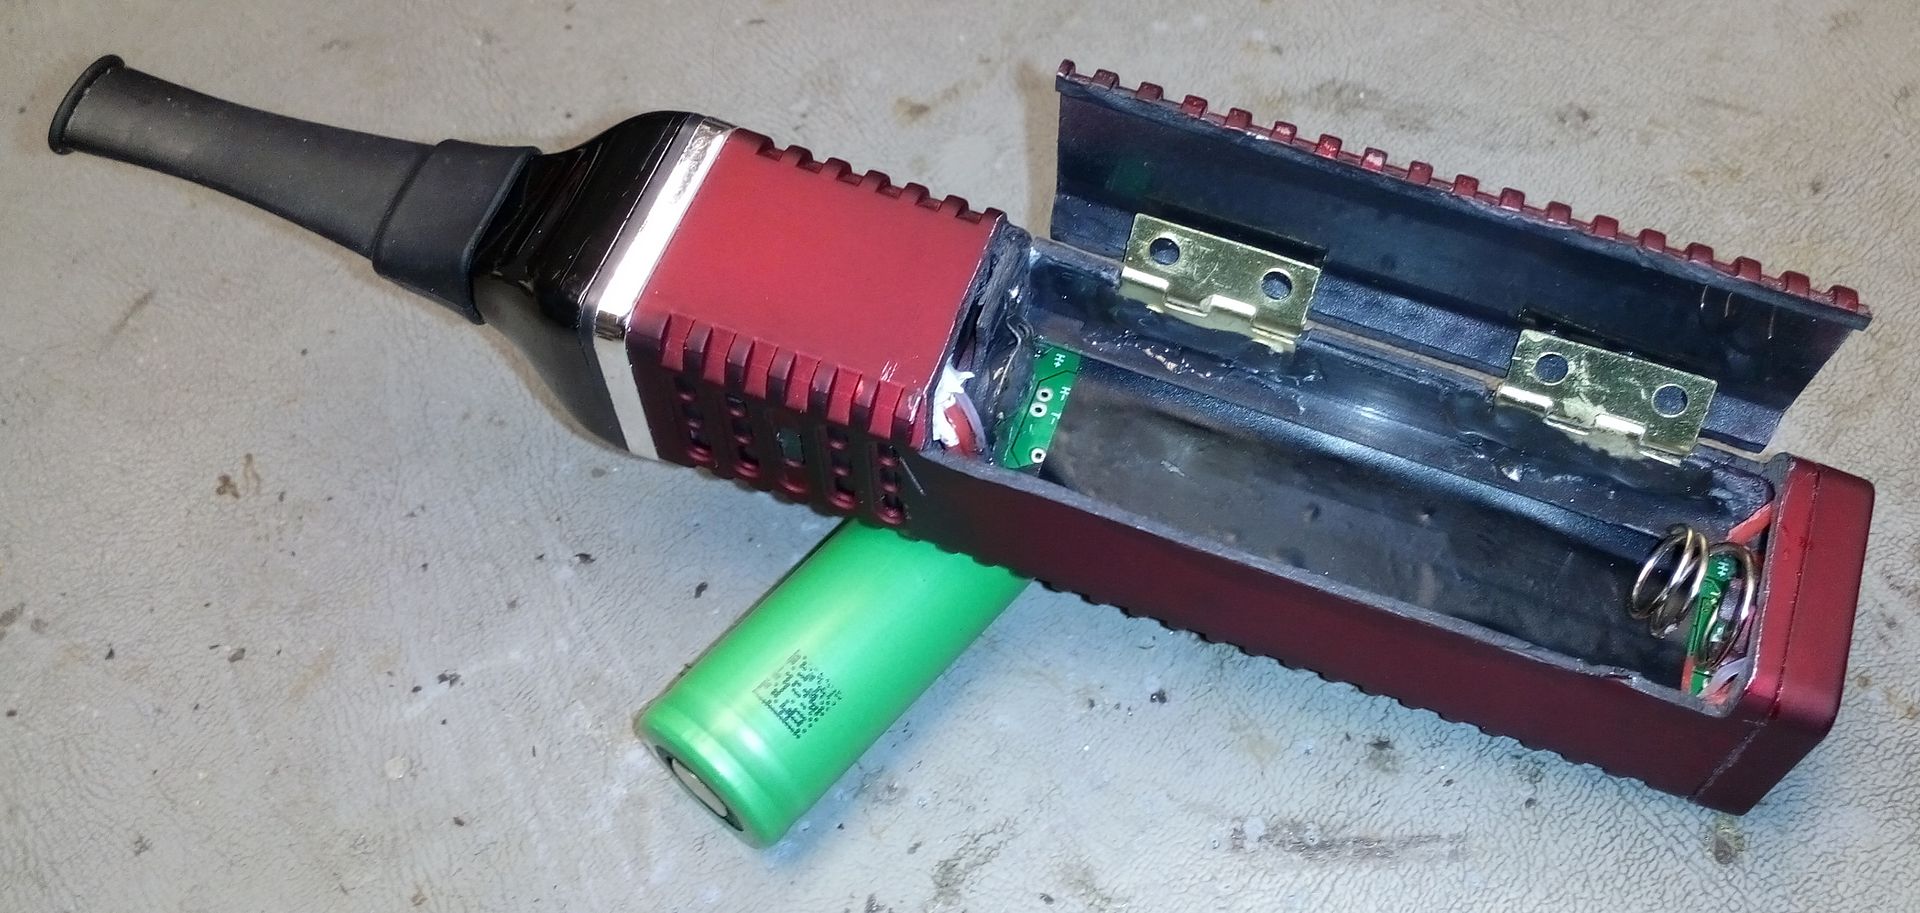
Got the (now) battery cover cut out and smoothed a bit. Cleaned and re-assembled. Tucked the wires under the lips which again is conveniently already there. Added an additional wire for the positive leg of new battery connector. Again, I just used a contact from a different piece of equipment. I cheated a little and used JBWeld to join it to the top of the enclosure.

39c2b5cf-5002-4cfe-9f3a-a8baf911f616_zpss3vdn0ca.jpg


Bought a little wooden box at the dollar store just for the hinges.

IMG_20150218_165220_zpssgcplvcm.jpg


IMG_20150218_211106_zpsebvp4soa.jpg


IMG_20150219_004343_zpsuz15w81c.jpg


Getting there.
 

Justpassedu

Well-Known Member
First off, really liking this vape. Very light and easy to use. Was a little put off on having to charge and worry about having it in ready mode.
Had been thinking about doing this mod since the start and found it easier than expected.
Please do not attempt unless your completely confident in your soldering skills and battery knowledge. Don't want any house fires over this.

The starting point is through the bottom. There are pressure points on the sides and there was a very small amount of glue on mine as well. Once the bottom comes off, you will see all the wires. This is the only place the wires are soldered to. There are 6 wires, 2 for the battery, 2 for the thermo couple and 2 for the heater. Polarity only matters for the battery.
3 of the wires all go to the same pad. 1 from the heater, one from the thermo couple, and the ground.
Note that the heater, thermo, and ground pads are also available for use at the other end of the PC board. I did not use but is an option for shorter wires.

IMG_20150217_172042_zpsgvpbwscm.jpg

IMG_20150217_172311_zpsukoufdtt.jpg


The battery has no markings but the important thing is that it has no protection board so using standard "decent" 18650s should be OK. The unit only draws about 2.5 amps while heating. I've tried all my ecig batteries with no problems.

IMG_20150218_224142_zpsifpvlev5.jpg


For the bottom (negative) battery contact, I used a spring from a broken 18650 flashlight. Important to use a spring designed for batteries as will compress if overheated. (safety feature) Soldered the spring directly to the USB shield. Once re-assembled, the spring is supported by the end cap which has an inner support conveniently already there.

IMG_20150217_194636_zpsrrvxftut.jpg

IMG_20150217_194838_zpsdbfu1hxk.jpg


To answer any questions regarding air path, there is very little flow coming down to the bottom. The heating oven is isolated by a molded barrier inside the enclosure and is actually screwed to it with two screws. (These are the screws which keep it from coming out of the top when pressing the two tabs visible on the outside of unit.) The only airflow would be coming around the seal where the wires disappear into the oven.

IMG_20150217_200300_zps46y10fya.jpg


Used a Dremel tool with thin cutting blade to cut out where I estimated the battery door to go. Note, I went about 1-2 mm too high as started to cut into the separating plate which keeps the oven insulated. No biggy.
Got the (now) battery cover cut out and smoothed a bit. Cleaned and re-assembled. Tucked the wires under the lips which again is conveniently already there. Added an additional wire for the positive leg of new battery connector. Again, I just used a contact from a different piece of equipment. I cheated a little and used JBWeld to join it to the top of the enclosure.

39c2b5cf-5002-4cfe-9f3a-a8baf911f616_zpss3vdn0ca.jpg


Bought a little wooden box at the dollar store just for the hinges.

IMG_20150218_165220_zpssgcplvcm.jpg


IMG_20150218_211106_zpsebvp4soa.jpg


IMG_20150219_004343_zpsuz15w81c.jpg


Getting there.


That's great Pipes , thank you. I actually have my red unit working really well , 0 problems but i still have my 1st black unit that stopped working after the 1st use sitting at home. I started taking it apart a few months ago but seeing this i am now thinking i may be able to get it going again. I'll give it a try , i have pretty good soldering skill's .
 

Solomon

Talk to the Beard
Brilliant! @Pipes

You also re-verified that little if any airflow is occurring thru the bottom circuitry or USB port.

I gave mine to my daughter, who just loves it - it's her "little red bitch" - particularly popular with former and current combusters who like the somewhat hot and thick vapor. So easy to maintain too (a big plus for her)
 

Pipes

Addicted DIY Enthusiast
Accessory Maker
very good job! it will be a good idea for a future release :-)
Thanks guys,
Somehow I doubt if you'll see in production units in this price range. The design of the unit is very inexpensive in the parts and geared as an expendable or disposable type item. Thus, just selling complete units in bulk. At least that's how I see it.
What I have also noticed is that with my higher quality batteries (low internal resistance), the unit has an easier time holding the temperature up during inhaling as well as initial heat up is somewhat quicker. I suspect the initial battery that comes which it is of a lesser quality. But obviously good enough for the task at hand.
I have now completed the mod. The only thing that was left was a battery door latch. I glued magnets on the inside of lid which hold to the battery. Simple but effective.
 

Bosse

Well-Known Member
Thanks guys,
Somehow I doubt if you'll see in production units in this price range. The design of the unit is very inexpensive in the parts and geared as an expendable or disposable type item. Thus, just selling complete units in bulk. At least that's how I see it.
What I have also noticed is that with my higher quality batteries (low internal resistance), the unit has an easier time holding the temperature up during inhaling as well as initial heat up is somewhat quicker. I suspect the initial battery that comes which it is of a lesser quality. But obviously good enough for the task at hand.
I have now completed the mod. The only thing that was left was a battery door latch. I glued magnets on the inside of lid which hold to the battery. Simple but effective.
Would it be possible to take out the battery from the bottom and replace it?
By the way- how could you take off the bottom cap?
 
Bosse,
  • Like
Reactions: ataxian

Pipes

Addicted DIY Enthusiast
Accessory Maker
Yes, of course it's possible. But have more considerations to think about.
The battery specs should be more closely looked at. This is to ensure proper match with it's internal charger. Assuming it is a 4.2v cut off is must likely but would not guarantee at this point. Also needs to be a "tabbed" type battery which will limit your search. You should never solder to a battery.
The PC board also needs to slide out about 3/4" so the battery can clear the USB connector.
This PC board also holds the little plastic control buttons in place. So if buttons come lose. the whole PC board needs to come out the put buttons back in the holes. This is much easier if opened up..:brow:
Also, the first wire off the board should be the battery ground wire since your dealing with a live circuit. And last to go back on.
OK, to remove the bottom, squeeze the sides (as the display faces you) just above where the cap seam is. These two spots push the hooks in enough for the bottom to be pull off. If lucky no clips will break. If one does, a dab of glue will fix it up later. From here the battery and board will move slightly out so soldering is not too bad. Once you move the board keep the unit as not to move those plastic buttons out of place. Or you'll be a cursing....
Hopefully I explained it all OK..
Fun little unit. And nobody warned me I'd void my warranty...:lol:
 

Bosse

Well-Known Member
Yes, of course it's possible. But have more considerations to think about.
The battery specs should be more closely looked at. This is to ensure proper match with it's internal charger. Assuming it is a 4.2v cut off is must likely but would not guarantee at this point. Also needs to be a "tabbed" type battery which will limit your search. You should never solder to a battery.
The PC board also needs to slide out about 3/4" so the battery can clear the USB connector.
This PC board also holds the little plastic control buttons in place. So if buttons come lose. the whole PC board needs to come out the put buttons back in the holes. This is much easier if opened up..:brow:
Also, the first wire off the board should be the battery ground wire since your dealing with a live circuit. And last to go back on.
OK, to remove the bottom, squeeze the sides (as the display faces you) just above where the cap seam is. These two spots push the hooks in enough for the bottom to be pull off. If lucky no clips will break. If one does, a dab of glue will fix it up later. From here the battery and board will move slightly out so soldering is not too bad. Once you move the board keep the unit as not to move those plastic buttons out of place. Or you'll be a cursing....
Hopefully I explained it all OK..
Fun little unit. And nobody warned me I'd void my warranty...:lol:
Well, I forgot. I am not sure what you mean with "those plastic buttons". Where are placed?
 
Bosse,

Pipes

Addicted DIY Enthusiast
Accessory Maker
The buttons you press. Two with arrows and the main button. The actual contact part is on the PC board and there are plastic spacers that you press on. They sit in cut out holes in the case held in place by the PC board. Removing the board will let them fall out very easily. Lots od "fiddling" to get them back if fall out.
Hope that;s clears things.
 

Slow Draw McGraw

Well-Known Member
Company Rep
Yes, of course it's possible. But have more considerations to think about.
The battery specs should be more closely looked at. This is to ensure proper match with it's internal charger. Assuming it is a 4.2v cut off is must likely but would not guarantee at this point. Also needs to be a "tabbed" type battery which will limit your search. You should never solder to a battery.
The PC board also needs to slide out about 3/4" so the battery can clear the USB connector.
This PC board also holds the little plastic control buttons in place. So if buttons come lose. the whole PC board needs to come out the put buttons back in the holes. This is much easier if opened up..:brow:
Also, the first wire off the board should be the battery ground wire since your dealing with a live circuit. And last to go back on.
OK, to remove the bottom, squeeze the sides (as the display faces you) just above where the cap seam is. These two spots push the hooks in enough for the bottom to be pull off. If lucky no clips will break. If one does, a dab of glue will fix it up later. From here the battery and board will move slightly out so soldering is not too bad. Once you move the board keep the unit as not to move those plastic buttons out of place. Or you'll be a cursing....
Hopefully I explained it all OK..
Fun little unit. And nobody warned me I'd void my warranty...:lol:
Ahhhh @Pipes always a good read.
 
Slow Draw McGraw,
  • Like
Reactions: Pipes

Bosse

Well-Known Member
The buttons you press. Two with arrows and the main button. The actual contact part is on the PC board and there are plastic spacers that you press on. They sit in cut out holes in the case held in place by the PC board. Removing the board will let them fall out very easily. Lots od "fiddling" to get them back if fall out.
Hope that;s clears things.
May be they will stay in place if I turn the unit around, with the buttons down, when slliding out the motherboard? Or any other better idea?
 
Bosse,
  • Like
Reactions: Pipes

Pipes

Addicted DIY Enthusiast
Accessory Maker
May be they will stay in place if I turn the unit around, with the buttons down, when slliding out the motherboard? Or any other better idea?
Yes, that's what I was doing. Also, some tape along the top to help hold in place.
If you do not slide the mother board out too far also will keep them from falling loose.
It's not the end of the world if one falls, but sure adds some extra work.
 
Pipes,

startrec

Active Member
in this picture, the PC and the batterie seems moved out by the bottom side, after being un-welded.
It's a picture than the manufacturer VS, sent to me when i asked him how to access to the battery.
it look's the same as the 2 firsts Pipe's pictures.

<a href="http://www.zimagez.com/zimage/titaninside.php" target="_blank" title="bottom">

the bottom cap seems easy to remove but i'd like to remove the heating chamber to isolate the wires/oven like Pipes, i can push on the two pins together but i have a problem with the point of glue ! have you a idea without breaking the unit (i hope there is only a point of glue :uhoh:
Thank's:evil:
 
startrec,
  • Like
Reactions: Pipes

Pipes

Addicted DIY Enthusiast
Accessory Maker
There are two screws as well as the clips to remove the oven. It is attached to the barrier which separate the unit into two chambers. Could access through the bottom with a long small Phillips (cross) screw driver. Board still needs to come out which is no biggy since the wires need to be un-soldered anyway to pull the oven out the top.
Curious though, why do you want to separate the oven? I had some crazy ideas about this too...hehe
Note that I never opened the oven up so no idea as to what to expect in there. If you do, please post back pics.
TIA and hope this helps.
 
Pipes,

jambandphan03

in flavor country
Here's a question, are any of you guys Pax users? If so, do you think the Titan 2 is at all comparable to the Pax? I sold my pax a while ago, but lately have been missing it and considering finding another. I really don't want to dish out over $200 on a vape right now though, so I thought I'd see how the Titan 2 compares, at least in vapor quality, if anything at all... I don't really care much for my Titan 1 and I worry I won't like the Titan 2.
 
Top Bottom