
-
SCAM WARNING! See how this scam works in Classifieds.
You are using an out of date browser. It may not display this or other websites correctly.
You should upgrade or use an alternative browser.
You should upgrade or use an alternative browser.
The Lab Glass Vaporizer
- Thread starter jojo monkey
- Start date

@Copacetic
Thanks, Copacetic!
I've tried concentrates and it was ok.... messy and ok. Heating up a titanium kit with a torch is easier and more satisfying for me at the moment. I shoved a glass nail into the glass vape to try it out and had the dab just under the heater. I need to work at it more. It kinda broke the dabs up into a few thin hits. I will say the first hits had some of the craziest flavor I have ever had from this vape. I only took the temps to 500F so I might need more heat. I need to change a few things before I go higher. I also need to try steel mesh.
I think the first version of my vape was closer to the sub in that it used a dimmer and needed lots of conduction in the bowl to make it work. The old version probably flashed vapor faster since there was so much heat in the bowl, but it made it hard to manage. The current version of my vape is all convection. The heater is over 2" away from the herb and does not warm the glass around it (unless you take a hit).
Last edited:
Following this thread and love that video. Great job!
Tricker12345
Member
Major props for making this thing from scratch - It looks absolutely amazing!
Any chance we could get an updated parts list or is the one that's on here sufficient? I'm definitely interested in building this vape if I can obtain all the parts. I wouldn't want to be going into the arduino/etc stages but the vape with the improved heating path and the heat controller box would be amazing.
Any chance we could get an updated parts list or is the one that's on here sufficient? I'm definitely interested in building this vape if I can obtain all the parts. I wouldn't want to be going into the arduino/etc stages but the vape with the improved heating path and the heat controller box would be amazing.
@Tricker12345 Thanks! Nice to have you here!
Yeah the parts list will get you damn close to where it is. I really only changed 1 part which is the outer adapter that holds it all together. It works fine with the off the shelf adapter, just hotter in the bowl.
I am having custom bowls and a 4th version of the outer glass made right now. Maybe I need to order some extras?
Tricker12345
Member
@Tricker12345 Thanks! Nice to have you here!
Yeah the parts list will get you damn close to where it is. I really only changed 1 part which is the outer adapter that holds it all together. It works fine with the off the shelf adapter, just hotter in the bowl.
I am having custom bowls and a 4th version of the outer glass made right now. Maybe I need to order some extras?
If you could possibly get some extras that would be amazing, how much would you be charging for them? Also any ETA on when those would be arriving? It would take me a month or two to get money for the entire thing but I'll slowly be gathering pieces for it as of now.
Rome wasn't built in a day! I made the vape slowly. It is absolutely the best with a pid controller, but you can run it on a dimmer if you wanted to start with the bare minimum. A $5 voltage regulator from ebay and a tiny box to house did me fine for some time. I also never ran it with all the beads so it might not be too bad? I mean once the temp levels off it would hit just the same as a pid controlled one. The difference is the pid controlled one would recover many times faster.
No hurries, I'll have plenty of extras.
No hurries, I'll have plenty of extras.
YungLeaner
Well-Known Member
Want to sell me one? I'm not much of a DIYer, but I would pay you for the DIY service and parts and tell everyone that jojo monkey is the bomb dot com.Rome wasn't built in a day! I made the vape slowly. It is absolutely the best with a pid controller, but you can run it on a dimmer if you wanted to start with the bare minimum. A $5 voltage regulator from ebay and a tiny box to house did me fine for some time. I also never ran it with all the beads so it might not be too bad? I mean once the temp levels off it would hit just the same as a pid controlled one. The difference is the pid controlled one would recover many times faster.
No hurries, I'll have plenty of extras.
edit: hope this didn't come off as annoying or presumptuous. I just love vaping out of cool shit and this is very cool, but DIY is really not my strength and if you're interested in making some money through selling one please PM me
Tricker12345
Member
Rome wasn't built in a day! I made the vape slowly. It is absolutely the best with a pid controller, but you can run it on a dimmer if you wanted to start with the bare minimum. A $5 voltage regulator from ebay and a tiny box to house did me fine for some time. I also never ran it with all the beads so it might not be too bad? I mean once the temp levels off it would hit just the same as a pid controlled one. The difference is the pid controlled one would recover many times faster.
No hurries, I'll have plenty of extras.
I think I'd rather just jump straight to the end product, as much as experimenting with it sounds. Although I may possibly go further and try out a couple different things once I've got it all put together. I usually vape with 2-3 other people so I'd like to have a system that can constantly stay heated and can withstand draw after draw with minimal down time, I think having the pid would help with that a lot.
Sounds awesome, send me a PM and we'll get something worked out
Last edited:
@Tricker12345 Thanks!
I agree the PID will make it much friendlier. Just looking down and seeing a number that represents something useful is nice. No counting before you take a hit or any other pre-hit rituals required. Just take a hit. You do have to wait 1-3 minutes to get exactly back to temp, but can take a hit whenever. Then again I hit this as hard as I can and encourage the people that have used it to do the same. You might find your way of using it. You can take out beads and make the hits weaker. So you can play with the mass and precise temps to find what you like.
So I have been trying to wrap up my coding and have not yet picked a box. Do I want clear plastic to show off the wires and lights or metal for durability? Form vs Function. ugh
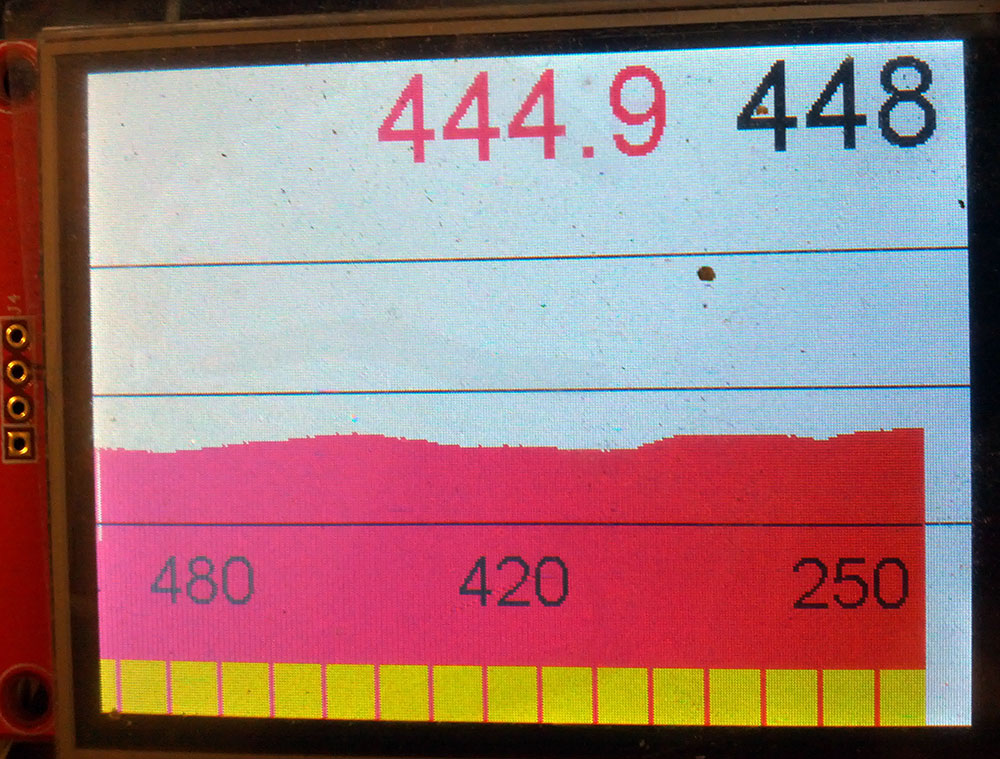
This is the current view of the 1st screen. I moved a few things around and made the background white for daytime visibility. I recently added the yellow graph at the bottom which shows the heater being fired. This has helped a ton in tuning the PID settings. The numbers at the bottom are favorites. The top right is the set temp. The red number is the current temp.
Pardon my ABV.
I agree the PID will make it much friendlier. Just looking down and seeing a number that represents something useful is nice. No counting before you take a hit or any other pre-hit rituals required. Just take a hit. You do have to wait 1-3 minutes to get exactly back to temp, but can take a hit whenever. Then again I hit this as hard as I can and encourage the people that have used it to do the same. You might find your way of using it. You can take out beads and make the hits weaker. So you can play with the mass and precise temps to find what you like.
So I have been trying to wrap up my coding and have not yet picked a box. Do I want clear plastic to show off the wires and lights or metal for durability? Form vs Function. ugh
This is the current view of the 1st screen. I moved a few things around and made the background white for daytime visibility. I recently added the yellow graph at the bottom which shows the heater being fired. This has helped a ton in tuning the PID settings. The numbers at the bottom are favorites. The top right is the set temp. The red number is the current temp.
Pardon my ABV.
Tricker12345
Member
@Tricker12345 Thanks!
I agree the PID will make it much friendlier. Just looking down and seeing a number that represents something useful is nice. No counting before you take a hit or any other pre-hit rituals required. Just take a hit. You do have to wait 1-3 minutes to get exactly back to temp, but can take a hit whenever. Then again I hit this as hard as I can and encourage the people that have used it to do the same. You might find your way of using it. You can take out beads and make the hits weaker. So you can play with the mass and precise temps to find what you like.
So I have been trying to wrap up my coding and have not yet picked a box. Do I want clear plastic to show off the wires and lights or metal for durability? Form vs Function. ugh
This is the current view of the 1st screen. I moved a few things around and made the background white for daytime visibility. I recently added the yellow graph at the bottom which shows the heater being fired. This has helped a ton in tuning the PID settings. The numbers at the bottom are favorites. The top right is the set temp. The red number is the current temp.
Pardon my ABV.
Wow, that looks awesome! Personally I would go with a metal casing just to make it look neater, but it is your design so it's up to you
") Are you planning on making a model with just this for the temperature control or are you adding this to the current setup just to have a display?
Are you planning on making a model with just this for the temperature control or are you adding this to the current setup just to have a display?Are you planning on making a model with just this for the temperature control or are you adding this to the current setup just to have a display?
Thanks man! This is where I am going with it. I use a knob for temp changes. This way if the screen breaks I can still find a temp and use it until I fix it. The touchscreen is there for the favorite temps and to show what the heater is doing. I also like that I can add a new button for whatever whenever I like. The funny reality was that the touchscreen was cheaper than buying 3 nice buttons.
a nerdy update: Adaptive tuning
tldr - I copy and pasted out of github to make my vape better.
I know this forum isn't the proper place to get too into coding, but I thought it would be neat to show how little you have to do sometimes. I recently added "Adaptive tuning" and thought I'd post how I went about it. With the <$30 PID's you are only able to put in one set of PID settings so you have to tune it to the middle. There are PID's that allow temp stepping and profiles for things like kilns and I explored these, but ... meh. They require an rs485 interface to program! The arduino is done via usb.
The goal is to safely warm up the vape and switch to aggressive settings while in use. I first thought that it would be tough to heat with two rules, but like many problems I am not the first to have it and someone has done the work and posted it on the internet. (my thanks to Mr. Beauregard!).
Here is some lovely sample code made by the author of the PID library:
(btw this is what an arduino file looks like)
https://github.com/br3ttb/Arduino-P...s/PID_AdaptiveTunings/PID_AdaptiveTunings.ino
So I copy and paste the part I need into my loop that runs 10 times a second. I edit it with my settings....
Code:
//if the temp is greater than 320F or the temp difference is greater than 100F be aggressive
if (tempF >= 320 || tempDiff >= 100) {
  PID myPID(&tempF, &Output, &Setpoint,3,5,1, DIRECT);

} else {
//this should cover the startup and whatever else for a slow warmup
PID myPID(&tempF, &Output, &Setpoint,2,2,1, DIRECT);
}
And that is it! "Adaptive tuning" sounds way more complicated than a few lines of code, but it isn't. ;P It is really just a simple loop putting in some settings, but I did not know it could be done until I saw the sample. I did not know you could declare the pid settings whenever you want.
Now there is way more code than that running the whole thing, but that one feature that can make the heater last longer and the vape perform better was just a few borrowed lines. Now i can change or add rules as needed.
Fun stuff.
Tricker12345
Member
Thanks man! This is where I am going with it. I use a knob for temp changes. This way if the screen breaks I can still find a temp and use it until I fix it. The touchscreen is there for the favorite temps and to show what the heater is doing. I also like that I can add a new button for whatever whenever I like. The funny reality was that the touchscreen was cheaper than buying 3 nice buttons.
a nerdy update: Adaptive tuning
tldr - I copy and pasted out of github to make my vape better.
I know this forum isn't the proper place to get too into coding, but I thought it would be neat to show how little you have to do sometimes. I recently added "Adaptive tuning" and thought I'd post how I went about it. With the <$30 PID's you are only able to put in one set of PID settings so you have to tune it to the middle. There are PID's that allow temp stepping and profiles for things like kilns and I explored these, but ... meh. They require an rs485 interface to program! The arduino is done via usb.
The goal is to safely warm up the vape and switch to aggressive settings while in use. I first thought that it would be tough to heat with two rules, but like many problems I am not the first to have it and someone has done the work and posted it on the internet. (my thanks to Mr. Beauregard!).
Here is some lovely sample code made by the author of the PID library:
(btw this is what an arduino file looks like)
https://github.com/br3ttb/Arduino-P...s/PID_AdaptiveTunings/PID_AdaptiveTunings.ino
So I copy and paste the part I need into my loop that runs 10 times a second. I edit it with my settings....
Code://if the temp is greater than 320F or the temp difference is greater than 100F be aggressive if (tempF >= 320 || tempDiff >= 100) { PID myPID(&tempF, &Output, &Setpoint,3,5,1, DIRECT); } else { //this should cover the startup and whatever else for a slow warmup PID myPID(&tempF, &Output, &Setpoint,2,2,1, DIRECT); }
And that is it! "Adaptive tuning" sounds way more complicated than a few lines of code, but it isn't. ;P It is really just a simple loop putting in some settings, but I did not know it could be done until I saw the sample. I did not know you could declare the pid settings whenever you want.
Now there is way more code than that running the whole thing, but that one feature that can make the heater last longer and the vape perform better was just a few borrowed lines. Now i can change or add rules as needed.
Fun stuff.
I personally don't do any coding but my roommate is really in to it and he's shown me quite a bit of stuff so I somewhat understand it! That's a super neat concept, if I understand it right when you switch to agressive it lets you heat it up much faster? If so, would it be possible to make it to where when it detects the heat dropping it ups the heat to keep the vape temperature up, and then drops it back down once the heat hits a certain point again?
Also, I'm guessing you are in the process of making a temp control box that has the knob and the touch screen on it as well? I would definitely like to see that completed if you get to that point soon!
you switch to agressive it lets you heat it up much faster? If so, would it be possible to make it to where when it detects the heat dropping it ups the heat to keep the vape temperature up, and then drops it back down once the heat hits a certain point again?
Yeah, the PID controller part of it tries to hold the temps 10 times a second. If it notices a change, it will push back. A dimmer would just keep giving a percentage of the power like a dummy. This is why the PID is faster, it is working to maintain the temps. The vape still takes a minute or so to settle back to temps. Think of a rocket landing with jets firing in bursts. This is what the PID is trying to do, a soft landing back to the temp so it does not overshoot.
The vape does not need to maintain the exact temp during a hit. It can't, it is too big. But that is the point of it, to be so big that it can't be overwhelmed and still have temp control. Kinda like how butane vapes work vs a grasshopper or herbalizer.
Little update:
I am still making the case and am enjoying the odd sized holes I have to drill like 27/64 and 59/64. (sarcasm) It really just means every hole has to be sanded down a bit because I don't have those drill bit sizes. Ugh. A custom case might be in the future to clean up my prototype dremel'in.
I finally tried a volcano concentrate pad in the vape. I originally tried going EVO style and stuck a glass piece into the heater. This was a mess. The pad is much easier and I can get vapor much faster. It does require a 1/2 pre-warm hit to really get it going. So I just need to find a better sized pad and concentrates are back on the menu!
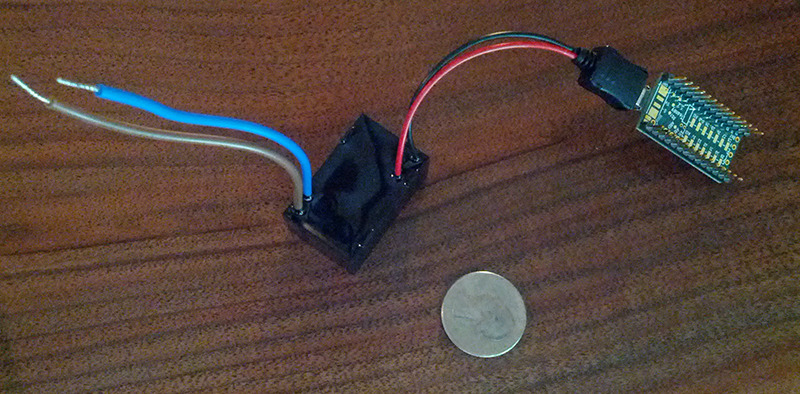
The coding for the arduino is still moving. I thought I'd take a snap of the arduino hooked to the 110v ac to 5v dc converter. Kinda cool that all the brains runs off 5v. To update the code I can power the vape off of a pc usb port and keep the rest unplugged from the wall.
I am still making the case and am enjoying the odd sized holes I have to drill like 27/64 and 59/64. (sarcasm) It really just means every hole has to be sanded down a bit because I don't have those drill bit sizes. Ugh. A custom case might be in the future to clean up my prototype dremel'in.
I finally tried a volcano concentrate pad in the vape. I originally tried going EVO style and stuck a glass piece into the heater. This was a mess. The pad is much easier and I can get vapor much faster. It does require a 1/2 pre-warm hit to really get it going. So I just need to find a better sized pad and concentrates are back on the menu!
The coding for the arduino is still moving. I thought I'd take a snap of the arduino hooked to the 110v ac to 5v dc converter. Kinda cool that all the brains runs off 5v. To update the code I can power the vape off of a pc usb port and keep the rest unplugged from the wall.
Last edited:
Tricker12345
Member
Any updates?
@Tricker12345
Thanks for asking.
I'm still moving along like the tortoise more than the hare- slow and steady.. Lately I've been re-arranging the circuit board and trying figure out the best layout. I am done with the case after that. I have all the parts I need, they just need to all attach to the circuit board.
I found some cool shit to replace some of the previously used parts. The cable from the box to the heater is now one that is highly flexible and normally used for industrial robot arms. I changed to a black resin coated cable cover instead of the white irish sweater looking one I used before. I tried to use fewer parts and change things out for higher quality parts.
The coding is also pretty locked in when it comes to running the heater. I am gonna try the code out on a 200 watt heater some time this week. So far I've only been testing on the 60 watt.
I post a vid when it no longer looks like a robot barfed on my desk.
Tricker12345
Member
Post that case up as soon as it's finished, what material did you go with? Sounds like it's all coming along really nicely, I've since picked up an underdog to hold me over but I can't wait until you're done and I can start building ")
What will be the advantages of the 200w vs the 60w heater? Hotter, better reheat time, etc?
What will be the advantages of the 200w vs the 60w heater? Hotter, better reheat time, etc?
@Tricker12345 Can do!!!
I went with blue transparent ABS plastic for the first box. Same stuff as lego blocks. I think it is one of the same cases that voltage keeper uses. If I use it again, I like the idea of the display being behind the plastic. It would make the lcd impossible to break at the cost of losing the touch interface. The knob is plenty good enough and has a push button in it. I could add a menu to use the button. It is a fork in the road for sure. I do like the touchscreen and use it more than the knob on the WIP box though.
200w vs 60w... Yeah, all that except one thing: I actually run the vape cooler with a higher watt heater. With more watts per square inch there is more heat across the air path so you need cooler temps to get the same color abv. The downside with a higher watt is that it can overheat itself. I've lost a couple of high watters to warming the vape up from room temp with the old pid controller. This is why I moved to the arduino - to add logic to protect the heater. The code attempts to bring the heater up to temp in a gradual way so I can gain the benefit of the higher watt heater and ditch the flaw.
Still truck'in along.
Making the v1 and soldering what felt like a 100 things has me wanting to make a pcb for the next ones I make. It also has me questioning what a commercial version would look like. Does a vape need to be accurate to a decimal when on a dimmer it swings up and down only by only 10 degrees? I am gonna test some more. I think the answer might be somewhere in the middle. A open loop with some logic maybe?
Right now I have a few custom heaters I ordered and a tiny stack of touchscreen waiting to go into what is next. I just need to go right or left before I go forward.
side note: My last post was wrong ... higher watt does run at the same temp. I think the probe moved along the way along with my memory.
A video coming soon!
What Voltage are your heaters?Still truck'in along.
Making the v1 and soldering what felt like a 100 things has me wanting to make a pcb for the next ones I make. It also has me questioning what a commercial version would look like. Does a vape need to be accurate to a decimal when on a dimmer it swings up and down only by only 10 degrees? I am gonna test some more. I think the answer might be somewhere in the middle. A open loop with some logic maybe?
Right now I have a few custom heaters I ordered and a tiny stack of touchscreen waiting to go into what is next. I just need to go right or left before I go forward.
side note: My last post was wrong ... higher watt does run at the same temp. I think the probe moved along the way along with my memory.
A video coming soon!
I really wanted a cartridge heater with a thermocouple at the tip that I could fit into my old Sublimator head. I could throw together a quick Raspberry Pi or Arduino to control the relay and display. The Pi needs some Voltage level increases to control the SSR, but that's trivial in the long run. I'll have to give the post another read to see if I have any knowledge that could help. I can definitely handle the software side of a Pi or Arduino.@brucee10 Hey! They are 120v but anything can be run off the relay. The custom ones are 250w and run at 17% power to get out around 500F. Maybe one day I'll try a 50v and run the thing off a battery. All the other electronics need 5v-3.3v.
@brucee10 I don't know the size of the cartridge heater used in the sub, but ebay might have the size with a thermocouple. Otherwise ordering a minimum of 3 at omega.com for custom cartridges is the expensive way.
I chose to go off the shelf at the start. I also thought taking the temps on the outside of what I am trying to heat made more sense since it represents what I care about. Say you had your sub in an air conditioned room- taking the temps inside the heater would not adjust for that. You'd still be guessing when it was ready.
Arduino vs pi - I liked that the arduino doesn't need to load an OS to run a heater. I must admit that I have not tried a pi yet though.
Best of luck with your project! I hope you post about it!
hey man!
how is it going?
how is it going?