The Lab Glass Vaporizer

jojo monkey

Well-Known Member
Manufacturer
I posted in the homemade thread, this thread will have more trial and error stuff.

Homemade Vaporizers

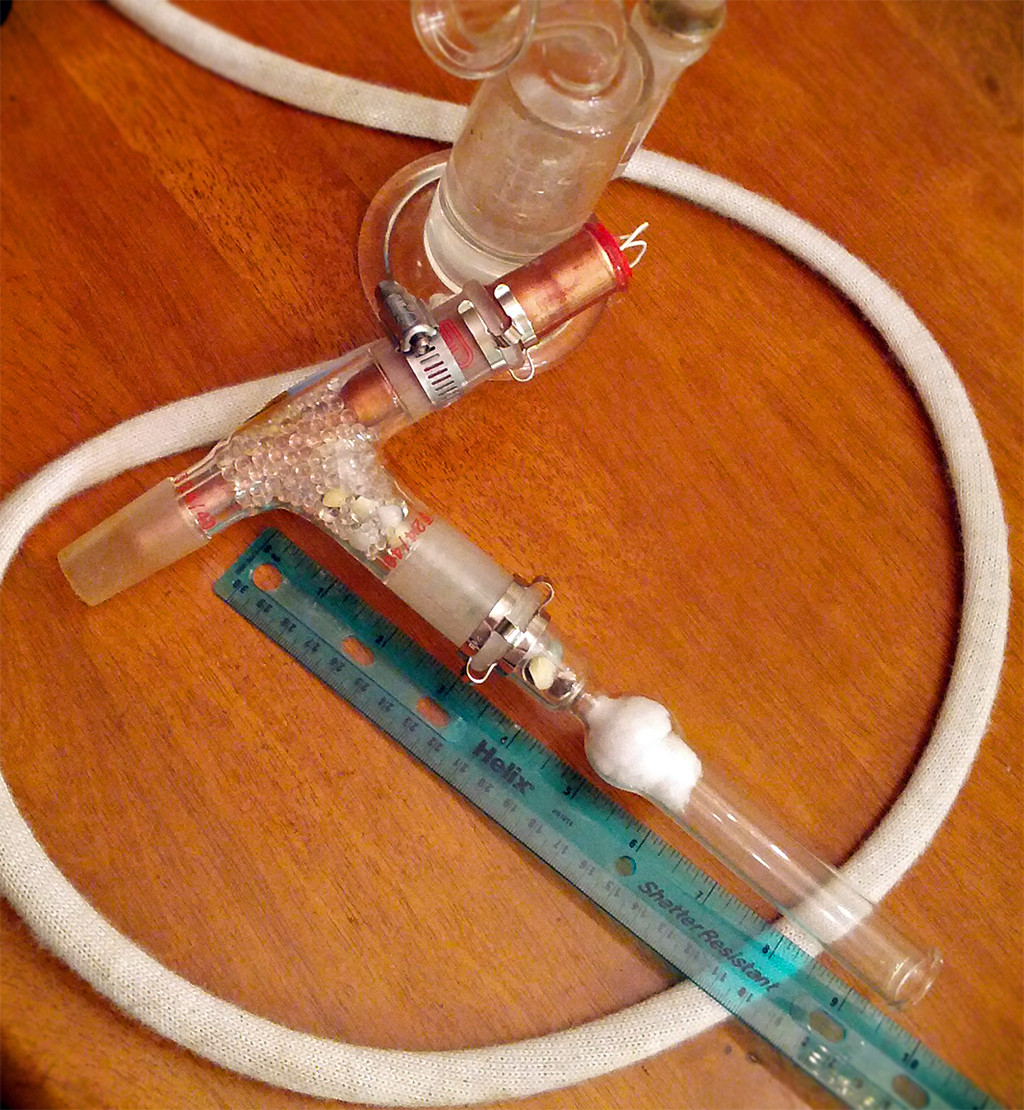
Here is the vape:
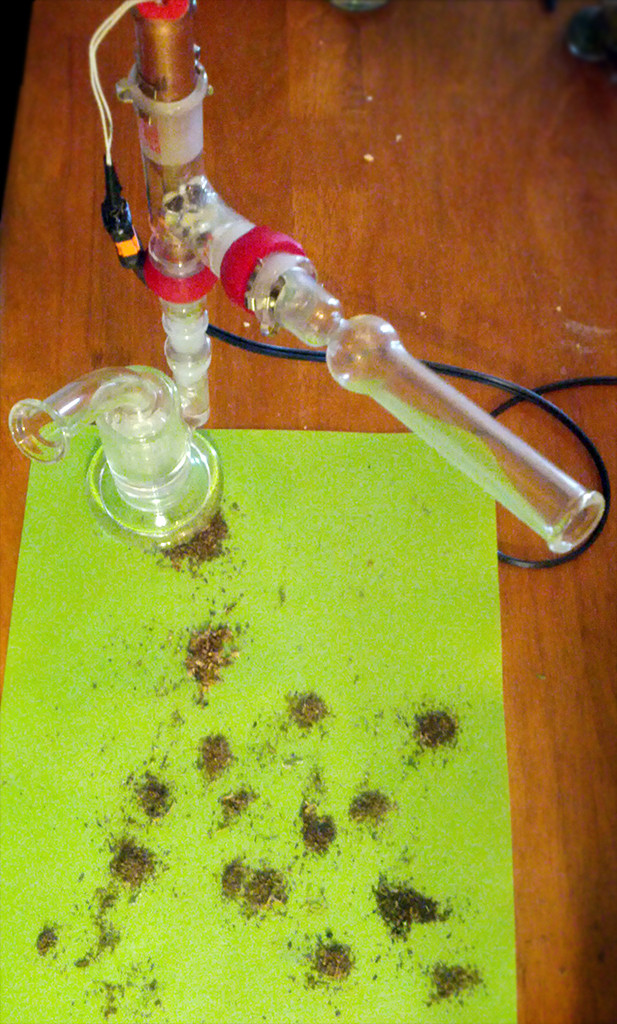
Hy35942.jpg


This weekend I will get to try it out with a pid controller vs the dimmer it is on now. I did get an idea from home brewers that I will add to the vape. I will keep the dimmer attached to the relay so I can have a boost outside of what the pid controller is trying to do. This way if I am taking a hit or if the pid can't keep up I can turn on the pwm and raise the heat. Boost mode with a dimmer!

I will have more after I play around with the pid and the thermometers. I decided on taking the temp on the outside. Taking the temp inside the element is inside the glass and far from what cools the fastest so that is out. Taking the temp in the air path ruins the whole glass path thing so that is out too. The outside should be fine and keep things working the way I want. The next problem is how to secure the probe and to select what kind of probe to use. I have a water resistant one, a small stainless steel one, and I am on the fence about a super thin one that I can stick to the glass with tape. I have some high temp tape on the way to try out. If it all works out this vape will be held together with two glass on glass parts and a piece of tape. I hope this sounds like a good thing to you too.
 

Hippie Dickie

The Herbal Cube
Manufacturer
i am a fan of all glass vaping, so that sounds good.

i selected an uninsulated thin k-type thermocouple (0.010") for my pid for faster response ... thermocouple is held against the hottest spot on the nichrome heater coil by nested polyimide tubes.

if the pid can't keep up

if you can deliver enough amps the pid will easily keep up - mine pulls 12 amps. i just up the temp setting if i need a boost ... it gains 10°F in about 5 seconds.
 

jojo monkey

Well-Known Member
Manufacturer
Hippie Dickie, I am a fan of your vape and posts! I am also a fan of glass.

You were right about the pid being enough. After I "auto-tuned" the pid, I found that a hit had much less impact on the temp and recovered much faster than heating it on a dimmer. I still like the idea of boosting or nudging the pid.

PID notes:

I have only been using the pid for a few hours and don't know shit about how it works other than 30 minutes of youtube. There is more to learn for sure. I am curious about messing with the pid settings. I have found settings for a diy enail:

P=50, I=105, D=237

Very heavy on the P. My pid tuned @ 200F calculated:

P=75, I=312, D=78

I am heating 1-2mm of paste, glass, 10mm of airspace, and glass again before I am taking the temp. The pid would overshoot by 30F past the set temp after a hit. Tuned it lands softly with a 7F overshoot before settling. Because there is so much lag I think I like the idea of keeping the pid settings for soft landings rather than overshooting because of a hit. I will experiment. :science: It is tough though; the more I test, the less I get done.

I originally configured the pid to not show the decimals and when I turned them on I found them helpful. They make it very easy to see the momentum of the pid. The pid controller updates 4 times a second so you see a nice show when you take a hit. This is thanks to the pt100 probe. The probe has a teflon cover and I removed the cover so the probe is directly on the glass. The wire is thicker than I like and there are smaller probes... I might not use it, but it works for now.

I did one more auto-tune (it's very complicated, you hold a button for 5 seconds and wait 15 minutes) on the pid controller at the vape temp, 310-ish on the outside. The new pid settings are:

P=48, I=180, D=45

Much closer to the e-nail's P! Here is how it responds to a hit:

313.1F - starting temp before the hit.
HIT:worms: and then I started the timer when I was done drawing.
296.3F - lowest temp reported - 20 sec after hit
313.1F - crossed back to set temp - 1 min 42 sec after hit
320.6F - max overshoot - 2 min 53 sec after hit
313.1F - crossed back and the decimal shakes a little longer - 6 min 20 sec after hit

Being able to hit it again in under 2 minutes is 1000 times better than what I was dealing with before with the dimmer alone. Well maybe not 1000 times, but it feels that way. I am gonna play around to see if I can change it for the better.

next up:
Still waiting on a few parts to make the wires pretty. Stainless vs something lighter.

Now that I have the pid I can figure out what kind of box I want.
 
Last edited:

jojo monkey

Well-Known Member
Manufacturer
Ok, I am done buying glass. The vape now has hundreds of glass pieces, but needs only 2.

SWe0Lwd.jpg


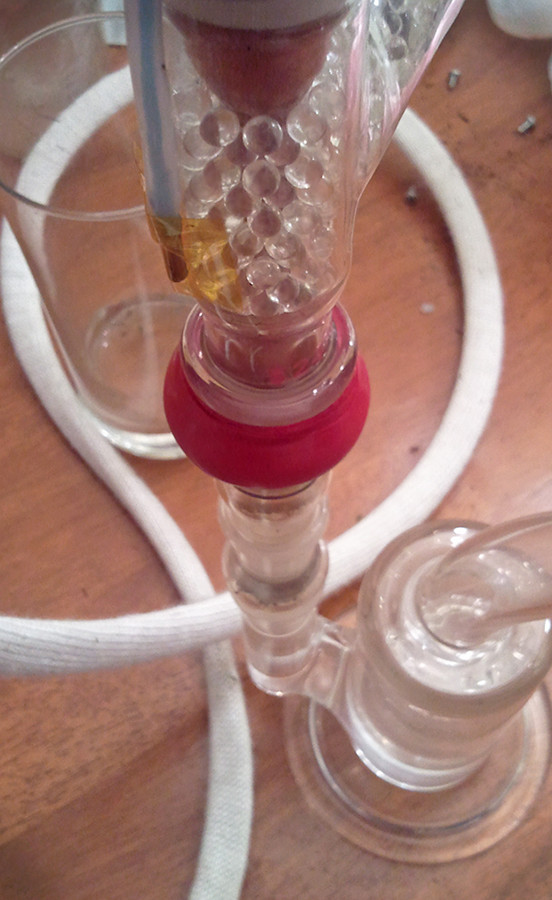
The effect of all of the beads is mostly good. The vaped drops 10F instead of 20-25F without when you take a long draw. The vape spot in the bowl is also larger. I went from just under a dime to dime sized. The vapor seems to show up faster too. The last plus is that I have less overshooting of the temp. The big drawback is that the vape moves slower getting back to temp. The pid setting set by the auto-tune with the glass @ 290F :

P=67, I=288, D=72

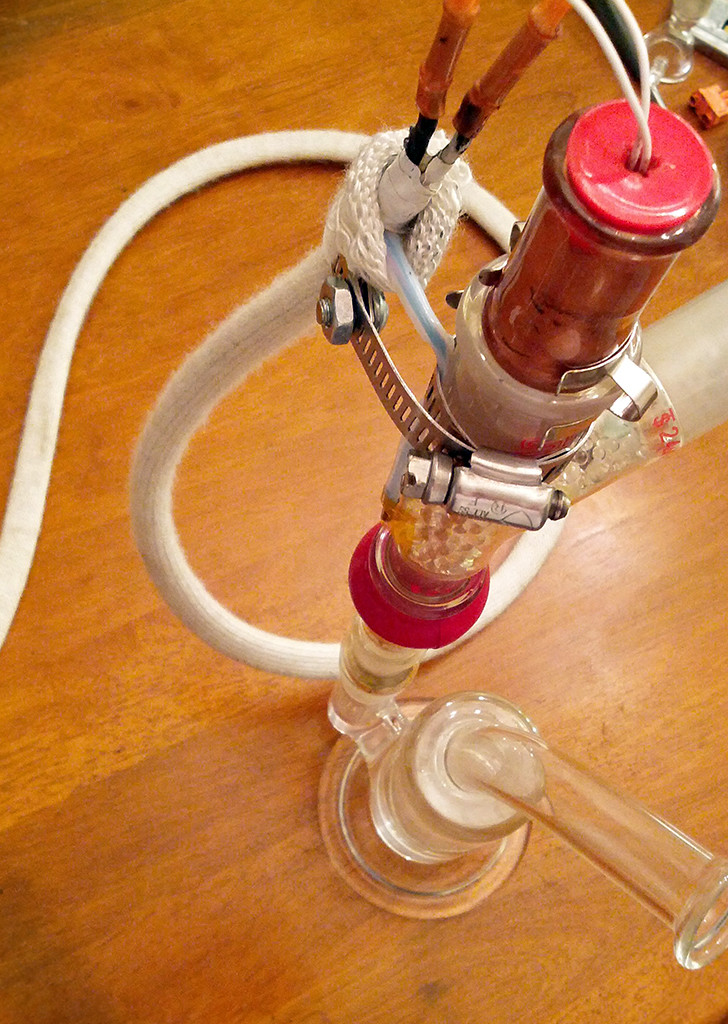
I also secured the temp probe with a clamp and a piece of high temp tape. The tape made a big difference in how responsive the temperature probe is vs the temporary silicone tape I used. The silicone held too much heat.

The last things to do is secure the wires to the vape and to box it all up. I have the securing of the wires part figured out. With the box I am deciding on how much space I want. It's a tiny as can be vs future proof thing. I might want to add a second relay or a timer. I don't now yet. I like the idea of it shutting off after an hour or two. I also want some sort of shut off or warning if it goes way over temp.
 

jojo monkey

Well-Known Member
Manufacturer
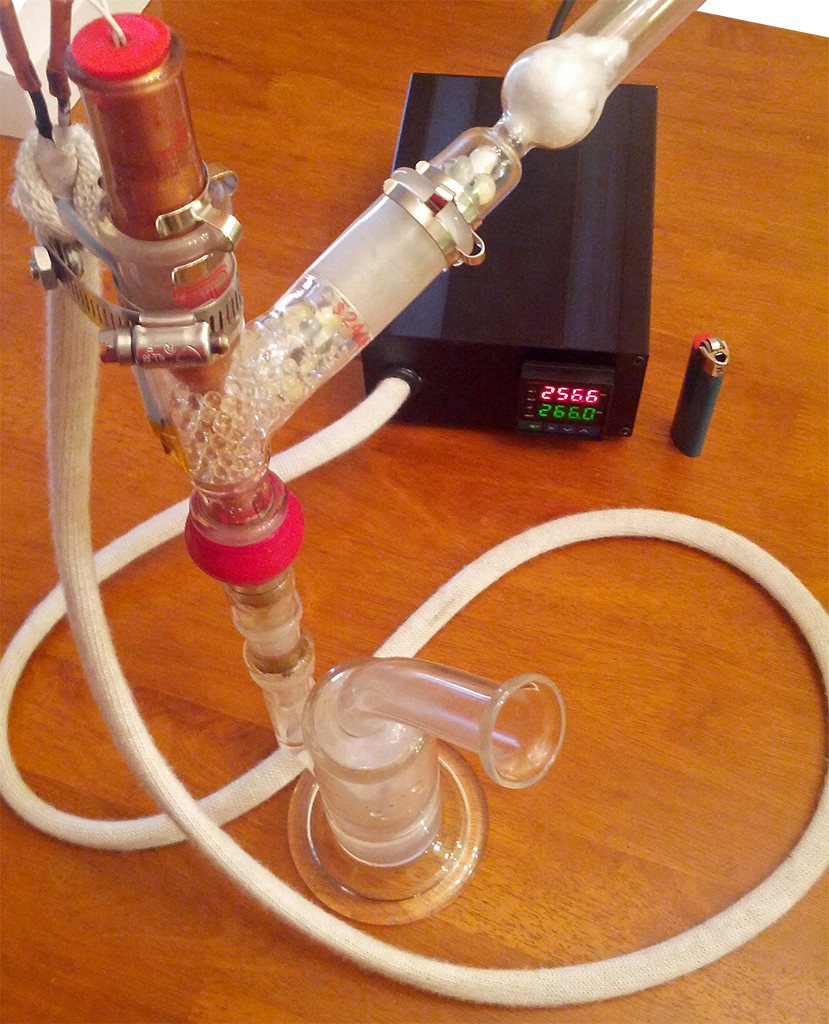
c0LN2n6.jpg

EUlCGzU.jpg


I got the head of the vape done. The wires are a little larger than I wanted, but the probe wire is in a hollow teflon tube and it makes the whole wire lighter than it appears. I am regretting my white cable cover. I did not expect it to be so much like a sweater. It is supposed to resist chemicals and high temps, but dust seems to defeat it. It will be ok for now. I do like that it is quiet on the table. The teflon also makes the wire stiff and have a large curl. This works as a plus because it helps keep the wire out of the way when I take a hit.

I still need a box for the PID. I will probably just have the pid and no boost on the final box. I am really enjoy vaping with the pid alone. The other day I was able to experience herb across 50F degrees in 10F degree increments. I was able to find the best place for flavor with the fine control.

Just about done!
 

lazylathe

Almost there...
That is very cool jojo!!

So basically you have a heater encased in a copper shroud that is controlled by a PID.
You draw air through the side tube and over the heater and directly onto the herb?
Cotton pre filter just in case! Good thought!

What is the exact purpose of the beads? Do they just regulate the temps by being a large, clean heat-sink?
I would imagine the bigger the mass the more stable the temp and smaller fluctuations.

I am going to ready from your first original post!
 

Scott A

Well-Known Member
Really sweet design man, I really dig this thing. I noticed you talking about the "vape spot", do you mean it makes like a halo effect in the bowl being dark in the middle while staying light on the outside? If so have you ever considered maybe using a piece of glass to hold the heater that has a female joint on it that would hook up to a bowl with a male joint that holds the weed? I dont even know if its possible (maybe you already have the parts?) to do something like that but ive always thought if I were going to try to make a vape I would do it like that to see if it helps reduce that effect. Basically keep the hole the hot air is coming out of larger than the inside diameter of the bowl holding the weed if possible. Anyways really sweet stuff and I look forward to seeing more posts about your vaporizer.
 
Last edited:

jojo monkey

Well-Known Member
Manufacturer
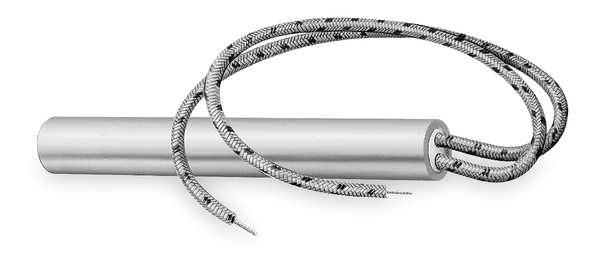
lazylathe - Hi, it's a 60W 3" long 1/4 wide stainless cartridge heater surrounded by thermal paste inside a glass tube. The tube is inside a 3 way glass part for an all glass path.

What is the exact purpose of the beads? It works fine w/o it, but it is better with them. They hold more heat than airspace. I get less temp drops when taking a hit with them in. Most of the beads in the handle do not get hot though, they are there for show (and because I bought too many beads).

"I would imagine the bigger the mass the more stable the temp and smaller fluctuations." Yep, but slower reaction time too.


Scott A - Yeah, a halo would be another way to describe it. I think it just comes with taking a hit in a cold bowl. If I let the bowl warm up a bit, the spot is larger (halo is smaller). Keep in mind the spot is in a 24mm lab glass adapter which is a little bigger than most bowls. I tried doing something similar to your idea using an 18mm part for the bowl underneath the 24mm, but the distance was too much. The real key was keeping the material as close to the element as possible otherwise I have the run the vape at ridiculous temps to cover the distance. Maybe a bowl shaped screen will keep things small and compact in the center?
 

Scott A

Well-Known Member
Cool stuff man. Some of what you are describing are principles that I see working in some of my convection vapes as far as the needing the material as close as possible and such. I see this with my log vapes where it seems like it takes exponentially more power to make up for small increases in screen distance from the heater. I like the idea of a bowl shaped screen, at least I cant think of any reason it wouldnt at least help a little bit.
 

jojo monkey

Well-Known Member
Manufacturer
I think i'm gonna stick the the current bowl and screen combo. My halo was too perfect...... The halo was caused by the glass seal. The vape seals against the screen and this smooshes weed at the edge into a halo that cannot be vaped....a weed seal. The vape does do edge to edge vaping inside the male end going into the bowl. It did not do this w/o the beads. If I hover the vape above the bowl I can get parts at the very edge to vape. Hovering ends up vaping the highest areas including the very edge of the bowl. I don't think the heat is too consistent hovering. The 40mm lab glass seal all the way down works best. I don't mind that it does not vape all of it because of the glass seal. The hits are plenty strong and it gives a nice three hit session when I put in .1-.2 grams. This seems to be the minimum amount for a nice green hit.

If I can get a bowl screen to fit inside the inner glass it would be nice, but it could make the thing harder to load. It is dead easy right now dumping herb into a 24mm opening.
 

jojo monkey

Well-Known Member
Manufacturer
ApwhzxZ.jpg


We are done, son! I've been vaping with it over a month and it is finally nice to have all the wires tucked away. I added a fuse and a on-off switch to the back of the box. I ended up going with a larger box just in case I want to add a timer to the front. I am also curious about a high wattage heater, but the vape performs better than I ever expected. Why mess?

The PID, relay, temp probe, box, and wires..... pretty much everything connected to the box added about $110 to the cost of the vape. The original dimmer and box I built was about $25. I can see why most vapes just have dimmers to control the heat. The difference being one uses the heater at 100% power and a computer to control the heat and the other uses a fraction of the power to maintain the heat.
 

jojo monkey

Well-Known Member
Manufacturer
Well I just did the math and can say that a DIY, pid controlled, all glass air path vape costs roughly $308.50-ish USD for all the right parts. I spent a little more than that due to trial and error. The $308.50 does not include the pipe. Here are the 28 parts(unless I am forgetting something):

cartidge heater $18.00 - 3" long 1/4" wide 60w
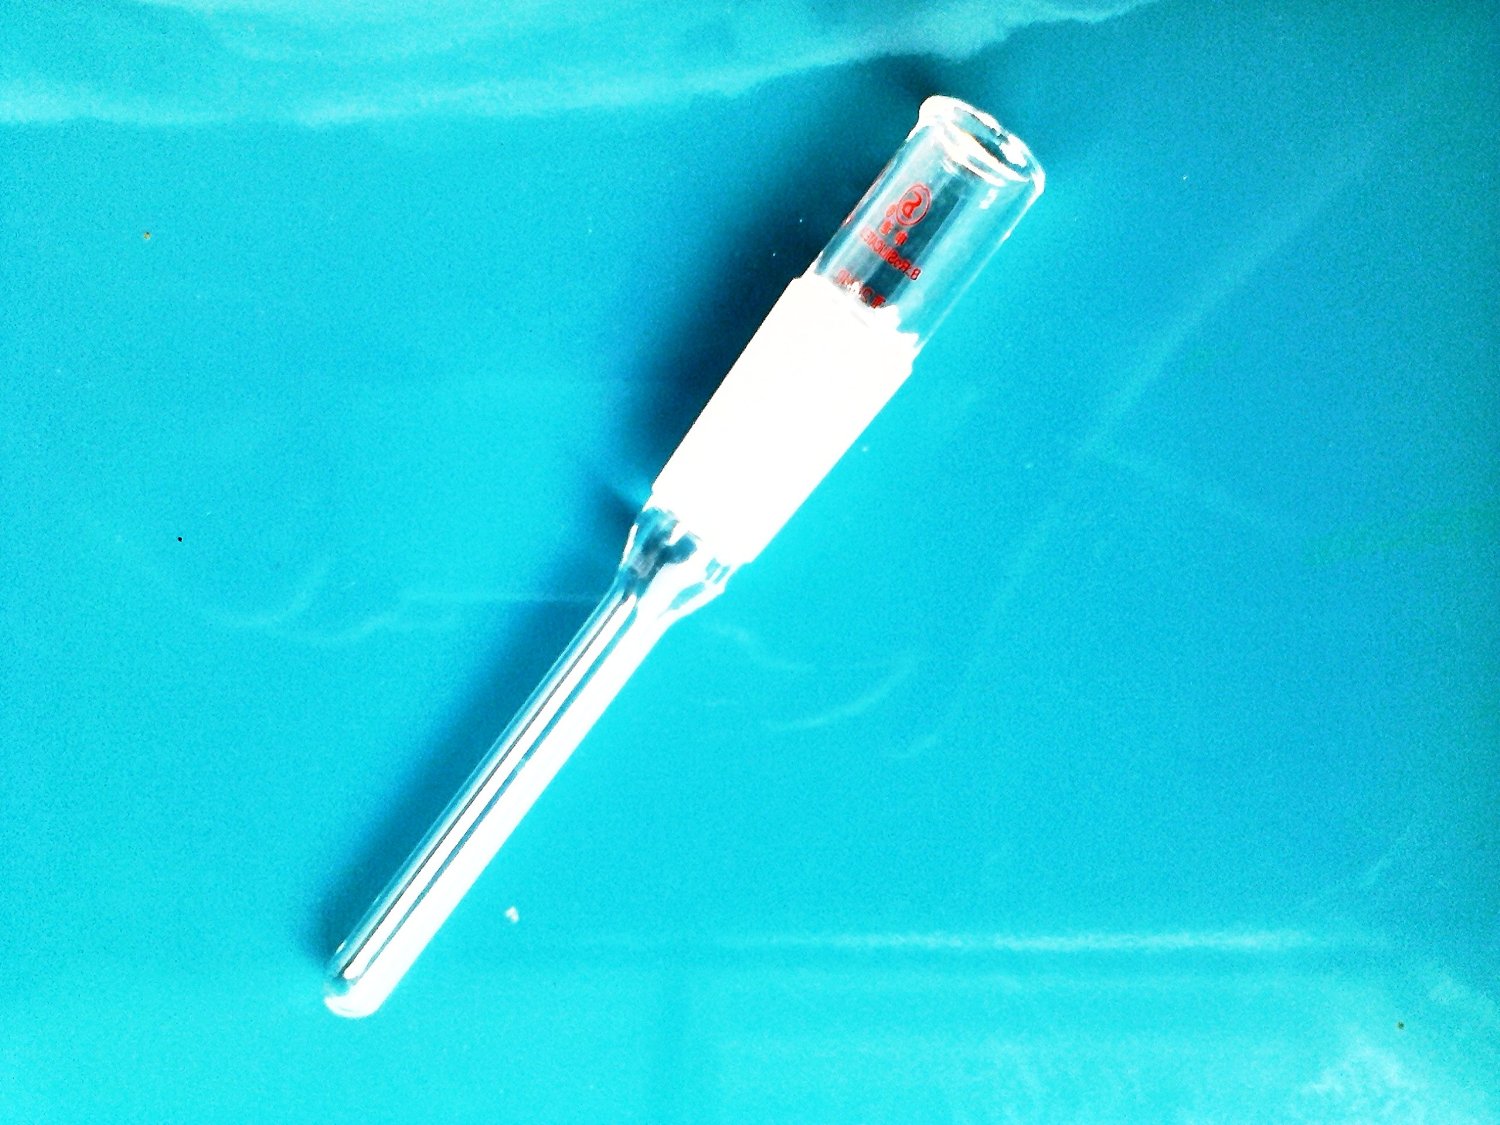
24/40 3way 105º distillation adapter $16.00 - This is main outer glass part
24/40 to 19/22 glass adapter $15.00 - This is the bowl
100m glass thermometer adapter $19.00 - This holds the heater and paste inside the 105 distiller.
thermal paste $16.00 - used around the heater and between the relay and heatsink
beads $40.00 - 300 3/16" boro beads (I am pricing this as if you purchased 300 of the right size..i goofed along the way)
cable clamps $7.00 - these white clamps are on both ends of the cable cover
hose clamp $1.00 - hold the temp probe wire to the glass and has a cable clamp attached to the end
cable cover $10.00 - the white nomex cover
heat shrink splice $5.00 - connects the heater wires to the wires into the pid.
wire $10.00 - to the wall
case $23.00 - is the space
silicone plugs $8.00 - goes on top of the 100mm glass adapter
silicone tape $7.00 - used around the bowl
fuse $2.00
fuse holder $4.00
switch $5.00 - on off
grommets $2.00 - use to hold the wires inside the holes on the case.
pid controller,pt100 probe,solid state relay,heatsink $65.00 - got them all together.
24/40 glass drying adapter $11.50 - this is the handle
24/40 stainless clamps $16.00 - these are the clamps that keep the glass together
glass nail (came w/ pipe) ? - goes inside the bowl to hold the screen
high temp tape $5.00 - used to hold the temp probe.
stainless mesh screen ? - goes on top of the glass nail inside the bowl
anti-skid feet $3.00 - used on the case

I am rounding the price with shipping included to to add a little wiggle room. I also got some of the parts above at the local hardware store. I just want to give an idea of what is in it and a rough cost.

I am sure the person making the next lab glass vape can save money where they want to.
 

jojo monkey

Well-Known Member
Manufacturer
I just learned that you should not calibrate your vape while it is inside of a jar. Ugh. The vape just got even better now that it has been calibrated in an open room. My 20+ degree temp swings are now 2 degree temp swings. I have seen as low as a .2 degree overshoot after a hit. The jar really goofed how the vape recovered.

The other thing I noticed is that how you tilt the head can effect the temp readout.

My new rules:

Store in the open air between hits
Keep upright
 

jojo monkey

Well-Known Member
Manufacturer
I noticed some temp readout jumps that were swinging higher than I like and decided to add some of the thermal paste between the probe and the glass. The change made a big difference in how reactive the readout is. The pid numbers also changed after an auto-tune. The p dropped by half. Kinda crazy that a little paste could help so much?

Since I moved my temp probe I had to once again locate my "flavor number".

With my vape I have no idea what air temps I am vaping at. I measure the temp on the outside glass.

Caryophylene - 119C - 246.2F
Pinene - 156C - 312.8F
Myrcene - 168C - 334.4F
Carene - 168C - 334.4F
Cineole - 176C - 348.8F
Limonene - 177C - 350.6F
Cymene - 177C - 350.6F
Linalool - 198C - 388.4F
Terpineol - 209C - 408F
Borneol - 210C - 410F
alpha Terpineol - 218C - 424.4F
Pulegone - 224C - 435.2F

more at: http://fuckcombustion.com/threads/vaporization-temperature-dependent-selection-of-effects.1637/

I just repeated what I did before. I grinded up a bunch of flowers and vaped green hits at different temps until I got the most flavor. It's wasteful, but worth it. I am using a haze hybrid so in my head I am thinking this is the number where limonene is not obliterated. If you find it, it will coat your tongue.

The way I am currently vaping has changed. I now take one green hit at the flavor temp. From that number I go up 40F and take my second hit. I do one more bump around 15-20F and take a hit or two. The end. Before vaping this way I did not change the temps. Thanks FC for the idea!

The best temps with the weed i am using is around 245F-255F on my vape. So I am doing a flavor number +40 +10 sessions until I figure out something better

I took some temp readings with my laser probe. It can find the max/max/avg temp per reading. With the vape set to 295F on the pid: The outside glass where the beads are present ranges from 200 to 300 F. So I am taking the temp pretty much on the hotspot on the outside glass. The tip of the glass heating element measures 390F. This is at the tip so I imagine the beads are hotter since the heating element has a hot spot in the middle. It is interesting to see the coldest spot on the element be 100F higher than the set temp. The max operating temp of lab glass is around 230C/446F so I should be ok. The pid at 300 is the highest I will vape at so these numbers are at the extreme end.

.
 
Last edited:

jojo monkey

Well-Known Member
Manufacturer
more tiny tweaks....

I just noticed that the amount of water in my bong changes how the vape hits. Less water has a higher frequency bubble and passes more air. Less water needs 15F lower temps and hits hard. It's the reverse with more water. I think I might use more water for first time vapers. The big drag with more water gives weaker hits.

I am still on the hunt for a tiny water pipe with minimal diffusion.

I might start measuring the water so I can have a more repeatable experience.

I just tried a no water hit through the pipe and my nose got zapped! After some googling, this sounds like my trigeminal nerve, the thing that wassabi zaps. I vaped at a lower temp (335myscale) because of lack of resistance.

I used to get zapped on occasion with my old whip vape. I wonder if the water is taking away something that I want. Now I am thinking I need 2 pipes.

New Rule: No water conditioning for the first draw.

The damn thing is a glass muscle and can rob the flavor on the first hit, I might as well get the most of it. No water low temp green hits FTW!
 
Last edited:

jojo monkey

Well-Known Member
Manufacturer
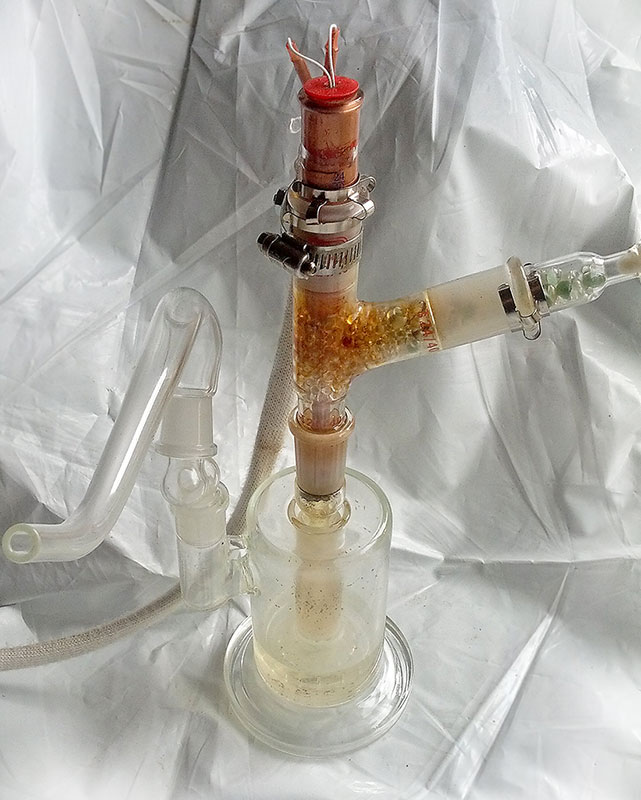
ucz4c1b.jpg


God damn dirty vape!

I put some white plastic down to show off my dirty beads. So dirty. This is what happens when you leave the vape head on the bowl for whip hits. The puffs of vapor that aren't cleared rise up. I don't mind it, but I did not expect it to spread so much. Cleanup is easy, I just need to remove the top clamp and pull up on the heater glass (aka 24/40 100mm temp prob adapter) and the beads will fall out. A few hours in iso cleans them up.

I am trying to clear it between hits when I can to keep it clean. I do like leaving the vape on the bowl as much as I can. The bowl gets super hot this way and I had to remove the silicone I had wrapped around it. (It just insulated it too much and got unnecessarily hot.) I am able to grab the bowl by the bottom to dump it. The end result is that I don't get temp drops like I used to putting the head into a cold bowl. The vape is much more stable leaving the head in. New rule: leave the head in the bowl and clear it between hits.

Once I started using the fc-ufo and I have not touched the j-hook for low temp hits or the d021-chug-a-lugger. I find myself using the j-hook as a mouthpiece and keeping the temp at a place a little under combustion. I replaced the tubing that came with the fc-ufo with 1/2 ID food grade tubing off amazon. I also replaced the whip mouthpiece with the SSV's because it is much larger and allows better airflow. So the really neat thing is that I can switch between tubes and mouthpieces on the same glass piece. I have a few whip lengths and my shortest is 18". If I compare the shortest whip with a glass mouthpiece I always get higher with the pure glass. The glass also gives more flavor. I did not think the silicone would make the herb so boring. Maybe a different material or a smaller inside diameter tube would change things? I still like the whip option, but I now look at it as a tool to use for social events. Silicone is not something I want to use when I want to get the most out of herb. I'm gonna test this some more and experiment on some people.

The fc-ufo is an amazing tool. Buy it on DHgate. Thanks fc!
 
Last edited:

jojo monkey

Well-Known Member
Manufacturer
Perks of a DIY vape:

A month back I decided it was a good idea to stand my vape head up on the PID box between changing the bowls... so I got up and out of the corner of my eye saw the glass head slide down the wall. For a few seconds I did not even want to look. Were there hundreds 400F beads all over the place? Did the glass around the heater break?

Lucky for me, the one part I always hoped would break if it fell broke....the handle... the cheapest glass part on the vape and the longest. The handle has a taper in the middle and this is where it broke. The handle costs around $9 from China and $11 within the US ( It is called a 24/40 drying adapter). The new one is a little longer so, more beads! I was off the handle for 5 days.

I was thinking, even if the whole thing smashed, the beads will always be good. The heater is a stainless cartridge so it wont get hurt. The worst case would be replacing all the other glass:

24/40 3-way distillation - $16 shipped
24/40 drying adapter - $11 shipped
24/40 100mm stem thermometer adapter - $18 shipped

So under $50 to replace the glass that could break. Not bad?

The other perk is that lab glass can be found on ebay, amazon, and all over the web. I think it will exist longer than most vaporizer warranties. Hell, I already own a vape from a company that went under and I can no longer get parts. I wont have this problem in the future and the parts are cheap.
 

jojo monkey

Well-Known Member
Manufacturer
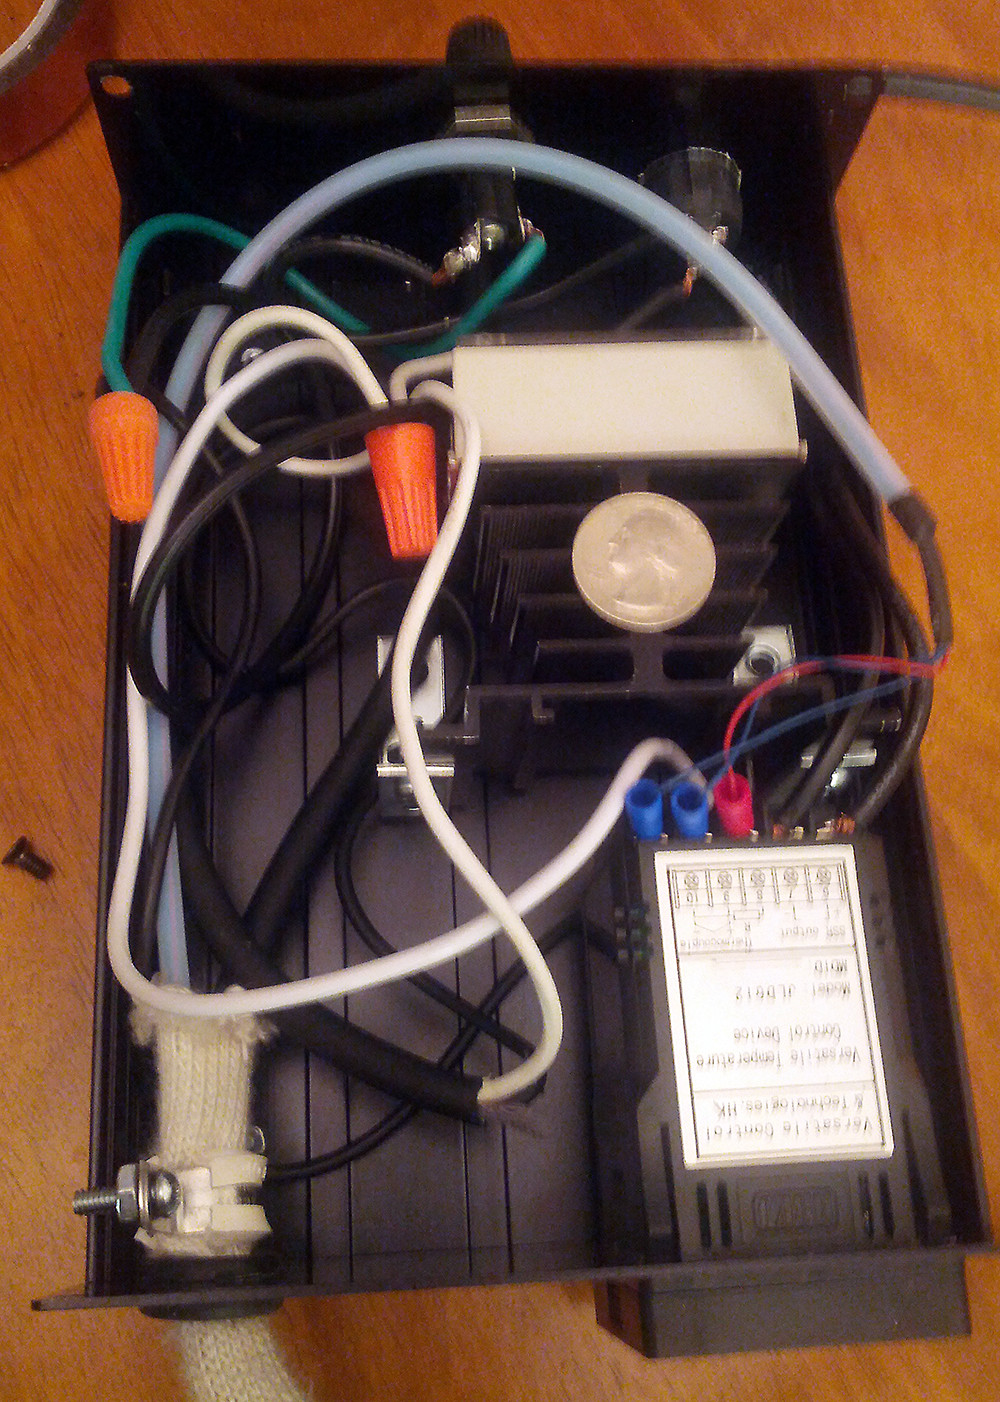
guts...

8N795nS.jpg


I thought I'd post a pic of the pid controller and solid state relay(SSR). The wiring is the same as any smoker, sous-vide, kiln, or whatever else that uses standard heating parts. All I did was follow the diagram that was included with the $30 pid controller. The heatsink never gets hot and I probably could have mounted the SSR to the case and skipped it.

Well I have been using this vape for over 6 months and have had no issues with the heater. I have left the vape on as long as a week. I normally leave it on all day. It is very nice to just walk up and take a strong hit or two and go about my day.

The vape takes just over 8 minutes to reach my normal vaping temps from OFF in an air conditioned room. When I read that more expensive vapes take longer to warm up or have to shutoff after set period of time it makes me feel good about the design and my savings. I also believe it should hit harder than any similar vape since I have more heated surface area and mass.

BTW, glass holds heat better than titanium and steel, it just takes longer to get to temps.
 
Last edited:

jojo monkey

Well-Known Member
Manufacturer
How to make a heater for the lab glass vape:

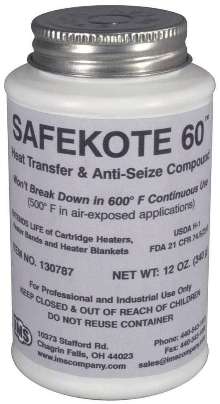
There are few vapes that have heating elements surrounded by glass. The ones that do heat air to heat glass to heat air. The lab glass uses a heat transfer compound to distribute the heat. The stuff is pretty much the same goop inside of a stainless heater. So it heats copper and aluminum to heat glass to heat air.

uHvI3QN.jpg


This is the stuff I used. It takes a bit to cook down and will bubble for a bit; This is the grease cooking out. I filled the 24/40 thermometer adapter just above the heater and had to replace the paste a couple times to top it off. I put the paste in a ziplock bag with the corner cut and squeezed a stream to transfer it; It is messy stuff.

The heater is a "low-watt-density cartridge heater" and has a 1/4" diamter and is 3" long. The one I use is 60W, but I might switch out for a 100w just to try it. I got mine at zoro.com for under $20 and its mfr part no. is LDC01950.

WMERWs2.jpg


The heater and the paste are inside of a 24/40 100mm thermometer adapter that you can find on amazon or ebay.

NdEPmOO.jpg


I have high temp silicone plug on top and put a hole in it for the wires. That is it for the heater! The heater could be hooked to a dimmer or a pid controller, it depends on what you want to spend.

Next up, how to make the rest of the vape head.
 

jojo monkey

Well-Known Member
Manufacturer
ecapple iv-1 (Chinese portable) vs lab glass vape
an apples and oranges battle


So I got a portable to go to a mountain and back again, kinda like a hobbit. The portable uses a single 18650, has temp control, and usb charging. The iv-1 also has a glass mouthpiece and mostly spill-proof glass bubbler.

So anyways.... The biggest difference between using the portable and the glass vape is the draw. It takes a 10-15 second draw on the iv-1 and a 2-5 second draw on the lab glass vape to get a nice hit. Using the iv-1 is like breathing through a coffee straw.

The glass vape drops 10F after a big hit, the portable drops up to 150F.

The iv-1 hides the temp overshoot and real-time temp once at the set temp, the glass vape does not.

The first hit from the glass vape is waaay more dense than any of the hits from the iv-1.

The iv-1 takes a few hits to get going. The glass gives you most of the extraction on the first hit.

The glass vape win on flavor, it extracts more and uses convection heat so there is no popcorn flavor in the later hits.

These days I use 0.05 to 0.1 grams in a bowl for the lab glass vape to get one nice hit and 2 additional 'ok' hits. This is enough to get me very high for a good while. The portable uses 0.3 grams in a ceramic chamber that uses conduction to heat the herb. So you are cooking herb the whole time it is in vape mode whether you are hitting it or not. I get 6-10 hits off a packed ecapple.

The iv-1 gets me high, but not as high as the glass vape and it takes a toll on my lungs having to hit a vape so much to get to where I like. Would you rather hit a vape for 150 seconds or 15 seconds to get messed up? It was also irking me using 3 times the herb I normally use at home just to be portable.

I really look forward to more efficient portables being available. I went cheap and got something that worked ok. It was nice to be portable, but using it was not without costs.
 

jojo monkey

Well-Known Member
Manufacturer
Well I am coming up on a year with this vape as-is. My original goal was to come up with a DIY vape that had very little customization and used all off the shelf parts.

I am an ethernal tweaker (not twerker) when given the chance. So I think I am gonna make a few changes to the vape. One big change, if all goes well, is I'll have a custom lab glass part made. I am breaking away from my original idea for sure.

I have a new heater on the way and brushed up on cartridge heater do's and don'ts. I made the mistake of covering the leads on the old cartridge with paste, this is a no-no. I never had any issues with the 60W though. I am gonna leave a bit of the cartridge exposed for a cold spot at the top on the new one.

So for the next heater I am gonna bump up to a 300W. I am hoping for a sub 2 minute warmup and very fast recoveries. Initially I was worried about the electricity, but it really isn't much more expensive. If I ran it for 24 hours it would cost 10 cents a day VS 53 cents a day. I think the time it's gonna save is worth the expense.

I am also replacing my Fotek solid state relay with a Crydom relay. I've read reports of fake Fotek relays burning out and stuck on. This should not happen with proper relay. My relay is missing the markings of a real one so out it goes! The Crydom cost 3 times more and is rated for over 2 million hours so I should be good for some time.

Hopefully the new heater core works out!

Now I just need the glass blower to blow me... some glass.
 
Last edited:

jojo monkey

Well-Known Member
Manufacturer
300w heater upgrade is sorta installed. I had to work around not having the right glass and rigged it out to take it for a test blaze.

Watching a 300w heater run through the pid controller's auto-tuning is a little scary. Part of the calibration has the heater dropping below the set temp and running at 100% power until it crosses back (normally a pid fires for 1-2 second bursts). The whole thing was glowing orange and I never saw any glow with the 60w so it threw me off. I calibrated at a lower temp for now.


So far so good though. I think the pid makes it soft land too much so there is tuning to be done. I can see the relay is firing much much less to maintain temps.
 
Top Bottom