• Do NOT click on any vaporpedia.com links. The domain has been compromised and will attempt to infect your system. See https://fuckcombustion.com/threads/warning-vaporpedia-com-has-been-compromised.54960/.

InductionVap - Dual use induction powered vaporizer

AWistfulNihilist

Well-Known Member
Hey Everyone,

Finally decided to make an account and post, been lurking around here for a bit! A lot of inspiration for this device came from these threads. I'd like to walk you all through the current version of an induction powered vaporizer made from easily (hopefully) sourced parts. I wanted it to also function as a stand alone IH for a vapcap as well, multi-purpose is always better.
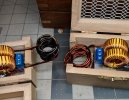
Parts list:
  1. Standard 5-12v zvs induction driver w/coil (amazon, ebay, alibaba, whatevs)
  2. 14mm female to 18mm male long glass adapter (not the single piece, the stacked piece with a donut shaped connector between)
  3. vapcap you are willing to cut the top and tab off of (I had a couple of broke ones)
  4. 3mm steel balls, I'm using 440c, but no reason you can't use 316. 10 or 15 is plenty.
  5. Some type of glass bead or pearl to fill to void. Borosilicate, ruby, quartz, sic, whatever works. I'm arriving at 3-4mm borosilicate beads, cheaper and no danger of getting so hot you would break or melt them.
  6. 12v 8amp power supply
  7. Button trigger. I'm using just a high capacity button wired directly to the power supply right now, I'm upgrading this to a mosfet protected momentary button with a 12v relay/delay to trigger a 30-60 second pulse. I'll wire the output to the led on the button so it's on while the induction heater is working, giving you an integrated indicator without having to wire an extra led.
  8. Wiring components, female barrel connector, 16-20awg wire, wire nuts or wago connectors
  9. 2x ss 14mm basket screens, 2x ss 18mm basket screens. 1 or 2 1/2" SS pipe screens to block the beads from the weed at the beginning of the 18mm male joint.
I'll walk through the construction with a few picture, initially I just had the thing naked and was manipulating it with the ZVS, now I built a cute little box for it.

Sorry about the Imgur imbed, was having trouble figuring out how to imbed images directly in here. The final picture is probably .3, maybe .4g of herb with some concentrate. Heat up is around 1 minute, full extraction took around 4 minutes.


I have a video walk through including a full session using it, it's currently loading up on the ol' youtube, so for now you can check out this video for the body pre-box and the old glass set up:


Problems that need solving:

  • I'm exceeding the duty cycle on this IH, but what does that mean for the unit, failure or chance of dangerous failure?
  • Current button set-up needs work, no mosfet, have to hold the momentary down for a while
    • possible fix: latching momentary or relay/delay to create timed cutoff (what I'm doing)
  • Having to cut a vapcap sucks, but it's so fucking perfect. I have some 316 solderless ss tubing coming in a couple sizes, hoping to find something cheap and easy to get/cut.
  • Corrosion? All the SS is getting heating to somewhere around 600f. No coating left after that.
  • Anything else you can think of!
Would love feedback, thoughts, improvements you would make. I want this open source, if you're going to make an IH for your vapcap why not make a desktop vape that qualifies as a heavy (IMO) at the same time? All in this thing is around 100 dollars US, even if you have to buy and cut a vapcap. That's if you don't have any of the parts already.
 

AWistfulNihilist

Well-Known Member

It loaded! Here's a 10 minute walk through, I ramble the entire time, sorry, I was testing a lot...

Timestamps:

0:00-1:40 - innards
1:40-3:40 - loading with herb/rosin
3:40-8:00 - extraction (vapor @ 5m)
8:00-end - AVB! The last image in the show is the AVB from this sesh, I predictably-accidentally turned off the camera while trying to get a better look.
 
AWistfulNihilist,
  • Like
Reactions: kenske

AWistfulNihilist

Well-Known Member
We got a little bit more development on the InductionVap. We've gone up a body version and 2 heaters!

I present, InductionVap V5body V4heater:

IMG_20201108_215609.jpg

  1. Standard ZVS (must be version with slightly higher gauge induction coil, lower gauge will burn itself out. Need to get the actually gauges)
  2. 12v relay/delay to time an on/off cycle for the heater
  3. 12v led latching button hooked to a mosfet
  4. 14mm female to 18mm male short stack adapter
  5. Borosilicate beads, 3mm (many)
  6. Quartz or other stone terp pearls, also 3mm (few)
  7. 3/8in tube steel (316 SS) @ .02in thickness - you only need a half inch, they sell it in 6' lengths. Need a better source here.
  8. 3x 1/2-3/4 SS screens to trap the boro beads in the middle. You need 2 screens between the beads and the herb for stability.
  9. 2x 14mm basket screens for the heater and 2x 18mm basket screens for the ends of the glass (DDave was my source here)

We've abandoned SS balls and have moved on to a slightly thicker tube of SS filled with 3mm quartz terp pearls. The 3/8 316 SS tube steel we're using is now .02in thick. It's much more capable of absorbing and conducting that heat from the induction. We're filling it with terp pearls instead of boro pearls because they're rated for a higher heat, we no longer need to double up the SS with SS balls, I don't think the SS balls are really getting a lot of induction through the tube steel anywho, mostly conduction from the tube.

However, we're filing the body with the much more cost effective boro pearls. You only need 10 or 15 quartz pearls to fill the SS tube. But you can get a shitload of boro balls from Vgoodiez for like 10 bucks. Those things make every other conduction powered vape better anywho.

We're timing a 50 second on, 10 second off cycle for the heater. This starts as soon as you power the unit on with the latching momentary button. I double wrapped the heater on this one, I don't think I'll do that again. The long cycle is causing the inner coils to darken from heat.

More pics!

Here is how to assemble the heater and place it. It's important the bottom of the heater is squeezed by the SS screen. The heater should be stable in there ever if you turn it around, the additional 18mm basket screen on top is the channel air and as an extra safety layer.

IMG_20201108_214417.jpgIMG_20201108_214505.jpgIMG_20201108_214610.jpgIMG_20201108_214652.jpgIMG_20201108_214757.jpgIMG_20201108_214829.jpgIMG_20201108_214844.jpgIMG_20201108_214855.jpgIMG_20201108_215048.jpg
 

AWistfulNihilist

Well-Known Member
Now I'll take you through the body, but first let's take a quick review of the last update:

IMG_20201108_215304.jpgIMG_20201108_215419.jpgIMG_20201108_215352.jpgIMG_20201108_215222.jpg


It's a bit bulkier, we got the size and weight down quite a bit, but other than that the heater worked great on this one. The move we did was a lateral rather than a upgrade.

Our new version:

IMG_20201108_215609.jpgIMG_20201108_220553.jpgIMG_20201108_215619.jpgIMG_20201108_215658.jpg

The 12V delay/relay is in there, I got the cheapest one on amazon that had both and button triggered and automatic loop. My loop is 50 seconds closed, 10 seconds open, repeating forever on power up. I could put in a momentary trigger and button trigger the loop, or require an input for each 30-60 second heating cycle. These things are surprisingly robust and easy to program.

Finally I'll leave you with an update of a full session with concentrate, please enjoy!


TommyDee

Vaporitor
You've solved the inconsistencies of the cap material's coupling ratio. Having a constant load simplifies a lot! Congrats @AWistfulNihilist . Any idea what kind of power levels you are running? No reason we can't crank that right up to 120 watts if you want.

BTW, take a look at Scotch Bright stainless steel pads. Literally one continuous stainless steel ribbon. Insane amount of surface area. They need a bake for cleaning but it is a seriously cheap heat dissipation material. - Scotch Brite SS pads Most grocery stores carry this stuff for a couple bucks. I have some for a log heat diffuser.
 

AWistfulNihilist

Well-Known Member
Unfortunately I do not, I misplaced my multimeter while redoing my garage and I haven't dug it out yet. Seriously need to. I would definitely love to see if I have additional room for power, I'd like to lower the cycle to maybe a 25/5 or even like 20/10. Since I'm not yet at the point where I'm introducing temp control, the amount of time spent heating is important. 50/10 is fine if I'm constantly hitting it, but it only take about 5 cycles totally alone before the inner coil darkens. The next cycle, the coil it will start to smoke. I either need to limit the amount of cycles or figure out a sweet spot for heating time.

I want to play with scotch brite pads as a heater outside the vapor path. I have a piece of enail glass a straight tube to fit a nail and a void to insulate. I'm going to stuff it with scotch brite and see if I can get the vapor path hot enough to heat a bunch of 3mm boro balls enough.
 
AWistfulNihilist,

TommyDee

Vaporitor
I see gears grinding my friend. There are ways to know how the unit is performing. I recently got a little lab supply that reads out watts. 30V 10A with fine adjustments really makes studying and testing these things much simpler.
 
TommyDee,

AWistfulNihilist

Well-Known Member
Hey everyone!

I got a little annoyed at tasting offgassing from the coated magnet wire, so I wanted to move the intake further away from the coil. I ended up taking more inspiration from the G43 and have built the heater inside of a 19/22 bent air intake. It's cause the air you intake to be forced through the center of the heater, which improves function quite a bit! Less heat up time for more consistent heat.

Two new videos:

First we go through the assembly of the new heater

Here is a function video, I'm starting it at vapor production, go back to see I load the bowl. Basically pulling and showing the contents of the bowl after every inhale.

Changes is this version:

  • Switched from 14mm female to 18mm female glass adapter to a 19/22 bent inlet adapater for the heater
  • Moved air intake away from the wire coil and created an unintentional handle!
  • Reduced time to 25/5 on/off

Pics:


IMG_20201206_121547.jpgIMG_20201206_121611.jpgIMG_20201206_121708.jpg
 

AWistfulNihilist

Well-Known Member
You could make the head quite a bit smaller if you wanted.

I love the concepts but the size is problematic. There is an opportunity to put only the coil and the black capacitor near the bowl. The connecting leads need to be sizable, and they need to run nearly parallel and close together, but they can be be conventional 12 gauge wire pair. The circuit board and inductors can remain remote. Limit the lead-length, of course. The lead-wires are still part of the active inductive circuit. That is why the lead-wire pair needs to run close together. Look at silicone hobby wire for flexibility.

Theory behind this - the work of the IH is done with a signal bouncing back and forth between the capacitor and the work coil. That is where all the high current happens. The feed-circuit, the energy stored in the inductors, is buffered by the inductors themselves stretching out the time domain. The capacitor's discharge is nearly instantaneous and is the reason for the high current pulse directly into a 1uh inductor, a virtual short circuit. Pay attention and you can fashion a nice little heater-head with a remote circuit box.
Quoting this here for reference, this is where I am currently going in development.
 

TommyDee

Vaporitor
Sweet! Remember that the lead-wires are essentially an active coil. The rule for minimizing energy loss in generating and collapsing the magnetic fields is bringing both legs of the lead-wires as close together as possible to minimize the magnetic field around the lead-wires. Millimeters rather than centimeters type of thing. This is how you control incidental coupling with iron objects along the wire as well. Things like keys and maybe magnetic strips on credit cards just to keep this in mind :D

Looking forward to what you come up with @AWistfulNihilist

Edit - loving the lab BTW!
 

AWistfulNihilist

Well-Known Member
Quick update!

Got a few days off work coming up and I'll be spending a bit of it on this. We have a new heater build in the works, we've been able to reduce the overall size and weight by around 30/40%, which is fantastic!

Heater coils are moving inside the wood. I've separated the inductor and zvs board and the capacitors. The capacitors are living inside the box, but i'm having trouble getting enough energy into the coils. Need to reduce the length of things and switch over to 12 gauge wire.
 
Last edited:

iDRINKBLEACH

knowing is half the power - Gi-JOE
Accessory Maker
moone boy waiting GIF by HULU
heck yeah hoping to see the changes, I'm guessing this weekend?
Quick update!

Got a few days off work coming up and I'll be spending a bit of it on this. We have a new heater build in the works, we've been able to reduce the overall size and weight by around 30/40%, which is fantastic!

Heater coils are moving inside the wood. I've separated the inductor and zvs board and the capacitors. The capacitors are living inside the box, but i'm having trouble getting enough energy into the coils. Need to reduce the length of things and switch over to 12 gauge wire.
 

AWistfulNihilist

Well-Known Member
PROBLEMS:

IMG_20201227_021616.jpg

So this is my OG device on the left, it's the daily driver and it's taken some damage. To the point where the bare coil touching started to short out the entire apparatus. I've ordered some fiberglass heat sleeving material, I'm hoping by covering the heating area with some light insulation, I'll keep the heat from killing the coils quite so fast, or at all. Gotta be fiberglass or something else that's not going to affect the coupling of the coils to the metal tube.

The wrap on the right is not tight enough to produce hot enough metal. Closer, tighter, more loops. About an inch of tube and an inch of tight coil wraps. I'll rewrap the wire once I have the insulating sleeve and try again.

Development on the TommyDee "half/quarter-pint" unit is very slow. I'm having an incredible amount of trouble getting either a good wrap on the coils or enough power to the work coil to get the metal tube to the point where it's 500-600ish degrees, where it needs to be to get air hot enough to vape weed.

I would love suggestions on sources for appropriately sized copper wire for the actual work coil, either coated, or uncoated will do. I'm thinking of potentially just wrapping some coils in tight sleeving as well.
 

TommyDee

Vaporitor
@AWistfulNihilist - 12 awg, 30", Ace Hardware solid 12 awg house wiring. strip the insulation. Otherwise the 12 gauge magnet wire from eBay. you want the 200 degree centigrade stuff, not the 155C red stuff.

A mandrel is key to winding the coil. If you got a spec, we can talk.
 

AWistfulNihilist

Well-Known Member
Okie Dokie, we're back in business. A quick few looks at the addition of hte insulation. I need to put a longer piece in however, this one wasn't quite enough to cover everywhere the coil touches the boro.

IMG_20201227_155204.jpgIMG_20201227_170437.jpgIMG_20201227_172359.jpgIMG_20201227_173252.jpgIMG_20201227_173300.jpgIMG_20201227_173926.jpg
 

Attachments

  • IMG_20201227_021616.jpg
    IMG_20201227_021616.jpg
    895.1 KB · Views: 29
Top Bottom