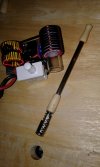
diy induction heater a little too hot

jmej

New Member
I built this the other day and would love some tuning advice. right now my vapcap clicks at around 3 seconds the first time, and even quicker for successive times. This much power is hard to deal with / dial in desired results. At least that's my initial impression, but I'm new to all this. The cap clicks really quick, but it takes 2 rounds usually before it actually produces visible vapor. At that point time to click is probably around 1 second in the heater each round after cooldown click.

Should I remove one or two coils? any other approaches? or do I just need to learn how to work with extremely quick timing?

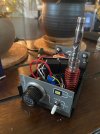
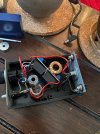
Also -- are these coils safe on plastic? It doesn't seem to get hot when powercycled super quickly, but is there any thin material anyone can recommend for putting between the coil and other components or plastic sides?induction_heater_1.jpginduction_heater_2.jpg
 
jmej,

jmej

New Member
What kind of voltage and amperage should I be looking for and where? (And what effect should removing a cap have on that?). I'm handy with a multimeter etc, but don't really have my head wrapped around this circuit.
 
jmej,

TommyDee

Vaporitor
There are a few constants you can count on; watts are everything. Caps act differently from one to another in an IH. DynaVapors vary like the color of rainbows in preference.

If you can measure amps, you can calculate watt by getting a simultaneous voltage reading. Or use a meter that reads watts. If you have a variable voltage supply, you can set the voltage and current to coincide with 60-70 watts when heating the VC. Tune for each cap and see if there is a happy medium in the range prescribed. If you just want to know how the IH and specific caps are performing, take a wattage reading and you'll have an idea where you are on the spectrum.

Removing the capacitor will reduce the power level by a notable amount. You can clip a leg or unsolder the thing.
 

jmej

New Member
Thanks for the help! Yeah, my heater is pulling 78-82 watts during a 3 second heat cycle. i’m gonna go ahead and clip a cap and see what the different is.
 
jmej,
  • Like
Reactions: TommyDee

jmej

New Member
after removing one of the caps i get around 50 watts and around 5 seconds to click. seems maybe a little more ideal, i’ll put it through its paces and see how it goes. thanks!
 
jmej,
  • Love
Reactions: TommyDee

tokenknifeguy

Well-Known Member
When using a torch, on the 2020 M, I usually hit it up about 1 second after the clicks and get really great hits. You should try that too, as I think it clicks sooner than it should, rather than later. That is a good thing too.
 
tokenknifeguy,

TommyDee

Vaporitor
@tokenknifeguy - interesting fact about induction heaters - there are two tuning parameters; ingress depth and power.

Ingress depth, the centering of the magnetic field, has everything to do with the clicker delay. The further the clicker is away from the center of the magnetic field, the center of the coil, the longer it takes to click. This means more heat of course, same as the 'extra second', but you can dial it in. In fact, the smaller the coil, the more sensitive this setting is. The best baseline for a new IH is to place the flat of the DV cap flush with bottom of the coil. Adjust from there. 3/4" coils are very forgiving where 15mm coils change their delay drastically with 1/2 millimeter moves.

The power level is how hot it bakes. You want a 4 second bake, sure HOTTER-N-HELL it is. 100 watts and just try to get that clicker to catch up before it combusts on the walls of the tip. That's the cost of speed - and some love that! Combustion, so what? No me - I hate combustion! I have learned 60-70 watts makes for a wonderful bake. A big open coil help make sure the tuning is simple and the power levels will be reasonable.

Once you get past the ingress tuning, you are about done. Every tip you have will function approximately the same with this setting. Same heat so to speak. Tips don't matter, this is merely preference. Remember, we're not after speed - we're after quality of the bake. Toast smells great - burn toast, not so much. Both are eatable.

The power parameter is what bites most DIY projects in the ass. Induction heaters are analog devices. They function based on the power given. In simple way, they translate voltage. The induction heater takes DC voltage and converts it to an AC voltage. The AC voltage is pushed into the coil making for an electromagnet. This part is simply what we are dealing with. Delivering the desired amount of 'power' is the can of worms that drives DIY on its head.

For desktop units, you have a known quantity. You will only be providing one voltage, typically 12VDC. You can read the current this draws to get a decent idea of what the wattage of your heater is with -that- cap. Every cap you have will have a different reading - some close to the same and other not. Say the unit draw no more that 5 amps with all of your caps. That is a 60 watt heater for your collection. For my collection, that would be a 50-70 watt heater. The actual voltage at the module itself will tell you exactly what is going on. Many IH are under-powered and the power supply is woefully under-rated. Knowing these parameters is a good thing to know.

Battery power adds a couple of new challenges. Consider the above - the power will change throughout the 9-12.6V range of the battery pack. That could mean the difference between a 60 watts heater we had at 12V and 35W paperweight at 9V. You want that entire battery pack's range down to 9V to be that 60 watts if not at least 45 watts. You need an acceptable target, but don't overlook it either. Each cap should love the setting from a fresh charge to the 9V cutoff of the BMS. Now you see the reason for tightening up performance throughout the voltage range.

But wait, there's more crap in the way! Cells have internal resistance. This has to be thrown in with the mix. We have high current devices. The least current you will draw is around 4 amps at low voltage. The cells are specifically depleted when they hit 9V when firing, they are being drawn down to that voltage due to the power being drawn through this virtual resistor known as internal resistance. So the cells will recover to some higher value at rest. Minimizing this effect to achieve the best battery performance is a real dance.

How does this flow from my fingertips so easily? This -is- my C'19 motivational studies. I have a history with induction heating and this makes it fun. Also know that I've been balancing these parameters for the new Fluxer Heaters Flite IH. Between what Orion was able to achieve with 1000mah cells and what I'm getting from the Flite with 1200mah cells, I am a firm believer that optimization on battery devices is very useful.

A little more information while we are here;
Magnetic Coupling has a ratio; firing current over idle current. I get a range from 6.2:1 down to 3.6:1 from different caps.
Any cap can produce vape at 150mah of energy imparted on the cap. '150mah to the click on an efficient IH' Back calculate Orion and you will get close to that figure. I get nearly 11WH from 3S 18350 1200mah cells.

These may not all have solutions but I've taken a lot of data to come up with the best compromise. Just because one cap makes everything line up, another cap could just knock down your house of cards. I have a wide range of caps now. And I have a perfect heater for me in the Fluxer Flite for all my caps. Not shilling here, honest. I had a little input with regard things discussed here. I am very happy with the results.
 

blastfromdapast

New Member
@tokenknifeguy - interesting fact about induction heaters - there are two tuning parameters; ingress depth and power.

Ingress depth, the centering of the magnetic field, has everything to do with the clicker delay. The further the clicker is away from the center of the magnetic field, the center of the coil, the longer it takes to click. This means more heat of course, same as the 'extra second', but you can dial it in. In fact, the smaller the coil, the more sensitive this setting is. The best baseline for a new IH is to place the flat of the DV cap flush with bottom of the coil. Adjust from there. 3/4" coils are very forgiving where 15mm coils change their delay drastically with 1/2 millimeter moves.

The power level is how hot it bakes. You want a 4 second bake, sure HOTTER-N-HELL it is. 100 watts and just try to get that clicker to catch up before it combusts on the walls of the tip. That's the cost of speed - and some love that! Combustion, so what? No me - I hate combustion! I have learned 60-70 watts makes for a wonderful bake. A big open coil help make sure the tuning is simple and the power levels will be reasonable.

Once you get past the ingress tuning, you are about done. Every tip you have will function approximately the same with this setting. Same heat so to speak. Tips don't matter, this is merely preference. Remember, we're not after speed - we're after quality of the bake. Toast smells great - burn toast, not so much. Both are eatable.

The power parameter is what bites most DIY projects in the ass. Induction heaters are analog devices. They function based on the power given. In simple way, they translate voltage. The induction heater takes DC voltage and converts it to an AC voltage. The AC voltage is pushed into the coil making for an electromagnet. This part is simply what we are dealing with. Delivering the desired amount of 'power' is the can of worms that drives DIY on its head.

For desktop units, you have a known quantity. You will only be providing one voltage, typically 12VDC. You can read the current this draws to get a decent idea of what the wattage of your heater is with -that- cap. Every cap you have will have a different reading - some close to the same and other not. Say the unit draw no more that 5 amps with all of your caps. That is a 60 watt heater for your collection. For my collection, that would be a 50-70 watt heater. The actual voltage at the module itself will tell you exactly what is going on. Many IH are under-powered and the power supply is woefully under-rated. Knowing these parameters is a good thing to know.

Battery power adds a couple of new challenges. Consider the above - the power will change throughout the 9-12.6V range of the battery pack. That could mean the difference between a 60 watts heater we had at 12V and 35W paperweight at 9V. You want that entire battery pack's range down to 9V to be that 60 watts if not at least 45 watts. You need an acceptable target, but don't overlook it either. Each cap should love the setting from a fresh charge to the 9V cutoff of the BMS. Now you see the reason for tightening up performance throughout the voltage range.

But wait, there's more crap in the way! Cells have internal resistance. This has to be thrown in with the mix. We have high current devices. The least current you will draw is around 4 amps at low voltage. The cells are specifically depleted when they hit 9V when firing, they are being drawn down to that voltage due to the power being drawn through this virtual resistor known as internal resistance. So the cells will recover to some higher value at rest. Minimizing this effect to achieve the best battery performance is a real dance.

How does this flow from my fingertips so easily? This -is- my C'19 motivational studies. I have a history with induction heating and this makes it fun. Also know that I've been balancing these parameters for the new Fluxer Heaters Flite IH. Between what Orion was able to achieve with 1000mah cells and what I'm getting from the Flite with 1200mah cells, I am a firm believer that optimization on battery devices is very useful.

A little more information while we are here;
Magnetic Coupling has a ratio; firing current over idle current. I get a range from 6.2:1 down to 3.6:1 from different caps.
Any cap can produce vape at 150mah of energy imparted on the cap. '150mah to the click on an efficient IH' Back calculate Orion and you will get close to that figure. I get nearly 11WH from 3S 18350 1200mah cells.

These may not all have solutions but I've taken a lot of data to come up with the best compromise. Just because one cap makes everything line up, another cap could just knock down your house of cards. I have a wide range of caps now. And I have a perfect heater for me in the Fluxer Flite for all my caps. Not shilling here, honest. I had a little input with regard things discussed here. I am very happy with the results.
no WAY am I an expert on anything and this may be just in the vocabulary but in my experience and understanding of the cheap IH modules and my undefstanding of how inductors operate the coil generates NO heat whatsoever and it is the magnetic flux working on ferrous (steel, nickle, and there is one other that escapes me maybe antimony) NOT SSteel by the way that the atoms are being furiously trying to push against the inductors natural opposition to current flow multiplied by the coil effect and the eddy currents produced inside the coil (area inside the coil) that causes the tip in the VC to heat. The SSteel in the body and tip are not affected by the flux, but the cap which is not SSteel but a spring steel or milder steel or the click disks at the end of the VC but I think it is the entire cap that get heated and transfers that heat thru the rest of the tip and by the same method radiates some of that back to the coil. Now that is strictly for the module the way they are made, but for changing the components and doing things to the circuit itself there MAY be some imbalence that DOES cause the coil to heat and that is what I think everyone here is trying to eliminate, but in my limited experience and I DO MEAN LIMITED with the 4 or 5 standard modules, the coil produces NO heat. It is not designed to. I even in the spirit of some of the experimenters of the early 1900s and late 1800s I stuck my small finger into the coil (DO NOT DO THID IF INJURY HAS HAD STEEL PINS in that same finger of course) all the way and with trepidation but not really fired it. NADA. Is it just a useage of terms when people speak of the coil HEATING the VC? Again, I am a novice and likely to be VERY wrong but at least with the standard modules the coil ONLY gets hot from the radiated heat back to it from the VC. I stand to be VERY corrected. Thanks in advance.
Doug
 
blastfromdapast,

TommyDee

Vaporitor
I love the geek-speak with all due respect. Indeed, it is electron flow restriction as I understand it. Yanking electrons back and forth in copper is not a big deal - not a big heat generator - but in steel, in varying degrees, these motion-restricted electrons tend to heat things up.

The circuit does draw about 15-20 watts just idle. It is reflected in warming of the coil over time, as well as the other components. When you change the coil to lighter gauge wire, it definitely heats up quickly. We're pushing 70-80 watts through the wire. It gets warm. At 12 gauge, it takes a while to get hot. That is why I recommend re-using the original length and gauge. However, none of the coil's heat is conducted to the VC.

The cap also shields the clicker. But there is a definite gradient along the cap depending on the coil dimensions. My caps have a distinct hot-zone in discoloration. The end of the cap stays relatively cool compared to where the heat is shared with the tip. That conduction of heat to the tip is crucial to a good solid draw. The overall cap 'heat soak' is less critical. Heat soak the tip. A 20mm tall coil is a nice targeted coil with some range for click timing.
 
TommyDee,

blastfromdapast

New Member
I love the geek-speak with all due respect. Indeed, it is electron flow restriction as I understand it. Yanking electrons back and forth in copper is not a big deal - not a big heat generator - but in steel, in varying degrees, these motion-restricted electrons tend to heat things up.

The circuit does draw about 15-20 watts just idle. It is reflected in warming of the coil over time, as well as the other components. When you change the coil to lighter gauge wire, it definitely heats up quickly. We're pushing 70-80 watts through the wire. It gets warm. At 12 gauge, it takes a while to get hot. That is why I recommend re-using the original length and gauge. However, none of the coil's heat is conducted to the VC.

The cap also shields the clicker. But there is a definite gradient along the cap depending on the coil dimensions. My caps have a distinct hot-zone in discoloration. The end of the cap stays relatively cool compared to where the heat is shared with the tip. That conduction of heat to the tip is crucial to a good solid draw. The overall cap 'heat soak' is less critical. Heat soak the tip. A 20mm tall coil is a nice targeted coil with some range for click timing.
thanks for that, I assume it is me that has the lack of the nomenclature but it also was just a point I was not too sure about. Thanks again. Kind of a new thing for me although I have made 4 but they were as stated with the 'standard out of the bag' devices and with a power switch from the mains and then the 5amp Momentary I figure it safe, but it is good to know and I always switched it OFF when not in use because I am so unsure. Thanks this is a fun thing

Doug
 
blastfromdapast,

TommyDee

Vaporitor
The original Side Port Mini - This was my first for some time. 60 watts on 3S 18650 on my favored '18 cap which pulls a lot of power.
The switch is a very light-load momentary with a bypass on 'pull'. I ShoeGoo'd the switch to the side. ShoeGoo is reversible. Same as the goo on the chokes. The glass vial was suspended with squished Teflon tubing ties together with string. Made for simple and repeatable adjustments.

20191208_010054.jpg

This is also where I learned Flowering Quince shrubs girt cylinders as it cures without adhesives or splitting.
 
TommyDee,
Top Bottom